Wood table: dimensions
A person’s personal space for a comfortable feeling is from 70 cm, that is, there should be no one within a radius of 35 cm. Therefore, a table in the form of a square 90x90 or 100x100 cm is suitable for a family of four.
If the kitchen area is small and the furniture cannot be placed in the center, then a rectangular product is installed against the wall, size 120x75 or 120x80 cm. A dining table, size 160x90 or 180x90 cm is used over a large area.
On the video - how to make a wooden table with your own hands:
In small kitchens it is better to place a transforming table or sliding furniture. These products are equipped with inserts 40-50 cm wide. They are located in the middle of the tabletop or hidden under a lid in a niche. When unfolded, the table dimensions reach 230-280 cm.
The standard height of a dining table is 70 cm. Furniture is also made 60-65 cm or 75-80 cm, depending on the height of the person.
Table for a country house
It is difficult to live in a country house without a refectory table. To independently make a table from boards for a country house, you do not need professional skills or expensive tools. It is enough to have several planed edged boards, bars measuring 50 x 50 mm, screws, glue and simple carpentry tools.
The width of the table is determined arbitrarily, depending on the needs and number of people. Let's look at step-by-step instructions for making a wooden table for your country needs. It is necessary to select five beautiful planed boards, 150 mm wide and 1200 mm long.
On a flat surface, it is necessary to lay out the boards of the future tabletop at intervals of five millimeters. The boards are fastened together with two transverse bars at a distance of 200 mm from the end of the tabletop.
The table legs are made from boards 150 mm wide. To do this, they are placed on a flat surface in the shape of the letter “X” and the joints are secured with screws. The height of the table is determined by calculation and the excess part of the boards is sawed off on both sides.
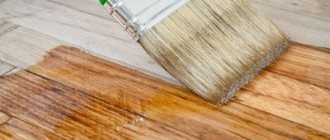
The legs are connected to each other by a jumper made of a wide board and secured with screws to the bars of the tabletop. Now you should carry out measures for antiseptic treatment of wood with paints and varnishes of the desired color.
Advantages and disadvantages
Wooden furniture - the charm of natural material and the feeling of home warmth. Advantages of a wooden table in the kitchen:
- environmental friendliness - wood is safe for health;
- strength - wood is treated with impregnations that increase the product’s resistance to deformation;
- durability - wood can be easily restored in case of breakdowns or aging;
- aesthetics.
A wooden table also has disadvantages:
How to make a wooden table diagram
- swelling - interaction with moisture can lead to deformation of the tabletop;
- lack of protection from high temperatures - the table should not be placed near the stove;
- limitations in design - wooden furniture looks organically in classic decor, country and Provence style.
Pros and cons of materials
The correct choice of material determines the service life of the furniture, resistance to damage and the cost of the product.
The dining table is made from various types of wood, chipboard or MDF.
Wood
The parameters for choosing a tree are strength, durability, resistance to breakage.
Natural material is selected based on its density. There are three types of wood:
- softwood - pine, spruce, aspen, linden, fir, willow, cedar, juniper;
- hard type - birch, oak, larch, maple, apple, ash, walnut;
- type of increased strength - iron birch, white acacia, boxwood, rowan, dogwood, yew.
When using pine, the material is treated with several layers of varnish. Walnut guarantees the strength of the product, but the furniture will be heavy.
Spruce is a characteristic aroma. But the tree quickly absorbs moisture, and the process of rotting begins. High-quality processing is required. Cedar is suitable for a table with light loads, since the wood is not very stable. But the material is not subject to rotting.
Homemade wooden table eating them
The ideal option is an oak tabletop. The product made from it is durable and strong. The furniture is easy to process, resists rotting and does not deform - an important factor for a room with a high level of humidity.
Larch has healing properties, but the product must be treated with antiseptics and this will prevent the material from releasing its medicinal phytoncides.
Homemade wooden table made of larch
Yew is a highly durable wood that is practically resistant to moisture. Wood is easy to process. White locust is a friction-resistant species. It has good elasticity. But it's poorly processed.
Yew table
Wooden tables for the kitchen are safe for health and beautiful in appearance. But the main disadvantage is the high price. To save money, you can make a table yourself: common materials are pine, oak, and walnut. Purchase well-dried wood with a moisture content of no more than 10% so that the product does not subsequently become deformed.
Chipboard
Often used in the manufacture of kitchen tables, chipboard is a slab of sawdust and wood shavings impregnated with formaldehyde-based resins. Pros:
- low price;
- good strength - the material holds screws and nails.
Homemade wooden table from chipboard
Disadvantages include low moisture resistance and formaldehyde resins emitted by the slabs. The material is not considered a completely environmentally friendly raw material.
There are two types of chipboard:
- e1 - low level of resins;
- e2 - prohibited for the production of children's furniture.
Chipboard with a reduced degree of formaldehyde is produced in Russia, Germany and Austria.
You can read about kitchen cabinet fronts here.
MDF
MDF is a board made of wood fibers with carbide resins. Advantages:
- absence of harmful substances;
- strength - 2 times higher than chipboard;
- imitation - the coating of the material can resemble glass, wood, metal;
- low price.
It is very easy to make a table from MDF yourself with the tools at hand.
But MDF is a highly flammable material: products should not be installed near open fire or quickly heating surfaces. The slabs are vulnerable to mechanical deformation.
Manufacturing
After choosing the material, the design, transformer, round or classic square product, and the dimensions of the future table are determined.
Legs are selected: shape, size depend on the material and type of table. When choosing a countertop made of chipboard, it will not be possible to nail it to legs made of the same material: insufficient strength. In this case, it is better to make the legs from wood or buy ready-made ones.
The kitchen table can stand on four, two or one leg.
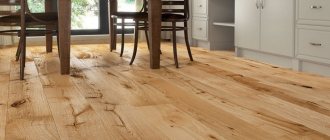
Characteristics of popular types of wood
A refectory table for the culinary kingdom can be made of metal, glass, marble, but furniture made of wood with a beautiful texture compares favorably with other materials. Let us briefly consider the features of the source material from the most popular types of wood:
Common birch. It has sufficient strength and does not cause deformation or radial cracks when drying. Prolonged exposure to a humid environment provokes the spread of putrefactive bacteria.
Beech. It is easy to machine and has a high solid density. When drying, the material tends to slightly change its geometric dimensions.
Oak. The dense structure, amazingly beautiful texture, high strength distinguish this material from the rest. Can remain in a humid environment for a long time without changing the strength characteristics and geometric dimensions.
Far Eastern larch. It has a fairly dense structure and high strength under dynamic loads. When kept in a humid environment for a long time, it does not change its properties. Periodic changes in temperature and humidity provoke stratification of the material along the line of annual rings.
Crimean pine. The material is soft and easy to machine. The high resin content allows it to remain in a humid environment for some time without changing its properties.
Note!
Do-it-yourself screen: a step-by-step master class for creating it yourself. Types of screens, manufacturing materials + design ideasDo-it-yourself installation of interior doors - preparation of the structure, selection of doors, installation step by step + instructions from professionals
DIY shoe rack - types of designs, manufacturing materials, step-by-step master class with simple diagrams and drawings
Aspen. This material is not prone to rotting. When drying, cracks do not appear. However, excessive softness limits its use in carpentry.
When choosing a material for a homemade kitchen table, you should not focus on the softness of the wood, but opt for Crimean pine or beech. A beautiful structure and sufficient strength instills confidence that the finished product will meet the artist’s expectations.
Classic with legs
A table with legs is a classic for the kitchen. In order to make a table from wood, complex calculations are not required. It is enough to select the legs of the required size for the tabletop and mount them. Tools and materials for work:
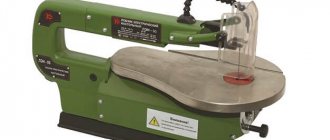
- saw or electric jigsaw, plane;
- screwdriver, drill, drill bits;
- nails, screws, dowels;
- grinding machine or sandpaper;
- pencil, tape measure;
- wood glue;
- boards - 8 pieces: four products are one meter long, two are 80 cm, the rest of the wood is 40 cm;
- four ready-made legs or beams 70 cm high. And which countertop to choose for the kitchen can be found out at the link.
In the video - how to make a classic wooden table with legs:
The tabletop is made: four boards are adjusted to one size - a meter. The width and thickness are equalized if the wood was not sawn on a sawmill. The material is sanded with a plane.
Markings are made on the edges of the boards, a step of 10-15 cm. Holes are drilled for dowels (chops), an 8 mm drill. The gaps are sanded, the dowels are treated with glue and inserted into the holes. The boards are connected. Excess glue is removed with sandpaper, and the edges of the tabletop are sanded with a plane. Treatment with steel sponge will add texture to the product.
If ready-made legs are used, they are fastened to short 40 cm boards with screws and glue. Holes are drilled on the inside of the cross beam at an angle and self-tapping screws are inserted. The crossbars are installed 2 cm from the edge of the leg.
You can make the legs yourself: the bars are cut into the desired shape with a plane, the products are processed with sandpaper and secured with crossbars.
In a similar way, 80 cm boards are attached to the legs on the sides. A tabletop is mounted on the frame. The product is treated with varnish or paint if desired.
You can read about combining wallpaper in a Khrushchev-era kitchen here.
Folding transformer
Compact furniture when folded, suitable for a small kitchen - a transforming table. The shape of the product is a rectangle, but there are also oval folding tables.
The table unfolds using a spring or gas lift mechanism (purchased at a furniture store). For the table, parts are prepared according to the required dimensions:
- four boards for the frame and two for the tabletop;
- legs - 8 pieces;
- one small board is the support of the product when unfolded.
The frame is assembled: four boards are adjusted to the same size and connected.
The folding mechanism is mounted to the frame: through holes are drilled in the base, the parts are fastened with bolts.
Legs are made: each product is two parts connected at an angle of 90° with small corners. Marks are drawn in the frame, holes are drilled, and the legs are secured with metal bushings.
In the video - how to make a transformable folding table from wood:
The tabletop parts are connected to each other with the front side. Places for installing hinges are drilled. A hinged fastener is screwed into the finished gaps. A small board is installed on the mechanism, the assembled tabletop is mounted to the folding parts.
The table is processed with a grinding machine or sandpaper, and covered with varnish or paint.
You can find out which bread bin is best for storing bread in this article.
Window sill table
A folding window sill table is an ergonomic and efficient option for a small kitchen. The simple design is easy to make yourself. For the main set of tools you will need a profile and two tubular supports.
This is what a window sill table looks like
It is better to treat wood with wax to protect it from moisture. If using chipboard or MDF, you will need edge tape and sealant.
The dimensions of the future table are selected: the optimal depth is 60-70 cm, the height is equal to the window sill from the floor level.
A tabletop of rectangular, square or curved shape is cut from the prepared material. The far side of the part is mounted on a profile under the window, the near side is mounted on a support in the form of a pipe.
A hole is made in the window sill-tabletop for the radiator: in winter the air will warm the window, the glass will not fog up. A small ventilation grill is glued onto the gap.
How to Decorate a Tabletop: Table Update
The surface of the table deteriorates faster than other pieces of furniture in the kitchen. To save money, you can update the countertop yourself.
Glass. The coating is removed from the surface and the base is sanded. A fresh coat of paint is applied. Tempered glass is installed after the layer has dried.
Tile decor. The surface can be treated with ceramic tiles. You will need material, glue, and grout for the seams. The tabletop is washed and dried. Tile adhesive is applied and ceramics are laid.
In the video - how to decorate the tabletop:
The table will gain weight, but it will not be subject to accidental damage.
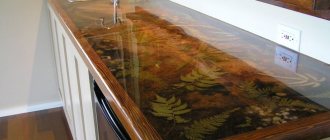
Decoupage. A great idea to transform an old table with your own hands. To work you will need PVA glue, furniture varnish, pictures - you can make them yourself or buy them ready-made.
Decoupage process:
- The countertop is degreased (soap solution or alcohol, vodka). Glue is diluted with water 1:1.
- The drawings are soaked in the solution and glued to the tabletop. Any composition. The pictures are carefully straightened: there should be no air bubbles.
- The dried tabletop is coated with several layers of varnish.
DIY oval tabletop
Only at first glance does it seem difficult to make a wooden oval tabletop yourself. A prerequisite is the presence of a hand-held circular saw. You need to select several smooth, equal length oak boards with a beautiful structure.
Some woodworkers insert thin planks of walnut, pear, or cherry between oak planks of the countertop. A dining table in contrasting colors looks good.
The boards are laid out on a flat surface, coated with polyvinyl acetate glue on the side edges, tightened with clamps and left in this state for three days.
After the glue has dried, mark the center on the back of the tabletop. It is better to construct an ellipse on a model made of a thin wood-fiber sheet. In any geometry reference book you can find this simple method of constructing a geometric figure and follow the instructions exactly.
Now you should secure the layout in several places on the back side of the tabletop and, using a circular saw, carefully cut out a geometric shape in the shape of an ellipse. The edge of the ellipse is removed with a special cutter.
Using a hand-held electric sander, thoroughly sand the surface of the countertop. The finished table part is attached to the base using screws.