Few interiors can do without such a piece of furniture as a chair. There is a wide range of these products on sale to suit any preference. In order not to undermine the family budget, many people think about how to make a chair out of wood with their own hands.
In this article we will look at a couple of ways to make a chair.
What tools are needed?
Without tools it is impossible to create a chair. Even if you can do it with your hands, it will hardly be possible to sit on it.
To make a chair you need a number of “helpers”. A saw or hacksaw is necessary first. Hammer, screwdriver, jigsaw, chisel, plane, mallet, grinder, stapler (construction), clamps, square and tape measure.
This is the list that we will need to prepare the stool
Creation of components
The first thing to mention is that this bar stool is not folding.
In general, creating a bar stool is not much different from creating a regular stool in school craft classes. So, we need to make 4 legs, a seat, 4 legs and the same number of bars that are located under the seat itself. Of course, all paired parts must be equal in size.
Use a workbench to fix the workpieces; it is advisable to use a level so that the structure itself is level and stable.
To create smooth parts, you need to use a plane, and then sandpaper or a cable machine. All this is done for ease of use and aesthetics.
- Furniture in the hallway: keeping the living space comfortable
Advantages of custom-made wardrobes
Buying a sofa
Let's get to the chair
So now we get to the chair itself:
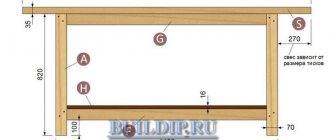
First of all, prepare 4 bars forty by forty mm and 440 mm long.
The most important thing when working with wood is to remove burrs. They can always bring pain, become a thorn and simply ruin your mood. For this you need the same sandpaper. Absolutely every wooden stick must be sanded.
It is necessary to prepare 4 drawers, which will act as jumpers between the legs. The seating area will subsequently rest on these legs. Typically, their parameters are 20x50x280 mm. However, here you can make a choice.
Now we need 4 more jumpers that will help strengthen the legs (or rather, what will be between them - the legs). Dimensions will be 30x20x280 mm. How to make a chair out of wood? Now you'll find out.
The main task of a chair is to seat. It is necessary to make it as comfortable as possible, which means using a wide board.
The next step will be the task of preparing the spikes. They must be done on all sides.
You need to make grooves in certain places on the legs. Their length and depth should be 2 centimeters, but the height of the grooves for securing the legs should be 27 centimeters from the floor.
Now we put it all together into a single structure, like a construction set. This way you can determine whether the seat is level and whether corrections are needed.
If everything is in order, we assemble the structure together, first connecting all the elements with wood glue. It is advisable to strengthen all this with self-tapping screws.
Then we simply screw long screws into all the legs. The places where the caps will be located must be thoroughly recessed in the wood so that they are not visible. After this, paint the chair thoroughly. That's all.
With backrest
The manufacturing process is similar to assembling a stool. But in this situation, you need to make a backrest.
In addition to the basic material, the following tools and compositions are required:
- wood glue;
- screws;
- chisel;
- cutter;
- hammer;
- other carpentry equipment.
Guided by the list of parts and the drawing for making a chair with a back, we begin to work.
Having prepared all the parts, they need to be carefully polished. In the process, getting rid of sharp corners and various defects. Use a cutter to select grooves in the right places to connect the elements and glue the entire structure. The assembled product is first coated with stain and then several layers of varnish.
At the final stage, the seat can be covered with dermantine, leather or other material.
Tables 2021 - 150 photos of exclusive new items from the furniture catalog. Modern design of tables, and the best options for combining them in the interior- Wooden chairs - main types, types of wood and modern models (90 photos and videos)
Adjustable chair - features of choosing a design and tips on choosing a material (145 photos)
To avoid damage to the floor, it is advisable to attach rubber or felt pads to the legs.
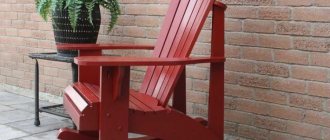
A soft chair
If you are interested in how to make a soft chair, then the answer is simple - you need to add a special pillow to the seat and back.
To do this, it is enough to use a pillow made of wood and soft material inside. Feathers won't work since it's a chair.
Restoration
A situation often occurs when an old, once beautiful chair no longer meets all the requirements and begins to require replacement. In this case, restoration of chairs is suitable if there is no desire to get rid of them and buy new ones.
If the chair was made of high-quality material, then over time it only lost its appearance, some of the fastenings became loose. To restore it, it must first be disassembled.
After this, you need to remove the old layer of varnish, sand the surface, coat it with special agents against fungus and mold, and then coat it with varnish again. Various metal elements such as fasteners, screws and bolts must be replaced, since the old ones are most likely covered with rust.
We recommend reading:
- Do-it-yourself furniture decoupage: review of the best techniques, original ideas and beautiful design (140 photos)
How to update furniture with your own hands - a review of the best ideas for beautiful restoration of home furniture (120 photo ideas)
Furniture care: best secrets and simple tips for caring for all types of furniture in an apartment or house
After this, it will be possible to assemble the structure back, as a result of which it will be possible to return the old chair to its former appearance, get rid of the squeak and give it stability. If you wish, you can additionally make chair covers with your own hands. Completely different materials can be used for this. As a rule, fabric or wool protrudes; it is easier to form covers from them.
Paper chair
There is also an option to make a table out of paper. This is a great way to make a children's cuddle chair. For example, if a small child wants to create a small house in which his characters will live.
However, for this you need to already learn how to work with paper. You can find out how to do this on the Internet.
Main stages of work
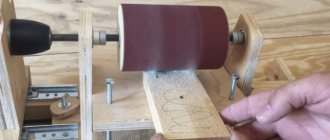
First of all, the author makes markings on the workpieces in order to drill mounting holes. The edges on the slats need to be rounded. The author simply cuts them on a band saw, but you can also do this on a sander.
At the next stage, you can begin assembling the high chair. First, the author assembles the seat. Next, two bars are bolted to the seat, which the author connects using a strip.
After this, the second part of the structure is made, and then both parts will need to be connected to each other.
The result is a very compact, light and comfortable chair with a backrest that you can take with you when going out into nature. To protect the product, it is recommended to varnish the wood.
For details on how to make a folding wooden chair with your own hands, watch the video on our website.
3. Cut these 5x84 cm
The design of this chair is very old. Some call it a Viking chair and claim that its roots go back to the Middle Ages. For some, it originated in American Boy Scout camps in the early 20th century. No matter who, how, where or when they were made, they are always very convenient, inexpensive, durable and universally applicable. My wife has been using this for 20 years.
This design only requires a 5 x 30.5 x 240 cm board - these are usually used for load-bearing floors and decking. No nails or glue needed. A few basic tools are enough.
Step 1: Materials
You need one board about 30 cm wide and 2 m 40 cm long. It cost me $8 at a large hardware store.
Tools:
• Any straight instrument at least 90 cm long
• Drill with long drill bit
Step 2: Cut 1: Back
We need to cut a board 120 cm long. This will be the back. Saw off and set aside..
I have attached to the instructions a drawing of the required cuts on checkered paper. The side of each square is 2.5 cm. Cutouts are shown in gray. Maybe someday this sketch will make me famous.
Step 3: Cut 2: Seat
Putting the back aside, we move on to another board. Its length should be 114 cm.
1. Seat – 114 cm
2. Scraps – save for later
Step 4: Cuts 3, 4, 5 and 6: Cut out the board
Draw a line 30 cm from one end of the seat board. This mark limits the seat. Measure 5 cm on both sides of this line. After 84 cm, measure 5 cm on both sides again. Using a long object, draw a straight line connecting these marks.
In general, we cut 2 strips measuring 5 x 84 cm from the seat board.
Use a circular saw as much as possible and trim the cuts with a hacksaw.
1. seat board – 30 cm
1. Length 30 cm
2. Cut this part 5x84 cm
3. Cut these 5x84 cm
Step 5: Cuts 7, 8, 9, 10: back slit
Find the backboard you set aside. Measure 27.5 cm from one of its ends. This will be the bottom edge of our slot.
I spent a lot of time on it.
First, I sawed off a 7.5 cm piece from the rest of the board to fit the slot..
Then I attached this part to the back at the 27.5 cm line.
I marked the width of the slot along this piece. I did this because I don't have the best eye in the world. I can cut it off in the wrong place.
Then I used this piece to mark the height of the slot.
Once you have marked the location of your cut, drill a hole into which you can insert the circular saw blade. This can be done in different ways. It's better to make a larger hole than a smaller one.
Step 6: Insert stop 1 into slot A
Check if everything matches. If it matches, great! If not, widen the slot a little.
Step 7: Finishing
I like to cut 2-3 cm off the corners of the top of the back and seat.
The finished chair can also be painted, coated with a polish or a protective compound, depending on where and how you will use it.
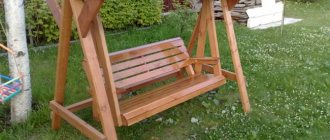
Why are folding chairs needed?
We make folding chairs in order to use them in places where they will not be located for a long time. For example, in nature.
If you go somewhere outdoors, then a folding chair would be an excellent option. It is easy to install and does not need to be assembled for a long time.
Folding stool seat
progress of work on assembling the stool
The finished stool folds and unfolds in one motion (photo 10, 11). You can make a convenient folding table to go with it.
*Tsarga is a transverse crossbar connecting the legs of tables or chairs, on which the reliability and strength of the product depends.
Once again, it is worth recalling that every detail should be carefully sanded. It should be free of sharp corners and all kinds of irregularities. The assembled chair is covered with stain and varnish (up to three layers). In this case, each layer of varnish is applied after the previous one has completely dried.
Photos of chairs
https://www.youtube.com/watch?v=BsUOyE1nz5k
Self-production
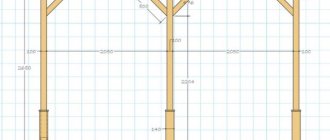
Before making a chair with your own hands, you need to make a drawing. You can limit yourself to a sketch with all dimensions.
The chair consists of the following elements:
- Side abutments. They are located at the back, the backrest is attached to them. They are a continuation of the hind legs.
- Back. Mounted on abutments.
- Front legs.
- Tsargi.
- Seat.
- Leggings. Fasten all the legs of the chair.
- Armrests. I am not always present.
- Crackers. Installed in the corners of the structure.
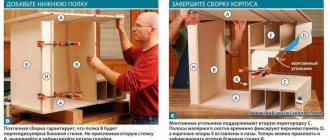
Assembling a stepladder
To assemble such a structure, wood or plywood with a thickness of 20-25 mm is taken. The first stage involves the production of structural parts. All components of the future chair are cut out.
Stepladder assembly procedure:
- The panels are installed in grooves.
- After tightening with clamps, the grooves are deepened to the required level. Places for screwing in self-tapping screws are marked.
- The back is installed.
- The holes for the screws are drilled out.
- After this, the parts are coated with glue and tightened with clamps.
- The steps are glued into the grooves located in the inner part of the legs.
- The seat board is installed and attached to the legs.
- The chair is turned over and a step is attached to the underside of the legs.
- Now the front part of the structure is assembled, as well as the upper part of the stepladder. The step is installed using self-tapping screws.
- The front of the seat is attached to the front of the legs. Drill 2 holes for dowels
- The protruding part of the dowels is cut off.
- The surface is polished.
- Both parts are installed together, and they are fastened together with hinges.
- The design is being tested. At the first stage - in the form of a chair.
- Then in the form of a stepladder. If the structure comes apart smoothly, it means it was assembled correctly.