Geometric wood carving consists of different elements that have a geometric shape and is done with one cutter. The ornament for carving can be: lines, squares, triangular and tetrahedral recesses, etc. This technique will even allow you to make carved works of such shapes as leaves, flowers, berries, ears of corn. If you develop the skill, it will turn into the form of contour carving.
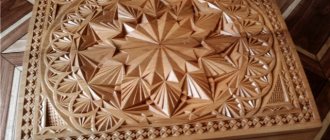
Original box made with geometric carvings
You can look for sketches for wood carving on the Internet or come up with your own. Geometric cutting is quite simple to perform; for this you will need: a cutter, a pair of semicircular chisels. Geometric carving lessons will show how you can play with chiaroscuro and unusual patterns. It is especially beautiful in different triangles, nail-shaped cutting and triangular-notched shape. This cutting allows for polishing and matte finishes.
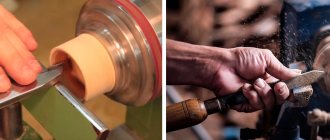
Tools
For triangular notched carving, you only need a jamb knife, it has a beveled blade. In addition, the following tools are needed:
- flat chisel, 2 cm wide;
- semicircular chisel;
- hacksaw;
- files: round, square, semicircular;
- ruler;
- simple pencil;
- compass;
- eraser.
Elements and patterns for performing geometric wood carvings
The cutting technology is simple, but each component plays its role in the work.
Wood
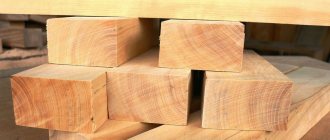
Wood comes in the following types: hard, very hard and soft. For beginners, it is better to use soft wood, it is easier to work with (linden, pine or aspen).
Linden is more difficult to obtain than other types, as it is often used by professionals. Pine has a disadvantage - it splits when cut.
Aspen is a good option for work. There are many visual photos of what kind of wood it should be, and what the longitudinal fibers look like along which you need to work.
Abrasives
Files and rasps remove excess wood quickly and smoothly. They differ in the nature of the surface, which can be rough, medium or relatively smooth. Always use flat, semicircular or round shaped tools with a handle. Riffler-type files and rasps have teeth on both ends and come in a variety of shapes. They are used to penetrate hard-to-reach places and remove small chips. Tools with a rough surface are used for cleaning small areas.
The flexible sanding belt is useful when working on curved surfaces. Sanding cylinders as part of a hand drill or press are indispensable for final finishing. Polishing tools differ in surface texture and the nature of the material, meeting a wide variety of needs. Use sandpaper only after finishing the job, otherwise abrasive particles will get stuck in the wood and your tools will quickly become dull.
Preparing for work
For the first lesson, you need a board measuring 170 by 110 mm and 2 cm thick. Sketches for this work will be given below. The surface of the board must be sanded with sandpaper. Now, using a ruler and a simple pencil, draw out the entire surface of the tree in 5 cm cells.
Wood carving patterns
Then we draw all the figures, as shown in the figure below. There were 7 figures in total: pegs, diamonds, a twist, a pyramid, stars, squares and a rosette. From these figures you can then create new patterns. A photograph that shows what compositions can be made from just elements, and how the composition looks after processing and painting the wood.
Knives
You will need a good knife - one that will be comfortable to work with. There are three types of knives - with a folding blade (pocket knife), with a fixed blade and knives with a replaceable blade. I prefer to use fixed blade knives because they are the safest. Knives also vary in blade shape and steel type.
I recommend a high-carbon steel blade with a hardness of 55 to 60 RC - it will retain its sharpness longer than a stainless or low-carbon steel blade. For finishing and creating shapes, I use a blade 4 mm thick and 3.8 to 5.1 cm long. A knife with a narrower and shorter blade is better for detail work. Some carvers prefer knives with replaceable blades because instead of sharpening the knife, you simply need to change the blade. Another advantage is this. that the handle of such a knife can be used with small chisels.
Pegs - the first figure
In triangular-notched carving, the entire process consists of two operations - pricking and trimming. These are simple movements that are easy to do in practice. We take the knife in our hand, the thumb rests on the beveled part of the handle. Press the cutter vertically to deepen it a few mm, then lower the blade at an angle to intersect the line of the side knife in accordance with the markings. In the same way, a prick is made on the left side of the triangle.
For pruning you need:
- attach the cutting part of the knife to the left side of the triangle, so it connects to the top with its bevel;
- we move the handle of the knife back, maintaining a parallel between the right side of the pattern and the cutting blade (this movement is done with the hand, as if we were pulling a bow);
- press on the knife, returning to the first position of the hand; so the nose of the knife is on the top, and the cutting part is on the right side of the triangle.
Security measures
All movements should come from the hand, this simplifies the work and takes the load off the shoulder.
The working hand (in which the cutter is located) is pressed tightly against the work table to free the movement of the hand. When you hold the workpiece with your free hand, you need to ensure that your fingers are positioned so that they are not on the working part when the cutting process is in progress.
Removing knots
Sometimes there are knots in carving blanks. In this case, the knots are drilled out or cut out with a jigsaw, and plugs made of homogeneous wood along the diameter of the drilled hole with a similar texture pattern are inserted in their place. The technique for removing knots is as follows. The knot is drilled out so as to capture the wood around the knot that interferes with the overall tone. The plug is always adjusted to the hole in the same position. The direction of the grain of the wood in the cork should coincide with the direction of the grain of the base around the hole. To make adjustment easier, the hole is painted over with a simple pencil, and the plug is rubbed in by rotating left and right inside the hole. In this case, the protrusions on the cork that prevent it from fitting tightly to the walls of the hole are painted with a pencil.
After hammering the cork in with wood glue, its protruding part must be cut off with a hacksaw, but not chipped off: the chip may go inside, and the cork will have to be drilled out again. Level the seal with a rasp, file and sandpaper.
Viteika – third figure
Wood carving for beginners involves mastering basic carving techniques and basic shapes. Viteyka is the same type of chips. They are simply shifted to the side in relation to each other.
Shapes for geometric carving
The result will be a winding path. To do this, you need to cut out and pin the lower triangles, and turn the board - the upper ones. So we will see that there remains a “snake” in the middle.
Pyramid – fourth figure
The first patterns were the simplest. And you can deal with them without difficulty. The following ones will be more difficult to complete, since they consist of several triangles and are located in a certain order in relation to each other. So the pyramid consists of three triangles, it has in the center the point of contact of all the corners. Therefore, when cutting a given figure, each element, when pricked, comes into contact with the same point several times. The most important thing is that pruning is done in the direction of the wood layer.
If you cut across, you will get unwanted chips that will ruin the patterns.
Chisels
Chisels come in different widths and curvatures. Curvature is indicated by a number. The steeper the curvature, the larger the number. So, a chisel with number 3 is almost flat, and number 11 has a U-shape. Of course, a number 10 or 11 chisel cuts deeper and removes more wood than a number 3. On the other hand, a number 3 chisel is useful for finishing. The number 12 V-shaped chisel has a wide range from 24 to 90 degrees, but the most common chisels are those with an angle of 60 to 70 degrees.
When choosing a chisel, pay attention to the handle so that the tool does not roll onto the floor when you place it on the table. Otherwise, you will constantly have to repair the blade.
When choosing a chisel, also keep in mind the size and type of carving you want to make. For manual work, palm-sized chisels are more suitable, and for small parts you will need even smaller tools. Sculpted and relief carvings require the use of standard chisels with heavy handles.
Squares - figure six
This element is clearly different from all the others. There are no triangles in it, and it is cut out completely differently than all the figures. This cutting method is called straw. Many sketches include squares. They can be either the border of the work, a frame, or part of the main elements of the drawing. This figure is cut this way:
- we retreat from the marking by 1 mm to the right, holding the knife at an angle of 45 degrees, deepen it by 2 or 3 mm and cut along the line to the end;
- on the left side of the strip we do everything the same;
- We make a puncture at the end and beginning of the strip, with the knife directed vertically.
In this case, a piece of wood is separated from the workpiece, which is called a straw.
If you cut through all the lines in this way, squares will come out at the end of the work. The technology is simple, but requires some experience to perform.
Sealing cracks
When drying products, cracks often occur. The best way to repair a large crack is to glue a piece of the same wood into it. For this purpose, the gap is cleaned and leveled with a knife so that it is easier to fit the insert under it. If it is impossible to select a piece of wood from the same blank, then select a piece of the same color, located far from the core of the trunk and oriented in the same way towards the center. After the glue has dried, the joint is planed and cleaned with a plane or chisel.
Small cracks are usually sealed with a special putty, mixing sawdust of the same wood with liquid wood glue. Sometimes oil paint is added to wood glue, which gives the putty plasticity. The more oil paint in the putty, the longer it takes to dry, but the more reliable it is and the less it dries out. However, such inclusions in wood are a serious hindrance to carving; they should be used only in places where work with cutters is not planned. Otherwise, it is better to mix sawdust with PVA or select the appropriate acrylic putty.
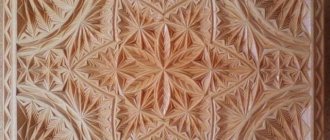
Rosette - the seventh element
This part is the hardest. It requires more skill to cut it. Wood carving for beginners is quite a difficult task, but all elements are doable. First you need to draw patterns on the workpiece, and only then start cutting. For this we need a compass.
Rosette made with geometric carvings
First we draw a large circle, then mark a small one inside it, 5 mm smaller. Now you need to divide the circle into 16 equal parts. We draw the main lines through the center, along and across. We find 4 more points using a square, with an angle of 45 degrees. We connect these points with segments that run through the center.
Visually mark the points in the middle of each segment on the small circle, and connect them with triangles to the large circle. Now you can see that the entire rosette consists of elongated pyramids. Photos of paintings with a rosette made are very memorable; they are not only beautiful, but also difficult to execute.
Carving
Carving is a complex form of creativity that requires mobilization of attention and accuracy. The cutting technique itself does not allow for correction. The contour carving technique involves cutting straight and curved lines of varying widths and depths. The line should be expressive and clear. It is necessary to draw students' attention to the fact that the more the chisel is immersed, the thicker the mark remains on the board. The liveliness of the line is based on this: in one place it will be thinner, gradually turning into thick and back, which is achieved by gradually tilting the chisel. When making very thin lines, use a cutter. If when carving with a semicircular chisel, a semicircular groove is left in one pass, then when carving with a cutter, a triangular groove is obtained in two passes. When these operations are combined, beautiful products are obtained.
It is advisable to begin exercises in performing contour carving on soft wood, and only then move on to hard wood. The boards should be fixed horizontally and only in extreme cases rotated 180°. Hold the chisel or cutter by the handle with your right hand, and hold the blade close to the blade with your left fingers. This will protect the carver's left hand from the chisel sometimes breaking off. To perform flat contour carvings, flat and semicircular chisels are used. First, a semicircular chisel is passed along the contour of the design, leaving a groove. Now the light areas are cut out with a flat or semicircular chisel, depending on the artist’s intent. When cutting out the background with a semicircular chisel, you get a relief background that harmonizes well with the silhouette. Sometimes such a background interferes with the perception of the main thing in the carving: then they use flat chisels, which make it possible to obtain a flat background surface.
Composition of figures
Geometric cutting in its beauty represents not only individual elements, but also various composite ornaments. Composition is a combination of different elements that have their own structure and unity. The initial step in cutting is marking. You need to start with the main center lines. Sketches for the composition of carved jewelry can be very different; you can draw up a sketch yourself or find it in manuals and books on this technique. What is good about geometric cutting? In it you can make your own drawing, both simple and complex, only from the basic elements.
There are many photos that will show how beautiful this technique looks in practice, how you can make a gift yourself with a minimal set of tools or decorate your home using decorative cutting.