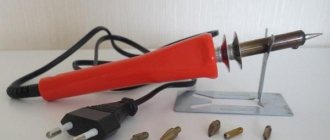
I somehow decided to make a homemade burner based on the model of the Soviet burner “Vyaz”. Back in the 90s, they gave me an “ELM” wood burner for my birthday . As I remember now, the orange body is exactly like in the photo below (photo from the Internet). But at that time my interest was not in the burner , but rather in how it worked. In short, over time, I destroyed it to the point of “kantsur” in childhood, now not understanding why. As they say, all that remains of the goat are the horns and legs - only the transformer has survived to this day. And now, after eleven years, I decided to correct what I had done and assemble a remake of this wonderful burner . I wanted to make a burner with my own hands practically from scratch . Only here is the power regulator - it was not possible to get a wirewound potentiometer, and in its place I used a lighting brightness regulator - a simple Chinese dimmer on a triac.
Description of the device
The wood burning device has a fairly simple structure. It consists of:
- transformer. This is the base of the device that generates the voltage;
- cord connecting the transformer to the handle;
- lever;
- a tip that heats up and is used to apply the design;
- power regulator - it will help change the degree of heating of the tip.
The “Fantaser” burner has the simplest device, so it is suitable for beginners and children.
Some models of burners have replaceable nozzles and tips, brass seals - with their help they apply drawings of different brightness and depth, draw small details, or, on the contrary, paint over large areas. It is important that the kit includes a replacement needle.
The more interchangeable tips there are, the more opportunities you have to create a unique product. Sometimes replacement parts are included in the kit, or they are purchased separately.
How to choose a device for wood burning?
It is worth paying attention to the power of the device; it is better to give preference to pyrographs with a power of 20 W. This will allow you to quickly apply an artistic pattern to a hard surface.
If you work in this direction at a professional level, then you should pay attention to the pen. The hard nib pyrograph has some features:
- cheapness;
- durability;
- easy to use;
- overheats;
- long heating time.
Wire pen instruments have the following features:
- high price category;
- heats up and cools down quickly;
- it is necessary to change attachments frequently;
- There is a heat control function.
It is also necessary to pay attention to the equipment included in the device. The presence of replaceable attachments and a stand in the kit will be a pleasant bonus when purchasing. Some manufacturers only sell the pyrograph, and you will have to purchase all other components yourself. These little things, although not so important, speak of the manufacturer’s attention to detail.
Operating principle of the burning machine
The operating principle of a pyrograph is quite simple. A piece of nichrome wire is attached to the handle. Electrical voltage is supplied to it, which is generated by a transformer. Nichrome heats up to high temperatures when exposed to current. It is with this hot tip that the desired design is applied to the wood.
With the necessary parts and tools on hand, a pyrograph can be assembled at home.
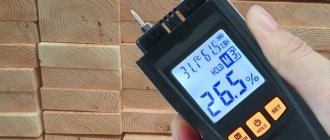
It is important to remember that for the electric burner to operate correctly, you need a power source capable of generating a voltage of at least 5V and a current of at least 4.5A for a long period.
Currently reading:
- The best board games;
- The best children's toys on AliExpress.
Flaws
The disadvantages of this process are as follows:
- This is a lengthy process that consumes a lot of electricity, which in a home environment can have a significant impact on your electricity bill.
- There is no way to redo any action. Any wrong movement leaves a mark on the surface of the wood, which cannot be corrected.
- During a long process, high loads are created on the soldering iron, which can lead to its breakdown.
Tools and materials for burning
Before you begin the actual burning, you need to prepare everything in advance. Having basic tools and materials is a must.
Naturally, the arsenal of beginners and professionals may differ. The main necessary tools include:
- A soldering iron with suitable power (the presence of several modes, a temperature regulator, the ability to change the tip and other features do not play a major role, although they can make the burning process more comfortable);
- Aluminum oxide, which is used to clean tool bits and tips;
- Tips of various thicknesses and shapes, or special nozzles for burning;
- Tool holder or stand.
Types of burning devices
Before purchasing a wood burner, you need to decide on its types. The choice of one or another device also depends on who will be doing pyrography - a child or an adult, a professional or a novice master.
Depending on the type of tip, burners are divided into two types - with a solid tip and a wire tip.
Hard pen device
These devices are very popular. They are designed in the likeness of a soldering iron, the working part of which is a replaceable solid tip made of brass or other suitable material. The working surface consists of a solid tip, inside of which a nichrome wire is placed. Usually equipped with removable nozzles of various shapes.
Advantages of these devices:
- the transformer is housed in a solid housing;
- convenience and ease of use;
- reasonable price.
Flaws:
- heats up slowly and cools down just as slowly;
- no heating regulator;
- the handle often gets hot;
- due to the large handle, the needle is located far from it - this makes it difficult to make delicate ornaments;
- Continuous use risks overheating and failure.
Attention! The nozzles are changed a few minutes after switching off, when the tip has cooled down!
This wood burning machine is suitable for children. Ideal for applying large and medium-sized designs.
Wire pen device
Professional devices for applying designs to wood include devices with a lavalier working surface. With a tip made of thin nichrome wire. Such burners usually come complete with spare needles, the shape of which can be changed with pliers.
The nichrome wire itself is a working surface; the current flows directly to the pen.
Advantages:
- has a power regulator for heating the working surface;
- heats up and cools down quickly;
- suitable for delicate and painstaking work.
Flaws:
- high price;
- The devices are “capricious”; nichrome burns out and often requires replacing the tip.
Suitable for creating complex designs. It is better not to buy it for beginners; it is more suitable for professionals.
If you are just starting to master the art of pyrography, or are choosing devices for a child, pay attention to the budget option with a hard tip. It will allow you to master the basics of burning. Expensive models with thin feathers should be looked at by craftsmen who have experience in this type of creativity.
Tip length
The larger it is, the more inconvenient it is to work with the device. Especially when it comes to burning out small parts. The shorter the tip, the easier it is to use the pyrograph, the more accurate the drawing is.
Number of protective plates
Their purpose is to protect the master’s hand from high temperature. The best option is two plates, but one also copes with its task quite successfully.
Holder thickness
The choice depends on the hand size of the person for whom the device is intended. It is important that the electric burner fits freely and comfortably in the hand of an adult or a child.
Cord thickness
If the device is intended for a child, a thick cord is undesirable, since the weight of the pyrograph increases and it becomes more difficult to operate. In “adult” models, on the contrary, a thicker cable is desirable, as this extends the working life of the product.
Power, heating temperature
The optimal power of the device is from 30 W, the temperature is above 480 degrees. If you buy a model with lower performance, the process will go very slowly. Many buyers ask: is it worth overpaying for a large number of attachments? In fact, this only matters for professional modifications. The more attachments, the more opportunities to solve complex creative problems. As for standard amateur sets, there can be up to 5 of them, and even then they are not always used. For this reason, it makes no sense to overpay for a large number of attachments. If necessary, they can be purchased separately.
The simplest homemade burner
To decorate a small board with pyrography or simply try your hand at something new, you don’t have to buy a professional machine.
From a soldering iron or radio components
You can make your own wood burner using a soldering iron. To do this, it is better to choose a model with a replaceable tip. Nozzles with the required profile can be easily made from a copper or brass rod.
A practically professional burning device can be made according to a circuit with current regulation in the primary winding. To work, you will need very few parts: a transformer, several resistors, capacitors and dinistors. The circuit is not particularly complicated, however, manufacturing the device will require knowledge and skills in working with a soldering iron.
Mini burner
If soldering radio components doesn’t appeal to you or you simply don’t have the time, you can make a device of the simplest configuration. To make a mini-burner you will need:
- unnecessary power supply (charger) from a mobile phone;
- syringe needle;
- sewing needle;
- material for the handle (wooden skewer or brush handle);
- soldering iron and solder;
- shoe thread;
- electrical tape or heat shrink tubing.
The process of making a burner is not particularly complicated. You should start by preparing a syringe needle. The plastic part is bitten off from it; it is not needed in this device.
Both needles are attached to a wooden handle diametrically opposite. The easiest way is to secure them with threads. The sewing needle is carefully bent to such an extent that its point barely touches the point of the hollow syringe needle.
The plug is cut off from the old power supply; it is also not needed. The ends of the wires are stripped. The wires are soldered to the needles. Polarity doesn't matter. At this point, the production of a homemade wood burner is almost complete.
As a final touch, it is necessary to give the product an attractive appearance and create conditions for convenient use. The wire is wound to the handle. This can be done using the same thick thread. This design will be convenient and reliable, however, it is worth strengthening the thread with glue, and after it hardens, put heat shrink on the handle or wrap electrical tape.
Note! Heating of the tip occurs almost instantly. The principle of operation of the device is extremely simple: resistance arises between the needles and the needle from the syringe (due to the fact that it is thin-walled) becomes hot.
Perhaps, such a burner will not be able to make a picture (insufficient power, not the most convenient tip), but you can practice and decorate, for example, a cutting board.
Which companies are better to pay attention to?
Like all tools, a soldering iron has a number of advantages and disadvantages that the user should be aware of. It is impossible to create a masterpiece using the first option you come across. At first, a person will make a lot of effort to find his own style and device. Available options for beginners, at a low price - models offered by the companies: TransVit, SibrTech, Ogonyok. These are good companies that are suitable for beginners and children to master the basics of wood burning in a month or two, depending on the pace of learning.
A little about the history of creation
The history of drawings on wooden surfaces goes back thousands of years. The first finds in the form of burnt ornaments and patterns on wooden products were household items and household utensils that were discovered by archaeologists during a scientific expedition to Peru. Their appearance dates back to 700 BC. Later, pyrography originated in Egypt and penetrated the culture of Asian countries. For wood burning, thin metal pins were used, which were heated in hot coals.
1
So what should you choose?
If a person is just discovering the world of burning art, then for work he will need simple burning products that have a hard pen. An adult or child will be able to apply simple drawings (usually with thick lines), and will also gain important experience and skill, which will allow him to move on to a more complex and professional device.
A burner with a thin nib must be selected based on the specifics of the job. It is also worth choosing a product for your own needs and trying not to look for unnecessary benefits, as this may affect the quality of the assembly and the heating element.
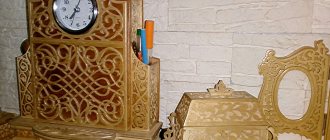
Burning ideas
If you have no idea what you want to do the first work on, then burning wood on a cut is suitable for this. This is a self-sufficient work that fits perfectly into the interior and is popular among buyers.
Burning will allow you to create many exclusive products or decorate ready-made items.
You can decorate interior items, for example:
- chairs;
- shelves;
- hangers;
- boxes.
You can create decorative kitchen utensils such as spoons, plates, bread bins, and cutting boards. For those who prefer a country style in their interior, this will be a great addition.
Any item with this type of artistic decoration will become a real highlight in the interior. Moreover, image diagrams can be downloaded from the Internet, which simplifies the task of finding ideas.
Methods for creating images
The principle of creating a pattern by burning is that part of the wood is charred and darkened, thereby standing out in contrast against the general light background. Working with a very thin tool, you can paint pictures on wood.
There are various pyrography technologies, many of them are complex and require special equipment. Among others:
- open flame treatment;
- firing using a clay stencil;
- burning with hot sand;
- friction burning on a lathe.
These are quite complex techniques, but an electric device is best suited for creating pyrography masterpieces at home. In the design of such a wood burner, the high temperature of the tip is created due to the flow of electric current through it.
The industry produces various models of burners, so it is not difficult for a novice master to choose the right tool. In addition, if you have the skills to work with a soldering iron, you can assemble such a device yourself.
Currently reading:
- The best online toy stores;
- History of the development of the IKEA brand.
Making a simple burner
If you wish, you can assemble a wood burner with your own hands. To do this, you will need a small set of tools and some improvised means, commonly used household items. To assemble a homemade burner you need the following materials:
- Wood bead.
- Insulating adhesive tape.
- Power unit.
- Nichrome alloy filament.
- Soldering device.
- Flux for soldering.
- Tin for solder.
- Electric drill with attachments.
Other materials may be added to the list, such as sewing threads and rubber thermal tubes.
How to work correctly
It is easy to notice that the working tool of a wood burner resembles an ordinary pencil, and therefore the technique of working with it is not much different from ordinary drawing. It’s just important not to forget that the “pencil” is very hot.
The entire work process can be represented in a few simple steps.
Preparation
You need to choose a board on which the drawing will be applied. Its surface should be flat and smooth. To level the wood, the wood is scraped and treated with sandpaper.
A good material for burning, especially for a beginner, is plywood. It is cheaper, its surface is almost ready for work, you just need to smooth it with sandpaper.
Drawing
For those who have drawing skills, it is not difficult to cope with such work; moreover, craftsmen can do without a sketch, working straight away with a burner. For beginners, we can advise you to select a suitable picture on the Internet, print it and transfer it to your work surface. Here, old time-tested copy paper will come in handy; you can scale the image using the square transfer method.
For a novice master, it is worth choosing simple drawings that are not replete with small details. In addition, it is better to immediately make something concrete, not some abstract board, but, for example, a plywood stand for a microwave oven, which can be decorated with floral patterns.
Burnout
Using the heated tip of the burner, they begin to apply a pattern along pre-designated lines. The handle of the instrument is held like a regular pencil.
Drawing begins with the outer contours. Straight lines are performed with quick movements without pressure. It’s not difficult to make an accent or draw a thick line; you just need to slightly reduce the speed of the burner’s movement. In curved areas, you must hold the tool perpendicular to the surface of the board, avoiding excessive pressure.
Note! If there are several closely spaced lines, you should not try to draw them as quickly as possible; the wood must cool, otherwise the spaces between them may burn out.
The shade of the line can be changed within a fairly wide range. This is easy to achieve by changing the temperature of the tip, the shape of the working tool (in the case of replaceable attachments) and the angle of inclination.
Final processing
The completely finished image is processed with fine-grained sandpaper. Then they are coated with a layer of furniture varnish and, if desired, partially or completely painted.
Rating of quality burners for children
It’s always nice to receive a gift made with your own hands, so by giving your child such an item you will not only interest him in creativity, but he will also learn tolerance and perseverance. After all, using such a device requires perseverance and accuracy.
It is important to remember that children should not be allowed to use the device independently. Therefore, first of all, you need to think about how to make the work safe.
Tenth Kingdom Pattern-10k
A fairly compact set, perfect for children. Helps a child learn to burn wood. Heating is carried out in two modes, so after adjusting the temperatures, the designs have shadows and interesting patterns. The needle is of a special shape, with its help the child will create any ornament and design of varying complexity. The light weight of the device allows you to take the set with you on trips. Reviews about the pyrograph are mostly positive; parents highlight the safety of the product, convenience and appearance. Suitable for children from 8 years old.
| Weight, kg | 0,71 |
| Manufacturer country | Russia |
| Operating modes | 2 |
Price: from 1389 to 1500 rubles.
pros
- ergonomic handle;
- universal needle;
- 2 heating modes;
- ease of use;
- a light weight;
- 1 year warranty.
Minuses
- Only 1 nozzle included.
The burner is comfortable to hold in your hand. The child is 9 years old, we decided to finally try to teach him this type of leisure. He is diligent and creative, and he liked the burner. Over time, the pyrograph heats up more and more slowly; sometimes it is necessary to spend time waiting. But overall, for the money it’s a good option.
Smoke
The Dymok wood burner does an excellent job of applying all kinds of patterns to wood, fabric and leather. The body of the device consists of durable plastic. Devices for artistic burning of Smoke are equipped with a step-down transformer, a thermostat and a pencil with a pen.
Burning set Red cat HP-0268
Large set with 6 special attachments and two prepared sketches on boards. The set develops the child's imagination, logical thinking and fine motor skills. “Red Cat” is suitable for boys and girls, and the manufacturer creates themed sets (for example, the “Transport” set). Today the set is one of the most popular due to its thoughtful and high-quality content. Keep in mind: the manufacturer has indicated age restrictions 14+.
| Weight, kg | 0,5 |
| Manufacturer country | Russia |
| Operating modes | 6 |
Price: from 989 to 1050 rubles.
pros
- creative sets on various topics;
- development of the child’s abilities;
- Includes 2 boards with sketches;
- availability for purchase in the store.
Minuses
- age restrictions.
The set is good, the device works great. The child was pleased, although before that he had not shown any interest in creativity at all. In fact, burning is more than just an art: it is also the development of a child’s personal qualities, and at the age of 13-14 this aspect is extremely important.
wood burner Set for burning Red cat HP-0268
Burning set “Morning walk”
Manufacturer: Dreamer. Full set, there is a board with a stencil applied and 1 board without a pattern. Average price: 1200 rub.
Burning set “Morning walk”
Advantages:
- set of extended equipment;
- availability of replaceable nozzles;
- easy.
Flaws:
- no heating sensor;
- takes a long time to warm up.
| Index | Characteristic |
| Power | 30 W |
| Equipment | stand, sandpaper, stencil board, 2 burning boards, replaceable tips |
| Cord length | 115 cm |
| Dimensions (packed) | 37x25x8 |
| Weight | 215 gr |
Burning set “Horse and Owl” by MultiArt
The kit includes 6 additional attachments. Made in China. You can order online from the AliExpress online store from China. Recommended for use by children over 6 years of age. Price: from 800 rub.
Burning set “Horse and Owl” by MultiArt
Advantages:
- a budget option;
- additional nozzles.
Flaws:
- takes a long time to warm up;
- burns shallowly (may scratch the board).
| Index | Characteristic |
| Power | 40 W |
| Equipment | replaceable attachments, board, stand |
| Dimensions (packed) | 18x10x4 |
| Weight | 230 gr |
SibrTech Azhur
A high-quality product that is intended for children over 14 years old, as it has a complex design. Burning is done smoothly and accurately. There is a temperature adjustment that will help you choose a specific value for each image. The kit includes a durable stand, replaceable attachments, etc.
The power limit is 20 W. With such an electric burner, the images will turn out smooth and beautiful. The set is suitable as a gift for beginning pyrographers. The service life is 365 days, but if the operating rules are followed, this value can reach 2 years.
Sold at a price: from 750 to 1,200 rubles.
SibrTech Azhur
Advantages:
- High-speed heating;
- High-quality assembly;
- There is a power regulator;
- Fast cooling;
- Low price for a set.
Flaws:
- There are no critical shortcomings.
Lori No. 1 and No. 2
The burning set consists of all the necessary accessories that allow you to get acquainted with the art technique. The attachments are represented by different points; they have a laser tip that allows you to apply an image to the board. The set contains many beautiful pictures; at the end of the work, they can be framed, complementing the interior of the children's room. The boards are made of low quality material; upon contact with them, a slight roughness is observed, which distorts the lines and does not allow them to be sanded. Heating takes up to 5 minutes, which is not very convenient for active, impatient children.
Advantages
- Simple device;
- All necessary materials and tools are included;
- Durability;
- Comfortable to hold in your hand.
Flaws
- Replaceable elements are installed using pliers, which is not very convenient;
- Low quality board.
Based on the reviews, we can conclude that the set is suitable for children aged 6-8 years who are just learning to use a soldering iron and apply different images to boards. It has a low price, so almost every family who wants to instill in their child a love of art can buy it.
Master burning set
Manufacturer: Tenth Kingdom. Designed for children over 6 years old. Average price: 300 rub.
Master burning set
Advantages:
- Ease of use;
- several designs for burning on stencils;
- quality materials.
Flaws:
- no replaceable nozzles;
- not recommended for children under 3 years of age.
| Index | Characteristic |
| Equipment | 8 stencil boards, 2 plain boards |
| Dimensions (packed) | 18x11x4 |
| Weight | 165 gr |
Sparta 913225
There is a laser tip that allows you to burn out the smallest details.
For a fairly low price, Sparta offers as many as 6 convenient attachments and a special stand. Many people praise the burner for its ease of use; children can easily grasp the handle thanks to the special grooves on the handle. The plastic case is strong enough; if the device is accidentally dropped, it will remain intact. But still, this should not be done, since the electrical component of the device is afraid of shocks, so even though the equipment itself will remain intact after a fall, malfunctions may begin in its operation.
pros
- Low cost
- Comfortable handle
- Rugged housing
Minuses
- No heating modes
- The handle may become very hot during long periods of use.
- Every 15-20 minutes you need to cool the device, otherwise it becomes impossible to work
Dreamer Morning walk
The burner has a standard operating principle; the set includes 6 different attachments, which have an individual shape and allow you to draw unique images. The kit also includes a steel stand, sandpaper, and plywood, which soften the creative process and make it more comfortable. The device takes quite a long time to heat up, on average it takes up to 5 minutes. Additional attachments make the patterns more diverse and develop more deeply in this area.
Advantages
- Good equipment;
- Ability to apply different designs;
- Quality of materials;
- Affordable price;
- Easy to use.
Flaws
- Takes a long time to heat up;
- There is no button to regulate power.
In their reviews, users say that the soldering iron copes with its functions, but also has certain disadvantages that do not appear immediately. Due to the inability to adjust the power, not all images, ornaments and lines can be applied.
BONDIBON with board and Paints BB 1413
The set includes 3 additional nozzles and stencils on burning boards. After burning, the picture can be decorated with the paints included in the kit. Which makes the activity even more interesting. Warranty: 1 year. Price: from 800 rub.
Advantages:
- price;
- equipment.
Flaws:
- takes a long time to heat up;
- The handle is not very comfortable for a child.
| Index | Characteristic |
| Power | 20 W |
| Equipment | interchangeable nozzles, board, stand, paints (6 colors), brush |
| Dimensions (packed) | 20x8x4 |
| Weight | 250 gr |
TUNDRA basic
30 Watt device, which is intended for use by children over 14 years of age. This device is inexpensive. Production is carried out in accordance with the EAC certificate. The handle is comfortable and has a rubberized element at the end, which allows you to hold it more confidently. Power cord length – 150 cm.
Advantages:
- Burns well;
- Power;
- Price;
- Comfortable handle.
Flaws:
- Heats up;
- Solid pen.
The last hero
Manufactured by Tenth Kingdom. The last hero burners allow you to create patterns of any complexity. Heating time is approximately 5 minutes, there are buttons to adjust the temperature. Warranty: 1 year. Price: from 1500 rub.
Advantages:
Burner circuit
Schematic diagram of an electric burner based on ET
On the Internet, I came across modifications of such transformers for the manufacture of a pulse soldering iron. In the case of a burner, minimal modifications to the UPS will be required.
First, remove the board from the case and solder the output transformer. A lot has been written about these schemes, so I won’t go into details. It copes well as an electric burner. I will only say that bipolar transistors MJE13003 (TUVE13007) can be replaced with more powerful current ones - MJE13005, MJE13007 (the last digit means operating current). When choosing a UPS, you need to take into account the fact that it should not have short circuit protection!
So, having removed the transformer from the board, it must be disassembled. A lot has also been written about disassembling ferromagnetic transformers. But, I will share my experience. First of all, remove the film and use a knife to remove the glue on the core connection. Afterwards, heat the water in a small container until it boils. But we don’t immediately throw it into boiling water, but heat it first with warm water. Due to the fact that the quality of these trances is very low, they can break. Therefore, after warming it up a little, we put it in boiling water and leave it there for a few seconds. The procedure can be repeated and try to loosen the winding body, and also run a knife along the seams of the ferrite halves. In the end, you will be able to disassemble it, but do not rush, do everything with caution. In my case, even after breaking such a trance, I did not despair, and connected the four pieces of the core with tape. Some glue the cracked slices, but even without that it works just fine, tightly compressed with adhesive tape.
Having disassembled the transformer, remove the secondary winding, and in its place we wind 3-4 turns of stranded wire with a cross-section of 2.5-4mm2. An electrical cable (mains cable) is suitable for this. The insulation is first removed, and in its place a heat-shrinkable casing of suitable size is put on. Why heat shrink tubing? Because it takes up less space relative to the cable insulation. Now, we wind four turns, with a branch from the third. The voltage on the last turn will be approximately 9.0-10.5V. All that remains is to put the transformer back together and remove the leads, as can be seen in the photographs.
It's time to work on the body of the electric burner. For this we need an aluminum furniture leg. Yes, yes, furniture again! It is very cheap (less than a dollar), but most importantly it is made of 1 mm thick aluminum. Thus, the case will serve as a heat sink for transistors, which get very hot. Square leg height =100mm. The issue of the front panel is also resolved. To do this, we disassemble the leg and leave a plastic plug with which we cut off a part - so that all the components of the product fit. Further, the radiator for transistor switches is also aluminum.
I used a 5mm thick plate radiator. It already had threaded holes, which I later used. But if you find a copper plate, it will definitely serve as a better heat sink. You can also use any other radiator of a suitable size. In addition to this radiator, I connected an aluminum U-shaped profile - you guessed it, also a furniture one, which fits tightly into the square profile of the case.
As an aside , there are many aluminum profile forms in furniture production. In the variety of accessories you will find both profiles suitable as radiators and ready-made housing solutions. All that remains is to dream a little and apply these solutions in amateur radio.
The radiator must be in close contact with the body! This way, the heat will be distributed evenly, with greater efficiency, throughout the entire body, without requiring bulky radiators. The U-shaped profile is connected to the radiator plate with a small gap (2-3 mm) through small washers and then we screw this “sandwich” to the plate included in the impulse generator kit. Transistors and the board must be attached through an insulator, also from the UPS. It is preferable to ground the burner housing.
Don’t forget, the device is connected to a mains voltage of 220V, so we take all safety measures during assembly and commissioning!
Now, we drill holes in the plastic front panel for the electric burner operating mode switch - for the wires and for the red and yellow . We connect the LEDs with limiting resistors with hot glue, as can be seen in the photo.
Next, twist the switch and solder all the wires together (see figure). Switch – P2T-21 (Soviet production, maximum switching power up to 660 W with active load). It is necessary to use the most powerful toggle switch possible, otherwise the contacts will overheat! The maximum power of the electric burner reaches 70 watts.
To the body, as legs (anti-slip), we glue self-adhesive cork or silicone (available from glaziers and furniture makers). As a handle, I used a ready-made handle from an industrial burner. And if you make it yourself, then a handle from a burnt soldering iron will do. Or we cut it out of textolite, wood with a fluoroplastic tip of suitable thickness. Fastening for nichrome - the terminals of electrical blocks are just suitable for these purposes.
I found nichrome for tips with a diameter of 0.8-1.5 mm on the radio market. Suitable for different heating devices. It must be bent as in the photographs and the tip flattened with a hammer. I made two types of tips: one from millimeter nichrome - for burning and cutting, the other from one and a half millimeter, for rougher work. Accordingly, the second one will effectively heat in a more powerful operating mode of the device (turbo).
The wire for the electric burner must be selected with a large cross-section and the most flexible. Otherwise it will get warm. Naturally, the electric burner will work intermittently, approximately 15-30 minutes.
Firstly, the efficiency is very low, which leads to large heat losses. And secondly, the handle will heat up, which forces you to work with it cyclically. For more convenient use, I advise you to adapt a push-button pedal (from a sewing machine or from some machine) or a push-button power switch, etc. I did not make additional holes in the case or radiator for heat removal. This is at your discretion, depending on the radiator used.
The device is very easy to manufacture, thanks to ready-made solutions for its assembly. It can be made by any beginner with minimal electronics skills. The main thing is to follow safety rules when working with it. After all, the tip temperature reaches 500-600 degrees.
If you make an electric burner for a child, then the presence of an adult when working with it is mandatory. I hope it brings joy and creative success! Author: Florin Matiencu ( flomaster ).
The bidding has ended. The lot is not sold.
Perhaps the seller will put it up for auction again later. Write him.
Set "Skillful hands - M" burner, electric foam cutter, block.
Models with wire feathers
The advantages of burning devices with wire feathers are more extensive. Due to their impressive power, they can be used to work with the hardest tree species. Heating and cooling are carried out in a few seconds. Many devices are equipped with a filament wire temperature regulator. To begin with, you can heat it white or slightly warm it up.
Models equipped with wire feathers solve problems much faster and more efficiently than others. And if the wire burns out after prolonged use, it can be easily replaced with another one. By the way, most European manufacturers of such equipment use nichrome metal as heating elements, which has a long service life.
Representatives of this group have found wide application in the most painstaking and subtle areas.
Disadvantages:
- Expensive.
- Difficulties in repair, especially if the model was purchased on the Internet, and there is no possibility of finding spare parts.
- Frequent burnout and deformation of tips.
If the heating elements are replaced frequently, the locking handle will no longer be usable .
If we talk about the most popular models, then among them we will mention devices for burning “Pattern 1”, “Stayler”, “Weller” and others.
Rating for professionals
For adults using the device at home, it is necessary to choose models with the lowest degree of smoke. The rating includes both new products and time-tested burners.
ZD 8905
An excellent option for professional and semi-professional use with a maximum power of 40 W and a temperature of 750 degrees. Operating modes are regulated using a special control unit. The heating time of the device is only 15 seconds. PROS:
- fast heating;
- convenient temperature adjustment;
- high power.
Minuses:
- decent price;
- the need to buy additional attachments;
- a lot of space occupied by the device.
Burning set 0260 Pebaro
The products are German-made, the company has established itself on the Russian market as reliable. The kit includes 20 replaceable nozzles. Price: from 2000 rub.
Burning set 0260 Pebaro
Advantages:
- 2 year warranty;
- heats up quickly;
- burns through plywood well;
- good quality materials.
Flaws:
- price;
- when heated too much, the pen bends;
- plastic stand.
| Index | Characteristic |
| Power | 30 W |
| Equipment | Stand, replaceable attachments |
| Dimensions (packed) | 29x9x4 |
| Weight | 226 g |
Stayer 45227
A distinctive feature of Stayer 45227 is a real abundance of attachments that help you work in a variety of genres when creating various patterns on wooden boards. Most often used by experienced craftsmen, since only they can fully unleash the full potential of this electric burner and all its attachments. By the way, some even use it to decorate leather. Among the pleasant aspects, it is also worth noting the comfortable handle and simple change of attachments (using pliers). The set includes a stand, a special chest and 2 knives.
pros
- Excellent equipment
- Comfortable
- Stand
- A huge number of attachments
- Compact
Minuses
- Takes a long time to heat up and cool down
Burning set 45225 STAYER
STAYER is a German company that has positively proven itself in the market. Heating time: 4 minutes. Price: from 700 rub.
Advantages:
- price;
- good quality;
- ease of use.
Flaws:
- long heating;
- Doesn't always burn through wood well.
| Index | Characteristic |
| Power | 30 W |
| Equipment | Stand, replaceable attachments |
| Dimensions (packed) | 28x12x7 |
| Weight | 210 gr |
Micron WBT-01
A cheap device designed to improve professional skills. You shouldn't expect any supernatural meanings from it. The power is standard and is 30 W. The set includes 5 different attachments to ensure high-quality drawing. The operating temperature reaches 510 degrees.
Advantages:
- Low price;
- Durable network cable;
- Short heating time;
- There are replaceable nozzles;
- High quality build.
Flaws:
- There are no particular shortcomings.
Burning machine with temperature control function ZD-8905 REXANT
The device is designed for working on wood, plastic, cork, and leather. Temperature range: 450-750 degrees. Heats up within 25 seconds. Has heating adjustment. Price: from 2,200 rub.
Burning machine with temperature control function ZD-8905 REXANT
Advantages:
- quality materials;
- ease of use;
- multifunctionality.
Flaws:
- price;
- few additional stings;
- buzzes when working.
| Index | Characteristics |
| Power | 40 W |
| Equipment | replaceable tip |
| Dimensions (packed) | 214x79x178 |
| Weight | 1.3 kg |
ZD 972A
A model with which you can create real works of art or teach children the art of pyrography. The heating time of the nozzles is about 3-5 minutes, and to replace them you need to use special tweezers. 19 metal “stings” of different shapes allow you to burn out various geometric patterns. PROS:
- temperature control in the range of 450-750 degrees;
- comfortable handle of the device;
- high power, allowing not only wood burning, but also soldering;
- good set.
Minuses:
- high price compared to other models;
- long heating time – you can use the burner only 3-5 minutes after turning it on;
- lack of stand and power control.
Burning station 45228 STAYER
Products of German quality and reliability. The company has a positive reputation in the Russian market. 12 month warranty. Burner type: manual. Heating temperature: up to 750 degrees. Average price: 2300 rub.
Advantages:
- quality materials;
- burns wood well;
- switch on the body.
Flaws:
- price;
- few replaceable attachments;
- At high temperatures the handle gets hot.
| Index | Description |
| Power | 40 W |
| Equipment | set with nozzles |
| Cord length | 1 meter |
| Dimensions (packed) | 180x57x210 mm |
| Weight | 1.24 kg |
Burning machine with Pebaro attachments (0280)
Made in Germany. It is used not only for wood burning, but also for soldering products. Heating temperature: from 50 to 500 degrees. Average price: 9,500 rub.
Burning machine with Pebaro attachments (0280)
Advantages:
- multifunctionality;
- temperature regime;
- quality materials.
Flaws:
- price;
- dimensions.
| Index | Description |
| Power | 24 W |
| Equipment | stand, station, soldering iron, replaceable pen |
| Dimensions | 19x27x7.5 cm |
| Weight | 1.3 kg |
Selection tips (recommendations)
To avoid mistakes when choosing, follow the following recommendations.
Tips for beginning burners:
- The best trees for working with a pyrograph are linden, birch, beech and sycamore. When burning pine or oak, you will have to take into account their heterogeneous structure;
- wood grain is often used as part of a design, indicating shadows, distant mountains or clouds;
- The surface of the base should be thoroughly sanded before starting work;
- work in a ventilated area;
- You must first apply the image on which you will burn (with a pencil, using graphite paper (not copy paper), prick with a needle directly from the drawing, or “roll” it printed on an inkjet printer);
- different depths of tone and saturation are obtained due to different speeds of movement of the instrument, different heating temperatures;
- it is impossible to remove the applied stroke, only if it is pale it can be turned into a stroke deeper in tone or sketched out altogether;
- after applying pyrography, the product can be coated with varnish, wax or PVA glue (first let the wood cool and carefully go over it with the finest sandpaper);
- If the drawing is painted, then shellac varnish is used for watercolor paint, and amber or copal varnish for oil paint.
How to choose a wood burner?
You can buy a wood burner or pyrograph at any craft store or hardware store with a soldering equipment department. There are two categories of burners: devices with solid pens and devices with wire pens. The former can have up to 20 nozzles in a set, while the latter allow you to adjust the heating temperature. When choosing a pen burner, pay attention to its power - the more power, the faster you can work. The advantages of burners with hard feathers include:
- high strength;
- ease of use;
- democratic price.
Disadvantages of feather burners:
- long heating and cooling;
- heating the handle;
- possibility of overheating and combustion;
- Difficulties with lace burning and other delicate work.
Advantages of wire nozzles and pyrographs:
- fast and easy work;
- inexpensive and simple replacement of the heating element;
- perfect work with details even on hard wood.
Disadvantage of wire nozzles and pyrographs:
- frequent replacement of the heating element;
- high cost of purchase;
- limited selection.
Tips for parents
If you decide to purchase a wood burner as a gift for your child, nephew, or as a big gift for the boys in your class, then carefully read the following tips: Tip 1
For beginners, it is better to take a simple burner with a small set of attachments (for example, a Stayer device and 6 attachments).
When he gets used to them, you can purchase a set with a large number of attachments (for example, a Stayer device and 20 attachments) or with paints (for example, a ZUBR device and 7 attachments with a set of paints). If your child likes the gift and wood burning becomes a professional hobby for him, then you can safely give him a burning station (for example, Stayer “Pyrograph-2” with replaceable tips). Tip 2
If you are purchasing a device for a child, be sure to ensure that the selected electric burner has elements that protect against burns, and that the kit includes a stand for the pen and a cover for the work area.
Tip 3
Look at the package.
Give preference to a device that comes with a spare needle or several pens of different profiles. Then, with the help of one device, it will be possible to make various patterns and control the thickness and depth of the pattern of the painting. Tip 4
To make pyrographic designs, buy a burner with wire pins.
It consists of a step-down transformer, an electrical cord and a handle with a pin, the tip of which is made of nichrome wire. Such a device allows you to burn complex plots, combine execution techniques, and also play with light and shadow in the drawing. In our section “Burning Devices” you will find several options: kits with nozzles of up to 20 pieces and with paints, a burning station, a device for artistic cutting of plastic. They vary in cost and power. Choose a pleasant and useful gift for your loved ones and friends! Sources
- https://masteridelo.ru/remeslo/derevo/vyzhiganie/kak-vybrat-apparat-dlya-vyzhiganiya-po-derevu.html
- https://gadgetok.ru/top-luchshih-vyzhigatelej-po-derevu.html
- https://yanashla.com/luchshie-vyzhigateli-po-derevu/
- https://DrevoGid.com/instrumenty/vyzhigatel.html
- https://ToolsTver.ru/instrumenty/instrument-dlya-vyzhiganiya-po-derevu.html
- https://oxko.ru/luchshie-vyzhigateli-po-derevu/
- https://derevo-s.ru/oborudovanie/instrument/vyzhigatel
- https://vyborexperta.ru/otdyh-i-hobbi/luchshie-vyzhigateli-po-derevu/
- https://zuzako.com/reyting-luchshih-elektrovyzhigateley/
- https://kupill.com/top/vyzhigatel-po-derevu-luchshiy/
- https://molotokmarket.ru/stati-instrumentah/vyzhigateli-po-derevu-otlichnyy-podarok-rebenku/
How to choose a soldering iron burner
This question is one of the most frequently asked to us on various sites on the Internet, and at master classes too. We decided to put together all the necessary knowledge, in our opinion, for a more confident purchase of the device.
It’s worth mentioning right away that we are talking only about soldering iron-type burners, based on our own experience of working with them and the testing we conduct for implementers. Without any extra cleverness, just an answer to the questions:
— how to choose a burner for a child or as a gift?
— I burned it as a child or I want to try again. Where to begin?
So, the most basic thing: all soldering iron-type burners belong to the “hobby” category because they are easy to use and inexpensive. The range of prices among different manufacturers is very small, and there is often only one country of origin;) Therefore, when choosing, you should not rely on a higher price and widespread advertising. The first thing you should pay attention to is the length of the “sting” from the tip to the holder. Due to the high temperature, it is pulled away from the hand, and this makes the work a little more difficult: after all, we hold the pen or pencil much closer to the drawing.
A rod that is too long is difficult to control—precision is lost, and small parts cannot be easily burned out. A rod that is too short can result in stronger heating of the hand, although this is very subjective. Between the hot metal part and the handle-holder of the soldering iron burner there are protective plates. They are designed to protect the hand from the heat of the hot rod. It is believed that two such “rings” are better, but in reality, one completely copes with its functions. (On the right is our student’s work on MK, her second burning experience in her life).
When choosing a device for a child, it is a good idea to pay attention to the thickness of the holder: it is difficult for a small hand to grasp the device tightly. And what is also extremely important is the length and thickness of the cord. Everything is clear with the length, but the thickness greatly affects the work: the load on the hand increases. When working for a long time, this is very noticeable, and even more so for children. That is, on the one hand, reinforced wire and plug guarantee a longer life for the device, on the other hand, they make the work physically more difficult. So it is better for children to choose a lighter device. The material of the handle - rubber or plastic - does not matter, the whole beauty of “soldering irons” is that they heat up to a certain temperature and that’s it, then they just hold it.
Heating power and temperature are also important criteria. Devices with a power of less than 30W and with an incandescent temperature of less than 480 degrees should not be considered - the wood will burn too slowly, and burning may seem too long and painful :)
Separately, we would like to say about the positioning of soldering iron burners as 3 in 1 (burner, soldering iron, hot knife). Perhaps someone is captivated by such versatility, but we prefer to have a separate device for each type of activity.
Well, about the attachments: don’t let the wide variety confuse you, this is just a marketing ploy. In reality (and not only here, but also according to reviews in general), a small standard set is enough for the eyes. All you need is a comfortable “spatula”, an attachment with a sharp tip, and, in general, everything else is up to your desire and preference) Numerous shaped attachments are more for children’s entertainment. Although, let us emphasize, with a certain amount of imagination, you can create unique masterpieces, even creating ornaments using only figured prints :)
And in conclusion, before purchasing, we would like to advise, if possible, to try out the burner at all available demonstrations in stores, at master classes, with friends and acquaintances: hold it in your hands, try to draw - in burning a very important role is played by personal preferences, your own feelings, not recommendations.
We hope that this material will be useful to someone, and will slightly dispel the myth about the “childishness” of soldering iron-type burners. For example, our works below were performed by him, using one attachment. Not for the sake of bragging, but for inspiration :)
If this topic turns out to be in demand, we will continue publishing. We will answer all questions in the comments, and the most pressing ones in separate articles :)
Inexhaustible inspiration to you!
Maria and Tatiana,
VZBRELO.
(when using materials, placing an active link to the authors is mandatory)