There are many types of different connections that are widely used today in repairs. They are needed for assembling and repairing furniture, for connecting individual parts of some functional elements. But it is the tenon joint that has earned the greatest popularity among all types.
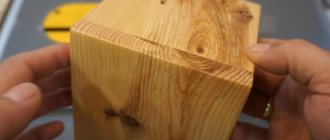
A tenon joint is a connection of wooden parts by tightly fitting the tenons into the holes (grooves).
The connection based on grooves and tenons is mostly used for wooden materials. It provides a fairly strong joining, while preventing the parts from deforming. This is especially good for furniture, when it is necessary to ensure maximum reliability of fasteners.
Advantages and disadvantages of a tongue-and-groove connection
A tenon is a protrusion on two sides of a board, a groove is a recess on opposite sides. To connect the parquet into a single sheet, it is necessary that all the tenons fit into the grooves and are held tightly there. The tongue-and-groove connection is the simplest; previously it was equipped with all types of parquet. Nowadays, piece, modular and artistic parquet, as well as solid and some types of engineered boards, have tongues and grooves.
Engineered tongue and groove boards
Since with such a connection nothing prevents the boards from moving back in the future, the parquet must be fixed with glue and staples during installation, or each board must be nailed to the base. Or they are screwed on with self-tapping screws.
It turns out that when you buy parquet with a tongue-and-groove joint, you need to include in the estimate in advance the costs of glue, staples, nails or screws. If installation experience and knowledge are not enough, you will need to spend money on the services of professional parquet floorers.
Half-tree connection
Quite often in carpentry they use various options for half-timber joints (simple or straight lock). This type of assembly of wooden structures is characterized by ease of manufacture and high reliability. The following varieties are distinguished:
- cross connection;
- half-tree - dovetail;
- gusset;
- on the mustache;
- half-tree splicing.
The first two methods are used to connect parts that intersect at right angles. Especially popular is the dovetail, in which the neckline is trapezoidal and the sides are not at right angles. The lock groove widens slightly from the end, providing a more reliable fixation. It should be noted that a tenon joint can also be called a dovetail if the tenons are cut in the form of trapezoids.
The second and third methods form a completed angle. Splicing is used if it is necessary to increase the length of the workpiece.
Pros and cons of the castle
A lock is a connection with additional fixation. The simplest lock looks like this:
In addition to the tongue and groove, there are additional protrusions and grooves at the joints of the boards that prevent the parquet flooring from coming apart during operation. Parquet with a lock can be laid using a floating method - without the use of glue, nails or screws. And although this work also requires knowledge and skills, it is much easier to do than installing parquet with glue and screws.
A parquet board with a lock can also be glued if for some reason you need to fix it to the base.
Locking joints are available only for parquet and engineered boards, as well as for solid bamboo boards. Solid boards made from other types of wood are equipped only with a tongue and groove: a lock made of solid wood will not spring back and will eventually break under constant loads.
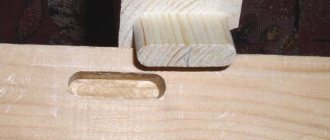
Marking of the second part
Tenon joint elements.
After this, we move on to marking the second part of the connection. To do this, you need to take the two parts that are supposed to be connected and attach them tightly to each other. In this case, you need to ensure that it matches the lines of the cuts. When the parts are perfectly attached to each other, it is recommended to clamp them in a vice so that they do not move.
Now that the parts are properly fastened, you need to apply marks with a pencil on the second part that has not yet been marked, and then make the initial cuts with a file. These will not be solid lines, but just thin marks, similar to scratches. But it is still necessary to do them, since it will be easier to work later. Only when making marks, try to do it in such a way as to achieve perfect evenness and avoid bending.
Related article: Widening door openings in buildings of various types
After this, it is necessary to release the parts and move them further relative to each other. It is important to take this into account. If you move the parts just a little by the width of the file, the connection will turn out to be quite rigid. And if you make the shifts a little more, it will be freer.
However, it cannot be said that any of the options is bad. It all depends on the nature and size of the parts being connected. And also on the specific type of wood used. If you use plywood, then you can make shifts only along the width of the cut, since in any case it will not be subject to severe deformation.
What types of locks are there?
Each well-known manufacturer has its own patented lock with a personal name, for example, Kahrs - WoodLoC 5S, Upofloor - Reallock and so on.
The name usually contains the words “lock” or “click”, meaning that the boards are locked or snapped together. They need help with this: in order for the boards to securely interlock and all parts of the lock to fit tightly into each other, a special parquet hammer or impact block is used, and sometimes both together.
How to secure boards with a lock. Excerpt from Kahrs instructions (PDF)
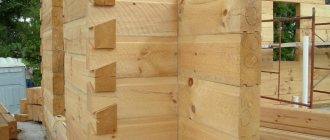
Types of corner connections for timber
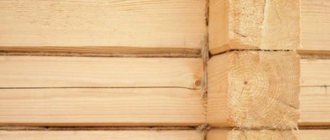
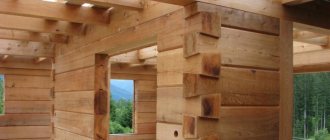
Separately, it is worth mentioning the connection of timber or logs when making a log house for a house or other building. This construction technology has been used for centuries; high-quality logs guarantee a long service life for the building.
There are two main types of corner joints when building a log house:
- without a trace (in the paw);
- with the remainder (into the bowl).
Cutting without residue means that the stacked logs will form an even angle, their ends will not protrude beyond the building; a separate type of it is a warm angle. Cutting with the remainder, in turn, means that a weave of protruding ends will be formed at the corners of the building. The second method is more expensive in terms of the amount of material, but the building retains heat better and is more stable.
There are various ways to connect wooden parts; the ability to determine the optimal one for a particular type of work will significantly diversify the range of products that a craftsman can make. The correctly chosen method will provide an attractive appearance to the product and guarantee the reliability of the three-dimensional structure.
Attention to the ends
Locks from different companies differ in the profile and method of connecting the ends of the boards. If there is a regular lock at the ends, during installation you will need to first assemble a whole row of boards on the floor, and then connect it to the previous one. This is not as convenient as attaching boards one at a time. Therefore, manufacturers came up with latches at the ends: you insert the board with the long side into the desired place of the previous row, and it joins with the adjacent one using a latch. You just need to press and hear the “click”.
Boen X-Press Lock
Demonstration of an end-joint lock on a Haro floorboard
Marking and making eyelets
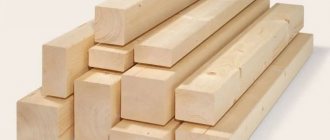
The production of elements begins with cutting out a groove into which the tenon will be inserted. The quality of each of them largely depends on the accuracy of the markings and the level of the tool used. For its manufacture, a milling cutter can be used, which allows you to speed up the process of obtaining the eye. In home workshops you can make a groove with your own hands. The manufacturing sequence depends on the type of tenon joint. The basic sequence is as follows. Marking begins by dividing the workpiece into three equal parts. Next, cuts are made using a thin hand saw. Then, using a chisel of the required width, the inner part of the cut is removed, obtaining a groove element. The final processing of the walls of the resulting groove is carried out using sandpaper.
Lock and tongue and groove - comparison
When choosing parquet, you need to pay attention not only to the connection, but also to other characteristics: type of parquet, type of wood, coating, thickness of the plank and face layer, and others. The choice will depend on the conditions of your premises, goals, budget and plans for the future. Here are the limitations of parquet with different types of joints:
| Lock | Tenon and groove | |
| What board is it applied to? | On a parquet board, less often - engineered, even less often - massive | On solid, engineered board, piece, modular, artistic parquet |
| What kind of base can it be laid on? | On a base prepared according to the installation rules, with or without a substrate. Cannot be installed on joists | Any prepared foundation, including logs |
| How can I lay it? | Floating or glued | For glue, nails or screws |
| Can I install it myself? | Laying parquet is easy; even a non-professional can do it if he follows the instructions. | Laying parquet is difficult and requires special knowledge and experience |
| Are additional materials needed? | For floating installation you need a substrate, for adhesive installation - special parquet glue | You need glue and staples, nails and screws, as well as tools for screwing or driving them |
| Can parquet be reinstalled? | It is possible to disassemble the parquet and reassemble it if it is laid in a floating manner | Cannot be removed and reinstalled |
How to make a tenon pick-up device
When forming tenons on wooden workpieces with a manual router, it is not fixed in any way in space and is brought to the workpiece manually. That is why it is very important that when using a power tool, the workpiece is in a device that can ensure not only its reliable fixation, but also the accuracy of the spikes formed on its surface.
The design of the simplest device that is able to cope with such tasks is:
- several fixed guides (lower, upper, side);
- movable bar, due to which you can adjust the sampling length.
Device No. 1 – for removing the tenon
Such a device is manufactured, the dimensions of the components are selected individually, in the following sequence:
- Along the edges of the plywood sheet, vertical side elements of equal height are fixed, with cutouts made in the central part.
- Guides are installed on the side elements along which the sole of the hand router will move.
- To limit the movement of a hand router along the upper guides, the side strips should be fixed to them.
- On a sheet of plywood, which plays the role of the base of the device, it is necessary to install a movable element, with the help of which the amount of overhang of the edge of the workpiece will be adjusted. For fixation, you can use a regular thumbscrew or any other suitable fastener.
When manufacturing a device of the proposed design, the following points must be taken into account:
- The height of the upper guides should correspond to the sum of the thickness of the workpiece and the small gap required to install the locking wedge.
- The cutouts in the side vertical elements are made of such a width that it takes into account the length of the tenon being formed.
Device No. 2 – for making a groove
You can work using the device of the proposed design with a hand-held milling cutter of almost any modern model, the options of which provide the ability to adjust the cutting speed, feed rate and overhang of the working part of the tool used.
To create a dovetail tenon on the side surface of a beam or board, a device is used that is manufactured as follows.
- A hole is made in a sheet of multi-layer plywood from which the cutting part of the dovetail cutter will protrude.
- A hand router is attached to the bottom of the prepared plywood sheet. To do this, you can use clamps, screws or any other fasteners.
- A 2.5 cm thick board is fixed to the surface of the plywood sheet on which the workpiece being processed will move. It will act as a guide element. This board is a consumable material and is used once with a cutter of a certain diameter.
Device No. 3 – for dovetail milling
Such a device can be installed between two chairs or a more convenient and reliable design can be used to place it.
Remember
1. Tenon and groove are grooves and grooves along the perimeter of the boards. To fix them to the floor you will need glue and nails or screws.
2. The lock has a more complex profile and locks the boards without additional materials. Can be installed floating.
3. Pay attention to the ends - it’s good if they don’t need to be inserted into each other, but just press and snap into place.
4. When choosing parquet, think about the installation budget, the type of base and your plans for the future: this determines what type of parquet and with what lock will suit you.
Basic information
Roof sheathing: what is it and how to do it correctly?
One of the most proven methods of connecting two parts is considered to be a tongue-and-groove connection. This method of fastening wood products is the most widespread. It is used to fasten parts of window frames, doorways, various furniture elements, and the walls of wooden boxes. Each element of such products has a specially made tenon (or several pieces) or a groove (several grooves).
The types of main connections of parts made of wood are defined in GOST 9330-76. This document defines the following characteristics of such fastening of wooden parts:
- rules for abbreviation (abbreviation) of various compounds;
- drawings showing the appearance;
- permissible dimensions of each element;
- the procedure and rules for determining the size of each element;
- expressions for calculating the dimensions of the required cutting tool;
- formula for calculating the strength of assembled elements;
- inspection procedure and strength testing.
GOST 9330-76 Basic connections of parts made of wood and wood materials. Types and sizes
1 file 285.82 KB
According to this standard, all connections are divided into the following categories:
- corner (end and middle);
- box (mainly belongs to the corner category);
- along the edge;
- the so-called “on the mustache” length.
For each of these categories, the standard has its own abbreviation (short designation). This marking consists of two capital letters of the Cyrillic alphabet and one number. For example, UK-2 means that we are talking about a connection with a double open end-to-end tenon, UK-9 is a “mental” connection with a plug-in non-through round tenon. The entire list is set out in more detail in the text of the adopted standard.
Any type is accompanied by a detailed drawing. Each of them shows frontal and profile projections indicating dimensions, formulas for calculating each element, and finished results. To obtain a strong connection, the standard defines tolerances that must be observed in the manufacture of each element. The parameters of the corner tenon (its length, pitch and bluntness) are given in detail. Based on the results presented, the guest developed recommendations for choosing the necessary cutting tools. Separate references are made to other documents (standards) that determine by what means each of the listed products must be secured.
Types of finger joints
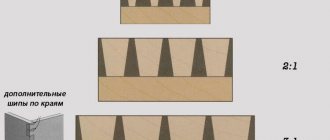
Today, a wide variety of such methods for fastening wooden parts has been developed. All types of tenon joints are classified according to the following criteria:
- number of spines;
- their form;
- eye depth (through or not);
According to the first sign, tenon joints are: single, double, multiple. It determines the number of fasteners produced. The main forms of the spike are:
- rectangular (has different lengths, pitch and apex angle);
- round;
- triangular;
- so-called “dovetail” (one-sided or two-sided);
- gear (with different angles of inclination);
- angular.
The choice of shape and size depends on the material used and the level of load that the entire structure must withstand. A tenon joint with many rectangular tenons has become widespread. Its main advantage is considered to be ease of manufacture and the ability to use it for any wood.
Hazardous factors
Milling machines require complete safety and high qualifications of the worker. When using electric machines, accidents may occur due to material ejected during milling. Therefore, the performer of the work must have special work clothes.
If heavy dust is generated during the milling process, you must wear safety glasses. Maximum safety in this situation is provided by special clamps and vices that effectively hold the workpiece, preventing it from being thrown out. Do not hold the workpiece in the rotation zone of the cutter with your hands or directly touch the rotating tool. It is necessary to use special clamping devices to advance the part during milling.
Originally posted 2018-07-04 07:37:46.