It's no secret that an ax is an indispensable carpentry tool. In addition, the ax is especially useful in the household: from chopping wood to home repairs.
This article examines issues related to the manufacture of a taiga-type axe, because finding such a useful tool on the market is quite difficult, and it will cost a lot. The article provides additional useful information that will tell you which ax is best to choose for certain needs.
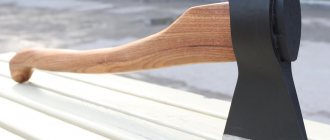
“Planting” the ax on the handle
This process can be done, for example, in this way:
- The top of the ax is adjusted in accordance with the eye. Unnecessary wood should be removed with a knife.
- The ax handle should be placed horizontally on a flat, hard surface, and the ax should be placed on top. On the handle you need to mark with a pencil the place to which it needs to be inserted. Having divided the segment in two, you should put a second mark.
- Use a vice to clamp the ax handle so that the wider end is positioned upward. Use a hacksaw to cut to the 2nd mark directly under the wedge.
- The wedge can be from a store, or it can also be made from wood by hand. Its thickness can be 5-10 mm, the length is the same as the depth of the cut, and the width is equal to the eye of an ax.
- You need to put a board on the table, and put an ax on it, upside down. The ax should be put on the ax handle, tapping it on the board. Next, you should turn it over and tap it with the handle while inserting it. This should be turned over and tapped several times in a row. As a result, the ax handle should fit into the eyelet.
- After this, the ax handle must be placed vertically, and a wedge must be inserted into the cut and hammered in with a mallet.
- Oil should be applied to the ax handle, the excess will drain off, and the tool will be left to dry. After everything, use a rag to wipe the ax and handle.
In addition, you can watch a video on how to make an ax, with the help of which the essence of making the tool will be clearer to you.
Distinctive features of the taiga type ax
Most people do not see the difference between a taiga and an ordinary ax at all. So what are the differences between these two types of axes?
- The length of the roundness of the blade means that the taiga ax is lighter in weight;
- A long beard provides additional protection against deformation and breaking. Typically absorbs up to 60% of impact force;
- Special sharpening - allows you to use the ax as a standard cleaver, when choosing the right blow. In this case, the leading edge of the blade is twice as wide as the rear. The edge of a regular ax has the same thickness;
- A special angle of inclination of the ax reduces hand fatigue and increases the overall efficiency during work.
Important nuances
The strength and durability of the ax is determined by the resistance of the wood to dynamic shock loads. The reasons for premature breakage of the handle look like this:
- the use of soft wood reduces the service life of the ax by almost 2 times;
- poor drying - the blade landing site begins to become soaked;
- low density of the ax head - the blade walks along the surface, eventually breaking the handle.
It should be clarified that a properly made handle can last for several years without requiring repairs.
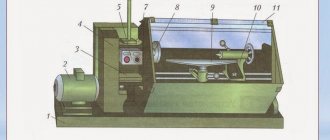
Making a taiga ax head
It is worth purchasing an ordinary carpenter's ax, the head of which will weigh 1400-1500 grams.
From the front we cut off the protrusion of the blade flush with the butt. We form the roundness of the back of the blade - the grinder will help us with this. It is necessary to cut off all the metal so that there are no corners left.
We move on to the inside of the blade - carefully cut out a semicircle, which is necessary for a more comfortable grip. In addition, this manipulation can significantly reduce the weight of the head. To further reduce the weight and increase the maneuverability of the ax, it is necessary to saw off the upper corners of the butt.
Sharpening is done using an emery machine. For best results, install a large circle with medium grain. In addition, sharpening should be done on both sides.
Adviсe
The ax handle should be made so that it does not slip in your hands. That is why it is not recommended to lubricate this part with paints and varnishes or use any special linings. They can lead to the instrument simply slipping out of your hands at a crucial moment.
The material you use to make the blade should not have any damage, dents or strange nicks. Brand new ready-made elements can shine like a spinner. Make sure that there are no distortions on such objects.
The types of wood that can be used to make a good handle are acceptable. But it should be borne in mind that not every natural material is suitable for the manufacture of this part. The wood should be thoroughly dried before being used.
The wooden blank for the handle will need to be dried in a dark place. It is advisable to store it for at least a year, and better yet for five years, before using it to make such tools. Only in this case can you be sure that the ax handle will not change its size over time.
Impregnate the wooden handle with special products that will make it resistant to dampness and moisture. Flaxseed oil or good old drying oil is ideal. It is advisable to apply the selected impregnation in several layers.
Sharpening an ax must be done correctly. For example, when using a sharpening wheel, you will need to hold the butt at a slight angle of 45 degrees. Movements should be calm and smooth. No need to jerk.
Do not neglect drawing up a drawing of the future structure. Many beginners skip this important stage, considering it not the most important. In the future, such people face a lot of problems and inconveniences. It is better to prepare all the necessary templates and diagrams in advance. Having them on hand, making an ax with your own hands will not be difficult.
When purchasing a ready-made cutting part for an ax, it is very important to pay attention to its markings. Its presence will indicate that the element complies with the necessary GOST standards. Items with suitable markings are listed above
Items with suitable markings are listed above
The blade should also have an eyelet for installing the handle. It usually has a cone-shaped structure
Items with appropriate markings are listed above. The blade should also have an eyelet for installing the handle. Usually it has a cone-shaped structure.
How to make an ax with your own hands, see the video below.
An ax is an important item in the everyday life of a skilled craftsman. Axes can be solid-forged, made of metal and a shaft, and axes are also made from reinforcement. Below you will find 8 photos of ideas for ax models made from rebar that you can make with your own hands.
The photo shows what kind of bends an ax made of reinforcement should have.
The red-hot reinforcement will gradually turn into a blade.
Another type of ax made of reinforcement.
An ax made of reinforcement, ready for battle.
The ax is at the machine, almost ready.
An ax made from a piece of rebar.
An ax made of reinforcement with a bandaged handle.
Making an ax handle for a taiga ax
It is worth noting that choosing the right wood is the key to success in making a high-quality taiga ax. Ideal options would be maple and ash. Simpler options are birch and pine. The latter is perfectly polished and sharpened, but is extremely unreliable due to its fragility.
Below are the instructions:
Selection of lumps - without knots or defects. Processing and drying - the tree is cleared of bark and split in the middle. Wood should be dried at +25°, with a humidity level of 15%. Aging lasts two months.
Creating a mold - we will need a hatchet or a large knife to remove the main wood. In addition, do not forget about a chisel and a small hammer - these tools will be needed for smaller jobs.
How to mount an ax? You should use gauze and epoxy resin. After three days, the taiga ax will be ready for use.
The last step is sanding and varnishing. The ax will become not only useful, but also beautiful, like in the photo from the advertising catalogue!
Preparing material for the handle
A block of one-year-old wood is hewn parallel to the grain. The blank for the handle should be longer than the template. We make the place that is inserted into the eyelet wider than the main part.
We outline the attached drawing on both sides, and do not forget to leave allowances. After inserting the upper part into the eyelet, we remove the excess wood.
DIY ax
Any ax can be made at home. By following simple rules, you can make simple, hunting, taiga, tourist, throwing or decorative hatchets, tools from car springs with your own hands.
You can also modify an old tool or completely remake it, creating a new and easy-to-use axe.
From a spring
A small tool is made from a spring from a car with your own hands. It can become either a working object or an original decorative item, similar to a Viking axe. Whatever you have in mind, it can be easily accomplished if you follow all the steps consistently. Just select the option you want, watch the video and get started.
A tool made from strong and durable materials will last a long time. You can do this by following these tips:
- Take a used car spring (width - 10 cm, length - approximately 40 cm), using a previously prepared template with a marker, draw the contours of an ax on its surface.
- Cut the product along the contour with a grinder, then sand the workpiece well to give it the appropriate shape.
- An ax handle can be a leg from an old chair. For fastening, make several holes in the spring.
- Saw off any excess from the leg, then saw it in half. Drill 3 notches in both halves. Then assemble the handle, secure it with screws and bolts, and then grind it using the machine.
- Sharpen your blade.
From reinforcement
The reinforcement is very strong and durable; splitting axes are made from it. These hatchets will be useful to you at the dacha, during camping and other conditions. They are well suited for chopping wood. You will make a durable ax from reliable material, and it will serve you for many years. Mark the parameters on paper. Please include all measurements as they may vary. The handle of a hatchet can be large, medium or small, like its blade. How to make a hatchet with your own hands from rebar:
- Take 2 reinforcement bars (length 50 cm) and blanks (8 pieces) from which the upper and lower squares will be made.
- Use a welding machine to weld a couple of squares, and then the posts.
- It is better to make the blade from steel up to 10 mm thick. Weld it to the fittings too.
- Sharpen your blade.
From a circular saw
It is possible to make an ax with your own hands from a circular saw. A durable and strong tool is made from a carved disk. In this case, the disk will not need to be pre-hardened, since it has already been hardened.
A product made from a circular saw will be very reliable. A hatchet from this tool is made as follows:
- Sketch the product, then cut out the finished template. It needs to be placed on the cutting disc.
- Use an impeller to cut along the contour of the template.
- Heat the part with a torch, then drill holes.
- Wipe the ax thoroughly with sandpaper.
- Make a handle from wood. Apply glue to both halves of the handle, then secure the 2 screws.
- Sand the handle, then coat its surface with varnish.
From stone
A durable and reliable ax is made from natural stone. Such raw materials will produce durable blades. Just keep in mind that such work will be labor-intensive and time-consuming. But the result is worth it, because the ax will serve you for a long time. These types of stones are suitable: granite, quartzite and sandstone. The best solution for such a tool is an oak handle. Oak products are more reliable and wear-resistant. A workpiece made of smooth wood, without bulges or knots, is suitable.
Making an ax handle is simple: cut the wood, use a template to give it a shape that will be comfortable to hold in your hands. Sand the stone so that the material can fit as closely as possible to the end of the handle and is well fixed to it. There is no need to use special machines and other equipment. It is enough to remove the surface layer from the surface of the stone. The handle cannot be made from raw wood: when it dries, it will decrease in size. Because of this, you will not be able to use the axe.
Read with this
- Do-it-yourself ax sharpening
- DIY Viking ax
- Features and Benefits of Kitchen Ax for Chopping Meat
- Tourist axe: main characteristics
- Devices for cutting bottles: how to quickly and easily cut plastic tapes from bottles (100 photos and videos)
- Tomahawk ax: types and photos
- Types of huts made of branches and their construction
- 9 ways to make a hammock with your own hands
- How to make a wooden sled with your own hands
- DIY goblin costume