Among woodworking machines, there are those whose purpose at first glance is the same. And it may be difficult for a non-professional to understand all the nuances, as a result of which the wrong device will be purchased. Such machines with similar functions can be called jointers and surface planers. Both of these devices are designed to level wooden surfaces. However, there are still differences. And if you don’t know what you need – a jointer or a surface planer, then this article is for you.
What is a jointer and jointer
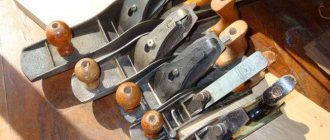
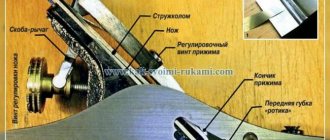
Now, in the age of technology, if you type the word “jointer” into a search, you will see all kinds of jointing machines. However, originally a jointer was a hand tool designed for leveling wooden surfaces. It is an elongated plane with a double blade. When processing a wooden product with this tool, you should monitor the chips. When it becomes continuous, then you can understand that the work of leveling is nearing completion.
Such an instrument can still be purchased today. If you have a small amount of work and a lot of time, a simple hand jointer will be enough for you.
A jointing machine is most often a fairly large device with a lower knife shaft to which two or four knives are attached. In other words, the surface to be leveled should be located below. When the shaft rotates, irregularities are carefully cut off with knives.
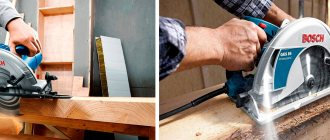
Electric hand tool
For simple operations on processing short boards, hand tools with an electric drive are used. To trim the surface, a lot of force is required, so an electric motor was added and the design was slightly improved. Because of this innovation, its performance characteristics have improved:
- the mass has become larger, the pressing force has increased;
- processing has become more accurate;
- work has accelerated;
- Replacement nozzles have appeared in the kit sold.
Read also: How to connect an LED strip to a 220 switch
What is a jointer used for?
The boards and timber that come out of sawmills can be called rough lumber. There are irregularities, knots and resin pockets left on them. During their storage, temperature and humidity change, which is why the board may “lead” a little. If you are building a shed or temporary structure, then this is not so scary. It’s a different matter if the lumber will be used to make parquet, for interior decoration of a house, for furniture or to build a permanent structure. For example, a gazebo or a summer kitchen. In these cases, everything must be neat and beautiful, therefore, the boards and beams must be leveled before starting work.
Advantages of a jointer
- The described machine can process workpieces of any size - both large and small.
- At the end you will get a flat and smooth surface.
- You can chamfer and plan curved parts.
- Depending on the power and number of attachments, you can choose a machine of both medium and high price categories.
- Among professional machines there are multifunctional options. For example, a planer-sawing machine, or a planer-thicknesser machine.
How to operate a jointer
Most modern woodworking tools are quite easy to use. And the jointer is no exception. The main thing is to understand the principle of operation, follow the operating technology and, of course, follow safety precautions.
- The work table of a jointing machine consists of two parts. The back of this table always remains level with the knives, in other words, it is stationary. Before starting work, the front part should be installed slightly lower than the rear part.
- The part must be fed onto the knives from the front, towards the rotating knives. The knives remove a thin layer of wood, removing all irregularities on the surface.
- If everything is done correctly, the thickness of the removed layer will be equal to the difference between the levels of the front and back of the desktop.
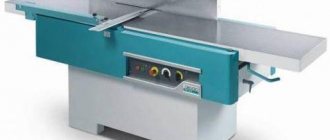
What is a thickness planer
In order to make blanks of the same thickness with maximum accuracy, thicknessing machines are used. The knife shaft in this device is located not at the bottom, but at the top. The workpiece is fed across the work table either manually, or it is fed onto the knives using special rollers.
The described machine levels the top of the board, making it parallel to the bottom. It follows from this that in order for the workpieces to be even and of the same thickness, they must first be leveled from the bottom side on a jointer. After this, you can level it from the top side using a surface planer.
There are both small, low-power models suitable for the home workshop, as well as complex, multifunctional and powerful industrial machines. The latter are often multifunctional. For example, there are planer-thicknesser machines on which you can level both sides of lumber and adjust all the parts to the desired thickness.
Let's take a closer look
Let's look at the example of a board that needs to be leveled on four sides. A simple groove-type cutter will be needed, ideally the wider, the fewer passes will be created for leveling. On the other hand, the narrower it is, the deeper the immersion into the wood will be, which makes it possible to remove more material in one go.
Note: If you need to remove a little wood, take a wide cutter, and if there is a lot, then use it already.
These methods can be combined
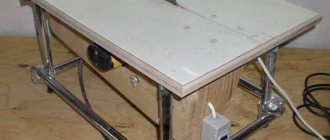
The workpiece is placed on a vertical surface. Now you need to make sure that the workpiece is motionless. This can be done using wood chips or thin pieces of wood. The main thing is that she is immobilized in a vertical position.
Afterwards we will need rails, instead of which we will use a profile pipe.
We will need: two rails of the same size, a device along which we plan to move the hand router. We will use the simplest cutter.
Processing with our device will not be a bit inferior to a jointer and surface planer, only it will take more time.
First, the rails are attached to the tabletop using a clamp. The rails must be pressed as tightly as possible.
The square pipe used as rails is made slightly smaller in size
Note: There must be a spacer between the rail and our material so that during operation the metal does not cling to the cutter.
Next you will need to fix the rails using clamps.
After everything is securely fixed, a certain device will be needed that will stand on the rails, along which the part will move up and down and select the tree.
Important: The workpiece is well secured so that there is no movement during milling.
The last device on which the cutter will move. Why do we take 4 pieces of square pipe and fasten them together. We screw the slats on the sides. Next, install the device on the pipe rails.
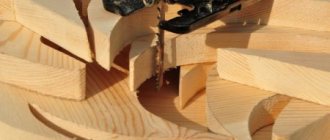
Let's start milling. If there is a need to plan a lot of wood, then it is better to do it in stages. If everything is prepared, we decide on the depth at which milling will take place. We now move on to direct milling, for which the cutter is driven along the surface of the workpiece.
Important: The work must be done very carefully so that the cutter does not touch the rails. This completes the jointer's work.
During cooking, the boundaries of the cut of wood fibers with a milling cutter will be visible. These areas are sanded to create a perfect surface.
Afterwards the router will work for the surface planer
First you need to thoroughly clean the countertop.
Now we take the leveled surface of our workpiece as a base. We don’t put anything under it now; the workpiece should lie on a flat horizontal surface. It only needs to be secured horizontally.
Now you can remove the required amount of wood. During the process, we measure and remove all excess from the reverse side.
Now we have a base and a reverse side parallel to it. Using a milling cutter, we completed the work of the jointer and planer.
What is a thickness planer used for?
As mentioned earlier, a thickness planer is designed for high-precision calibration of wooden products by thickness. We are talking not only about lumber, but also about other blanks. For example, about countertops, doors, cabinet doors, parquet boards and so on. And in order to make work as convenient and comfortable as possible, manufacturers provide their devices with a number of advantages.
- Different models have different maximum workpiece dimensions. You can choose according to the width and height of the workpiece, as well as the depth of planing.
- To make it convenient to work with long boards, the work table can have folding parts that extend it.
- For greater safety and speed of work, the supply of workpieces to the knives is made automatic. Of course, there are also more budget models with manual feed.
- The chips are removed by a special built-in turbine.
How to joint boards correctly
Jointing is the treatment of the surface of a wooden workpiece with a jointer of any type.
To work with hand tools, the workpiece is fixed on a workbench. The wood fibers should be located in the direction of movement.
You need to take the jointer with both hands: with your left hand by the handle, with your right hand by the block. For left-handed people the order is opposite. The tool is moved along the surface along the fibers, pressing with its own weight on the device, pushing it forward. At first, the chips will be of different sizes; as the product is ready, they will become long and even in thickness.
The surface is processed layer by layer to avoid height differences and the formation of unnecessary holes.
How to joint with an electric jointer:
- Secure the device to a workbench with a board support.
- Turn on the power and place the board on the blade against the stop.
- Repeat as many times as necessary to get results.
When working with equipment, you must observe safety precautions:
- Keep your hands away from the blade.
- Wear protective clothing.
- Use the clamp holders to move the board. They will protect your fingers from the knife.
To avoid cutting off excess, apply a chalk line to the surface to be treated. The smoothness of its disappearance will indicate the uniformity of the cutting. The line has disappeared, which means the surface has become smooth.
Edge processing is performed in the same way as grinding the main plane. It is enough to turn the workpiece over with the desired side facing the blade and repeat the steps.
How to get by?
If there is no special tool, you can use a regular cutter. The video shows one of the methods of jointing with a router.
For this we need a manual router.
- Measure the distance to the blade on the tool.
- Secure the board to the workbench.
- Attach a metal or flat wooden guide to the board with the workbench so that the distance to the edge coincides with the distance to the blade. You need to leave a small allowance of 2-3 mm for processing.
- Start the router, firmly grasp it with both hands, position it perpendicular to the edge, resting against the guide profile.
- Treat the surface. One pass is enough.
A device for leveling horizontal planes is used according to the same principle. The video demonstrates the horizontal processing technique.
Planer or thicknesser
The differences between these two machines are described above. Now let's try to understand which one will be more necessary for different amounts of work.
For everyday work around the house, of course, you don’t need to buy expensive machines. If you are making something at the dacha as a hobby purely for yourself and your loved ones, a hand jointer may be enough for you. Or a set consisting of a manual jointer and a small low-power thickness planer.
If you are engaged in wood construction, or make furniture and other products for sale, you will need greater precision in your work. Depending on the availability of space in the workshop and financial capabilities, you can purchase both machines, or one that performs both functions.
For more or less continuous production, low-power machines are not suitable - they will not cope with the volume of work. In this case, it is worth taking a closer look at powerful multifunctional devices with high performance. They are not cheap, but they allow you to speed up the production process and, accordingly, pay for their cost.
Electric
Today, a stationary jointer can be manufactured in an electric version. Professional devices are characterized by the following features:
- Quite a large mass and clamping force.
- During operation, high precision can be achieved.
- Increased labor productivity.
- Often the design provides the ability to quickly change knives.
Read also: Should an LED ring?
The electric jointer is used in industry and everyday life; the product is characterized by high performance characteristics. The only drawback in most cases is the high cost, as well as significant energy consumption.