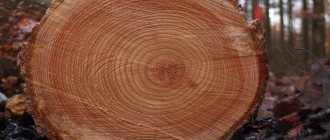
DRYING WOOD. Features of drying lumber from birch wood
Birch wood is a soft hardwood. Birch is a kernel-free species. The wood is white, with a yellowish or reddish tint.
About 70 species of birch grow in Russia, of which two are most widespread and important: silver birch or warty birch,
so named because of the warts on young shoots, and
downy birch
, which gets its name from drooping shoots and leaves. The distribution area of both species is wide, covering 2/3 of the area of all deciduous species in the country.
Of the Far Eastern species, yellow or ribbed birch
, growing in the Amur and Ussuri basins,
black birch
- in Transbaikalia and the Primorsky Territory,
iron birch
- in the Primorsky Territory.
Dark bark birches of Eastern Siberia and the Far East are often called stone birch
.
Silver birch wood is characterized by relatively high strength, hardness, impact strength, but low resistance to decay.
The density and strength of iron birch wood is 1.5 times, and the hardness is 2.5 times higher than silver birch and downy birch.
Wood from other types of stone birch also has higher physical and mechanical properties. Iron birch wood is used in mechanical engineering.
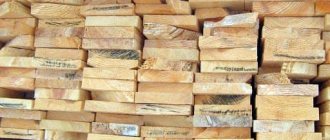
Birch wood lumber undergoes minimal transverse warping
.
However, when drying birch boards, there is a tear in the ends of the boards
, running along the core in the direction of their length. Such gaps are explained by increased longitudinal shrinkage of wood in the peripheral zone of the trunk compared to shrinkage in the core zone of the tree trunk. Therefore, before drying, it is necessary to take measures to protect the ends of the boards.
The average humidity in the freshly cut state of silver and downy birch is 78%, and that of yellow birch is 68%.
DRYING WOOD. Birch drying modes can be characterized by the following features:
- A constant
or with slight deviations temperature
Tm
during the entire process
of drying wood
according to the wet thermometer of a psychrometer. - As the thickness and density of the dried wood increases,
softer drying modes
are used (the temperature Tm decreases and, accordingly, the psychrometric difference in air temperature ΔT decreases). - To dry export lumber
, in which melting of resin, loss of knots and change in natural color (yellowing of birch wood from heating) are not allowed, low-temperature conditions are used with
Тм up to 45ºС
and
ΔТ up to 15ºС
. - The duration of drying
lumber from birch wood depends on the selected drying mode, which in turn depends on the density and thickness of the wood being dried. The denser the birch wood, the longer it will take to dry.
For example,
The drying time for lumber with a thickness of
32 mm of soft birch wood
(for example, silver birch or downy birch) from 60% to 8% is approximately
5.5 days.
at drying temperatures up to 70ºС.
For denser wood
birch (for example, stone birch) it is necessary to use soft drying modes with a temperature not higher than (50...55)ºС.
The drying time for lumber with a thickness of 32 mm
, such as birch wood from 60% to 8%, can reach
12 days.
What you need to know
Wood specialists share their experience and tell you what is useful to know in matters of preparing and storing firewood.
Of great importance is:
- type of wood - hard woods contain more water than soft ones; poplar and birch have much less moisture than beech and oak, although the latter, due to their high density, burn longer and give off more heat;
- cutting time - in spring, summer and autumn there is a lot of natural moisture in the tree, which it needs for growth, so the optimal cutting season is winter;
- it is better to strip the trunk of the bark so that it dries faster and eliminates mold and bugs;
- the denser the wood, the longer it will take to dry it;
- When purchasing chopped firewood, check the conditions and period of previous storage.
By the way! If there is no special device to measure the moisture content of wood, you can apply the principle from the traffic rules - if you don’t know what road you are on, always think that you are on a secondary road, i.e. think that the tree has just been cut down.
Whether it is worth suffering all winter with firewood that burns extremely poorly and inefficiently is up to the stove owner to decide. In fact, the problem can be solved quickly - stack the woodpile correctly and leave it until next year! The wood will dry out on its own and the moisture level will drop to an acceptable percentage. Everything ingenious is simple!
How to dry birch?
One of the most exciting issues for any woodworker concerns drying birch.
This tree species can figuratively be called universal, since logs and finished lumber from birch are dried in the same way as any other wood, which we will discuss in detail in this article.
Before you start drying birch, it is important to block the pores at the ends of the workpieces and on their cross sections.
Wood processors cover the ends and cuts with paint or glue (in particular, PVA). If these actions are neglected, the ends and cross sections of birch blanks will dry out quite quickly than the main parts of the blanks.
When a birch dries, it shrinks unevenly, decreases in size in some places more and more quickly, and in other places practically does not change its basic dimensions.
As a result of this unfavorable uneven drying of the wood, a certain tension is formed in it, which, so to speak, is released and breaks the fibers of the material, forming cracks.
The next condition when drying birch is to eliminate the possibility of any drafts affecting the uneven drying of the tree (it dries exclusively from the side that is affected by the draft)
Drying oak, pine and birch
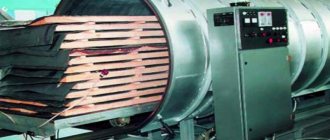
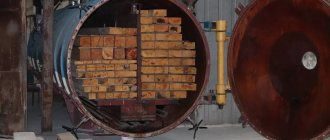
We have repeatedly talked about the fact that all lumber goes through the mysterious drying process. Drying wood is a necessary stage that affects the further quality of production. In drying chambers, the strength of lumber increases, shrinkage decreases, and weight decreases. Subsequently, lumber that has passed the drying stage is much easier to process.
Unfortunately, many enterprises in the Russian woodworking industry cannot boast of high-tech solutions in the field of drying and the use of modern production technologies; convective drying chambers are assembled on their own and turn into a “hand-made” device with a very long drying process and a low-quality output product.
If the wood drying process is not streamlined, this will certainly lead to defects that will negatively affect the cost and quality of the product, as well as increase drying costs, which will become additional difficulties for the owner. In this material we would like to talk about the nuances of drying wood of the most common species in Russia.
Drying oak wood
Oak wood is used in the construction of log houses and in craft workshops that produce premium furniture. Oak wood is a very durable material that is “hard to spoil,” but before starting processing you should consider what tasks it will be used for in the future.
If you buy something through a link in our posts, we may receive a small share of the sale.
Wood workers, wood carvers, furniture makers and home improvement enthusiasts often take on the task of drying wood slices. Although it is not a very difficult or complex task, a specific process must be followed to achieve the most effective results. If you're looking for how to dry strips of wood, we've put together four of the best methods for doing so.
How to dry wood slices and discs
Before you get started, we recommend purchasing a moisture meter from your local hardware store or online. A moisture meter is relatively inexpensive and will allow you to directly read the moisture content (percentage) in seconds.
This will help you know how long you need to use these methods to dry your wood slices.
Process and technique
The easiest and least expensive way to dry cut wood discs is to leave the wood at a certain moisture level. This allows you to achieve the desired level of drying. However, there are several factors to consider.
The time it takes for wood disks and slices to dry largely depends on the type of wood, the moisture level when you left it to dry, the thickness of the wood and the processing techniques used. will be used.
The most important thing to remember when drying wood this way is that you cannot rush the process. If you do this slowly, you will reduce the chance of the wood cracking or splitting. This is why the standard technique used to dry wood is to seal the end grain and then leave the piece of wood to dry.
End grain preparation
Compaction of the end grain slows down the drying process, which is very important when drying wood. You can use a commercial product such as Anchorseal to seal the end of the fibers.
If you don't want to do this, you can also use melted wax. No need to worry about the type or quality of wax. You can use any wax.
Some people make the mistake of using latex paint, but we generally don't recommend it. Latex paint is quite porous and is unlikely to work effectively as a sealant.
You can use oil-based varnish or enamel paint as they act effectively as water barriers. The thicker the wool, the better it dries in most cases. In fact, for best results, it would be a good idea to seal the end grain tightly.
You might also consider adding a good paintable wood putty if the wood needs a little help.
How to dry wood slices in the oven
When discussing drying wood in the oven, we will consider three options:
- Microwave
- Toaster oven
- Conventional oven
No No matter which method you choose, you will need a special oven for this drying process. So we've outlined these three methods so you can determine which one is best, based in part on what you have.
Using a microwave oven
If it's a really small piece of wood, you can quickly dry it in the microwave. If this is something you do regularly, there is nothing wrong with purchasing a used microwave.
Use this microwave oven for this purpose only. However, quick drying this way is only suitable for small items.
Using a toaster oven
You can also use a small firewood toaster or a regular oven. The only problem with a regular oven is that you won't want to use the same oven for cooking if you used it to dry your wood.
Extractives may be minor components and usually constitute less than 10% of the wood. But when you heat wood, its physical properties change and it releases certain chemicals that can be harmful.
These extracts can turn into harmful compounds when you use the same oven to cook food. Not only will your food take on a certain flavor, but the compounds can be harmful to your body.
If you can get a used oven (microwave, toaster, or regular oven), you can effectively use it to dry wooden discs.
Using a conventional oven
Even if you use a regular oven to dry the wood slices, you should do it slowly. You can fire wood roast for more than 24 hours to get effective results. This depends on the type of wood and humidity level. Ideally, you should aim for at least 24 hours.
Working with thermostats
One problem you may see with ovens (both conventional and toaster ovens) is inaccurate thermostats. Ovens often cannot maintain temperature. Even high-quality brands can report inaccurate temperature readings.
Simply put, you can't always rely on oven thermostats. This could have a negative impact on your wood drying project.
You can use a radiator inside the oven to ensure that the area remains heated to a certain level. Microwave cooking may be a good idea. For small wooden discs and slices, you only need to heat the wood for 10-20 seconds and then repeat the exercise after 2 minutes.
Preventing a split
Splitting is a natural drying effect. When a piece of wood dries out, the cells break down and dry out, causing the wood to split. There are several techniques that can be used to minimize the risk of splitting:
- Any wood pieces left outside should be brought to room temperature.
- You can use a wood stabilizer to prevent the wood from cracking and splitting during the drying process. This technique is often used by woodworkers, furniture makers and wood carvers.
- An added benefit of wood stabilizing solution is that it also makes the wood look cleaner and brighter.
- Apply wood stabilizing solution once the wood is brought to room temperature.
- Always allow the wood to dry evenly and ensure that the piece of wood is open to air on all sides.
- Take your time drying. This minimizes the risk of damage to wooden discs. Do not add any additional heat or air movement. For small items, quick drying is suitable. But if you do this with larger pieces, you risk splitting and damaging the wood.
Wood stacking
If you are not going to use the oven to dry the discs and cut wood, then you will be relying on time to slowly dry the wood for you.
In this case, you can speed up the drying process and even out the results by stacking the wood correctly. The trick here is to allow air to flow in and around each piece of wood. The more air you give, the faster the wood will dry.
You can achieve this by placing gaps horizontally between layers of wood and leaving space between each piece of wood. Place it in a well-ventilated area to increase air flow and reduce drying time.
But it works best indoors, where the tree is protected from rain. At the very least, if you don't have indoor space, place it outside under a cover. The covering of the wood prevents air from being able to pass through it.
When storing indoors, ventilating the room with a fan will also help increase air flow, reducing drying time.
Conclusion
If you want to know how to dry wood strips, you can follow the methods described above. Drying wood is not a difficult task, but you must take care of the timing and temperature.
Whether you decide to let the wood dry at room temperature or use the oven, you need to follow some basic principles. These include being patient throughout the drying process and not rushing it, as this can damage your wood disks.
The drying process also depends on the type of wood and the level of drying required. In most cases, it is best to manage the process slowly and systematically.
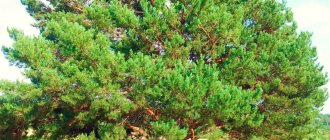
How to dry pine
In industry, pine is dried in two ways: in a special chamber and in the fresh air in the shade. In the second case, the main disadvantage is the rather long drying time.
However, you still have to dry lumber at home, so this process is carried out in a natural way.
To do this, you first need to prepare a flat surface and always under a canopy or in the shade under thick tree branches through which the sun's rays do not pass.
Interesting video: DIY pine drying chamber
This area must be covered with any waterproofing material. A garage or other room with insufficient fresh air will not be suitable.
Modern production rejects this drying method and chooses special chambers.
Here the wood is first well heated, then dried, and then subjected to final heat treatment. The pine is dried to standard humidity, which is 12%.
If the humidity in the environment increases, the wood begins to absorb it.
What is needed for the process
In addition to the lumber itself, it is necessary to have a number of items in order for drying the boards at home to be done efficiently:
| Elements for rearranging | Most often, a wooden block 20-30 mm thick is used for these purposes; sometimes plastic elements are used. It is not recommended to use metal products, as they begin to rust under the influence of humidity and brown stripes may remain on the surface, which is undesirable. It is important that all the items you use are the same size, this will allow you to lay out the material evenly |
| Waterproofing for soil | It is not necessary to purchase new roofing felt or film; used materials are also suitable. It is important that the ground on which the stack will be located is closed, this will prevent the ingress of moisture, which is constantly released from the soil |
| Covering material | Drying boards with your own hands is impossible unless you cover the stacks. For this, metal or plastic sheets, slate or moisture-resistant plywood are used. It is important that the elements used have a certain rigidity, this will allow them not to touch the surface of the wood and ensure an optimal microclimate |
| Log or timber | Any specialist, in response to the question of how to properly dry boards at home, will recommend erecting a canopy; it is this simple design that will provide the best conditions for the process. For its construction, you can use a block or log, and used slate is also suitable for the roof; the price of the structure will be low. But the benefits from it will be enormous |
Advice! As you know, moisture escapes through the ends the fastest, which can cause cracking of elements; to prevent such excesses, it is necessary to treat them with a mixture of lime and wood glue; this will balance the drying over the entire area, and much less cracks will form.
How to dry spruce
Drying spruce in a chamber is the main method of drying lumber of this type of wood, although the owners do it in a natural way.
Fast and high-quality drying requires the availability of the necessary equipment. Only in the chamber can you regulate humidity, air circulation and temperature.
Drying on the street can only serve as a preliminary drying of boards, logs and other lumber that are stacked.
Interesting! How much wood will there be in a cubic meter? HERE!
In this case, dry wooden spacers must be placed between the rows. The formation of stacks is carried out from lumber of the same species. In addition, the size of the boards should be the same.
The correctness of their installation is checked using the template method.
The boards are laid out depending on the direction of the air flow. Pre-stacks are formed on a pre-prepared site. This happens next to the drying chamber.
If the boards are laid manually, it means that vertical lifts are used, which significantly increases productivity.
How to dry cedar
When drying cedar wood, be sure to follow a gentle regime. This is due to the fact that cedar can crack. If you dry this type of wood under a canopy, the percentage of defects will be reduced to a minimum.
Before drying cedar, the ends of the boards or logs are coated with paint or lime. This reduces the likelihood of cracks occurring. And although this lumber is quite strong, it still remains soft and flexible.
Due to its high resistance to moisture, cedar is successfully used in the production of external carved elements.
Drying of cedar boards is carried out at a given temperature (25ºC) and the required humidity concentration (18%).
This concept includes the alternation of temperature and humidity processes that act on lumber. The temperature rises gradually, and the humidity, on the contrary, decreases.
The drying modes are set by the master, taking into account not only the type of wood, but also the thickness of the boards, their quality category, the required final humidity and the type of chamber.
How to dry larch
Coniferous wood is dried at a temperature of 25ºC. This regime can only be maintained in a chamber, but under a canopy, drying the larch can continue for quite a long time.
At woodworking plants, the drying process is automated, so everything takes place in the same time interval. Today there are highly specialized enterprises that work with a specific type of wood, for example larch.
Subsequent storage
After the drying process is completed, only completely cooled wooden pieces are removed from the drying chamber. This process cannot be accelerated artificially; it must take place naturally. Next, you need to take the necessary measures to preserve the lumber, which will provide it with a certain level of humidity. Good results can be achieved if a number of requirements are observed when storing wood.
For example, in the case when it is necessary to preserve a beam or a standard board, then small gaps need to be made between the rows of these lumber, which will promote free air circulation and prevent the appearance of fungal or mold spores on the wood. For long-term storage of dried lumber, it is necessary to remove the bark from the workpieces. They do this for the reason that the bark may contain insect pests that feed on the wood and spoil its appearance.
In addition, during storage, lumber must be protected from exposure to precipitation and sudden changes in temperature.
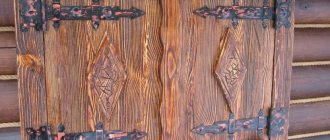
Drying birch
Wood is the most popular building material and is actively used for the construction of structures with various parameters. These can be gazebos, entire buildings, terraces, doors, furniture elements, etc. But how to dry it properly so that the finished product lasts a long time. Difficulties are caused by such a species as birch. It is very important to dry or buy high-quality dried lumber. But not all types of wood can be quickly dried to 6-8%. For example, birch, of which there are almost 10 varieties in Russia alone, is a very dense tree in structure. Because of this, a large amount of moisture remains in it.
Technologies for proper drying of wood
Drying wood is an important stage of preparatory work before further processing. As a result of drying, excess moisture is removed from the wood. This is necessary so that the wood materials become more durable and do not change shape after construction. In addition, dried wood is not susceptible to cracking and rotting. Thus, the process of drying wood allows us to obtain wood products of the highest quality.
There are a lot of methods for drying wood, but they all have the same goal - to obtain the most reliable material with good physical properties.
Need for drying
Wood blanks in the form of logs have a high degree of moisture, so they will need to go through a cycle called wood drying. The moisture contained in the workpieces can gradually decrease naturally, but this will take a long time and will lead to a chaotic phenomenon of compression and expansion within the wood fibers. For this reason, drying of workpieces is carried out under strict control and under certain conditions.
Damp and undried wood structure has a tendency to rot, crack and bend. To avoid such unfavorable phenomena, various methods are used to bring wood to condition, with specified humidity level parameters. Drying conditions and cycle duration directly depend on the method of removing excess moisture.
Each wood drying method has its own properties, having both advantages and disadvantages.