Inlay is the art of decorating created products. The plates of material with which the pattern is set are cut into the base material. They differ in texture and color. After cutting, the surface of the product will be smooth.
The most ancient art originally appeared in the East. Later it acquired new uses in Ancient Greece and Rome. It reached a high level of skill in the 11th-13th centuries. thanks to Italian architects. Their white stone buildings were decorated with rich ornaments.
In Rus' in the 9th-10th centuries. artisans mastered the art of inlaying steel.
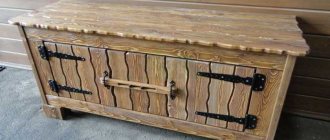
Finished work
basic information
Inlay is one of the types of mosaics, when patterns from plates of another material, mainly precious metals, are applied to a wooden base using the cutting method. The name comes from the old word "incrustatio", which means "covering".
During this work, the inserts should be flush with the entire surface of the object. A variety of materials are used for coating : metals, expensive stones, marble products, ceramics, wood and mother-of-pearl.
Inlaying is an art that has been popular since ancient times and is still developing beautifully.
The essence of technology
Traditionally, marquetry is made of wood. The concept itself has French roots and is translated as markings or markings. The Italian name for decorative compositions made from the thinnest sheets of wood veneer is intarsia. Additionally, in addition to veneer, other materials are used: mother-of-pearl, small plates of bone, various precious and semi-precious stones, and so on.
This method of covering furniture came into fashion only in the 17th century, becoming one of the most beautiful finishing options. Until now, furniture makers have not invented a better way to refine surfaces. For many years, the technology and manufacturing technology have not changed. Marketing specialists are very popular - this is a rare, highly paid specialty that requires great perseverance. Such artists can lay out entire portraits, paintings, patterns from small pieces of wood veneer, everything is assembled entirely by hand.
Veneer inlay is done as follows: small pieces of wood veneer of various species are glued onto a surface made of wood or any other materials. These pieces can come in different shapes and colors. Fragments may differ from each other in factors such as texture and shade. The finished composition looks extremely impressive, the product turns out to be original and unique.
Many wood species are used to create marquetry. This is how different designs and colors are obtained, the veneer is periodically etched, and colors appear that cannot be found in nature. “Green tree” is created from light maple, soaking it in iron or copper sulfate for 24 hours. Black or gray colors are created by soaking walnut or pear veneer along with old rusty iron nails.
Etching allows you to achieve uniform staining of the veneer to its entire depth. Another method of coloring is water-based stains, but they only impart color to the top thin layers of wood, which are erased when sanded. To achieve light golden shades along the edges of small pieces, the veneer is fired. Sometimes it is necessary to lay out veneer in a checkerboard pattern using only one type of wood. To do this, the pieces are laid out at different angles - the wooden surface tends to reflect light differently.
The wood will appear somewhat lighter if the grain is perpendicular to the viewing angle, but will darken if the grain is longitudinal. The same rule applies to solid wood.
Marquetry paintings are used for cladding furniture. Most often they consist of a large number of small parts of different colors and textures. The most expensive works are complemented by other materials such as brass, bone, and mother-of-pearl. Buying veneer will not take much time, and there is also a lot of information about creating products. The hardest part is learning and achieving success in this area. The best furniture makers exhibit their works at auctions and in museums.
The marquetry technique is not as simple as it seems at first glance:
- To begin with, the artist outlines the final ornament, paintings or patterns on paper, which are then divided into individual elements and painted in the required color, which makes it possible to avoid mistakes when subsequently cutting the veneer. After which the drawing is cut into several separate elements and transferred to sheets of the required shade. Using the resulting contour, the required part is cut out with a special knife.
- The easiest way is to draw a line on the veneer with a pencil, but the paper only strengthens the surface, preventing breakage during particularly delicate work.
- When cutting out parts, it is necessary to carefully observe the direction of the wood fibers, paying great attention to the natural texture of the surface. Realism can be achieved in cases where the bend of the vessels completely coincides with the bends of the cut out parts.
- Beginners often complete their first projects using only two colors of veneer - the main pattern and the background. This is the easiest way: pieces of wood are cut along the intended contour and fill the voids cut out in the background sheet. It turns out a nice and light ornament.
- When each piece is in place, a special “shirt” is created: each piece is held together with gummed paper, forming a single sheet. Then you need to strengthen the parts on flat wood surfaces: for large areas, use a press, and for antique and modern furniture, use a rolling hammer.
- To achieve a better result, you can coat the final surface with shellac or its closest analogues. The best varnishes can make wood surfaces look like plastic.
Many years of training will allow you to turn your hobby into a way to make good money. You can learn how to create marquetry through master classes, video lessons, and courses.
Materials for work
The first step is to prepare the materials for work. To create the inlay you will need special tools:
- Cutters.
- Chisels and chisels of different types.
- Thicknessers, drill.
- Special marker and compass.
Material for making the ornament:
- Pear.
- Beech.
- Maple.
For inserts, material of a natural shade is most often used and only sometimes it is painted. From one type of wood you can choose not only different tones, but also colors. If black is required, use dark walnut and pickle it in oak bark with iron particles or rust for several days. You can bring out any color of wood, close to the natural color , if you cook thin slices of pear in certain dyes.
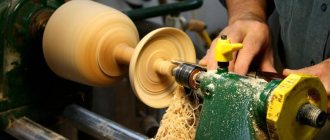
To create the inlay, blocks of selected wood are cut into plates two mm thick. To do the job well, it is also worth using a drawing, wire, veneer and plywood.
DIY marquetry
The process of creating marquetry takes a lot of time - it is a very complex, painstaking task. When creating products using this technique, it is important to maintain high precision and be careful. It is worth remembering that market artists are famous for their patience, perseverance and desire to create. Before creating marquetry, you need to arm yourself with special materials, look through many sketches and choose the best option. You can make such masterpieces with your own hands as:
- Luxurious veneer paintings framed in elegant baguettes.
- Decorate the furniture.
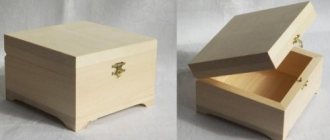
- Create a gift box.
- Design and post your own family coat of arms.
Initially, marquetry masters make small paintings and panels from veneer. Due to the pliability and flexibility of the material, it is easy to stick to the surface. Marquetry paintings are considered environmentally friendly, durable masterpieces that can serve as decorative elements for many generations.
Marquetry is also used to decorate rooms and decorate furniture. Unique products are obtained only if the following conditions are met:
- All furniture to be finished must be made only from natural wood.
- The surface areas must be sufficient for inlaying and carving patterns by hand.
- One element of decor will stand out greatly from the overall composition, so if the bed has been decorated, you can additionally decorate the bedside tables. This way you get a whole bedroom set.
Furniture made using the marquetry technique turns out elegant and sophisticated. Creating it with your own hands is very time-consuming and difficult, but the product will last for many years and will become a family heirloom.
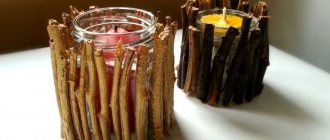
Marquetry technology is also used to create souvenirs and small decorations. In a small mosaic you can see many multi-colored intricacies glinting in the sun. A handmade box would be a good gift; you can also put a second gift in it and give it to a loved one. To decorate boxes with wooden mosaics, you should know the following:
- The workpiece must be made of wood.
- Before work, you should choose a pattern and make a drawing of it.
- Additionally, it is worth decorating the box with stones and metal.
The decor of the products will depend solely on the preferences of the person who will receive such an unusual gift in the future. In order for the box to be durable, all decorative elements must be strong and of high quality. Family coats of arms, created with your own hands, will complement the interior of a house or apartment, and will also serve as a family heirloom.
Thus, creating marquetry is quite difficult. Delicate work will take a lot of time, but the results will exceed all expectations. The most important thing is to first create drawings according to which the ornament will be created in the future.
Stages of inlaying wood with metal
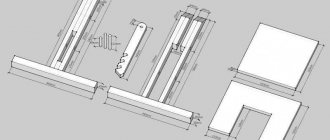
The order of inlaying: an ornament or other selected design is applied to a taken board using a compass or a special marker. After transferring the image onto the object and marking it, they move on to inlay. First, straight lines are made , between which it is necessary to place a strip of other wood, and the material is selected between the cracks to a depth of two or three mm.
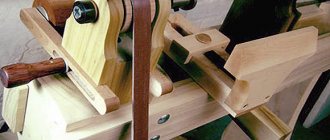
Straight lines on uniform planes of the object are cut with a special tool using a thickness planer; two cutters are placed in its movable block at a selected distance.
With this device, with a prepared board of the same color, a strip is made a little longer than necessary, then, using a chisel or knife, it is cut to the selected length. The finished strip is treated with special glue and inserted into the prepared socket. To make flower petals or “wheat”, use a round chisel. The arc is cut off on both sides, then the recess is selected with a thin chisel.
In the same way, an insert is made from colored material. Having coated the element with glue, insert it into the prepared socket and tap it with a mallet or hammer.
Intarsia making technique
Intarsia was the predecessor of marquetry. It was also used in Greece, Rome, Egypt and the East. Most often, this technique was used to decorate dishes and furniture for the church and noblemen. Previously, geometric shapes, as well as images of plants and animals, were common ornaments. Now you can choose a unique design both in shape and color.
Stages of creating a product using the intarsia technique:
To make the product interesting, beautiful and of high quality, special attention is paid to creating a drawing diagram; only with its help can you make the exact shape of the objects. Learning wood intarsia patterns is the foundation of this skill. It would also be a good idea to experiment with the choice of wood, because there are exotic types of wood with very interesting textures.
In terms of its execution technique, intarsia is similar to block mosaic, in which parquet is made and walls are decorated. Thin plates are prepared in advance from different types of wood, differing in color, size, and structure. Then you need to combine everything into a single composition. Operating principle: wood fragments are inserted into recesses prepared in advance and glued to the base. Block mosaics can also be three-dimensional (decorated with carvings). It is ideal for making boxes.
Decorating walls with mosaics
Mosaic fits perfectly into the overall interior of the house and enlivens it with its colors.
Do-it-yourself wooden mosaic for walls is not only an original and stylish method, but also quite practical, since when in contact with water and steam, the material does not deteriorate or deform due to a special coating. Thanks to this, wooden mosaics decorate living rooms, kitchens, and even saunas. It is often used when decorating premises in restaurants, cafes or offices.
The most suitable wood for creating mosaics is birch, ash, oak, acacia, maple, and walnut. The material is preliminarily subjected to heat treatment, cleaned of contaminants and thoroughly dried. Only solid wood that is sawn according to certain rules is suitable for intarsia.
When decorating the walls, you can adhere to the chosen geometric pattern and select the necessary shades to match it. Compositions that look like a chessboard or a honeycomb look very impressive. Or you can place fragments on the surface in a chaotic manner, and this will also look like an interesting design solution.
The main advantages of wood inlay:
Making wooden products using the inlay technique is a very interesting and fascinating process, but only a true professional can create a unique masterpiece. And to become one, you need constant practice.
Source
Creating strokes and patterns
At the end of the work, strokes and patterns are applied to the mother-of-pearl to complete the image.
The methods of working with such a device differ from engraving with a drill, which makes lines in any direction. They work with a graver somewhere along the axis of the hand, and the workpiece, together with a vice, is turned over on the table so that the cut takes place in the direction that is easiest for a person. In this case, the thumb of one hand rests on the finger of the other, which helps control the device: it cannot run forward and cause a real scratch.
The device is sharpened on a special disk inserted into a drill.
The large lines that create the main pattern are made first. Next, mark small lines with a pencil and cut them with a thinner pencil. At the end, the points are set with an electric tool (matte, it is very similar to a small jackhammer and produces blows with the tip). When all the lines and dots are made, the mother-of-pearl is painted with alcohol-based black paint, which can penetrate and be absorbed into parts of the cuts. Remove unnecessary dye from the surfaces of the mother-of-pearl using a thick rubber band.
At this point, work on the product is almost complete. All that remains is to wipe the wood with linseed or some other drying oil, and you can take the item to the customer or transfer it to a new operation. Well, in the end, many should remember that do-it-yourself wooden mosaic for walls is suitable for decorating rooms in the Country, Provence style and is considered an excellent alternative to wallpaper.
To decorate products, you can also use the wood marquetry technique for beginners; it is performed in a similar way and does not require any special skills.
Originally posted 2018-04-18 14:01:51.
Source