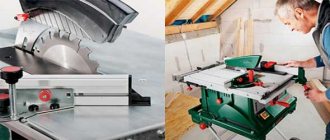
Planing equipment is an essential component of a complete woodworking process. Factory-made products are quite expensive, so a homemade jointing machine is quite suitable for home needs.
The purpose of this tool is to longitudinally level a workpiece made of wood or chipboard (materials painted or containing glue can dull the cutting elements of the equipment). After planing on a jointer, the processed side of the workpiece becomes smooth and even, which is necessary for subsequent calibration on a thicknesser or milling.
Joiner design
Industrial options are distinguished by their dimensions and significant weight, which provides suppression of vibration arising from rapidly rotating machine parts (up to 12,000 rpm). The total length of the working surface of such equipment is 2–2.5 m. The width of the table, which determines the maximum width of the workpiece being processed, is in the range of 400–600 mm.
Simpler jointing machines, which you can make yourself at home, have less weight, size and, accordingly, shaft rotation speed (no more than 6000 rpm). The total length of tabletops on such equipment is 1–1.5 m with a width of 200–300 mm.
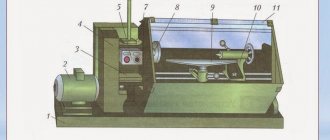
Main components of a jointer
- Bed. A massive element that provides structural rigidity, chip removal, and placement of the electric drive.
- Work tables (server and receiver).
- Stop ruler. For planing at an angle.
- Shaft with cutting elements (knives).
- Electric drive. Provides shaft rotation through a belt drive and pulleys.
- Rack or fan type protective mechanism.
Main components of a jointer
Additionally, your jointer can be equipped with a workpiece feed mechanism and an aspiration chip removal system.
Safety precautions when working
The jointer, due to the combination of dangerous factors - high shaft rotation speed and the presence of sharp blades, is a potentially traumatic equipment. Working with it requires strict adherence to a number of safety rules. This is especially true for homemade instruments: incorrect calculation of the elements that make them up often leads to fatal consequences. To avoid problems when working with a jointing machine, you need to adhere to the following requirements:
- Before starting work, you need to wait until the shaft reaches maximum speed.
- Under no circumstances should the working tool be inspected, lubricated or cleaned of chips during operation. To do this, you need to stop the machine, turn off the power and only then start servicing.
- When processing small parts, the length of which does not exceed 40 cm and the width - 5 cm, you should use a special vertical stop. It looks like a thick board, which is fixedly attached to the feeding work table.
- To increase operational safety, the jointer shaft can be equipped with a special protective flap. As the material moves forward, it moves away, and after processing is completed, it returns to its original position using a spring system. The blades of the shaft remain closed from accidental contact.
- Lighting is of great importance - all work should be carried out under the light of a powerful lamp, or outside.
Following these simple rules will help make your work not only fast, but also completely safe.
Making your own jointer
Before starting any activities to make a machine with your own hands, you will need three things: a project, materials and tools. They are all interconnected, since the project directly depends on what materials are available and what tools are available. If you do not have a welding machine and the skills to work with it, there is no point in considering a project that involves a welded structure.
Tabletop jointer - drawing
The metal structure can also be assembled using bolted connections. This option will have some positive qualities: a bolt-on jointer can be disassembled without much effort if necessary.
For a carpenter, the most convenient option is a wooden structure, but it is inferior to metal in rigidity and in the service life of some elements of the machine. In addition, certain nodes cannot be made from wood.
Some components will have to be purchased or ordered. These are parts such as:
- shaft with knives, fixing wedges, a set of bearings, yokes;
- electric motor;
- pulleys;
- belt;
- starting device.
To draw up a project, you need to decide what functions the device will perform. The following options are possible:
- Jointer. A device whose purpose is to plan a part on one side without calibration.
- A two-operation machine that performs the functions of a circular saw and a jointer.
- Multi-operational machine. Such devices can be used for sawing, planing, drilling grooves and milling, like a thickness planer.
The jointer is the easiest to manufacture, requiring less tools, material and skills.
Manufacturing of the bed
The main element of the jointing machine, it will contain work tables, a shaft with knives and a stop ruler. A drive will be installed in the frame body, and chip removal will also be implemented. To make the structure rigid, you will need appropriate material.
Assembly:
- for the upper part on which the countertops are located, a channel with a height of 100 mm and a wall thickness of 5 mm is suitable;
- the legs and lower platform can be made from a metal corner (50 mm);
- The structure is fastened together by welding or bolting.
Assembly diagram of the machine bed
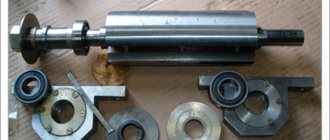
Shaft with knives
This unit must be purchased assembled. The kit should include:
- shaft;
- knives;
- bearings with housings (yoke);
- wedges with which the knives are fixed.
Assembling the shaft with jointer knives
The quality of the material and the balancing of such elements, made in the factory, are much higher than homemade ones.
This unit can be ordered from a turner, providing him with drawings and specifying the details. It’s good if the turner works at an enterprise and has access to balancing equipment.
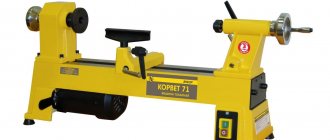
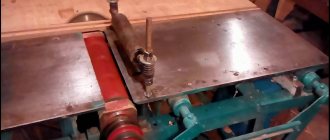
Desktops
Stationary electric jointer
Industrial jointers are equipped with massive cast tabletops with stiffening ribs to prevent deformation during operation. This is unattainable when making it yourself. Therefore, it is better to use sheet material as the optimal solution for arranging the planer platform. Ideally, this should be a flat metal plate 10 mm thick, or, in the worst case scenario, a sheet of plywood.
The plywood must be of sufficient thickness (minimum 10 mm), in addition, you need to pay attention to the quality of the surface - the plane must be flat. It is advisable to use sanded waterproof plywood, without small tubercles or fallen knots. To increase the service life of a plywood tabletop, you can attach a sheet of galvanized metal to its working surface with your own hands.
The serving table is made 2 times longer than the receiving table. This makes it easier to level the workpiece during jointing.
Electric motor
The main parameters that need to be taken into account when choosing an electric drive for your jointer:
- power;
- number of revolutions;
- operating voltage of the power supply network (220, 380 V).
The longer and larger the diameter of the cutting tool, the more powerful the motor will be needed. You can use a low-power drive, compensating for the lack of power with pulleys, but in this case it will not be possible to achieve the speed necessary for clean processing.
As an example, consider a shaft with a diameter of 100 mm and a length of 300 mm. For stable, long-term operation at speeds of about 6000 per minute, you will need a drive with a power of at least 3 kW. If you change the length in the input data, reducing it to 200 mm, you can use a motor with a minimum power of 2 kW.
Engine for jointer - device
As for engine speeds: it is more rational to use a drive that has at least 3000 rpm. Otherwise, to obtain sufficient speed of the cutting tool, you will have to use pulleys.
The operating voltage of the drive depends on the voltage of the electrical network in the workshop. An engine that runs on 380 V will be more powerful and more reliable than an engine with the same rated power, but designed to operate on a 220 V network. But in a home workshop, 380 V is a rarity, and the connection costs so much that these funds can buy an inexpensive factory jointer.
It should be remembered that this is a homemade jointer for household use, and it does not need to be mercilessly loaded, planing the entire width of the knives at 5 mm per pass. Not every industrial unit (especially a modern one) can withstand such loads.
Basic Concepts
Such equipment will have numerous rotating parts. From this we can conclude that making such a machine with your own hands will not be so easy. Therefore, when starting to manufacture it, you need to calculate your strength. If you already have some similar experience, then you will cope with the task. It is worth noting right away that you will not be able to make a jointing machine entirely from parts of your own making. Of course, it’s possible that you have a large assortment of different devices in your “bins,” but this rarely happens. First of all, this concerns the shaft with knives and bearings. They will most likely have to be purchased or even ordered. But if everything you need is available, then you can safely start designing.
Some parts for the jointer: knife shaft, knife bearings, will have to be purchased or ordered
First of all, it’s worth understanding what kind of “package” you want to receive. There may be several options:
- just a jointer. It will only perform one function;
- set of jointer and circular saw. In this case, the functionality of the machine is doubled;
- equipment capable of performing the role of a jointer, a circular saw, a grinding device, a grinding and drilling machine. Such a device will be very useful for your workshop, but it will be difficult to do it yourself.
The most optimal and easiest option is to make a jointer and a circular saw on the same bed. Plus, both tools will rotate from the same electric motor. This feature will greatly facilitate our task.
Let's look at the main components of our future tabletop jointing machine. It will include:
- Bed. This structure will support the entire machine and the equipment installed on it. To make it, it is best to use durable channels with a wall thickness of 8-10 millimeters. The bed can be made either collapsible or permanent. In the first case, all its components will be connected using bolts and nuts. If you do not need a portable machine, then the channels can be secured together by welding. This option will be more reliable. You can do without a bed if its role is played by a desktop;
- Work tool. This is one of the most important components of the machine. The jointer knives and the saw itself - it is with their help that you will saw and process the boards. The knives are firmly attached to the shaft. They must be made of reliable and strong steel. Circular saw with pobedit tips. Such a tool will last you much longer;
- The rotor is where all the tools will be attached. Without this part it is impossible to make a single machine, planer or circular saw. Finding a suitable rotor can be quite difficult, so it is better to order it from a professional turner, having previously provided it with drawings;
- Desktop. For a properly functioning machine, you need three surfaces. One will serve as a workbench for a circular saw, and the other two for a jointer. The thickness of the material for the working surface must be at least five millimeters. Multilayer plywood or metal sheets are suitable for these purposes. In this case, it is advisable to make a slight difference in height for surfaces intended for jointing. The side along which the workpiece will be fed should be a couple of millimeters lower than the side to which the already processed side will go. This difference will make work easier and significantly reduce vibration.
Assembling a jointing machine with your own hands
The shaft with cutting elements is attached to the top of the frame in the middle; the exact location depends on the size of the work tables between which it should be located. The shaft and table top must be located in the same plane so that the top point of the cutting tool knives coincides with the top surface of the receiving table.
The feed table is mounted in the same plane as the receiving table, but 1–2 mm lower. This distance determines the thickness of the chips removed in one pass. The quality of planing depends on how accurately the planes of the surfaces coincide, namely, how smooth the planed workpiece will be.
Machine assembly diagram
There are options for adjustable feed plane height using eccentrics or a screw mechanism.
When assembling a jointing machine with your own hands at home, it is very difficult to efficiently implement such a mechanism. It would be an incredible achievement if this equipment would plan smoothly with fixed worktops.
The electric drive is mounted on the lower platform of the frame. It is advisable to use an adjustable platform to install the engine to ensure more comfortable belt tension. The tension mechanism can be implemented using a technological hole in the platform and a screw with a nut as adjusting elements.
How to install a shaft with a knife?
Installing a shaft with a knife is a responsible job. The performance of the entire installation depends on the quality of its implementation. Therefore, it must be approached as responsibly as possible. Any jointer consists of a drum with knives that are located on its surface, as shown in the photo below. When rotating, it performs the main task of installation - removing wood from the surface of the workpiece.
Such an installation has its own characteristics. The drum that is attached consists of several parts. This includes bearings, a cutting element and a shaft installed in the center. Together they form a single shaft. Moreover, you will need to buy blades, since it is impossible to make them yourself.
The drum is installed using bearings. They provide a strong and secure fit
In addition, it is worth paying special attention to the mechanism with the blade. It is located on the base
It must be firmly attached, because the entire load of the device is marked here. As for the output of the shaft, a roller is attached to it, on which the belt will be placed in the future. This part can be made independently. The main thing is that the profiles of the element and the belt match.
You can watch the video on how to make a household wood jointer. It is shown below. It clearly shows the entire process from start to finish. At the same time, its features and subtleties are taken into account. This is a great helper when making your own installation.
Connecting mechanisms
Rotation is transmitted from the engine to the shaft by means of a belt drive through pulleys. The pulley sizes are selected in accordance with the engine power and speed.
For a drive with a rotation of 3000 rpm, a ratio of 1 to 2 can be considered normal. For example, the diameter of the cutting tool pulley is 100 mm, on the drive it is 200 mm. The optimal ratio for DIY assembly can be obtained experimentally and largely depends on the quality and balancing of the rotating parts of the jointer.
The drive is connected to the electrical network using a starting device, in accordance with the instructions of the electric motor.
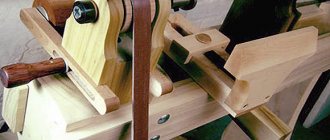
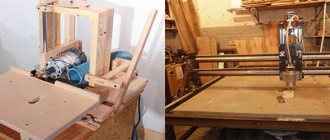
Alternative option
A simpler and faster way to make a planing machine with your own hands is to use a manual electric planer, having previously modernized it a little. Every self-respecting home carpenter must have such a tool. All that needs to be done is to make a device to fix it.
The easiest option for making a machine with your own hands is to use sheet material as a base:
- plywood;
- OSB;
- chipboard;
- Chipboard.
It is necessary to make technological holes in it for attaching the tool, so that after installing the plane, the cutting edges of the knives and the receiving platform are in the same plane with the surface of the table.
Additionally, your device can be equipped with a stop ruler for planing at right angles, and a chip extraction system, which can be implemented using a household vacuum cleaner.
Safety when working with homemade equipment
When planing, attention should be paid to safety during operation. The presence of a cutting edge can cause injury. The safety recommendations are as follows:
The safety recommendations are as follows:
Sharp chamfers, which can cause damage to the skin, are removed from all manufactured elements. At the time of planing, attention should be paid to the fact that the chips must be removed using a special vacuum cleaner. Work can only be carried out using various protective equipment. At the time of planing, the workpiece should be pushed with a special element, thereby eliminating the possibility of injury.
In addition, the equipment must not be left switched on. Each time after creating a product, the tool should be cleaned.