The sharpness of a knife is one of the main parameters affecting the quality of wood processing. In addition, this characteristic also affects the degree of safety when working on the machine.
Often a person does not want to run around over and over again in search of a place where he could bring his cutting tools into proper condition. In this case, it’s time for him to think about making a homemade sharpening machine that would solve the issue of the sharpness of planing knives once and for all.
Why is timely and correct sharpening necessary?
Planing knives, like other cutting tools, require maintenance for certain reasons:
- with a blunt blade of planing knives, the wood will be processed very poorly;
- when working with soft types of wood, pile and various irregularities will form on the surface;
- the worn edge will crumble;
- When planing with blunt tools, the machine motor overloads
Even if you decide to sharpen it yourself using diamond stones, the effect of such work will be very insignificant. You'll have to resharpen them soon. For these reasons, people who plan professionally choose only automatic or mechanical sharpening.
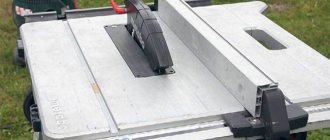
Preparing the workplace and equipment, installing the screw that controls the angle
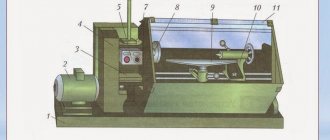
To sharpen knives, you will need a special sharpener, but you must use modern variations of it with a low speed, which have water-type cooling. The Tormek T7 with a special Tormek SVH holder is most suitable for these purposes. A smooth and clean sharpening stone will help you complete this process efficiently. In the future, a practical example will be considered based on a set of Tormek equipment.
When sharpening, you need to install a screw with which you can change the sharpening angle, but first you need to prepare the workspace by fulfilling certain conditions:
- We install the Tormek SG250 sharpening stone, leveling it using a special tool Tormek TT-50. The device comes complete with T7.
- It is necessary to smooth the sharpening stone using a cleaning and leveling stone.
- We remove the standard stop and install a specialized stop.
- We screw in the screw itself, which can later be used to adjust the angle of the chair being sharpened.
- We install a special holder for the blade.
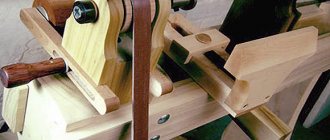
It is recommended to sharpen cutting tools whose width is more than 12 millimeters. And the length of the knife no longer matters. In addition, you can rearrange long knives. Correct installation of the blade in the holder is of great importance, because sharpening with large distortions is possible. Correctly this process is performed as follows: install the back of the knife all the way and clamp it with special holders.
Basic Concepts
Such equipment will have numerous rotating parts. From this we can conclude that making such a machine with your own hands will not be so easy. Therefore, when starting to manufacture it, you need to calculate your strength. If you already have some similar experience, then you will cope with the task. It is worth noting right away that you will not be able to make a jointing machine entirely from parts of your own making. Of course, it’s possible that you have a large assortment of different devices in your “bins,” but this rarely happens. First of all, this concerns the shaft with knives and bearings. They will most likely have to be purchased or even ordered. But if everything you need is available, then you can safely start designing.
Some parts for the jointer: knife shaft, knife bearings, will have to be purchased or ordered
First of all, it’s worth understanding what kind of “package” you want to receive. There may be several options:
- just a jointer. It will only perform one function;
- set of jointer and circular saw. In this case, the functionality of the machine is doubled;
- equipment capable of performing the role of a jointer, a circular saw, a grinding device, a grinding and drilling machine. Such a device will be very useful for your workshop, but it will be difficult to do it yourself.
The most optimal and easiest option is to make a jointer and a circular saw on the same bed. Plus, both tools will rotate from the same electric motor. This feature will greatly facilitate our task.
Let's look at the main components of our future tabletop jointing machine. It will include:
- Bed. This structure will support the entire machine and the equipment installed on it. To make it, it is best to use durable channels with a wall thickness of 8-10 millimeters. The bed can be made either collapsible or permanent. In the first case, all its components will be connected using bolts and nuts. If you do not need a portable machine, then the channels can be secured together by welding. This option will be more reliable. You can do without a bed if its role is played by a desktop;
- Work tool. This is one of the most important components of the machine. The jointer knives and the saw itself - it is with their help that you will saw and process the boards. The knives are firmly attached to the shaft. They must be made of reliable and strong steel. Circular saw with pobedit tips. Such a tool will last you much longer;
- The rotor is where all the tools will be attached. Without this part it is impossible to make a single machine, planer or circular saw. Finding a suitable rotor can be quite difficult, so it is better to order it from a professional turner, having previously provided it with drawings;
- Desktop. For a properly functioning machine, you need three surfaces. One will serve as a workbench for a circular saw, and the other two for a jointer. The thickness of the material for the working surface must be at least five millimeters. Multilayer plywood or metal sheets are suitable for these purposes. In this case, it is advisable to make a slight difference in height for surfaces intended for jointing. The side along which the workpiece will be fed should be a couple of millimeters lower than the side to which the already processed side will go. This difference will make work easier and significantly reduce vibration.
Don't miss: Design of a metal lathe - diagram and main components
Estimating and setting the required inclination angle
By analyzing the characteristics of the marks left by the sharpening stone, it is possible to correctly assess the angle of inclination by selecting the desired proportions. Then a holder with a knife is installed on the fixed stop. Adjustment is carried out using the stop screws; you need to lower the holder until it touches the stone. Using the angle adjustment screws, select the required parameter in relation to the stone. When rotating manually, the marks on the painted blade determine the need to adjust the angle of the holder. And if necessary, such adjustments are very easy to make.
Operating angle range 30-45 degrees. Its exact degree is determined by the specific type of tree. A 1985 handbook written by Karl Fronius states that quality will depend not only on the angle, but also on the blade's reach and head diameter. The classic parameter is considered to be 40 degrees. When choosing a specific number, do not forget that the cutters are designed according to a standard backing. If you increase the angle, there is a risk of the butt rubbing against the workpiece. And if you reduce it, the cutting edge will become weaker and thinner.
Some rules and features of sharpening
Having set the angle of inclination to the desired position, you can begin the sharpening process itself. You can record the amount of metal being removed; two sliders with a scale and 0.1 mm division are designed for this purpose. The sharpening specialist will be able to adjust this parameter quite accurately. Do not forget to securely fix it with special clamps after each filing to prevent vibrations during sharpening.
The sharpening process itself is carried out by changing the position of the holder in relation to the sharpening stone. It is important to ensure that the knife does not go beyond the extreme point of the stone. It is advisable to stop the holder 10 mm from the edge. Separate stops are provided as a braking element, by moving which the desired stroke is set. The decisive factor here will be the experience of the person who sharpens the planing knives. During the process itself, water is formed, which accumulates and collects on the blade. Then it flows onto the body itself and onto the floor. A lot of water is wasted, so don’t forget to constantly add it to the special section. And the spill itself can be reduced by placing some kind of pad under the leg, 6 mm high.
Another nuisance during sharpening will be the constant clogging of the sharpening stone, which affects the duration of this work. It is best to periodically clean it with the SP-650 bar provided for this purpose. When working with soft metal, sharpening will go much faster and the stone will have to be cleaned less often, because such material is removed in fairly massive sections.
After half an hour of work, you get an even chamfer with a stable burr. All that remains is to polish it using a leather wheel and polishing paste. First of all, you will need to complete the plane of the knife, and only then the chamfer itself.
Features of working with a manual machine
Manual machines are used only in cases where it is necessary to sharpen not too many knives. Otherwise it would have taken a lot of time. But if you need to sharpen several knives, then this method will be quite acceptable, but you must adhere to the following rules:
- you need to check the surface of the stone, because the use of such machines is only possible with clean sharpening tools;
- try to make sure that the carriage with the attached knife is brought in quite smoothly, without any sharp jolts;
- the speed of movement of the carriage should not exceed 6m/min, high speed may damage the blade;
- During one pass, the carriage must advance a distance that is 15 cm greater than the length of the knife.
Features of working with an automatic machine
- the wet method is more suitable for sharpening planing knives, because the blade is constantly cooled;
- at the preparation stage, you already need to set all the parameters, including the angle of inclination and the distance of movement of the carriage;
- the most important factor is the installation of knives on the carriage;
- the process should be carried out quite smoothly, without sudden twitching
Wheels for sharpening flat knives
Wheels for sharpening knives of woodworking machines must meet three basic requirements: - ensure high productivity of the sharpening operation, - provide impeccable sharpness of the cutting edge of the knife, and - guarantee burn-free grinding to avoid the appearance of defects. In addition, it lasts a long time without becoming greasy or crumbling.
We have developed the characteristics of grinding wheels that meet all these requirements. One of the important features is the low temperature in the cutting zone; our experience guarantees the preservation of the properties of the cutting edge after sharpening knives made of tool and high-alloy HSS steels.
By knives of woodworking machines we mean jointer, surface planer and planer knives. Both flat and profile. In other words – all flat and profile knives for jointing and planing machines.
Currently, hard and tough HSS steels with a high content of tungsten, vanadium, chromium, molybdenum and cobalt are widely used for the manufacture of planing knives. Such steels, as a rule, are difficult to grind with abrasive tools of classical characteristics. Salting appears, and as a result - burning of the edge. For sharpening knives made of HSS steels, we produce several characteristics, the most universal characteristic for today is A 46 I. These are wheels made of white electrocorundum with FEPA 46 grit (No. 40 according to GOST), with hardness M2 on a special ceramic bond, which ensures high-performance grinding without burns during sharpening dry - without the use of process fluids (previously coolants - lubricating-cooling fluids).
When sharpening knives with a length of 60 to 600 mm, the average durability of cup wheels with a diameter of 100 mm (6,100x50x20) on the Corvette-470 machine was 1 mm of wheel height per 6.25 linear meters of knives, or 250 linear meters. for one cup. When using wheels of larger diameter and, accordingly, a larger working surface area and wheel height, the durability is proportionally higher. For industrial use we produce rings with a diameter of up to 400 mm.
INF-ABRAZIV has the ability to produce wheels for Quadro, YongYang, WTG (China), Griggio, MVM (Italy), Jeffer (Taiwan), Ilmetech, AVM, Beaver, WEINING, V-HOLD, Leadermac machines. Below on the page you can see some of the circles that we produce in series; in particular, you can buy a circle for the BOSHERT machine measuring 175x45x35. Each wheel of our production has not only high cutting properties, but also the absence of unbalanced mass and precision manufacturing accuracy.
To remove the burr after sharpening, release the bars. The most in demand are stones made from powders with a grain size of F600. For jointing, bars and segments are manufactured with a grain size from 360 to 1200 FEPA. The bars can be purchased in rectangular and round profiles.
On the website you can purchase wheels in the form of rings, cylindrical cups and straight profile wheels for sharpening flat carpentry knives. We produce wheels both for sharpening jointing knife heads and for working on surface grinding machines. For example, for sharpening printing knives on MSQ series machines - MSQ 1600C (ROPLOR), MSQ-A, MSQ-B, MSQ-C, MSQ-D, MSQ-E.
The last edition of the article was November 25, 2019.
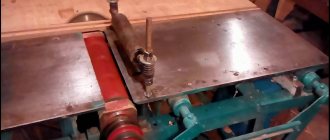
DIY sharpening machine
If desired, it is possible to assemble the sharpening machine yourself. You will need the following items: table, faceplate, vacuum cleaner, motor and machine cover. The faceplate will become the main and most expensive component. It is advisable to choose American or German manufacturers. Then an engine with a power of 1.5 kW is selected; even supported options are suitable. For example, you can purchase motors from washing machines.
The motor must be installed under the tabletop, and the faceplate must be secured to the moving element. Don't forget to consider the on and off buttons. You need to put a casing on the faceplate, cutting off one side, from which sharpening will be done. You will also need to make a cutout at the bottom of the tabletop for a vacuum cleaner. This machine is also suitable for working with other cutting surfaces.
Sharpening knives in specialized workshops
If you are unable to organize the correct sharpening of planing knives or it becomes difficult to set the desired level of inclination, then contacting a workshop will be an excellent solution to the problem. This method has the following advantages.
- Expensive and high quality equipment is used. The straightness of the cutting edge will be much better than when processing it yourself.
- Modern cooling systems are used that will prevent the cutting surface from overheating and collapsing.
- Additional materials and special technologies are used to refine the knife, which affects the functionality and service life of such knives.
- In a workshop environment, it is possible to obtain the most even edge due to the absence of overheating and weight differences. In practice, the result should be an ideal instrument.
Why do you need a jointer?
A woodworking shop can have a variety of machines, but the most commonly used (besides the circular saw, of course) are jointers and planers. These two types of units are slightly similar in their function, but differ in the method of use.
If you need to make a wooden blank in the form of a board, beam or shield, then it is better to use a thickness planer. Such a device, the main tool of which is the same knife, is capable of cutting the source material into two parallel parts. In this case, both of them will be adjusted to certain sizes.
Don't miss: DIY miter saw - making with drawings
Thicknessing machines are available in both single-sided and double-sided types. In the first case, only one side of the workpiece is processed in one pass. A double-sided thickness planer is more productive. Here the output is an almost finished part.
Thicknessing machines have a shaft located above the tabletop. Moreover, the latter is made massive in order to smooth out large vibrations. In addition, the mechanism is equipped with a special casing, which is designed to dampen noise.
A jointer has a slightly different task. This device is used to create a smooth surface without significant roughness on the workpiece. This machine, like the previous version, is equipped with a shaft with knives, only in the jointer it is located under the table top.
The workpiece is fed onto the work surface from one side, and the output from the opposite side is already partially processed. This way, layer by layer, the desired evenness is achieved. After processing on a jointer, the part can be fed to a surface planer.