What type can a manual jointer take?
In almost every workshop, the plane occupies an important place.
However, this tool is not always able to process wood properly, especially if it is not configured correctly. Scratches appear, and whole fibers are gnawed out of the seemingly smoothed plane instead of chips. A tabletop jointer manifests itself in a completely different way; with your own hands you can turn a clumsy board into a glossy sparkling finishing material. A typical hand-held jointing tool is much more massive than a plane, and the weight of the body alone gives it a significant advantage, since the pressure on the surface is as tight as possible. The length of this carpentry tool is rarely less than 90 centimeters, with the exception of the so-called semi-joints, the sole of which usually reaches a length of 25 to 50 centimeters. Another distinctive feature is the presence of a comfortable handle behind the piece of iron protruding above the block, without which the jointing process would be very difficult. By the way, the width of the cutter is from 6 to 8 centimeters, which requires careful adjustment, without distortions.
Less common and rarely used varieties of jointing tools are tsinubel, zenzubel, folding and tongue-and-groove
. Let's look at each in more detail so you can decide for yourself whether it's worth having something like this in your workshop. If you make furniture and are faced with the need to cover wood with fabric, tsinubel will be very useful in your work. This tool has a heavy block with a length of 200 millimeters and a cutter with a triangular corrugation of the working surface, which ensures that the wood is curled and fluffy.
The Zenzubel, used for cutting and planing quarters and folds, is also quite heavy, despite the fact that it has a narrow body with a length of 240 millimeters, since the block is made quite high. A cutter with a straight or beveled blade, the length is usually about 20 centimeters (hence the large height of the body), and the width is up to 2 centimeters. The purpose of the folded shoe is similar, the only difference is that it has a wider last and a stepped sole. There are usually two ledges, one sets the width of the rebate along the edge of the part, and the second is necessary to maintain the depth.
A tongue and groove tool (a tool for selecting grooves or, otherwise, tongues) requires a special description, consisting of two blocks, a working one and a guide, connected with screws. There are two varieties of it, each of which has its own name, which, however, is used relatively rarely. Actually, to make a groove, you need a nuthebel, which has a replaceable narrow cutter, the width of which is selected based on the required parameters of the tongue. Federhebel is designed for obtaining combs and has a piece of iron with a slot, which is also replaceable. The universal version of the tool allows you to freely change one type of cutter to another.
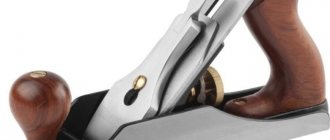
Pictured is a Stanley manual jointer, shuruping.ru
Photo of a do-it-yourself jointer, modelmen.ru
In the photo - a household jointer, avito.ru
Photo of homemade jointer by Steven Serber, woodgears.ca
In the photo - a homemade stationary jointer, avito.ru
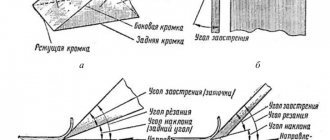
CONNECTION OF BLANKS.
The first step in jointing lumber, joining two pieces together, is the operation most familiar to us. The alignment of edges and planes requires their absolute parallelism and rectangularity. Next, let's look at a few tips that will help you get a good result.
Fiber direction. The first thing we will consider is how to determine the direction of the fibers on the workpieces. To avoid unevenness and chips, you need to determine the wedge-shaped direction of the fibers on the product and feed the workpiece to the knives with the narrow part of the wedge, and not the wide one. If the orientation of the workpiece is incorrect, you will feel strong impacts of the knives on the workpiece at the beginning of planing. The photo on the left illustrates the direction of the grain. Cutting depth. As I noted earlier, the planing depth on my jointer is set to no more than 1.7mm. This setting promotes smooth jointing, and it also helps extend the life of sharp knives between sharpenings. The exception is when working with very uneven lumber. In this case, I don't mind planing the piece more aggressively until I get a more or less flat side. This way, even if there is a chip, it will be fixed later. Edge jointing . The trick here is to hold the workpiece facing the fence and keep the edges square. The photos below show the basics of the method.
Start by applying pressure to the leading edge of the workpiece as you move it towards the cutting head. When moving the workpiece, shift the pressure on it, first to the middle, and then to the edge. Your efforts should be aimed at maintaining constant contact of the workpiece with the take-up table and stop. During the last pass, you need to reduce the feed speed of the product, with this step we will get a smooth edge, without ripples. A slow pass will give a smooth edge and make a strong joint. When preparing parts for splicing, carefully inspect each workpiece, carefully adjust the edges so that there are no gaps and select each workpiece in the joint according to the direction of the grain so that the joint can be seen as inconspicuously as possible. Selecting the direction of fibers in workpieces is often more complex than adjusting the edges for joining. The pictures below show techniques for planing boards, and how to plan a curved and twisted board.
Classification
In accordance with the current classification, according to their purpose, types of planes are conventionally divided into two groups:
- Flat planing;
- Figure planing.
Flat planes, types
- Half jointer
. This is a shortened version of the jointer, designed for planing large elements. The length of the sole of the semi-jointer is 60 cm, the width of the cutter, like that of the jointer, can reach 8 cm. Like the jointer, it is used for fitting various parts.
- Medvedka
larger in width and length and has paired transverse handles on the sides. Usually two people work as a bear at the same time. The piece of iron on the bear is secured with a special wedge
and removes a layer of 1 mm. A bearer is used for planing elements such as boards for external cladding, for floors or ceilings.
Sander
used for final cleaning of surfaces and leveling defects that arose at previous stages of processing. Using a sander, the ends, areas with knots and irregular or complex wood structure are planed. In this type of tool, a double knife with a linear blade and a chip breaker is installed, the knife attachment angle is 60 degrees.
Zinubel
used for processing twisted types of wood and for applying small grooves on the surface to improve the adhesion of elements in subsequent adhesive joints. Tsinubel knives have ribs that form teeth when sharpened. Placing the knife at an angle of 80 degrees relative to the block allows you to process even twisted wood without scuffing. On average, the length of the sole of the tsinubel is 20 cm, the width and height are 6.5 cm. The knives are single with a serrated blade.
- End plane
used for processing ends and planing small surfaces with a tangled fiber structure.
- Single planer
used for reprocessing
. When planing, chips are formed without breaking; The surface is characterized by small scuffs or chips.
- Double planer
has a chipbreaker in addition to the knife, which improves the quality of processing.
Figure planing, types
Zenzubel (selector)
equipped with a double knife, which improves the quality of product processing. Used for planing perpendicular planes and cleaning quarters. The width of the blade-shaped knife does not exceed 33 mm. The tool is similar to a folding belt.
Federgubel
It is distinguished by a special blade shape, which forms a rectangular longitudinal protrusion along the edge of the wooden workpiece.
- Falzgebel
, like the zenzubel, is used for profile planing. It is equipped with a single knife, having a straight or oblique configuration, and is used for stripping quarters (folds). It has a stepped sole, sometimes removable, which allows you to select folds of the required size and profile for each individual case.
- Staffgobel
and stacker
– thanks to knives having a concave shape, they give the workpieces a rounded shape. The stacker is used for processing convex surfaces.
tongue and groove
used for selecting tongues (grooves) along the edges of a wood piece. Consists of a pair of pads connected by special metal screws. The first block is a guide; the second, holding the knives - securing.
Gruntubel
It is a block with a pointed hook in the form of a cutter installed on the side of it. This cutter is fixed in the block using a screw or wedge. Designed for making grooves of a trapezoidal profile located across the grain of the wood.
Gorbach (American)
used for processing curved and concave planes with internal or external diameters. It has a curvilinear shaped block.
When creating wooden products, many different types of operations are required, so in carpentry and carpentry, only one type of plane is often not enough! Some types of planes are best used exclusively in pairs
- federgubel, bear or tongue and groove. Other modifications require sequential use: sherhebel is used for preliminary rough processing of raw materials and jointers are used for final finishing of planes. The main purpose of planes as a tool is to process planar-linear surfaces and create the necessary reliefs.
Despite the wide range of electric planers offered by stores, ordinary hand tools are still quite popular among carpenters. The fact is that with their help, wood processing can be done somewhat better. Most often, modern carpenters have both types in stock and use them for initial processing of workpieces, and use manual ones for finishing them.
Manufacturing
For work you need to use the following materials and tools:
- Electric planer or motor, depending on the chosen design option.
- Plywood 10-15 mm thick for tables and 15-20 mm for making the side wall of the bed, which will serve as the basis of the structure. For manufacturing, you can use chipboard, but such a jointing machine will be less convenient.
- Drill with drill bits of suitable thickness.
- Jigsaw.
- A circular saw.
- Electric screwdriver.
- A wooden board or timber for making a side support.
Making a jointer from an electric planer is easier than using a separate motor, but the latter will be less powerful. Before starting work, you need to select a suitable design and make a drawing.
We make the bed
It is the basis of the entire structure. All other parts are attached to it. When making it yourself, it is convenient to use a sheet of plywood of a suitable size for this purpose.
The frame must ensure high structural stability. All parts must be securely attached to it. The method of attachment depends on the material used. For metal parts, you can use welding or screw fastenings; for wooden parts, screws and glue. When choosing a frame option, you need to consider whether you plan to make the structure collapsible. In this case, it is more convenient to use screw connections.
Installation of the blade shaft
You won’t be able to make a shaft for a jointer yourself. It is better to order this unit from specialists or purchase it in a store. The saw consists of three blades, which, when rotated, remove a layer of wood from the workpiece.
The drum is mounted on the frame using bearings. A roller must be provided at the edge of the shaft on which a belt connected to the motor shaft will be attached.
Table
The design provides two tables for the jointer - receiving and feeding. They are located on both sides of the shaft with knives. The surface must be smooth, because the workpiece must be pressed against the surface during processing.
In order for the processing to be of high quality, the height of the tabletop surface must correspond to the blades. The lower it is, the greater the layer of wood that will be removed during processing. To adjust the height of the table, a special mechanism is installed.
Motor Drive Installation
To make an electric jointer, you need to choose the right electric motor. It is enough for its power to exceed 1000 W. It is convenient to use models that are powered by 220 V.
The pulleys of the engine and drum with knives must be in the same plane. In order to achieve this, it is necessary to use special tools (level and other measuring tools). In this case, the belt will transmit rotation in the most efficient way.
The belt must be tight. Otherwise, it will not be able to provide the required rotation speed. When providing space for the engine, it is necessary that it be possible to adjust its position. In this case, it will be convenient to select it so as to ensure the desired degree of pulley tension.
Hard stop
It is necessary to install a wooden piece perpendicular to the surface of the table, which will serve as a guide. It is needed in order to ensure the linear movement of the workpiece. To do this, you can use a wooden piece of a suitable shape. In this case, it is necessary to clean its surface so that there are no burrs or irregularities on it.
Assembling a jointing machine with your own hands
The shaft with cutting elements is attached to the top of the frame in the middle; the exact location depends on the size of the work tables between which it should be located. The shaft and table top must be located in the same plane so that the top point of the cutting tool knives coincides with the top surface of the receiving table.
The feed table is mounted in the same plane as the receiving table, but 1–2 mm lower. This distance determines the thickness of the chips removed in one pass. The quality of planing depends on how accurately the planes of the surfaces coincide, namely, how smooth the planed workpiece will be.
Machine assembly diagram
There are options for adjustable feed plane height using eccentrics or a screw mechanism.
When assembling a jointing machine with your own hands at home, it is very difficult to efficiently implement such a mechanism. It would be an incredible achievement if this equipment would plan smoothly with fixed worktops.
The electric drive is mounted on the lower platform of the frame. It is advisable to use an adjustable platform to install the engine to ensure more comfortable belt tension. The tension mechanism can be implemented using a technological hole in the platform and a screw with a nut as adjusting elements.
Selecting the right unit
When choosing a jointing machine, pay attention to the following characteristics:
- Rotation speed of the blade unit.
Surface processing occurs due to the rotation of a cylindrical knife block with cutters (knives) attached to it. The higher the rotation speed of the block, the cleaner the wood surface is processed. - Table length and jointing width.
Both of these characteristics affect the parameters (length and width) of the workpiece that the machine can work with. Therefore, before purchasing a unit, you should determine the average dimensions of the workpiece and select equipment based on the data obtained. - Planing depth.
As a rule, modern planing machines allow you to set different planing depths. This allows, on the one hand, to bring the workpiece to the required thickness in a minimum number of approaches (when setting a large planing depth), and on the other hand, to obtain a perfectly smooth surface (in several approaches with the minimum possible depth). - Security provided.
The planer must have a special guard for the knife block to prevent the operator's hand from getting under the working cutter. Different models have different security systems, differing in their degree of sophistication. - Type of knives.
Most machines have pre-installed knives made of tool steel. This tool allows you to work with different types of wood and wood boards. However, if it is necessary to process a large number of grainy workpieces (for example, teak), it is better to change the knives to harder ones. Also remember that the final result depends on the sharpening of knives, which means they must be sharpened periodically.
Also, when choosing a jointing machine, you need to take into account its dimensions and cost. In this case, you will be able to choose equipment that really suits you and suits you in all respects.
A few basic rules for jointing
When working with wooden blanks on a machine, you must follow a number of simple rules:
- The jointer must be held with both hands: the right one is located on the block, and the left one is on the control handle;
- When planing, the device must be guided along the wood fibers, and you can push the device with your own muscular strength;
- To process the edge, you need to turn the timber with the required side towards the knives and plan it in the order described above.
Safety Basics
Do not touch the blades while the machine engine is running; All work is carried out only in special clothing: there must be a protective headgear on the head, hands must be in gloves, eyes are protected with special glasses (it is important that all elements of personal protective equipment fit tightly to the body); In the process of jointing, in order not to damage your fingers with knives, it is necessary to use clamping holders; For more precise processing and in order to prevent cutting off excess layers from the part, a special marking line is applied to its surface using chalk. If after treatment it disappears completely, then the surface can be considered smooth.
What is a jointer?
An indispensable tool for anyone involved in woodworking is a jointer. For those who do not know what a jointer is, we will briefly provide a small educational program.
In most cases, jointers are used when it is necessary to almost perfectly level surfaces that have a large area, or when jointing the edges of long parts.
In its design, the jointer is very similar to a regular plane, but at the same time a double knife is installed on it.
In the front part there is a special plug that fixes the knife (if you have to adjust the jointer knives, remember that you need to knock out the plug with a mallet).
On the block (the basis of the structure) behind the knife there is a handle that makes it easier to use this very useful tool.
When carrying out planing work, a manual jointer levels the surface.
Note that during the first passes the chips from under the tool will be “ragged”, but during subsequent passes they will gradually become smooth and continuous, which will be a signal that the surface being processed has already been leveled.
If you need to process small workpieces, it would be more advisable to use a semi-jointer.
It has smaller dimensions, but at the same time provides the same high quality of part processing.
Note that if you intend to take up carpentry professionally, it is better to purchase an electric jointer, which differs from its wooden counterpart in that it allows you to reduce the effort required to process the surface. And it will take much less time.
Finally, we note that when working with an electric jointer you must follow all safety rules, otherwise there is a high risk of injury.
How to choose a jointer
To choose the right wood jointer, you need to consider the following factors:
- Workspace material. Stationary jointer tables are made of steel, cast iron, aluminum alloys and silumin. Countertops made of cast iron have the highest strength. The cheapest tables are made of silumin. They are easily deformed during use.
- Width and length of the desktop. These indicators determine the dimensions of the processed workpieces. Machines with a width of up to 15 cm and a length of up to 140 cm are used in home workshops. They are capable of processing small workpieces. Devices with a width of up to 63 cm and a length of up to 200 cm are used in large woodworking shops.
- Number of knives. The more cutting elements are attached to the planing shaft, the less frequently they need to be sharpened. For low intensity use of the tool, you can purchase models with 2 knives. For frequent processing of large quantities of bars, devices with 4 knives are required.
- Type and power of the power unit. Planers are equipped with a commutator or asynchronous electric motor. They differ in design and power. Commutator motors are installed in household jointers. They make a lot of noise. Asynchronous motors are installed in industrial tools and are characterized by high performance.
- Speed of rotation of the knife shaft. The faster the cutting elements rotate, the more accurate the cut. The average speed of the knife shaft is 4.7 - 5 thousand rpm.
Jointer knives
When choosing knives for a jointer, you must consider the following features:
- The type of wood determines the material used to make knives. For processing products made of pine and other coniferous trees, it is recommended to use blades made of P6M5 alloy. When planing softwood blocks, knives made from HSS alloy are required.
- For carpentry work, it is necessary to equip the machine with figured or straight knives. They provide high cutting accuracy and allow you to create unique contours on the surface being processed.
- Devices with dull knives will not be able to accurately process a wooden workpiece.
Knife blades wear out during long-term use of the machine and require sharpening. The following factors indicate wear of knives:
- When the jointer is running, the electric motor gets very hot.
- After processing, moss forms on the surface of the bar.
- The processed workpiece turned out to be uneven.
If the blades cannot be sharpened, they must be completely replaced.
Difference from surface planer
Thicknesser and jointer machines are used for processing wood products and other soft materials. The differences between these tools are as follows:
- Thicknesser must be used for finishing workpieces.
- The quality of the cut when working with a jointer depends on the skills of the operator; when working with a thickness planer - on the technical characteristics of the equipment.
- To align the 4 sides of a block using a jointer, a side rip fence is required.
- When working with a jointer, it is necessary to adjust the depth of penetration of the cutting elements into the surface being processed.
In industry, jointing and thicknessing machines are used together. The jointer sets the geometry of the wooden parts, the surface planer calibrates the processed workpiece by thickness.
Drawings and diagrams
Before assembling the benchtop jointer, it is necessary to develop drawings. In the process of creating them, you should take into account the elements that will be part of the diagram. Standard jointers without additional features include:
- bed;
- shaft equipped with blades;
- rotating roller;
- engine;
- three tabletops;
- emphasis
In the process of developing drawings, the master must indicate the main distances between the key elements of the stationary structure. To do this, you will need to take into account the location of the motor, roller and shaft with blades. The circuit will allow you to determine how much the number of output rotor rotations will decrease if there is an increase in power, and vice versa.
Connecting mechanisms
Rotation is transmitted from the engine to the shaft by means of a belt drive through pulleys. The pulley sizes are selected in accordance with the engine power and speed.
For a drive with a rotation of 3000 rpm, a ratio of 1 to 2 can be considered normal. For example, the diameter of the cutting tool pulley is 100 mm, on the drive it is 200 mm. The optimal ratio for DIY assembly can be obtained experimentally and largely depends on the quality and balancing of the rotating parts of the jointer.
The drive is connected to the electrical network using a starting device, in accordance with the instructions of the electric motor.
Overview of species
All models of the equipment in question available today are divided into manual and stationary. The first ones are designed for processing relatively small-sized workpieces. One of the key design features of manual jointers is the presence of a fastening element for installing the tool on a workbench.
Stationary models, as a rule, are used in carpentry workshops and furniture factories. Naturally, this equipment belongs to the professional category.
Manual
It is no secret that performing work with a mechanical jointer requires significant physical effort. Based on this, the demand for electric handheld models is growing at a record pace. As already noted, such a tool, when installed on a workbench or table, essentially turns into a small-sized stationary machine for woodworking.
Despite the fact that a hand-held electric jointer is a carpentry tool primarily for household use, with the right approach it allows you to process large volumes of wood. Moreover, the list of obvious advantages of such models includes their mobility. An equally significant point is due to the lower cost of equipment compared to stationary modifications.
Stationary
Equipment belonging to this category is significantly more expensive than manual models. The cost of stationary electric jointers, which are professional carpentry tools, starts at 12 thousand Russian rubles. Naturally, the functionality and performance properties of such devices differ significantly from their manual counterparts.
The stationary electric jointer is designed to perform a large number of manipulations.
Planing of large-sized timber and boards. Trimming workpieces at any angle. Selection of through grooves and shaped elements, that is, operations that are extremely difficult to perform using hand tools. High-quality processing of solid wood, the width and length of which are up to 650 and 3000 mm, respectively
It is important to take into account that the thickness of the workpiece must be at least 12 mm. Processing wood of particularly durable species, which include, for example, hornbeam and oak. It should be noted that, taking into account such capabilities, stationary jointers have a reduced speed of the cutter head
The increased productivity of the workpiece processing process is ensured by the corresponding power of up to 6 kW.
Among other things, the samples of equipment under consideration have the following technological features:
- increased number of cutting elements with a larger diameter;
- equipping a stationary guide ruler;
- possibility of adjusting table height;
- the presence of folding-type protective covers;
- The depth of planing is determined by a special mechanism that controls the extension of the axis of the cutter head.
The shaft with knives is located in radial rolling bearings and perpendicular to the table axis. In this way, potential distortions of the workpiece being processed are compensated for during the jointing process. This, in turn, ensures an even distribution of force between the knives used. Another design feature is a two-piece table mounted on the bed. At the same time, its rear part is stationary and is located on the axis of the knife shaft, and the front part is movable, taking into account the thickness of the chips being removed.
Planing knives
When selecting and using them, it is necessary to rely on the following factors:
- The material from which the knives used are made depends on the type of wood being processed. For example, to process pine bars or parts made from other coniferous trees, you need to use knives made of R6M5 alloy. For softer breeds, knives made of HSS steel are perfect.
- If the main focus of your work is on artistic carpentry, then straight and shaped knives will become a necessity. With their high cutting accuracy, they will be able to create unique patterns and contours on the processed plane of the part.
Due to long periods of use, knives are naturally subject to wear and require sharpening. The following signs will indicate the onset of this moment:
- During operation of the machine, the electric motor becomes very hot;
- Upon completion of processing, the surface of the part does not acquire a flat appearance, but, on the contrary, there is a certain “mossy” appearance;
- The treated surface turned out to have pronounced irregularities.
Installing knives on a jointer
When attaching knives to the planing shaft, you must be guided by some features:
- After placing the knives in the grooves, you need to secure them tightly;
- Only with the help of a clamp above the planing shaft is it possible to press the templates tightly to the edges of the work table;
- The blade must be raised until it comes into contact with the part. A special mark must be placed at the point where they touch;
- While fixing the bolts, the knives must be kept taut;
- After completing the adjustment of the first knife, you need to turn the shaft and continue adjusting the others;
- After completing the installation, you need to remove the template and change the bevel angle along the edge, as well as change the protrusion along the edge of the steel plates and the planer shaft. Next, it is recommended to test the blades with the electric motor running.
Setting up the device
During operation of this equipment, knives are used that have a chamfer and a sharpening angle of 40 degrees. Such knives are sharpened using special knife sharpening equipment. The radius of curvature of the cutting edge should be no more than 6-8 microns. As for the straightness of the knife length per 100 mm, it should not exceed 0.0025 mm.
Before installing the knives into the shaft, the front and rear tables should be lowered. When the blades are installed, it is quite acceptable for them to protrude beyond the edge of the chipbreaker by 2 mm, and of the shaft - no more than 2 mm. An important point is to control the parallelism of the knives. Special equipment is used for this. The difference should not exceed 0.1 mm per length of 1000 mm. The indicator device is used for more accurate installation of knives.
Next, they move on to setting up the tables, guide ruler and feed mechanisms. When all this is done, the machine starts in idle mode. If any deviations are detected in its operation, then it is adjusted.
Overview of species
Despite the simplicity of its components, there are currently more than a dozen types of planes. Devices made of wood and metal are conventionally divided into the category of general purpose, pure processing and figured carving.
When the master has decided on the purpose of purchasing a plane, he can choose an edging, end-cut, trimming, roughing, painting, grinding, large stationary tool or some other.
Flat planing
Planers of this type are of the following types.
Manual single. The tool is used to make a wooden surface smooth to obtain an ideal plane. The device has a straight blade with a slightly rounded edge. The absence of sharp corners prevents the formation of grooves. Thanks to the single plane, craftsmen can easily correct rough work done with a saw or axe.
Figure planing
This category of tools is used during the manufacture of grooves, processing of protruding parts and edges. Despite the fact that many craftsmen use electric devices in their work, figure planers are still popular.
The zenzubel looks like a narrow plane, which is needed to select a quarter. Thanks to the minimum width of the device, the end of the workpiece is removed, resulting in a groove. There are several modifications of this device, with which the master can work both along and across the fiber. Often, zenzubel is selected for finishing procedures that are aimed at forming rough wrappers.
Planer-thicknesser machine
It is a combined unit that organically combines the functions of a thickness planer and a jointer. Its advantage lies in this functional combination.
After the initial cutting and pre-processing of the boards, they are sent for surface thicknessing and jointing. The task of the paired equipment is to eliminate all irregularities. The machine consists of a work table attached to a frame. The workpiece is fed to the bed, and the work table is intended for receiving; between them there is a knife shaft with blades.
The workpiece is fed to the bed and, through automatic or manual feeding, moves towards the work table. At the same time, it interacts with the blades of the knives, which rotate and clean the plane of the part. The difference between this type of machine and jointing equipment is the ability to plan to a given depth. The knife of thicknessing equipment is located on top, but some models provide for the location of knives on the surface of the work table and under it. To determine the height of the blade, use a ruler located on the body.
A planer and at the same time a thicknessing machine performs two operations simultaneously, so its use is justified in large-scale industrial production. It can be used in the construction of high-rise buildings. High-quality processing is guaranteed, and incoming primary lumber can be corrected on site without any problems.
Features of operation and device
If you only use a jointer or surface planer, you will not be able to achieve a properly processed surface:
- the lower surface for processing on thicknessing equipment must be leveled, which can be achieved by preliminary jointing;
- if necessary, you can process two surfaces - one by jointing, the other finally - by thicknesser;
- Thickening and jointing simultaneous processing is possible only on a machine with these combined functions;
- The planer-planing machine copes well with workpieces that have undergone not very high-quality initial processing;
- The Federal Reserve System consists of two parts, each of which is responsible for specific functions.
Recommendations when choosing equipment
The woodworking market offers a wide range of FRS
When choosing a worthy unit, pay attention to the following parameters and characteristics:
- number of knives on the working shaft;
- dimensions and weight of the machine included;
- engine power;
- the speed of movement of the workpiece during processing.
Types of machines
The machines are a single system of planing and thicknessing. The powerful asynchronous motor is protected by a belt drive from increased overloads and operates with reduced noise emissions.
If during operation there is a failure in the electrical power supply, then spontaneous restart is impossible due to the use of a magnetic starter in the design. To reduce friction, the surface of the bed and work table is made of polished cast iron. For ease of operation, the receiving table and the serving table are made quite long. Switching from planing to thicknesser and back occurs quickly; for each mode, the nozzle has two positions. The machine operates without vibration.
Machines with simultaneous planing and thicknessing have undeniable advantages and improvements:
- the switch is made in the form of a rotary block;
- Powder coating is used to cover the frame;
- the durability of the frame and its protection against corrosion is due to the material used - cast iron;
- the feed can be turned off at any time;
- human protection from wood dust is provided;
- For ease of height adjustment, a convenient handle is provided;
- Some models use knives with double blades.
Popular models
KRATON 01 ptwm is equipped with a rigid frame, automatic feeding of parts is provided, a magnetic starter serves as protection against arbitrary switching on, a built-in turbine collects waste chips and dust, engine power is 1.6 kW, the maximum grip size is 2.5 mm, the speed is 8 thousand. in a minute.
STARK 1700 PWJ was developed by German designers, the model is distinguished by high quality characteristics. There are 2 knives on the shaft, the width of the planing strip is 203 mm, the speed of the part is 6 m per minute, the engine power is 1.7 kW, the shaft speed is 9 thousand revolutions per minute.
Types of jointing machines
There are 2 main types of jointing machines:
- Manual jointer. This tool is most often used in home workshops. It has a simple design and low cost.
- Electric jointer. This device is characterized by its large mass and high energy consumption. Its advantage is cutting accuracy and increased productivity. An electric jointer is used in large industries. The disadvantage of this tool is its high cost.
Planers are classified according to their purpose:
- Planing and jointing machine. Only planing of wooden parts is used.
- Planer-thicknesser machine. Used for planing and calibrating workpieces.
- Jointer-circular machine. Designed for longitudinal and transverse sawing of bars and milling of parts.
- Universal machines. Capable of performing drilling and grooving work, jointing, sawing and calibrating boards.
Stationary jointers are divided into:
- One-sided. These tools are equipped with 1 working shaft. In one pass, they are able to process only the lower surface of the product. Single-sided devices are not equipped with an automatic workpiece feeding system. The planing speed of the block is no more than 10 m/min.
- Double sided. These devices are equipped with several planing shafts. Therefore, they are able to process all surfaces of a part at the same time, which increases the speed of planing wood parts. Double-sided tools are equipped with an automatic workpiece feeding system.
Portable mini jointers are also used in home workshops. They are small in size and light in weight. The disadvantage of mini jointers is their reduced performance characteristics.