The range of lumber offered is quite wide; woodworking products vary in quality, cost, as well as types of wood cutting.
Let's take a closer look at what types of wood cutting exist, and to do this, first let's look in general terms at what the actual technology of wood cutting is. First of all, the original log is transformed into a carriage with a circular saw, cutting two planes along its sides. If all sides are sawn, then the output will be edged material, which is divided into timber, small timber and edged boards. Planed boards are called lining, floorboards, platbands and baseboards. Glued products include, for example, furniture panels.
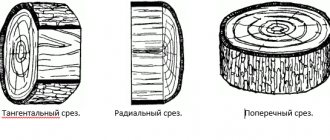
Wood cutting
There are the following types of wood cutting: radial, tangential or rustic. Depending on the dimensions of the cross-section, the edged material is divided into boards, beams and whetstones. If the width of the section is twice the thickness, then it is a board. Edged lumber refers to beams if the cross-sectional dimensions are more than 10 cm. A distinctive feature of beams is their width, which is less than twice the thickness.
Wood sawing methods
- Wood cutting diagram.
- Wood cutting methods. Methods for cutting wood
Radial and tangential cuts Radial is a cut in which the plane of the cut passes through the core of the trunk. The wood of such boards is quite uniform in color and texture, the inter-ring dimensions are minimal. Radial cut boards are resistant to external influences, are practically not subject to deformation and have high wear resistance. The radial cut board has a shrinkage coefficient = 0.19% and a swelling coefficient = 0.2%. These indicators for radially cut lumber are twice as good as for tangentially cut boards. Since the yield of radial cut boards is 10–15% of the total volume, their cost is quite high.
1 2 3
Cut texture: 1 - tangential cut; 2 - radial cut; 3 - semi-radial cut.
A tangential cut is a cut in which the cutting plane passes at a distance from the core, tangentially to the annual layer of the trunk. Such boards have a pronounced texture and a rich wave-like pattern of annual rings. Tangential cut boards have higher shrinkage and swelling coefficients, but are more affordable.
Wood texture and defects
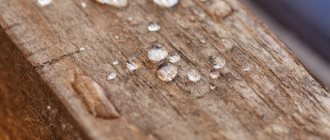
texture is a natural pattern formed by the fibers and layers of wood and determined by the characteristics of its structure. Depends on the location of the wood fibers, the visibility of the annual layers, the color scheme of the wood, the number and size of the medullary rays. defects are defects in the shape of the trunk (growths, beveledness, hardness, etc.), natural inhomogeneities in the structure of wood (knots, core, heel, twist, etc.), violations of the integrity of its tissues for various reasons (cracks, resin pockets , wormholes, rot, etc.), stains of biological chemical origin (blue, dent, etc.), foreign inclusions, mechanical damage and processing defects that reduce the quality of wood and limit its use. The inclination of the fibers is the deviation of the direction of the fibers from the longitudinal axis of the material (formerly called cross-layer). It is found in all breeds. There are tangential and radial inclination of fibers. Traction wood is the wood of some deciduous species (beech, poplar) with a change in structure in the extended zone of trunks and branches, manifested in a sharp increase in the width of the annual layers. Detected by hairiness. When exposed to color it turns brown. Curling is a tortuous or random arrangement of wood fibers. It is found in all tree species, more often in deciduous trees made from the butt part of the trunk. It can be wavy and tangled. Curl - local curvature of annual layers near knots or sprouts. It can be one-way or end-to-end. It reduces the strength of wood. The eyes are traces of dormant buds that have not developed into shoots. The diameter does not exceed 5mm. There are scattered and group ones. By color: light and dark. Reduces the strength of wood. Pocket - density inside or between annual layers, filled with resin or gums. The core is the narrow central part of the trunk, consisting of loose tissue of brown or lighter color than the surrounding wood. At the ends of the assortment there are spots about 5 mm of various shapes, on the radial surface - in the form of a narrow strip. Displaced core - eccentric location of the core, accompanied by curling. Double core - the presence in an assortment of 2 or more cores with independent systems of annual layers, surrounded on the periphery by one common system. Stepchild is a second peak that remains in growth or has died off, passing through the assortment at an acute angle to its longitudinal axis over a considerable length. Dry side is a section of the trunk surface that has become dead during the growth of the tree as a result of damage. Sprout - a wound that has healed or become overgrown Cancer - a depression or swelling on the surface of a growing tree resulting from the activity of fungi or bacteria. False core is a dark, unevenly colored zone, the border of which does not coincide with the annual layers, separated from the sapwood by a dark border. Wood spotting is the coloring of the sapwood of deciduous trees in the form of spots and stripes, close in color to the color of the core. Inner sapwood is adjacent annual layers located in the core zone, their color and properties are close to the color and properties of sapwood. Watershed - areas of core or mature wood with high water content.
Main dimensions of lumber
There are standard dimensions of lumber. For example, the cross-section of a beam can be 10x10, 10x15 or 15x15 cm, and the length is 6 m. Deviation from these standards will require a special order and will also be associated with additional financial costs. The most expensive is profiled timber, manufactured to the highest cleanliness class.
The edged board can be 2.5 cm, 4 cm or 5 cm thick, 10 cm, 15 cm wide, and a standard length of 6 m. The length of small timber, in addition to the standard value of 6 m, can also be 3 m Its cross-section will be 4x4 cm or 5x5 cm. A by-product of the production of these lumber is a slab, on one side of which there is a face, and on the opposite side there is untreated wood.
Sawing wood
IntroductionWood processing is one of the most ancient crafts. Wood processing tools and techniques are widely known.
Wood processing techniques for building aircraft models are very diverse: splitting, turning, planing, veneering, chiselling, drilling, bending, gluing, etc.
Ignorance of basic techniques for processing and setting up tools causes unnecessary difficulties in work and sometimes even discourages the desire to work. You can see how a novice modeler, using a dull saw, works for a long time and, without getting the desired results, splits the board along the layer with an ax or knife. This often leads to damage to the part. The resulting material residues, as a rule, cannot be used, and they lose their value. Working with a sharp, serviceable tool that suits its purpose is always effective and does not require much physical effort.
Wood can be processed manually, using mechanized tools and on machines.
Carpentry and special modeling tools are used to process wooden parts.
Every modeler needs to have a set of carpentry tools, and in model workshops, in addition, there should be small woodworking machines
Marking and marking tool
Before you start processing the part, you need to mark the workpiece. The quality of the part largely depends on the correctness and accuracy of the markings. Even small errors in drawing marking lines can lead to irreparable defects. Despite the apparent simplicity of this work and the simplicity of the tool used, you need to be very careful, and after marking is completed, carefully check the constructions made.
To draw lines in carpentry, a surface gauge, a scriber and a compass with sharpened legs are used. In the manufacture of flying models, these tools are used less frequently, since they deeply cut the surface of the parts, significantly reducing their strength. It should be borne in mind that on smooth surfaces intended for polishing or coating with nitro varnishes, these tools leave deep marks that are difficult to remove.
To draw lines when marking, it is best to use a simple graphite pencil. To mark parts made of hard wood, TM, T, 2T and ZT pencils are used; for soft wood, for example, linden or spruce, M pencils are used.
The following tool is used for marking.
A metal or wooden ruler with millimeter divisions is used for measuring and marking dimensions. When marking, you can also use a folding meter or steel tape measure, for sizes less than 100 mm - a caliper.
A metal square is used for marking right angles and checking them. The correctness of such squares is checked by comparing them with a control square. If there is no control square, then on a flat board with a straight edge a line is drawn along the square, then the square is turned to the other side and a second line is drawn next to the first line.
If the lines turn out to be parallel, the square is correct.
The malka is used for setting aside corners and checking them. Set the grinder to the desired angle using a protractor or protractor.
The marking tool is used to draw lines parallel to the edge.
Thin plywood, cardboard and celluloid can not only be marked with a marking tool, but also cut.
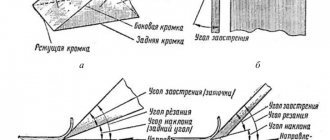
To do this, the surface scriber needs to be sharpened in the form of a cutter. SAWING OF WOOD and wood MATERIALS.
The task is not just to divide the wood, but to perform a dimensional operation to process transverse, longitudinal, oblique, and inclined planes using a saw. Ideally, the plane obtained by sawing is not subject to any further processing and is geometrically and dimensionally accurate.
Today, the best tool for hand sawing at home is a hacksaw with a universal tooth with a pitch of 2.5 ... 4.5 mm. This hacksaw allows precise sawing in any direction and is universal in the household. She is also good at professional things. With a hacksaw you can make cuts in wood in any direction with a cutting width the size of the thickness of the hacksaw or more, i.e. With just one hacksaw you can make a groove with a width ranging from the width of the hacksaw set (1.5 - 2 mm) to 4 - 5 mm or more. Wider grooves are made using a hacksaw and chisel. A hacksaw can be used to very accurately and better than a file to correct the side surfaces of a tenon.
The universal sharpening of the tooth is shaped closer to the tooth for longitudinal sawing and therefore it is the starting point for sharpening. Several types of sharpening have been tested in practice (see appendix). With different labor intensity, they give comparable results. Therefore, you can choose the sharpening method according to the shape of the saw tooth, file, equipment and your skill in sharpening saws. A hacksaw, like any cutting tool, must always be sharpened, be straight, have an appropriate spread, and have a comfortable handle.
Now, actually, about sawing. First of all, you need to choose a comfortable position. The legs are apart, the back is straight, the torso is tilted at the hip joints, the emphasis is on the left (for a right-handed person) hand. The position is balanced, stable, comfortable.
Sawing is carried out along the marking line, cutting off half of it from the side of the material being removed, i.e. always the marking line (half of it) remains in the part (in the body of the part). It is more convenient when you observe the marking line to the left of the hacksaw. This is achieved by positioning the workpiece. Once a certain skill is achieved, cutting is also easy to do to the left of the line.
When sawing, the workpiece itself must be secured, fixed in a vice, or on special stops with pressure with a non-working hand. Dimensional sawing is always (in most cases) carried out from the front side of the workpiece with a horizontal movement of the hacksaw. We pay special attention to the straightness of the hacksaw’s movement in both horizontal and vertical planes. The whole body, legs, back, neck, supporting arm are relaxed. The working hand holds the hacksaw without tension; the muscles used are only those necessary to hold the hacksaw and move it. Check to see if opposing muscles are engaged (flexor-extensor and vice versa).
The cut (start of sawing) is made with an inclined hacksaw, moving away from you from the far edge of the marking line. Holding the hacksaw in a canopy, we make one or two smooth movements of the hacksaw over the marking line. We observe the passage of the edges of the hacksaw teeth relative to the line, adjust its position and, while moving away from us, lightly touch the workpiece with the hacksaw. The main thing is not to cut the line. If the cut has moved away from the line towards the material being removed, this can be easily corrected. The hacksaw is tilted at an angle of approximately 10° to the horizon (practically rests on the workpiece) with its teeth in the direction of the desired offset of the cut, and several light longitudinal movements of the hacksaw are made with virtually no pressure until the hacksaw teeth reach the marking line. Without stopping the longitudinal movements of the hacksaw, it turns to a vertical (or other necessary) position and continues cutting. When the hacksaw is immersed in the material to a depth of ~ 2 mm, the hacksaw is transferred from an inclined position to a horizontal position without stopping its longitudinal movements. While sawing, you should not put pressure on the hacksaw - it seems to be sawing itself and selecting the optimal cutting depth required for it (the thickness of the chips removed).
How should you direct the hacksaw to the marking line? There is a rule: a block of wood with a flat end is taken in the left (non-working) hand, placed on the cutting line, through this block the workpiece is fixed on the stop, and along the end of this block the hacksaw is directed to the line by pressing it against the end of the block during the filing motion of the hacksaw . The fingers of the left hand are kept at a safe distance to prevent injury from the hacksaw. But in this way it is more than difficult to make an accurate cut with a hacksaw, especially when making a long, inclined, oblique or correction cut. According to the author, it is more professional to guide the hacksaw with the thumb of the non-working hand. With the correct and controlled position of the hand, this is also safe, but allows constant visual control of the position of the hacksaw and control of the sawing process. The left hand is placed on the workpiece, pressing it, at a distance of 2.5-3 cm from the cut. The thumb is bent upward and to the right and touches the hacksaw 3-5 cm above the teeth. It is practically excluded from the dangerous zone of influence of the hacksaw teeth. The most injured is the index finger. It, like the other fingers, is bent, placed on the workpiece with nails, and thus the workpiece is pressed. Or they grasp the workpiece together with the stop, controlling the position of the index finger. Constantly being in a state of control over your actions completely eliminates the possibility of injury. The rule must apply: not a single thoughtless movement or action, i.e. not a single automatic action. This is the beginning of the development of self-control, which should always be turned on.
An inclined cut is carried out as follows: we make a cut on the far edge, move the hacksaw to a horizontal position and cut to a depth of 1-1.5 mm. Then we tilt the hacksaw to the required angle, orienting it along the marking line, and cut along it. Several trial bevel cuts allow you to fully master this process. Oblique cuts are carried out in the same way as straight ones. A special feature is that it is somewhat difficult to cut - when cutting on an edge, the hacksaw moves at an angle to the fibers and tends to slip off them. In this case, we proceed as with inclined sawing: we make a notch on the edge perpendicular to the fibers (in no case cutting the marking line) and then, turning the hacksaw to the marking line, calmly saw with a horizontal hacksaw, controlling the cut along the vertical (or other necessary) marking lines.
Using a hacksaw to shape a groove wider than its thickness, for example for a thin key, is done as follows: mark the groove, make a vertical (or other necessary) cut to the full required depth along the right marking line. Then, as when correcting a cut, we lay the hacksaw almost flat on the workpiece (angle 5-10°) with its teeth towards the second marking line and with horizontal movements of the hacksaw we bring its teeth to the left marking line. We turn the hacksaw to a vertical position (or another necessary one) and, pressing the hacksaw tightly against the left side of the cut, we cut the resulting ledge, forming the left side of the groove. In this way, grooves up to 4…5 mm wide can be easily made. Children learn this exercise easily and do it well.
It is useful to note the use of a hacksaw to adjust the thickness of the tenon. The workpiece is installed horizontally with the tenon plane facing up. A hacksaw is applied to the plane of the tenon perpendicular to it with its teeth. The thumb of the left hand fixes it as if making a gash. Now we make sawing movements with a hacksaw, at the same time moving it with the thumb of our left hand along the plane of the tenon. We carry out movements both perpendicular to the axis of the workpiece and slightly at an angle to the right and left. In several passes along the plane, a layer of up to 2 mm can be easily removed. This method is easier, more accurate and better than processing the tenon with a rasp or file. In addition, we perfectly roughen the surface for subsequent gluing.
As a result, we know that sawing produces precise dimensional processing, prepares the surface for gluing, and corrects errors. It is the accuracy of sawing that ensures the quality of fit of the joint surfaces. Sawing is a responsible and at the same time fascinating wood processing operation.
Tools related to sawing wood.
A hand saw consists of two main parts: the saw blade or handle, which is used to hold the saw while working, and the saw blade.
Each saw tooth represents a cutter. The saw teeth, bent alternately to the sides, form a so-called set, which facilitates the movement of the saw blade, since the cut is wider than the thickness of the blade.
Depending on the shape of the tooth and its sharpening, transverse, longitudinal and universal saws are distinguished. Saws can be manual or mechanized.
Based on the size of the teeth, saws are divided into fine-toothed (tooth height up to 3 mm), normal (tooth height 4-5 mm) and coarse-toothed (tooth height 6-8 mm).
Fine-tooth saws are used for precise work, and coarse-tooth saws are used for rough sawing on soft or raw wood.
Hand saws
A crosscut saw is designed to cut wood across the grain; its teeth are shaped.
A rip saw is used to cut wood along the grain. Its main difference from a cross-cut saw is the absence of side edges on the teeth.
A saw for universal sawing, used for sawing in both longitudinal and transverse directions, differs in the shape of the tooth.
According to their design, saws are divided into saws with a tensioned blade and saws with a free blade.
The bow saw is a type of saw with a tensioned blade. It can be used for a wide variety of jobs, depending on the width of the supplied blade and the shape of its teeth.
Hacksaws (ship saws, ax saws) have a free wide blade with teeth of various shapes and sizes. Thanks to their ability to maintain the direction of the cut, hacksaws are very convenient for modeling.
Sharpening hand saws
Working with a dull or faulty saw is difficult and unproductive, so before you start working, you need to put the saw in order and make sure it is sharpened correctly. To do this, remove tar and rust from the surface of the saw with a rag soaked in kerosene, then, if the saw was bent, straighten it. The saw should be straightened with a mallet on a flat metal surface.
The straightened saw is clamped in a bench or special vice with the teeth up and the teeth are aligned in height and shape with a triangular personal file, and then they begin to set them. When setting the saw, the teeth along the entire length of the saw are bent alternately in opposite directions.
As a result of setting the teeth, the cut is wider than the blade, and the saw moves easily in the cut.
A poorly set saw produces an uneven cut and leads to the sides.
The saws are set with a special tool - a setter. The saw teeth are bent one after another in one direction, and the missing teeth are bent in the opposite direction. If there is no wiring, this work can be done with a screwdriver.
After setting, the saw is sharpened with a personal triangular or diamond-shaped file.
Jigsaws are a type of small manual or mechanical machine with tensioned thin saw blades, so-called jigsaw blades.
Jigsaws are used for the most delicate and delicate work, mainly for cutting shaped holes and curved cuts.
The design of the jigsaw depends on the size of the parts being cut and what material needs to be cut. To work on hard wood, plastics and metal, metal jigsaws with a slight offset are used. To work on plywood, use a wooden or metal jigsaw with a large offset.
Jigsaw blades are commercially known as “metal saws” and “wood saws.” Working with a jigsaw requires great care, since even with a slight misalignment of the jigsaw, the file easily breaks.
As a rule, a jigsaw is used on a stand that is screwed to a board or table. Especially small work on plastic and metal is done by clamping the part in a table vise.
When working in a vice, the file is clamped in the “tooth away from the handle” direction, when working on a stand - “tooth towards the handle”.
Good jigsaw files should be elastic and have clear, sharp teeth. The file should not have one-sided burrs resulting from the manufacture of the file, as they cause inevitable deviation of the cut to the side. To avoid jamming, leading to breakage, files wider than 1 mm must have a routing.
Along with flat files, round files are sometimes used, which allow you to make cuts in any direction without turning the jigsaw, simply by pressing its handle in the desired direction.
To cut grooves in plates, for example, ribs, several files are successfully used, which are clamped simultaneously. The cutting width is adjusted by the number of files.
If you don’t have files, you can make them yourself from flattened wire or a clock spring 1-2 mm wide.
To do this, you need to straighten the workpiece and clamp it in a vice, cut through the teeth through one with a small needle file, then turn the workpiece and saw through the missing teeth on the other side in the opposite direction. By using this method, the formation of one-sided burrs on both sides is avoided, and the canvas receives a unique layout.
You can make a file in another way. To do this, a straightened clock spring or a strip of spring steel of the required thickness is clamped between two plates in a vice and the teeth are cut with a sharp chisel.
Mechanical jigsaws
The performance of internal sawing work is greatly facilitated and improved with the help of mechanical jigsaws.
For mechanical jigsaws, files up to 200 mm long with a tooth height of 0.8 to 2 mm are used, depending on the thickness of the material being cut. Thanks to the correct movement of the saw and the large number of strokes per minute on mechanical jigsaws, you can saw several parts of the same type at once in a package up to 30-40 mm thick.
By design, there are spring and frame mechanical jigsaws.
A spring jigsaw consists of a frame and a crank mechanism with a return spring. The simple design of such a machine allows you to make it yourself in a locksmith workshop.
A frame jigsaw consists of a movable frame on which a file is stretched, a table frame and a crank mechanism that drives the frame. A frame jigsaw provides slightly more favorable conditions for saw operation than a spring jigsaw.
Working methods and accessories for sawing
Devices make work easier and also increase accuracy. These include stop bars on the table, a vice on the workbench, and a wedge for clamping the part on the workbench.
For precise cutting at a given angle, a device called a miter box is used. This is a wooden box made of well-fitted bars with precise slots located at angles of 90°, 45° and 30° to the longitudinal axis of the box. When working in a miter box, the part is clamped with a clamp or wedge inside it so that the cut passes in the right place. The saw blade, inserted into the slot, does not have the opportunity to move to the sides when moving, which ensures an accurate and even cut.
First of all, you should pay attention to sawing, that is, the beginning of the cut. It is important to prevent the saw from jumping and start cutting exactly according to the markings. To do this, as shown in the figure, use the thumb of your left hand to support the saw blade above the level of the teeth.
Mechanical saws
A circular or circular saw consists of a frame with an electric motor and a spindle on which saw blades of various diameters, thicknesses and with different tooth shapes are mounted, depending on the nature of the sawing.
A necessary device is also a movable ruler, which is installed at the required distance from the plane of the saw blade and ensures straightness of cutting.
Cuts in the transverse direction or at an angle are made using a pusher that moves along the groove of the table. It has a rotating ruler with a clamping bolt.
To prevent the sawn strip from moving to the side, you need to press it against the ruler with your left hand, and push the entire pusher forward with your right hand. To cut at an angle, the ruler is set at the desired angle and secured with a clamping bolt.
Sharpening the teeth of saw blades is carried out according to the same principle as for hand saws.
In the absence of special discs, you can also use disc cutters for metal 1-2 mm thick, having previously sharpened them.
Resharpening can be done on a sharpening machine with a thin slotted wheel or, after releasing the saw first, with a round or triangular file.
Circular saws speed up the process of sawing wood many times over and are used mainly for longitudinal sawing of lumber and making slats.
In velvet or planing saw blades, the edges formed by the depressions serve as a kind of cutters that plane the cutting surfaces. The beveled shape of the tooth and the presence of a large cavity between the groups of teeth provide, when sharpened correctly, a smooth cutting surface that requires almost no further processing with a plane.
The saw blade of a planing saw in its peripheral part has a constant thickness, and starting from 2/3 of the radius towards the center, its thickness decreases.
The disadvantage of these saws is that they do not maintain the direction of the cut well, leading it along an oblique layer or towards the dull surface of the saw. This drawback can be eliminated by carefully grinding the side surfaces of the disc.
When working on a circular saw, it should be borne in mind that a saw blade rotating at a high number of revolutions poses a great danger to the worker’s hands. Therefore, you should use devices, and when finishing the cut, push the material to be cut with a rack or pusher.
To avoid splinters and sawdust getting into your eyes while working, it is recommended to use safety glasses.
Working with a circular saw with unset or poorly sharpened teeth is ineffective and does not provide high-quality cutting. In addition, it is dangerous, since the disk can jam, and there are cases of the sawn part being thrown towards the worker. If the fuel is not properly charged, the saw will overheat and may become deformed and burst.
When installing the disk on the shaft, you need to check the sharpness and integrity of the disk - there are no cracks or broken teeth. Then you need to put the washers, tighten the nut by hand, locking the saw blade with a block, and finally tighten it with a wrench. After this, having turned the saw, you need to make sure that the disk does not hit, lower the guard, connect the current and test turn on the machine and cut.
It is necessary to set up, correct and remove the machine only after it has stopped completely,
Band saw is a high-performance machine for cutting shaped contours.
This machine consists of a frame on which the driving and supporting wheels of the saw blade and an electric motor are fixed, driving the driving wheel through the drive.
The tension of the saw band is adjustable, and its location is fixed with a stop and two rollers near the table.
The saw blade is made from a band saw blade, the width and size of the teeth of which are determined depending on the size of the machine and the type of work in the same way as for hand-held bow saws. Sharpening and setting are carried out according to the type of universal tooth profile.
To form a closed strip, the ends of the saw blade are connected by soldering with copper solder, brass or copper. The same applies to repairing torn fabric.
Soldering of band saws in the factory is carried out using a special electric welding machine.
In small workshops, you can successfully solder saws using the torch described in Chapter II, or using special pliers.
The following soldering process can be recommended: the place of soldering (the joint of the saw) is ground “on a miter edge”, then, cutting out a strip of brass 0.3-0.4 mm thick along the width of the saw, moistened with water, sprinkled with borax powder (borax serves as a flux that protects the soldering area from oxidation when heated) and placed between the surfaces to be soldered. Meanwhile, the massive sponges of the mites are heated in a forge or gas burner until they turn light red (800-1000 °C). The pliers are applied to the soldering area and squeezed.
The red-hot massive jaws of the pliers transfer heat to the saw, and it quickly heats up to the temperature of the jaws themselves. Brass and borax melt and, spreading over the joint, form a reliable connection.
After allowing the tape to cool in a clamped state until the solder becomes hard, the pliers are removed, and the soldering area is wiped with a wet rag so that it restores the hardness lost during heating (heated up). In this case, it is necessary to ensure that the rigidity of the soldering area is the same as the rigidity of the rest of the saw. If the joint turns out to be too hard after cooling, it must be heated again with tongs until a straw-colored tarnish appears and allowed to cool gradually. If it turns out to be too soft, then the pliers should be heated red-hot, warm the joint with them, and then cool the joint more sharply.
During cooling, it is important to ensure that the pliers do not become soldered to the saw blade. To do this, their sponges are lubricated with a solution of liquid glass and chalk before heating.
When installed on a band saw, the blade is placed on the upper and lower discs and tensioned with a special handle. Then, by rotating the upper disk, check that the web passes correctly over the disks and thrust rollers. If necessary, make adjustments using the device available on the machine. After this, the machine is turned on for a short time and additional adjustments are made.
It is necessary to ensure that the saw guard is installed and the blade guards are closed during operation.
Improving cutting quality:
- When sawing, do not allow the feed speed of lumber to decrease (this will lead to unwanted premature wear of the cutting tooth), the speed should be as high as possible;
- Make sure that the blade is of the correct shape (both before and during work);
- Do not allow resin to stick to the blade;
- Correct routing of the saw will extend the operating time (correct routing will eliminate the appearance of waves on the material and improve the quality of the finished product);
Tool
Sawing in a home workshop is done using an electric jigsaw and saw. The saw can also be electric or manual.
To make sawing easy, before starting work you should take care of the correct settings of the working tools:
- First you need to check whether the saw is well sharpened and, if necessary, sharpen it. This is done using a file.
- In addition, the saw teeth should be set alternately to the sides, this is necessary so that the saw does not get stuck in the cut during operation. The teeth are bent using pliers.