Every person who has worked with a circular saw at least once in his life knows how difficult it is to achieve an even and precise cut using such an electric tool.
Most people solve this problem with the help of the simplest devices, for example, strips of plastic or plywood, which are attached to the surface of the clamp. But it will be much more convenient to use a special guide rail for such purposes. It is precisely such a device that can extremely rarely be found in the basic configuration of a manual circular saw, and in construction markets such a device separately will cost the same as the saw itself. But this is even strange, because the device is not complicated.
If you have all the necessary materials, making a guide for a circular saw with your own hands is not so difficult, and this is what will be discussed in our article.
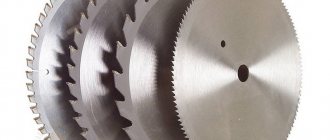
Types of tires
They fall into two broad categories:
- double-sided and one-sided;
- symmetrical, asymmetrical tires.
The main characteristics of the classification are:
- design features of the saw;
- geometric dimensions;
- the material used;
- availability of replaceable and complex tires.
Variety of guides
Based on the first feature, tires for electric and gasoline tools are distinguished. Dimensions indicate the processing capabilities of wooden products (depending on the length and cross-section of the block). The materials can be used: wood, wood boards, metal guides. The presence of tires of complex shape makes it possible to process wooden workpieces of complex geometric shape.
Based on the nature of their application, they are divided into three main categories:
- Universal tires. The design allows them to be used for almost most types of circular saws.
- Specialized guide rail. These are guide bars that are designed for use with a circular saw.
- Homemade. This type has great variety and is determined by the imagination and skill of the developer.
Universal guide rail
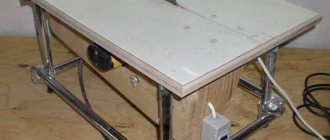
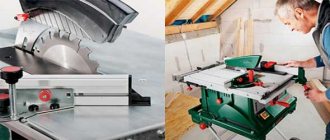
Making a workbench
- Mark and cut a tabletop of the required size from plywood. Clean the surface with sandpaper.
- At the bottom of the tabletop we mark places for holes for attaching the saw. To do this, you need to remove the blade and install the saw in the right place, making notes. The holes for the bolts are countersunk on the surface, and the heads of the bolts need to be sanded.
- If the material will be cut at different angles, the hole for the disk should be made in the shape of an inverted trapezoid.
- Mark the places where the stiffening ribs are attached to the tabletop (from below, at a distance of about 8 cm from the edge). The legs need to be secured to the ribs. The ribs are screwed on with self-tapping screws at intervals of 25 cm and glued with PVA.
- The legs are made from timber 100 cm long. Then a screed is made from timber for additional strength.
- To be able to adjust the height of the table legs, nuts and M14 bolts are attached from below.
- We fix the saw from below.
- We attach the socket to the inside of the table. From it we pull the wire to the switch.
- We make a parallel emphasis. We cut two strips of plywood, the same length as the width of the table. The width of the stripes is 10 cm. We make the corners round. We sand both strips and fasten them with self-tapping screws. Then we cut two strips of the same length, but three times wider. We fasten them. This will be the guide. We fasten the stop and guide. We set a right angle relative to the disk. We attach the rollers.
How to use a circular saw guide?
To perform the functions assigned to the bus, the following rules must be followed.
- Prepare the tool for work (remove any debris or sawdust from the surface).
- Check the reliability of the existing fastening system.
- Check that the selected tire and the prepared material for cutting comply with the characteristics of the circular saw.
- The guide for the circular saw is installed in a previously prepared place.
- Attach to the base or workpiece.
- Press the saw firmly against the surface of the bar.
Using a tire for a circular saw
Further actions must be carried out in accordance with the rules for working with a specific saw.
Peculiarities
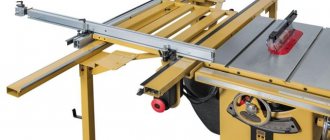
What these design solutions have in common is a rack that moves relative to the cutting blade along the plane of the saw table. When creating this rail, it is proposed to use a standard extruded profile of a rectangular unequal flange angular section of aluminum or magnesium alloys. When assembling a parallel miter gauge with your own hands, other profiles of a similar cross-section can be used in accordance with the length and width of the working plane of the table, as well as the type of circular saw.
The proposed drawing options use a corner with the following dimensions (mm):
- wide – 70x6;
- narrow – 41x10.
Design features of tires for circular saws
A circular saw guide has several basic design elements. The main element is always the guide (regardless of the selected material). Installed stops that determine the length of the permissible cut. Set of fastening elements. Ordinary bolts and nuts, clamps or wing fastenings can be used. The differences between the various guides are: the selected material (wood or metal), geometric dimensions.
Scheme for making a guide bar
From plywood
Necessary materials
To make such a tire you will need three pieces of plywood 10 mm thick. Their length should be the same and is usually equal to the length of the workbench on which the work will be done. One of the segments should be 25-35 cm wide (it will serve as the base), the width of the other two will be determined during the manufacture of the tire. Also prepare 16 mm wood screws.
Drawing with dimensions:
Manufacturing instructions
When creating a guide, all dimensions must be observed very accurately. Small deviations can lead to a sharp deterioration in the result. If desired, laminate can be used instead of plywood.
The plywood guide rail is made in several steps:
- Measure the distance from the inner edge of the saw blade to the rip guide groove located on the tool support platform.
- Cut one of the plywood strips so that its width is 0.2-0.5 mm less than the distance obtained in step 1. The grains of the top layer of veneer on plywood should be directed longitudinally.
- Using self-tapping screws, screw the resulting strip to a wide piece of plywood (base), precisely aligning their ends. This will be the working edge of the tire.
- Using a caliper, measure the width of the longitudinal cut guide groove.
- Screw the remaining strip of plywood to the base parallel to the first strip. There should be a gap between them, the size of which should be 0.2-0.5 mm less than the width of the groove measured in the previous paragraph.
- To avoid damaging the material being cut, a layer of soft fabric is glued to the finished guide on the bottom side.
The homemade guide is ready, all that remains is to prepare the hand saw. To do this, saw off a narrow strip of thick plywood or other sufficiently durable material. The height of this strip should be 8-9 mm greater than the depth of the guide groove on the saw base. The width corresponds to the width of this groove. The length is several centimeters longer than the length of the sole.
The resulting limiter strip should be secured in the guide groove so that it protrudes beyond both edges of the sole.
How to use plywood tire?
To make a cut, you will need two clamps and two flat pieces of wood slightly thicker than the work piece. The guide rail is installed with its ends on these bars so that its working edge protrudes slightly beyond the edge of the workbench table top. In places where the tire rests on the bars, it is tightly fastened with clamps to the workbench.
The workpiece to be cut with a cutting line pre-marked with a pencil is placed under the tire, and the cutting line is aligned with its working edge. Finally, a circular piece with a limit strip attached to it is installed on the tire so that the limiter on the sole fits exactly into the prepared gap. Now you can saw, holding the workpiece with your free hand and lightly pressing the saw towards the workbench.
Guide rail functions
Any guide rail: factory-produced or manufactured independently performs a number of important functions;
- Provides high accuracy and good cutting quality;
- Allows you to perform not only straight cuts, but also cuts of a given configuration;
- Allows longitudinal and cross cuts;
- Adjust the length of the cut piece.
- Carry out precise trimming of one or several workpieces at the same time.
- Ensures compliance with the rules for safe handling of such a complex instrument.
Materials and tools for making jigs for a circular saw
The implementation of your ideas will require a simple set of tools and a small number of non-scarce components:
- wooden blanks (usually 10mm thick bars or wood materials are used: plywood, wood boards, laminate);
- hardwood bars with a thickness of more than 10 millimeters (thick plywood, various types of wood boards, such as laminate, can be used);
- hardware (screws, self-tapping screws, bolts, nuts);
- an electric jigsaw or a circular saw itself;
- electric or hand drill with a chuck up to 10mm;
- electric screwdriver or screwdriver with a set of bits (mostly flat and Phillips);
- clamps.
Making a guide bar
Nuances when working
In conclusion, here are a few subtleties that are useful to know if you want to make a homemade carriage for a circular saw:
- It is recommended to install a thick block on the supporting wall in the place where the disk passes through it, which will prevent the saw from jumping over the edge of the wall, which can lead to injury.
- In order to give the structure greater slip, it is recommended to clean the runners with sandpaper, and periodically lubricate the grooves with a candle stub (paraffin or stearin). Sometimes wax is used, but it is not recommended to use it, since it melts during use and sticks to the runners.
- Before applying glue to parts, blow the structure away from particles of wood dust and shavings to avoid unevenness after gluing.
- After cutting through the walls, make sure that the saw passes through them freely. To do this, you can make a sawn hole slightly larger than the thickness of the disk.
Having made an end carriage in such a simple way in a home workshop, the craftsman will have at hand an easy-to-use, universal tool that can be used in most types of carpentry work.
Stop ruler is a simple and clear element
This type of tire as a thrust ruler is the simplest, easiest to manufacture and use. When manufacturing it, it is necessary to remember that no matter how simple the design is, it must ensure reliability and safety. A high-quality stop ruler can be used for an electric jigsaw, a hand-held circular saw, or a simple hand saw. Manufacturing is carried out according to the following sequence.
- Prepare a wooden or plywood strip. The width should exceed the width of the platform of the circular saw used by 20 centimeters.
- A ruler is made from this strip. The remaining sheet of plywood is used to make the base.
- The finished structure is screwed to the base. For this purpose, wood screws are used.
- The protruding part of the ruler is carefully trimmed. The edges should be milled.
Stop ruler
When starting to work with a finished tool, it is advisable to carry out several test cuts on secondary wooden products. You need to get used to the fact that when moving the saw along the length of the ruler, you need to apply different forces. Therefore, you should gain some experience. Then proceed to the finishing cut.
What are miter saw stops for?
All kinds of additional devices: stops, clamps, fasteners are used to securely fix the workpieces. The miter saw guide helps you make precise cuts across the grain of the wood. The factory stop has one drawback, which significantly reduces the scope of application. The cut cannot be made larger than the width specified by the manufacturer. This parameter is individual. Cutting boards of greater width requires rigid fastening of the stop.
Stop for cross and corner cuts
The crosscut jig is also often used. With its help, boards are cut quickly and accurately at an angle of 90°. This type of stop is also used for cutting boards. Its base is a sheet of plywood 10 mm thick. A guide block or rail with a height of at least 20 mm is fixed to it with glue or self-tapping screws. A stop is attached to the bottom side of the base, perpendicular to the guide and made from the same block.
The excess part of the base (from the guide to the saw blade) is cut off. Since this distance is different for each model of manual circular saw, the device is always made individually. It is usually secured to the material being processed with clamps.
Advanced craftsmen make their fastening devices from wooden washers, one of which has the shape of an eccentric. The clamping is carried out by a wing nut on the screw. This clamping device allows you to very quickly secure the fence to lumber of different widths.
If you install the same block on the other side of the guide, but fixed at an angle of 45° to the first one, and then cut off part of the base with a saw at 45°, you will get a universal angular stop for cuts at both 45° and 90°. A more universal design of the angle stop will be obtained if the bar rotates. And you can monitor compliance with the angle using a protractor attached to the top. It should be noted that making a protractor for a circular saw with your own hands is a more difficult task.
DIY remote guide bar for a circular saw
It is made independently. It has the following implementation options.
- In the form of a rail miter box.
- Using building rules, clamps, a piece of propylene.
- Using aluminum profile.
- Using flat wooden blocks.
- Use of wood boards (fibreboard, OSB).
- Using laminate.
DIY remote guide bar for a circular saw
Rip fence
A regular rip fence for a circular saw is a good example of how a small addition can make a big difference. Almost every hand-held circular saw is equipped with a rip fence for longitudinal cutting of a given width. This is a really useful device.
The standard stop has one drawback. For safety reasons, it is set to values that allow it to be used to make cuts less than 20–25 mm wide. This is done so that the stop does not interfere with the movement of the saw guard. But it is enough to attach a wooden block with self-tapping screws to the parallel strip of the standard stop - and its capabilities will increase, while the minimum cutting width will not be limited in any way.
Note! We must remember about safety - when making cuts of less than 15 mm, the block does not allow the protective casing to cover the saw blade.
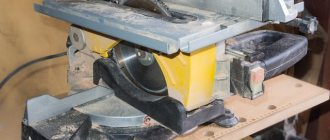
Rail miter box for manual circular saw
This device allows you to cut boards of a given length, bars, small workpieces in large quantities quickly enough and with high quality.
To make such a guide you must have:
- Metal corners of the same shelf size and length.
- The base is made of any available material: boards, plywood, chipboard. Its thickness must be more than 15 millimeters.
- Set of fasteners (bolts, nuts, wood screws).
Before cutting the workpieces, markings are made. Mark the length of the future tire and attachment points. The main conditions when choosing sizes are:
- the board should move freely under the guides;
- The selected circular saw blade should not be too high.
Rail miter box for manual circular saw
Bolted connections are used to secure the structure. The parallelism of the fixed corners should be carefully checked. Ensure that the circular saw blade slides freely. To do this, fluoroplastic strips are glued. They significantly reduce the coefficient of friction and reduce the load on the circular saw.
Another option is to install small wheels. Small-diameter bearings can be used as a finished product. Additional time and tools will be required. The created design will significantly simplify the cutting operation and ensure proper safety.
Useful tips
There are devices that cannot be called a tool, but they still help the master when cutting.
Blank template
When cutting a large number of identical parts, you can use the first one as a template for cutting the rest. You only need to attach a stop piece to one side of the first sample, and when installing such a template on the material to be cut, you can make many identical parts without marking.
Bruschi
This part makes it easier to install any stop and tire according to the markings - a beam with a small cross-section. There should be cuts on it, and the distance between them will be equal to the segment from the end of the saw blade to the disk. A couple of these bars will help you quickly install any guides quickly and easily.
Pull-out protection
The protection can be a block whose width corresponds to the thickness of the workpiece being cut, and if you attach it at the exit point of the disk, it will serve as a limiter and will serve as protection against chipping and tearing out.
A guide made from a rule, clamps and a piece of polypropylene
Implementation of this design will require:
- construction rule (used for finishing work);
- fastening clamps (the number is determined by the number of attachment points);
- pieces of propylene (thickness is selected depending on the thickness of the entire structure).
A guide made from a rule, clamps and a piece of polypropylene
The manufacturing procedure is as follows:
- If the selected rule has handles, they must be removed. Clamps will be fixed in their place.
- Adapters are cut from a piece of dense propylene. The thickness of the adapters must be greater than the depth of the rule groove.
- The holes remaining from the handles are drilled through along with polypropylene adapters.
- The resulting structure is fixed to the processed bar.
- The finished tire is glued with soft tapes. This allows you to avoid the formation of chips in the workpiece at the time of completion of the cut.
It will ensure quality work. The use of a ready-made building rule requires periodic adjustments to its location. Fastening should be done at a close distance from the cutting line. This allows you to guide the circular saw blade exactly along the intended line.
Making at home
The main thing is to accurately maintain the geometry. The basis could be:
- channel;
- pipe with a rectangular cross-section;
- corner;
- laminate.
A serious disadvantage of wooden and pressed tires is their sensitivity to moisture.
Option 1. Laminate tire.
- Using a ruler, cut two pieces of material of the same length.
- We mill one edge at a time.
- We attach it to the base (also made of laminate) with self-tapping screws.
- We check the width of the groove using an A4 sheet of paper with a thickness of about 0.11 mm: the paper is inserted into the device and screwed.
- The tire is fixed to the sole of the circular saw with a mount for a side stop. You can drill a hole in the housing if the warranty period has expired.
- The bar extends as far as possible in front of the hand-held circular saw. The toe of the sole should extend a few centimeters onto the guide. Using a laminate sawing disc, we saw off the edges of the guides so that they align with the markings.
This will absorb the depth of the cut (approximately 1.5 cm), but such a device is convenient and easy to manufacture.
Option 2. The basis is the building rule. A model with handles that move along a groove is suitable.
- The handles are removed, and softly fixed clamps with spring handles are selected instead. Models with a removable top are suitable. Having removed the upper part, the clamp is fixed to the rule using an adapter.
- Adapters are made from polypropylene on a milling machine. The result should be parts that, in cross-section, resemble the letter “T”. They are inserted tightly into the groove for the handles.
- Holes are made in the “leg” of the adapters and screwed onto the screws with clamps.
- The tire is laid on the sheet with the groove down and pressed firmly from below with clamps. There are no parts on top that slow down the operation of the circular saw. The only limitation in work is the length of the rule.
Option 3. To obtain an accurate cut, the edge of the tool base adjacent to the guide must be perfectly smooth. Professional tools with cast soles are distinguished by this, but inexpensive stamped bases do not have this property. Therefore, we offer the rail option. The tool moves along it without resting against the guide rail. At the same time, the force required to push the saw is significantly reduced. The rail can be made of aluminum U-shaped profile. You need two segments with different sections. The smaller profile is inserted into the larger profile without any gap, but free movement must be ensured.
https://youtube.com/watch?v=uD-EzQFupAg
Now the guide rail can be made by hand:
- A larger diameter guide is attached to plywood No. 3 with screws. The heads of screws and self-tapping screws are ground off so that they can be hidden flush.
- We tightly place strips of plywood No. 10 on both sides of the guide and also fasten them with self-tapping screws. Plywood can be replaced with chipboard.
The excess width pieces are sawed off, and the rail is ready.
Preparing the hand saw:
- A small profile is inserted into the rail, the height of the “legs” is removed so that the profile fits flush.
- The cut profile parallel to the saw blade is attached to the sole. For this purpose, a pair of M 4 wing screws are used. If the circular saw platform is smooth and of high quality, its edges can be adhered to.
- The hand saw is placed on the guide by inserting the profile into the guide rail. Turn on the tool and saw off the excess strip in width.
For a perfect cut, the edge of the tire is placed on the marking and the guide is attached with clamps. With a guide rail, the saw moves smoothly and does not wobble, cuts accurately and feeds easily.
Aluminum profile guide rail
The finished aluminum profile is one of the ideal materials for implementing the future design of the guide rail. Using metal instead of wood will create a more durable structure. In addition, the metal structure reliably prevents the entire structure from distortion. To assemble such a tire you will need:
- ready-made aluminum profile (better if it is U-shaped);
- fastening elements (bolts, screws, washers);
- sheet of plywood, you can use the remaining pieces from previous work (the main thing is that they match the design of the future tire).
Aluminum profile guide rail
The tools you will need are: an electric drill with a metal drill, a wrench of the required size, and a measuring tool. The manufacturing sequence is as follows:
- In manufacturing, two profiles of different sizes are used. First, a larger profile is attached to a thin piece of plywood.
- Sheets of plywood are rigidly attached to both sides of the aluminum profile. It is permissible to use particle board or oriented strand board. These blanks are attached to wood screws.
- Measure out excess pieces of workpieces. Use a circular saw to carefully cut them off. The resulting structure is called a rail.
After the work has been done, they begin to prepare the circular saw. The following preparatory operations are carried out:
- a profile with a smaller cross-section is placed in the rail;
- in height it should not exceed the height of the main profile;
- The profile prepared in this way is attached to the base of the circular saw. The fastening must be strictly parallel to the saw blade. It is produced using special wing screws with M4 threads;
- the circular saw is placed on the surface of the guide bar;
- To obtain an even cut, the edge of the guide bar is oriented along the previously made markings and fixed with clamps.
The use of such a guide allows for smooth movement of the saw. As a result, it is possible to achieve sawing accuracy, simplicity and ease of feeding of a circular saw.
Edge stop
This is already a rather complex device that requires time and precision in manufacturing. It allows you to cut parallel to the edge of the material being cut. It will be useful to make a drawing of it before starting work so as not to miss the dimensions. Actually, such a stop is included in the circular saw kit, but its short length does not always ensure an even cut. The large size and the desired strength require the base of the stop to be made of plywood with a thickness of at least 15 mm. You can also make a thrust bar from it.
Stages of manufacturing the stop:
- longitudinal grooves for dowels are made at the base;
- hardwood dowels are mounted on a stop bar;
- Another through groove is made between the longitudinal grooves to secure the thrust bar during operation;
- a hole is cut in the base for a circular saw blade;
- On the sides of the base, restrictive strips are placed for installing the circular and clamps are provided to secure it securely.
When installing the stop on the material being processed, the stop bar moves in the grooves of the base to the required distance and is secured through the through slot with a clamping wing screw. In order not to have to worry about the ruler every time, you can attach it (or a piece of tape measure) to the base of the stop along the guide grooves.
Laminate guide rail
The use of this material is determined by its availability and ease of processing. The sequence of manufacturing a guide bar for a circular saw is as follows:
- Mark the laminate into two strips of equal length (one will be the guide, the other will be the base). The length is selected based on the tasks assigned. Then they are carefully cut out.
- All edges should be carefully milled. This will result in machined, safe edges of the tool.
- Using wood screws, screw the guide to the base.
Laminate guide rail
To ensure ease of use and safety, the bar should be moved forward as far as possible on the hand-held circular saw. Using a disk designed for sawing laminate, saw off the edges of the guides. This action is necessary for accurate alignment with the applied markings. This will somewhat reduce the depth of the possible cut, but provides additional ease of operation.
What it is?
Essentially, a guide bar is a rail that allows a hand-held circular saw to slide forward and backward while preventing the tool from deviating from the cutting line. But a properly designed guide not only ensures an even cut, it also reduces the number of chips where the saw and the material come into contact.
Homemade guides have different designs and are made from different materials. Eg:
- plywood guide;
- rail miter box from a corner;
- aluminum profile tire;
- ruler from the building code;
- external carriage on bearings.
The miter box and remote carriage are the most difficult to manufacture. A plywood guide or profile rail is much simpler in design, but this does not mean that the cut made with their help will not be of such high quality. The difference between these varieties largely lies in ease of use.