Combined "trimming"
You can cut parts in much the same way using a compound miter saw.
There are not very many such “two-in-one” models on the market, but they deserve close attention. The peculiarity of their design is that the saw blade works on two sides: the lower part is used for facing and sawing at an angle, the upper part is used for sawing workpieces lengthwise. For this purpose, a special platform is provided above the electric motor, like a stationary circular saw. The guide stop allows you to set the width of the sawn part.
Of course, in terms of their characteristics, such models are somewhat inferior to their highly specialized counterparts in terms of accuracy of operation, but their strength lies in their versatility.
Professional craftsmen love tools like these. For example, when installing doors, a “trimming” will help connect the frame parts and platbands “on the mustache”, and on the upper platform you can quickly saw off the extensions to the required width.
Stationary with jointing
It is better to immediately design a stationary circular saw with a jointing drum. Without it, most of the work on its production will simply lose meaning, except perhaps for the sake of the creation process itself.
The structure of a stationary circular saw with a jointing drum is shown in the figure:
The device of a stationary circular saw with a jointing drum
When designing it, it is necessary to apply additional safety measures and ensure the quality of the machine. Firstly, during sawing, the jointing drum must be covered with a securely fastened protective cover on the pads to the jointing depth or slightly more, pos. And next. rice.:
How to adapt a jointing drum to a stationary circular saw
Loss of cutting depth will be approx. 6-8 mm (jointing depth up to 3-4 mm + 3-4 mm thickness of the lid. For jointing, a working pad of the same thickness (pos. B) is attached to the tabletop along its entire length behind the drum (along the workpiece). . overhang of the finished part behind the drum will lead to its planing onto a wedge; very flat, but due to the accumulation of errors during the construction or finishing work, it may turn out that all the processed material is damaged.
Note : by increasing the thickness of the working pad, you can adjust the jointing depth from maximum to 0.5 mm.
The motor matters
Secondly, the safety of using a homemade circular saw and the quality of sawing with it (especially finishing materials) is largely determined by the external characteristics (VnH) of the machine drive motor. ВнХ is the dependence of the torque on the shaft T on its rotation frequency N; the rotational speed (RPM) depends on the cutting resistance of the material being processed, and this, in turn, depends on the speed and feed force of the workpiece.
The VnH of a sequential excitation commutator motor (grinder, drill, hammer drill) is not monotonic (see figure).
External characteristics of a series-excited and asynchronous commutator electric motor with a squirrel-cage rotor
The maximum torque occurs at a certain rotation speed nр, slightly lower than the idle speed (without load) nхх. This is good: in the area of operating loads on the shaft ΔTр, the harder the material is, the stronger the motor turns the saw. Changing the feed force within these limits has virtually no effect on the quality of the cut, because the disk keeps the speed within the optimal range, and you can work at the highest performance.
The same thing, but without “adjusting” the saw to knots and other irregularities, is observed in a fairly wide range of overloads (ΔT region), i.e. High qualifications and a subtle tactile sense are not required from the operator - a beginner (not armless, of course) applied it once or twice, and that’s it, the work started. But, if you press hard, or something like a nail comes across, a dangerous property of the commutator motor appears in this case - a significant zero torque T0. An engine whose armature is forcibly braked will strive to turn at all costs: the workpiece can turn out and give you a kick in the teeth; the disk will fly apart.
Note : in manual circular machines, parallel-excited collector motors are used and/or with special armature winding circuits that reduce T0, but at the same time the “hump” of VnH is smoothed out. Therefore, in drills and grinders, where the “gnawing” ability of the tool with a small working stroke is important, T0 remains large. That is why it is impossible to put a saw blade larger than the standard one in the grinder - defects in work are inevitable, and the likelihood of injury increases sharply; This applies to abrasive discs to a lesser extent.
The VnH of an asynchronous electric motor with a squirrel-cage rotor is monotonous and quite rigid (in the same figure on the right). In the rotation speed range nmin – nmax that is optimal for a given disk, the feed force must be maintained very precisely, sensitively feeling the resistance of the material, i.e. Quite a high level of working skill is required. “Overfeeding” leads to a drop in both productivity and cut quality - a too slowly rotating disk tears the material. But if the saw suddenly jams, the motor will stop and begin to accelerate until the load is completely removed. If a 3-phase motor with a starting device from a single-phase network is used, then it will have to be turned off and restarted. When sawing long lengths, when the likelihood of awkwardness in work increases greatly, this quality of “asynchronous” VnH becomes valuable - a beginner/amateur can gradually learn to work without risking himself or spoiling a lot of material. Therefore, a homemade circular jointing machine should only be made with an asynchronous AC electric motor with a squirrel-cage rotor.
Motor mount
High-performance industrial circular saws, designed for long-term, round-shift operation, are equipped with large and heavy motors of 3-5 kW or more. Among other things, this reduces the sensitivity of the saw to material inhomogeneities and expands the range of permissible feed forces (see above), which, in turn, reduces the dependence of the quality of work on the qualifications and fatigue of workers. Another feature of circular saws compared to sawmills is that the belt drive from the motor to the disk turns out to be better than a chain drive, since you need to cut cleaner, but the material is of higher quality.
However, the belt tension weakens over time, so the engines of industrial circular saws are placed on supports that slide (and are fixed) in grooves (shown by arrows in position 1 of the figure).
Advantages of a pendulum motor suspension in a homemade circular saw over a sliding one
It is unrealistic to cut a long, even groove in metal without special equipment (a metal milling machine), but a 1-2 kW motor for a household circular is sufficient, and it can be placed on a pendulum suspension (item 2). Belt tension is thus ensured automatically without time-consuming adjustment work. There is more wear on the belt in a pendulum suspension, but you don’t work a full shift on your circular machine every day.
Note : assembly unit for pos. 1 pic. Above is the pendulum saw module of an industrial circular saw, which allows you to quickly install the output of the saw blade above the tabletop. But in the context of this section, this is not significant, and the output of the disk of a homemade circular saw can be changed not so quickly, but it is structurally and technically much simpler, see Fig.:
The mechanism for raising/lowering the saw blade of a homemade circular saw
The suspension hinge (shown by an arrow in position 2) can be quite rough (a steel pipe placed on a pin and filled with grease), but this does not noticeably affect the quality of the cut. You can do without a hinge on a steel sheet s(4...6) with screw support-clamps (shown by the arrow in position 2a). An additional advantage of the pendulum suspension of the motor is that the work table can be made tiltable, pos. 2b. When sawing a large amount of long timber (for example, for a construction site) by a sufficiently experienced worker, this significantly reduces his fatigue and speeds up the work.
Note: video material about building a circular saw with a jointing drum (sawing and jointing machine) on your own, see also the story:
Video: a simple homemade circular saw with a jointer
Rotation unit
The bearing assembly (rotation assembly) is the most complex and loaded part of a circular machine. We will try to make do with a minimum of expensive precision custom turning work.
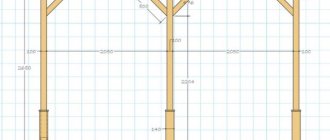
Drawings of a homemade bearing assembly of a traditional design are shown in Fig.
Drawings of a bearing assembly for a homemade circular saw
Critical dimensions are highlighted in color:
- At pos. 3 D32 – for the installation size of the saw blade (see above). Tolerance –0.05 mm.
- At pos. 4 D40 – for installation of bearings (see below). Tolerance +0.03 mm. Misalignment is no more than 0.01 mm. Finish sharpening in one setting on a high-precision machine.
- At pos. 6 D17 – for bearings. Tolerance –0.03 mm. Misalignment is no more than 0.01 mm. Finish sharpening in one setting on a high-precision machine.
- The pulley (item 7) is machined to size according to the gear ratio, based on the rotation speed of the existing engine, the diameter of the pulley on its shaft and the operating speed of rotation of the saw blade (see above).
Due to more stringent requirements for the cleanliness of the cut than for a sawmill, but the same as on it, or of a comparable length, conventional ball bearings, such as, for example, for a cutting machine, wear out quite quickly in a circular saw, and the saw begins to beat. Therefore, this design uses more durable bearings No. 60203; We will continue to focus on them.
How could it be simpler?
The described design of the bearing assembly is not without serious drawbacks:
- no jointing drum;
- turning the internal diameters clean in one setting is not a task for an amateur turner or even an entry-level specialist;
- from the heat when welding the bearing race 4 to the support plate 5, the race may move, and the bearings will not fit into the sockets, and it is possible to grind them cleanly in the assembly only on a rotary or shaping machine.
Unreliable design of the housing and bearing assembly of a homemade circular saw
With a jointing drum, it looks like it can be solved: cut the frame with the slab in half, and that’s it. But adjusting the machine to verticality and eliminating the misalignment of the saw blade outside of production conditions will cost painful work with no guarantee of success. Or you will have to machine the mounting pin with high precision (for one-time use). But then, so that the setting does not soon float away, you need a strong, rigid body of the machine. Like welded UBDS-1 or UBDN-1. A homemade analogue with threaded connections (see figure on the right) will quickly become loose, and after 2-3 readjustments the bearings will also break.
Unconventional approach
What if we completely abandon the holder with the base plate? Then only the shaft will need to be sharpened with high precision. How to attach it? In wood to wood, this will further simplify and reduce the cost of the machine. Wood is an archaic material, expensive and poorly technological in mass production, but not bad for piece work. In the old days, wooden sailing battleships served for 120-150 years, with periodic upgrades. And modern 40-year-old warships are subject to renewal only if there is no ready-made full replacement.
The method of attaching the bearing assembly of a homemade circular saw in wooden cages to a plywood tabletop is shown in the figure:
Fastening the rotation unit of a homemade circular saw in wooden cages
The frames require dense, fine-grained, fairly elastic hardwood. The best is maple; further – walnut, hornbeam, oak. In this case, a durable rigid body of the machine is also not needed; a simple “bedside table”, like for a table for a manual circular saw, is enough. Modern achievements include furniture screws - confirmed ones; in fine-grained wood they fit tightly and do not come loose from vibrations. The “trick” of the design is that during the adjustment process (see below), the bearings are pressed into the wood and thereby securely fixed.
Assembly of the entire assembly is combined with adjustment:
- A groove for the saw blade is pre-cut in the tabletop and holes are drilled for the heads of the D6 confirms.
- Pioneer (installation) holes for confirmations D4.8x60 are also pre-drilled in the clip blank.
- Empty clips are “baited” so far only with the top confirmations.
- A shaft with bearings is inserted into the cages.
- A saw blade is mounted on the shaft.
- The upper confirms are tightened so that the bearings fit into the cages without play, but not tightly.
- The disk is wedged in the groove symmetrically with 4 pairs of wedges: 2 pairs on top closer to the center, 2 pairs on the bottom closer to the edge.
- By tapping the wedges, align the disc along the slot and vertically.
- The upper confirmations are tightened until the heads are recessed flush with the table top.
- The confirmations are tightened alternately on both clips in 3-4 steps using an “envelope”, i.e. with a diagonal transition.
- Leave the assembly to “settle” overnight or, better, for 2-3 days, so that the bearings are pressed into the wood.
- Take out the wedges and check to see if the disc has moved. If the confirmations were tightened carefully and correctly according to the scheme, it will not work.
- They place and tighten, also with an “envelope,” the lower confirmations.
- Let the tabletop with the bearing assembly “settle” one more time.
- Check the disk installation again. It didn’t lead, did you pull the lower ones correctly? The unit is ready for further assembly and operation.
Shaft drawings for this design are shown in Fig.:
Shaft drawings for a circular saw with a jointing drum
The blank is round timber St45 D60. The finished shaft assembly with jointing knives must (!) be balanced in the centers. During balancing, the material can be selected both from the “raw” surface of the D60 and from the areas under the knives.
Tsulaga
Repairing a laptop battery with your own hands: instructions
When processing small workpieces, the tsulaga shown in the pictures below can be of great help.
To make it, you will need a piece of wood slab approximately 20 x 30 cm in size and 2 mm thick, as well as two planed strips, which must be fixed to the slab as shown in the figure. To prevent the slab from bending and breaking, the planks must be positioned transverse to the direction of its core layer.
How to work with a circular saw
The lower bar of the tsulaga rests against the edge of the tabletop and thus sets the correct direction for the cut; the shortened upper bar ensures good centering of the saw.
If you have to saw long boards or planks, then a second tsulaga will not hurt, which will serve as a stop for the other end of the workpiece.
A piece of wood slab and two pieces of plank are enough to make a practical tsulagi.
Before starting sawing, the saw placed at an angle must be pulled towards you several times.
Assembly instructions
Using the washing machine engine, you can assemble a circular machine not just “for beauty”. Such a device will be useful for installation, sawing or construction work. For example, using a circular saw you can easily unravel a 10*10 block. Isn't this an indicator?
How to connect the motor?
Diagram of a circular saw
Connecting the motor is the main stage in building a circular saw.
If you fail to connect the motor from the washing machine correctly, the device simply will not work.
The difficulty is not in connecting the engine, but in ensuring stable speed control.
As already written above, without this the saw will simply tear the material. To ensure regulation, you can use a voltage regulator instead of a tachometer, which is equipped with washing machine motors.
When connecting, some masters get confused, since the commutator motors that are installed on automatic machines have several outputs at once. Therefore, it is not clear how to make the connection.
The connection occurs as follows:
- First, the motor must be cranked several times in order to find the excitation coil or shoes. There should be 2 or more wires coming from them.
- Using an ohmmeter set to minimum resistance, we ring each output in turn. Here you need to find two with the highest resistance out of all the available outputs. This is the case if there are more than two wires.
- After this, you need to find the motor commutator and brushes, from which there should also be two wires.
- After this, you need to find the tachometer outputs. Often these wires can be found directly on the housing. If they are not there, then they are hidden in the housing, then you will have to disassemble the engine a little.
- Now you need to take one wire from the collector and connect the wire from the coil to it.
- The other collector wire must be connected to a 220 V network.
If necessary, you can change the direction of rotation by simply swapping the wires. We do a test run, having previously marked the wires of the coil and tachometer.
If the engine starts without problems, then everything was done correctly. Separately, you can consider the process of connecting the engine using a speed controller:
- We connect one of the coil wires to one of the armature wires.
- We connect the other one to the network.
- We connect the second armature wire to the dimmer.
- We connect the other output of the dimmer to the network.
- Let's try to start the engine.
Moving parts
After the motor is connected, you can proceed to creating the circular. The next step is the assembly of the moving elements, since it is they that bear the load, namely:
- Motor shaft.
- Saw shaft.
- Drive belt.
- Motor pulley from the washing machine.
- Circular saw pulley.
The design itself is simple, but there are a lot of points that are important to consider, for example:
- It is recommended to sharpen the small pulley by making 4 transverse grooves, this is necessary so that the belt clings and does not slip.
- It is not necessary to use a drive belt from a washing machine; you can take any suitable one, as long as it has transverse serrations.
- The saw mounting shaft must be as reliable as possible, which also applies to the nut and washer. Otherwise, the saw may become deformed, or even jump out and injure the person working.
Bed and frame
After assembling the moving elements, all that remains is to make a reliable frame and bed. Considering that this is an ordinary homemade circular saw, you can use almost any available material as a bed. For example, a sheet of flat slate. All that is required is to cut it to the required size and cut a hole in it for the saw blade.
Slate will be enough, but if you want to make a high-quality and reliable saw, then take a metal sheet with a thickness of at least 3 mm. And for the frame you will need a metal corner of 30 mm.
To weld the circular frame, you need:
- Weld two metal squares (or rectangles depending on the expected dimensions of the saw) of the same size from the corners.
- Next, connect with four corners of the same length.
- In the upper part, two more corners are welded across the main square. This will be the support for the bed.
- Exactly the same two supports are welded from below, only transversely to the top ones. This will be the support on which the motor is located.
- Now all that remains is to weld the legs on the bottom, assemble and connect all the elements, and the saw is ready.
DIY wood cutting saw
Repairing a chainsaw with your own hands: the principle of operation of the mechanism, an overview of the most common problems and their elimination. 110 photos and video instructions
If the owner needs a high-performance tool for opening and trimming boards for home use and needs to save money, then you can consider making it yourself. First of all, those craftsmen who have considerable experience in this matter and good training should think about this. First of all, you need to prepare the necessary tools for the job:
- set of files;
- welding machine;
- corner;
- steel sheet;
- an angle grinder engine with a power of at least 2.2 kW, operating at a speed of 2800 rpm.
To create a cutting machine, you need to complete a number of steps:
The work process begins with the manufacture of the bed. There is no way to do without it, since a cross-cut machine is a very cumbersome tool. As a basis for the bed, you can use a metal corner and racks from an iron bed. You need to make a working base from a steel sheet. Using a file, you need to process its edges. For the future saw you will need a pendulum stand, for the manufacture of which a channel is used. The finished rack must be installed on a steel sheet
Moreover, it is important to choose the right height, which should be 800 mm. The electric motor is installed on a special stand, which will move using hinges. Finally, all that remains is to attach a box to the homemade cutting saw, which will protect the master from chips.
The main working unit of the cutting machine is the sawing disk, which should have a diameter of 42 cm. As users of homemade cutting saws note, this is a great opportunity to save on purchasing a branded tool, which is often more expensive than a home-made device.
Miniature machine made from a washing machine engine
The circular is distinguished by its extreme simplicity and availability of materials for its manufacture. Perhaps its only expensive part is the electric motor. Stationary machines are equipped with a powerful asynchronous motor, which ensures cutting of thick wood of any species, but in a home workshop you can limit yourself to less power.
This design has a number of advantages. An engine from an old washing machine is inexpensive; moreover, a similar unit can probably be found in a home craftsman’s household. Connecting this motor is not particularly difficult; there is no need to look for circuit diagrams or do soldering. With all this, the power of such a unit is quite sufficient for most types of work.
The machine diagram can be simplified as much as possible by eliminating the belt drive. In this embodiment, the cutting tool will be mounted directly on the motor shaft. The base of the desktop mini-machine will be a frame assembled from a block with a cross-section of 40 x 40 mm. If desired, it can be welded from a corner or profile pipe.
Part of the body of an old TV, coated chipboard, is ideal as a stand (tabletop) for a circular table. As practice shows, this part is quite durable, and thanks to the varnish coating, it does not prevent the workpiece from sliding.
Using a jigsaw, two parallel cuts are made in the tabletop perpendicular to the cutout for the disk. A movable square will slide along them, playing the role of a side stop. It will help you make an even cut, if necessary, at a given angle.
Nuances of additional functions
The chainsaw does not gain momentum: an overview of the reasons and do-it-yourself repairs
Modern models of circular saws are safe equipment with high technical parameters. Many devices are equipped with additional functions that make the work process much easier:
- Slip clutch. This device allows you to avoid injury when the disk jams. Using a clutch, you can significantly reduce the shock when stopping the rotating mechanism.
- Smooth start. This function allows the disc to gain speed without jerking. A smooth start protects the mechanism from shocks, which has a positive effect on the service life of the engine.
- Overload protection. When the engine reaches critical indicators, the mechanism is automatically switched off.
- Supports the required disk rotation speed. When under load while cutting dense materials, power is automatically added. This function protects against a decrease in the disk speed.
- Accelerated braking. When you press the power off button on the device, the drive suddenly stops.
- Locking the start buttons. This feature prevents the tool from turning on if the switch is accidentally pressed. It is usually installed by pressing two keys simultaneously.
About choosing a saw model
Typically, recommendations regarding choosing a power tool model come down to comparing power, functionality and similar characteristics
We will not repeat these generally correct tips, but we will draw the attention of our readers to the main thing
Therefore, we strongly advise you to first determine more precisely for what purpose and for what work the tool is being purchased, and only then choose a specific model.
A circular saw is mainly used in “manual mode”, that is, the master holds it in his hands and moves his hands along the part being cut. For comfortable and fatigue-free work, the saw should weigh as little as possible and fit comfortably in the hand.
For a miter saw that is intended to be used in a carpentry shop, the recommendation is exactly the opposite: choose a saw that is as large as possible. It is preferable to buy a saw with a broaching mechanism, which allows you to cut workpieces of significant width and diameter.
How to saw a board evenly lengthwise and crosswise
Due to the differences in the design of hand and stationary saws, the methods of sawing wood differ significantly.
Working on a circular saw
If you need to saw a board along the grain, for example, an unedged board, then this is done as follows:
draw a straight line on the workpiece using a ruler;
then, along this line, with maximum precision, make the first cut to cut off the bark;
Next, you should install a parallel stop (guide) and spread the workpiece into smaller boards;
If the length of the circular table does not allow you to unravel long boards, then for these purposes you can make a simple device, shown in the following figure.
Using this carriage, you can trim boards and bars both at a straight line and at any angle.
Cutting boards with a hand-held circular saw
Many owners of hand-held circular saws are faced with the problem of trimming boards along a line. At the very beginning of sawing, the line is visible, but then it is blocked by the casing of the unit. Since the markings are not visible, the cut is uneven.
To cut the board smoothly and get the perfect cut, you need to position the tool so that the saw blade is opposite the marking. On the other side of the unit, attach a square to the board and move it to the base of the unit. Secure the square with a clamp. You will receive a guide installed at a right angle. Trim the board. The result is a perfect 90° cut.
For longitudinal cutting of boards, a guide rail is used. It may have longitudinal grooves into which a hand-held power saw is installed. You can also make a tire in the form of a simple long guide yourself. In the second case, one of the sides of the unit’s sole during sawing will go along the tire (ruler) attached to the workpiece. As a result, you will get an even longitudinal cut.
The following pictures show homemade guides, the width of which depends on the size of the hand saw sole.
Guide
To reliably guide a long board over the saw blade, the table top must be equipped with a sufficiently long guide. The parallel stop for a circular saw with your own hands should be adjustable. It is necessary that the ruler can move parallel to the cutting plane.
You can make a parallel stop from a corner with a wide shelf or a pine board. The design of the clamps can be arbitrary, as long as the stop does not move during hard work.
The best repair for circular saws is no repair.
It should be noted that improper operation of a circular saw greatly affects its service life and leads to an immediate need for repairs. Even knowing how to sharpen a circular saw will not protect it from improper use. Let's look at how to use a circular saw so that its repairs have to be done as rarely as possible:
- It is necessary to use only those blades that are suitable for this saw model;
- All discs must be sharp, as dull ones lead to engine overheating;
- You should always check that the disc is installed correctly and that the clamp is tight;
- Do not allow the motor to overheat under any circumstances.
By adhering to these simple rules, you can protect your tool from damage as much as possible.
Remember that following operating instructions costs much less than the necessary repairs if a circular saw breaks down. Important! When working with a circular saw, you must carefully adhere to safety rules
Causes of breakdowns
408-105 Stator for Hitachi G18SE3 and HAMMER angle grinders. Photo 220Volt
The most common cause of failure of the stator of an angle grinder is a violation of operating conditions. Asynchronous motors have the ability to maintain speed regardless of the magnitude of the current load. This is both an advantage and a disadvantage.
The ability to perform work under heavy loads is accompanied by overheating of the tool, which during long-term operation contributes to the occurrence of malfunctions in the rotor and stator windings. Under the influence of high temperatures, the protective layer of the insulating coating burns out, which leads to failure of electrical components.
How to protect your saw from damage
Any saw (especially its cutting edge) should not come into contact with other tools during storage. Such proximity can quickly cause it to fail.
If the saw does not have a cover, then a simple method will help protect its teeth from damage. A slot of the required length is made in a piece of hose, after which the hose is placed on the saw blade. A rigid hose covered with fabric on the inside is best suited for this purpose. It holds tightly to the saw blade even after repeated use.
If longitudinal sawing is carried out in large volumes, then it is better to purchase a circular saw. Doing this with a handsaw will get you dirty. This is the first, and second: the information that can be gleaned from the texts in the frame is incomprehensible for a beginner, and useless for a professional.
Reciprocating saw capabilities
This unit is a universal tool and, moreover, it is easy to use. Therefore, it is allowed to work with a reciprocating saw without special skills. Using a reciprocating saw you can perform the following types of work:
dismantle old windows and door frames;
trim unnecessary branches on trees in the garden;
cut wooden pieces to length;
cut metal profiles and pipes - thanks to flexible equipment, you can cut pipes flush to the wall;
cut metal rods and fittings;
cut out decorative elements in wooden blanks.
Before using the reciprocating saw, check that the rig and stop shoe are securely fastened. When working with this tool, adhere to the following rules.
- The workpiece intended for sawing or cutting must be securely fastened. This is especially true for metal blanks.
- The tool must be held with both hands.
- The blade is brought to the workpiece only when the unit is turned on. The web is removed from the material only after stopping the engine.
- To cut pipes flush, use long, flexible blades.
- Do not work with a curved blade. If this happens, level it first.
- When using a reciprocating saw, do not allow the blade to hit the ground, wall or other obstacles.
- During the sawing process, the support shoe of the unit should be pressed well against the workpiece. This will eliminate vibration and kickback.
- You need to choose the right length of the canvas. A blade that is too long and extends beyond the workpiece will vibrate and eventually bend.
- To avoid scratching the surface of the workpiece with the support shoe, you should put a piece of thermal insulation on it.
Mechanical problems
Symptoms of such malfunctions can manifest themselves in different ways, but almost always the operation is accompanied by extraneous noise. This may be a whistling, grinding or clicking sound. Now, while the engine and gearbox are still assembled, it is necessary to determine which of them is faulty. Try turning the motor by the shaft. It should rotate quite hard, but evenly, i.e. should not jam.
The layout of a circular electric saw.
If the motor shaft does not rotate or rotates jerkily, the motor is faulty. Take it apart and look at the bearings. The first is located in the engine housing, the other on its rotor. We can assume with complete confidence that one of them is to blame. The first one would be good, it's quite easy to change.
If the bearing on the engine armature is at fault, you can safely take it in for repairs. It is almost impossible to remove it yourself without a special device. In addition, any attempts to do this may result in damage to the anchor. You will not have to carry the entire saw to the workshop, but only the rotor. It's easier and cheaper.
The main gearbox malfunction is wear of the gear teeth. In this case, it must be replaced
You should also pay attention to the armature splines. They shouldn't be damaged either.
How to choose a circular hand saw?
When purchasing a tool, you should focus on a number of specific parameters:
Engine power. The higher it is, the faster and with less effort you can cut. In addition, large-diameter cutting discs can be installed on powerful saws (from 3 kW). Cutting depth. There are 4 standard sizes that you need to select based on your needs. A hand-held circular saw for wood can have an adjustable cutting angle. Stationary chip removal system or the ability to connect a vacuum cleaner
A very convenient option that allows you to work practically without dust and debris in the workshop or at home. The start lock is an important safety feature that prevents the tool from being started accidentally.
https://youtube.com/watch?v=WF_Uol1Ow0o%250D
Functions of a circular hand saw
The main “duty” of a circular saw is to cut large quantities of boards, drywall, laminate, plastic panels, soft metal and more. It is indispensable when building a house or cottage, and is also useful when laying floors in an apartment or covering walls with decorative panels. For speed of work and ease of use, the circular electric hand saw is equipped with a number of additional functions:
- Immersion in the material. This function is very convenient when working with large slabs.
- Adjusting the speed of rotation of the cutting disc. To work with different materials, different rotation speeds are required to obtain an even cut without burrs.
- The soft start function is necessary to increase the service life of the cutting blade. Thanks to it, the saw smoothly picks up speed after starting, rather than immediately spinning the shaft to maximum speed.
- A laser pointer is an optional accessory for a handheld circular saw. However, such a pointer is convenient to use when carrying out quick work.
Circular saw blades
An important consumable in a cutting tool is the cutting disc. Each model has its own characteristics:
- height and number of teeth;
- cutting profile geometry.
Conventionally, all disks for hand-held circular saws are divided into:
- Consumables for soft materials such as wood or plastic. They have a positive sharpening angle, the number of teeth is about 50-100, which ensures an even cut.
- Discs for hard materials are produced with a negative sharpening angle and fewer teeth. They can cut through harder materials, but the edges will be more jagged.
Advantages of a circular saw from a hand-held power tool
Let us list the main advantages of the scheme under consideration:
- Own forced ventilation.
- Excellent productivity with small volumes of processed material.
- Simple fixation of the disk, easy maintenance of the device.
- Possibility of obtaining cuts of different depths by selecting the appropriate disc.
Tool selection
When choosing a circular saw, you should pay attention and take into account the features of the device. It is necessary to imagine for what purposes it is being purchased and, knowing them, study the parameters of a particular model
Almost all other parameters of the circular depend on the outer diameter of the model.
The depth of the cut, its maximum size at right angles, is one of the characteristics of the saw. Models with a cut from 50 mm to 65 mm are distinguished by maneuverability. They are ideal for basic operations. To work on them you do not need to have exceptional physical qualities.
It is convenient to work with small workpieces made of thin materials on a tool with small dimensions and a low threshold. Devices with cutting parameters of 130 mm and more are produced; these are professional models. In such cases, a stationary installation will be the best option for comfortable work.
The power of the tool is also related to the outer diameter of the disc. The larger it is, the more powerful the motor. When the engine is running, the circular saw experiences heavy loads, so it is necessary that the machine has a power reserve. If it is not there, it will not only affect the quality of work, but the device itself will fail due to overheating.
Almost all models have a vertical saw blade position. The tilt angle varies from 90 to 45°. This is done using a special mechanism, which is equipped with a graduated scale.
A more rigid sole with a good service life is a cast sole. Many people prefer this type of tool base rather than a stamped metal base.
When choosing a model, it would be good to try it out, which will make it possible to correctly evaluate the product.
Conversion of the grinder
Tools and materials:
- Bulgarian;
- drill;
- clamps;
- screws or bolts;
- gearbox
The device of a homemade circular saw.
The easiest option is to remake the grinder yourself, but you need to remember that this tool has fairly high power ratings, which can make the work more difficult. An option with a 150 or 180 mm disc is used, and the speed must be low (4000-5000 rpm), because otherwise, the cutter will become dull at an unprecedented speed. 3-flute cutters are usually used for such modifications.
Options for attaching the grinder to the tabletop:
- On the clamps. Everything is simple here - 2 clamps tightly attract the tool to the selected working surface. It is quite easy to install and just as easy to dismantle, moreover, this is the only option when, after dismantling, you can continue to use the tool for its intended purpose.
- Self-tapping screws. Using a drill, 3 holes are made in the body and additional handle, into which self-tapping screws are then screwed and attached to the working surface. A similar option is also possible with bolts and nuts, which is much more reliable.
- Using an additional part. You'll have to contact a mechanic to grind out the connecting piece between the countertop and the grinder. To attach it, you will have to remove the protective casing, but after attaching it, the tool will not move anywhere. This option is the most reliable, although the most inconvenient.
Layout diagram of the elements of a homemade circular saw.
It often happens that you don’t have a low-speed grinder at hand, so you can use a reduction gearbox. To fasten working tools, screws or bolts are used, depending on the desire to maintain the quality of the tools.
Only in the first indicated case, after achieving the goal, can you dismantle the tool and use it for its intended purpose, and then only if it was used as a circular saw for a very short time. In all other cases, this option is not even worth considering, because The chance of getting injured during further work is 9 to 10.
Situations are different, so the protective casing is often removed. There is no need to install it back, but as a replacement it is better to use a steel angle welded to the working surface. This move will be much more reliable than factory plastic.
Types of circular saws
First, let's figure out how a circular saw differs from a circular saw. In fact, there are practically no differences; both names are used in parallel to refer to the same class of instruments. But still, a circular saw is more often called a device on which, instead of a set with teeth, you can install a smooth circle for cutting metals.
This work is often done using an angle grinder (in everyday life - “grinder”), but the device in question does it better:
- you can cut metal at an angle;
- the workpiece does not heat up;
- productivity, quality and cutting speed are higher.
Now about what types of saws there are:
- Stationary “circular machines” (circular machines)
. Not so long ago, this was the only type of device in this class. They are mounted on a table and are designed for large volumes of work. Cutting is performed in the same way as on a stationary device. Used in professional activities. - Professionals also use table saws
. They are attached to the table using clamps and can be transferred to another surface. Such devices take up less space and are often used in production, where a lot of wood cutting work needs to be done. - Hand-held circular saws
. Held in hands. They are used both by professionals and at home. Their purpose is to cut small-sized wooden products in moderate volumes. Also, you cannot do without such a tool when preparing sheet materials.
Separately, it is necessary to consider the types of plunge-cut circular saws. They differ in that before starting work, the disk is raised above the surface to be treated and covered with a casing. You can set the cutting depth in advance and start working. A plunge-cut saw is convenient to use when cutting out windows and making blind cuts.
Sometimes novice carpenters ask the question - what is parquet? This name is used (but not often) for a class of plunge-cut saws - with their help you can perform parquet work.
Based on the type of drive, all the devices under consideration belong to the class of power tools. Most of them are powered by 220 volts. There are also battery-powered models. They are more mobile, but have
reduced power and operating time limited by battery capacity
Mobility is not the most important quality for such tools, so you should choose battery-powered devices only when you plan to work in conditions where there is no power supply.
Disk speed and security
Without ensuring high speed of the toothed disk, it is impossible to guarantee the quality of the cut. However, for homemade equipment operated in a home workshop, safety during operation is no less important.
It is necessary to provide protective devices that are traditionally equipped with industrial designs. The opinion that one can completely do without such protection at home does not stand up to criticism.
TB rules are “written in blood.” All it takes is one awkward movement to end up on the surgeon's table. Therefore, security should be given the utmost attention.
Power saws.
The fastest of the presented power tools, an indispensable thing when working with rough cutting of timber, logs and firewood. The main advantage of electric saws is working with wooden blanks of large cross-sections and arbitrary shapes. But if we talk about the ability to cut accurately and accurately, then this is not about electric saws, and again, for an electric saw to work, you need oil to lubricate the chain and bar, which already makes the work dirty.
Electric saws also have different engine locations:
- The transverse (classic) engine layout is convenient for working in a vertical plane, but the wide dimensions cause inconvenience since the center of gravity is shifted to the left.
- Longitudinal arrangement of the engine - Provides a more accurate and accurate cut and differs from the transverse arrangement of the engine; due to the narrower, longer body, the saw becomes more maneuverable. The disadvantage of the longitudinal arrangement is the price, here the gearbox is already conical.
An electric saw is not entirely convenient for working with boards and beams of small cross-section, but if you need to prepare firewood, it will do (although there are cases when firewood is prepared with a circular saw and 20-30mm boards are cut with an electric saw). Again, using an electric saw in your apartment will be a little different;) .Yes, electric saws require less attention to maintenance than chainsaws, but there is a huge difference in speed, the preparation of firewood with a chainsaw is faster, unlike an electric saw (but have you seen the prices for gasoline). Users often forget about replacing the drive sprocket on an electric saw, which drives the chain into disrepair.
Photo source: Yandex pictures
Expert advice
Experts recommend following these tips:
- Before disassembling, conduct a preventive inspection of the equipment for correct diagnosis. The complexity of subsequent work will depend entirely on the severity of the breakdown.
- After processing all the elements, the “polishing” of the fixing cut begins. There are times when the clamps stick out a lot. In this case, the chain does not reach the surface that needs to be cut. Another situation may occur when the clamps are too deep and the blade gets stuck in the wood.
- Disassembling electric saws is an important phase during repairs, which must be carried out strictly according to the rules and in compliance with safety precautions. It is necessary to de-energize all unreliable elements and avoid getting debris into the teeth during preventive switching on of the tool.
You can repair saws of any kind with your own hands. To do this, you need to know the disassembly scheme and the rules for installing new parts in the box, observe safety precautions during the reconstruction of the tool, and regulate the power supply.
Design features
The possibility of safe long-term work on a homemade circular saw depends on the operating modes, reliability and ergonomics of the designed machine.
Knowledge of woodworking technology and the specifics of specialized equipment will allow you to create a table for a circular saw with your own hands, characterized by simplicity and durability.
How to use a circular saw
How to use the tool correctly:
- When working, do not use clamps, vices, or other methods of rigidly securing the workpiece. It is unacceptable to hold it with your hands or body.
- Do not overload the tool by doing work not intended for it.
- If the on/off key is broken, you should not use the tool.
- When replacing accessories, making adjustments or other work, the tool must be disconnected from the power supply.
- The tool should be stored in places that are difficult to reach for children and pets.
- Don't forget to periodically maintain your tool.
What can you do with a circular saw?
The operating principle of this unit is based on the rotation of the cutting disc by an electric motor. The saw design is available in two versions: manual or stationary
An important difference between these two versions is that the force from the engine to the disk in the stationary model is transmitted through a belt, while in the manual version the disk itself is fixed to the shaft. The saw can cut wood both along the grain and across it, and make quarter cuts. The tool can saw off soft metal and plastic if you use special discs
Setting up a circular saw
Before starting work you should:
- insert disk;
- make sure that it is securely fastened;
- make sure that the protective cover opens freely and returns to its original position when the handle is released;
- check the correct installation of the riving device;
- Make sure the saw is working properly by keeping it turned on for 10 seconds without load.
Adjusting the saw before work is quite simple. To do this you need:
- Adjust the position of the guide slot on the table and the disk using a caliper, placing the guide slots evenly along the blade. When checking the tooth at the front and back of the blade, the discrepancy should not exceed 0.05 mm
- The rip fence with groove or spline should be checked. Here the displacement should also not be more than 0.05 mm
- It is necessary to align the riving knife with the blade so that it is in line with the blade. In case of mismatch, more precise adjustment is achieved by rotating the washers
Advice! When removing the knife, you should remember the position of the adjusting washers so as not to adjust them again later.
- Tighten the mounting bolts securely to protect the table and the machine itself from vibration.
Why do you need a circular saw?
It is designed to cut coniferous and hardwood boards with a moisture content of no more than 50% and a thickness of no more than 64 mm. It is allowed to cut plywood, aerated concrete, particle board, asbestos-cement and cement-bonded particle boards.
A circular saw. How to saw with it
Main stages of working with the tool:
- Set the minimum depth of cut by adjusting the blade outlet downward.
- Set the guide to the size of the part by measuring the length from the edge of the blade to the edge of the saw sole. Mark the material.
- Make an initial cut of 3–5 mm.
- Continue sawing the material without stopping along the entire path of the blade.
- Use duct tape over the cut to avoid chipping.
Remember that the saw is a high-risk tool, and for convenient and safe work you should carefully study the safety precautions when working with the tool.
Frame and Frame
Having assembled the parts for the moving parts of the circular, all we have to do is make a reliable frame and frame for our circle. In principle, for a home circular stand you can take the most common materials, for example, a piece of thick flat slate. Cut a rectangle out of it and cut a hole under the saw blade, it doesn't cost anything. But we are supporters of permanent structures, so we prefer to take a 3 mm thick sheet of metal for a round frame and a metal corner for a 30 mm frame.
The picture above clearly shows what elements make up the frame of a homemade circle. In this case, it is also welded by itself, but not a static metal corner is used as a support, but special home tables. The stand is made of two metal tubes of different diameters, which are inserted into each other, so that the round layer can be adjusted in height.
Experts insist on welded round frame construction because vibration is bad for static fasteners created with bolts. Although, if you don't have welding, as a last resort, you can make a frame from the corners, fastening them together with bolts and nuts. The frame is also better welded to the frame. So, you can make a circular motion from the stirrer motor with your own hands if you have experience in making different household homemade products. Try it yourself, and perhaps you will gain some experience, which you will later share with our readers. Good luck!
A circular saw will always be needed on the farm: at the dacha or in a private home. However, rarely does anyone have access to a good expensive instrument, and a cheap analogue quickly burns out. The way out of this situation is to make a circular saw at home.
For example, there is an option to make it from a motor from an old automatic washing machine, which would be a shame to throw out and takes up space. Such a homemade tool can cope with a board up to 5 cm wide. The advantage of this design is its weight, which is about 20 kg.
The question arises: it doesn’t matter which washing machine is suitable. It’s not just the power of the motor, the stronger the saw will be and will cope with larger tasks
And a low-power tool will always be needed on the farm.
He doesn’t need a stationary table; an ordinary box will do, which will serve as both a support and a place for shavings. The main criterion is to connect the motor correctly, otherwise the assembled circular saw will not work. However, this is not the only difficulty.
In order for the tool to work properly and cope with various tasks without spoiling the material, it is necessary to adjust the motor speed. In a washing machine, a tachometer, which is controlled by an electrical system, is responsible for regulating the speed. A homemade instrument without electronics requires a different solution. The collector motor has several outputs. To be able to find which one to connect to, it is necessary to “ring” with an ohmmeter, which leaves our client to draw conclusions in pairs. We find where the greatest resistance is.