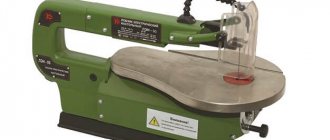
Among materials for presentable decor, plywood is the most popular due to its performance qualities. In addition, it is easy to process. Figured plywood products made using machine tools are becoming increasingly popular. Such products have three-dimensional patterns and the finest processing. Practical minds of craftsmen ask the question: is it possible to make a laser machine with your own hands or do you need to spend money on a ready-made one? First you need to understand all the intricacies of machine cutting plywood.
What is a laser device for shape cutting?
Laser engraving technology allows you to transfer drawings in volume onto a sheet of plywood. This method is innovative, but has already earned popularity among carpenters and home craftsmen.
The impact of the beam is based on micro-destructions of wood, similar in intensity to welding. When exposed to high temperatures, the contact area burns out.
The installation, which is a key part of the device, carries out the beam action of the laser. Hydrocarbon lasers are used for processing, therefore, it is impossible to assemble a laser cutting machine with your own hands without this part.
Useful little things
Finally, a few small tips for the owner of a homemade engraver:
- Use hardwood plywood (such as birch) for cutting. The instructions are due to the fact that resinous coniferous wood quickly stains the bottom and walls of the working compartment with resin deposited on them;
- Monitor the condition of the mirror in the work compartment. Soot deposited on it can lead to a drop in the power of the focused beam and overheating of the mirror itself;
- Keep your hands and eyes away from the line between the handset and the mirrors. Even without focusing, a narrow beam of 20 watts or more can cause severe burns and complete loss of vision.
This trace was left by a 10-watt beam. Exposure time – 0.5 seconds.
Pros of using laser processing
Interest in assembling a laser machine for cutting plywood with your own hands is due to the high cost of factory models. Such devices provide additional opportunities for manipulating products that are inaccessible under mechanical influence. Devices based on laser exposure are used both on an industrial scale and by home craftsmen, as well as small entrepreneurs.
A distinctive feature of laser cutting is the width of the seam, which can only slightly exceed the thickness of the laser beam of the device. This allows you to apply an accurate drawing that is as close as possible to the given layout. A laser machine assembled with your own hands is not inferior in quality to the cut produced by industrial analogues and is distinguished by the same technological processes inside the device.
Among the features of using laser cutting technology are the following:
- The area where the beam interacts inevitably takes on a darker hue.
- Using this method allows you to avoid mechanical deformation, since there is no need to apply classical forces.
- When choosing a source of wood for work, preference should be given to species with the lowest resin content.
- Laser processing produces a small amount of chips.
- When performing large volumes of work through machining, care should be taken to have a ventilation system.
- The uniformity of the cut obtained during the cutting process is affected by the set temperature conditions and the speed of the laser beam.
- The operation of the laser is controlled by computer numerical control (CNC), which allows for complete automation of the processing process.
Experimental production of a portable laser machine
A portable laser cutting engraving machine, relatively easy to manufacture, can be said to be the dream of small businesses entering the engraving or similar business. This is a kind of revolution of modern technology related to production, thanks to its ease of use and versatility.
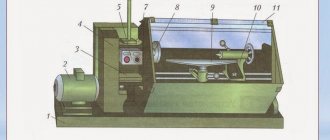
Block diagram of a laser engraving machine: 1 – stepper motors; 2 – 12 volt power supply; 3 – buttons limiting axial movement; 4 – voltage regulator; 5 – laser diode; 6 – electric motor drivers; 7 – Arduino controller; 8 – 5 volt relay; 9 – monitoring and control buttons For the manufacture of equipment with subsequent work aimed at cutting and engraving products, you will need to acquire software and basic modular parts. A list of required modules with a brief description is presented below.
Components of a cutting and engraving laser machine
The functioning of the hardware of the laser engraving tool is provided by the Eleksmaker or similar software, which converts the graphic image into G-code used by the controller.
The required image is imported in the Scalable Vector Graphics (SVG) format, and using Eleksmaker software it is converted into G-code, which creates the image coordinates. The Eleksmaker software controls stepper motors and controls laser power.
The electronic hardware of the project is the Arduino nano constructor - an electronic device based on breadboards. This is actually a ready-made control base for a portable laser cutting and engraving machine. The Arduino nano based controller supports:
- laser power adjustment,
- reduced light function,
- optical coupling insulation,
- protection against interference.
The Arduino system also controls stepper motors, and it is possible to flash the controller firmware if necessary.
Laser diode module of a homemade engraver
Laser diode modules are available in a wide range of wavelengths, power outputs or piller shapes depending on the application. Green lasers provide more noticeable differentiation on materials.
Laser diode housed inside a massive aluminum shell to provide insulation and efficient cooling. This kind of component is used in a homemade design. For use in the engraver design described, a laser module with a power of 500 MW and a wavelength of 450 nm is used. Designers with laser diode modules, presented in the table below, are well suited for project reproduction:
| Product | Supply voltage, V | Power, mW | Software |
| SLB Works | 12 | 500 | BenBox |
| Zeta USB DIY | 12 | 500 | Eleksmaker |
| NEJE DK-8 | 12 | 500 | Eleksmaker |
Possible design of the cutting and engraving machine frame
The CV joint supports and shaft supports can be mounted on hollow aluminum posts. Such elements are used for all main structural parts of the machine. The thickness of aluminum is about 2 mm.
Aluminum racks are relatively easy to cut and drill, while the material holds its shape well and has fairly high mechanical loads.
Additionally, given the square shape, the aluminum posts provide precise parallelism/perpendicularity to the supporting surfaces.
This is roughly what part of the chassis structure looks like, on which the axial guides for moving the stepper motors of a homemade laser engraving machine are fixed. Mounting holes on aluminum can simply be drilled using a cordless drill, and cutting the posts to size is done with a miter saw (or a regular hacksaw).
M5 screws and nuts are used in the frame structure to hold most parts together. The use of screw fastenings ensures easy disassembly and modification of the frame.
Introduction of stepper motors into a laser cutting machine
As experimental practice has shown, it is practical to use electric motors of the “NEMA 23” series or similar ones with high torque as stepper drives.
Powerful stepper motors, however, require powerful drivers to get maximum output. As a result, the optimal solution seems to be the use of an individual stepper driver for each motor.
The selection is as follows:
- number of stepper motors 2,
- motor type – “NEMA 23”,
- holding torque - 1.8 Nm,
- 200 steps/revolution (step angle 1.8 degrees),
- current consumption no more than 3.0 A,
- weight no more than 1 kg,
- connection type bipolar 4-wire,
- stepper motor drivers – 2,
- digital stepper driver,
- micro step function,
- output current 0.5 - 5.6 A,
- output current limiter function,
- pulse input frequency up to 200 kHz,
- supply voltage 20 - 50 volts DC.
For each axis, the motor is driven by a ball screw through a motor connector.
The appearance of an electric motor and an electronic driver for controlling such a motor, which can be used in a self-assembled design of a laser engraving machine. The motors are attached to the frame using two aluminum corners and an aluminum plate. The aluminum corners and plate are 3mm thick and are strong enough to support the weight of the engine without sagging.
Electronic control circuit for laser engraving machine
The laser cutting machine circuit requires at least 10 volts DC power and a simple on/off input signal, which is provided by the Arduino module.
The circuit uses the LM317T microcircuit, which is a linear regulator (stabilizer) of voltage and current. Through a potentiometer connected to the circuit, the specified current value is adjusted.
In general, the engraving machine has two separate power supplies due to different operating voltage requirements. So, stepper motor drivers require a power supply of 20-50 volts DC. Each stepper motor draws a maximum current of 3.0 amps.
When the motors are running continuously, the current consumption does not exceed 1 ampere. When the speed of the stepper motors changes, the consumption increases to 2A per motor.
Accordingly, a stepper driver power supply with a power of at least 100 W with an output voltage of 36 volts at a current of 3 A is required.
The laser driver requires a supply voltage of at least 10 volts at a current of at least 1.25 amperes. A power supply, for example from ATX PC computers, with an output voltage of 12 volts is quite sufficient here.
Laser cutting machine - sketch of processing using the Arduino interpreter
The Arduino controller interprets the sketch of the processing object as a block of instructions. There are a number of instruction symbols:
- fast move to the right one pixel (blank pixel),
- slowly move to the right one pixel (burnt pixel),
- quickly move left one pixel (blank pixel),
- slowly move to the left one pixel (burnt pixel),
- quickly move up one pixel (blank pixel),
- slowly moving up one pixel (burnt pixel),
- quickly move down one pixel (blank pixel),
- slowly moving down one pixel (burnt pixel),
- turning on the laser,
- turning off the laser
- return of the axes to their original position.
With each symbol, the Arduino controller runs the corresponding function to generate a signal at the output pins.
The Arduino functionality controls the speed of the motor through delays between step pulses. Ideally, the machine operates at the same high speed, whether engraving a pixel or passing a blank pixel.
However, due to the limited power of the laser diode, the machine must be slowed down somewhat while burning the pixel. Therefore, two speeds are used for each direction in the list of instruction symbols as indicated above.
The Arduino sketch also controls the scaling of the object image. Stepper motor drivers are set to half step. That is, the drivers require 400 step pulses per motor revolution (400 step pulses / 5 mm linear motion).
Without any scaling, engraved pictures are so small in size that the object is difficult to distinguish with the naked eye.
Principle of operation
Before assembling a CNC laser machine with your own hands, you should understand the main elements of the device and the mechanism of their operation.
A typical CO laser setup has a tube filled with gas molecules as the main element. An electric current applied to the catalyst gas causes the molecules to vibrate, thereby intensifying the light beam passing through the tube. Optical elements located inside the laser system amplify the flow of light and make it reflected many times.
For autonomous operation of the machine, an automated mechanism is required that moves the laser device. It's called a positioning device and its operation is coordinated by software. When a hole is formed in a certain place in the material, the laser carriage must be moved to another point so that the structure of the wood is not destroyed.
Shape cutting sequence
Figure cutting on a plywood sheet includes the main steps:
- First of all, a drawing is created. This is either done by manual application to the material or set electronically.
- Next, the cutting mode is selected, the main characteristic of which is the radiation power. The intensity of burning, in turn, directly depends on the thickness of the surface.
- Drawing a pattern on a material at a given speed. As a rule, high engraving speed is accompanied by greater darkening of the cut edges.
Is it possible to make a laser machine with your own hands? Yes, this is a real challenge.
To assemble a CNC laser machine with your own hands, you need to pay attention to the sliding of the guides; drives are presented in great abundance in stores of the corresponding profile.
Thus, if you use basic components similar to those in factory installations, and apply the principle of equivalent replacement of parts, it is quite possible to make a laser machine for plywood with your own hands, which is confirmed by the experience of inventive craftsmen.
Accessories you will need
Before assembling a laser machine with your own hands, you need to take care of the following important components, the tandem of which will allow you to get high-quality work from a laser engraving machine assembled by yourself:
- Laser converter device. A laser gun must be purchased, as its production is labor-intensive and does not justify the effort.
- Also, the installation must contain a special carriage, the smoothness of which will determine the result of the machine’s operation. Guides can be made from available materials, but they must cover the entire area of the surface to be treated. Thus, you will need motors that will need to be connected to an electronic board, relays, timing belts and bearings.
- The electronic power supply of the laser device, which is also responsible for executing commands transmitted from the control point to the laser.
- The software required to enter the data and the desired design or pattern.
- It is also necessary to ensure the outflow of harmful products formed during the combustion process. For this purpose, an established local ventilation system will be optimal.
Design
So, how does a homemade laser for cutting plywood work?
Machine bed.
The base of the frame is an aluminum corrugated pipe measuring 40x60, fastened with a furniture corner and metal screws. The body is assembled from inexpensive laminated chipboard - it does not experience significant loads during operation.
Please note: a 12-volt LED strip is installed around the perimeter of the case. The backlight will allow you to visually control the cutting process.
Guides for the carriage.
Guides are fixed directly to the frame pipes, ensuring the movement of the carriages along the transverse axis.
Fastening the guide for the longitudinal axis.
A longitudinal pipe with another guide is screwed to the carriages - this time under the carriage, which directly ensures the movement of the head.
Laser head on carriage.
And here is the laser head itself for cutting plywood. Foil is used to seal the connection between the tube and the fitting.
Carriage drive.
Stepper electric motors with a belt drive and gearbox are used to drive the carriages. They can be removed from a faulty scanner or inkjet printer with hopelessly dried nozzles.
Drive shaft for transverse axis carriages.
The use of two drives on carriages that ensure movement of the head along the transverse axis would create a problem with their precise synchronization. Instead, a single stepper motor with a gearbox and a shaft the length of the entire stroke of the head are used, guaranteeing synchronous movement of both carriages.
The photo shows the cover of the machine.
The massive lid is also made of chipboard; she goes up on furniture elevators. There remains a small gap between the lid and the body to allow air to flow in; smoke exhaust is organized from below.
Electronics compartment.
A separate compartment houses the power supply, stepper motor driver and DSP controller, which provides control of the machine.
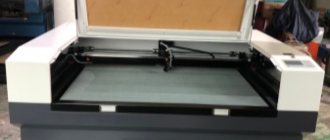
Compartment with laser tube.
The laser tube is installed using plastic fasteners that allow its position to be changed. A water cooling tube is visible next to it. Water is pumped through it by a low-power pump for a home fountain.
Cooling system storage tank.
Cooling is organized using a regular plastic 100-liter water bottle.
Full set
The design of the shuttles for the future device is assembled using rods that are inserted into their sides, which are responsible for the coordinate axes in a two-dimensional projection. The guide rods should first be sanded using sandpaper or a grinder. Next, they need to be treated with prepared lubricant for smoother movement.
In a moving mechanism, mechanisms are first installed to ensure movement, followed by ball bearings. The final step is to install the belts. When assembling a laser engraving machine with your own hands, it is convenient to use a metal base twice the size of the driving mechanisms. Fastenings can be self-tapping screws that are inserted into pre-prepared holes. A metal bracket is installed in the center of the machine, and a bearing system is installed along the curved edges of the metal base. A belt with teeth is put on the resulting movable system and it is attached with a self-tapping screw to a wooden base.
How to assemble a CNC laser machine with your own hands: step-by-step instructions
Self-assembly of a CNC machine is carried out in the following order:
1. Cutting and making the base. The easiest way to use it is to use plywood with a thickness of 10–12 mm. The base can be rectangular or rounded. When creating a powerful machine, it is made of metal.
2. Fastening to the base of fixed side walls. They can be made of plywood, chipboard, wood or metal. Holes are drilled on the walls to install guide rods.
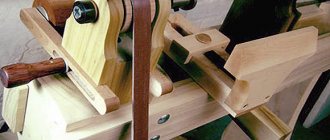
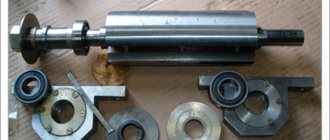
3. Installation of guides along the Y axis. Sliding supports for the movable side walls of the frame are first strung on them. A version of such supports is shown in the photo.
4. Manufacturing of movable side walls. Drilling holes in them for guides along the X axis and installing them on the walls.
5. Fastening the movable walls to supports.
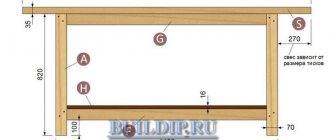
6. Assembling the working head of the machine. Below is a schematic diagram of the frame assembled with a universal head on which a laser emitter, spindle or other working element can be mounted. Its drawing is shown in the following photo. Specifically for the laser emitter, you can assemble a lighter design of the laser head with a cooling radiator.
7. Installation of the electrical part. Power supply, installation of limit switches, start and emergency stop buttons. An example of an elegant cell layout for housing an electrical circuit is shown in the photo.
8. Installation of electronics and connection of the control board and controller.
After checking all the elements, you can begin preparing the machine for operation.
automation and control
An important point in the operation of a self-assembled unit is the synchronous operation of the guide motors, which is achieved by connecting the control, which is carried out by a board that is the same for both mechanisms.
The programs necessary to run a homemade machine are available on the Internet. The required utilities must be downloaded to the computer used for management. Among the most popular for working with laser cutting are: Inkscape, Arduno IDE, Universal Gcode Sender (version 1.0.7).
These programs are installed according to a standard template, after which you can begin setting the parameters of the contour of the future drawing.
To control cutting and engraving parameters such as power (i.e. pierce temperature) and laser speed, you will need to configure the Arduno IDE board. First of all, you should download the GRBL code, which you can select from the list offered by the program. Then you can start adjusting cutting parameters.
Specifying a pattern for laser cutting
To specify the required pattern or picture, you can use a digitized drawing by hand or create a drawing in a graphics program. In openwork patterns, it is important to ensure that all elements are connected and the main structure remains intact.
The speed and degree of heating of the laser head can be determined with a little practice. An important role is played by the thickness and nature of the material used for processing. Thin sheets of wood require more careful and slow action.
When uploading an image, you should take into account the requirements of the program that uses the vector format for work. You can change the drawing parameters in the graphic editors Adobe Illustrator and Inkscape.
It should also be noted that if there are shaded areas in the drawing, the outline of these parts will not be filled in.
Electronics for a homemade laser CNC machine
Electronic components play a vital role in CNC machines. It must provide control of the device from a computer by issuing commands to stepper motors and guiding the trajectory of movement of the working element. To do this, you need a control program that will provide the necessary commands to the controller in the form of G-codes. An LPT port must be installed.
Important! To receive commands and distribute them to stepper motors, a control board is located in the controller. The standard board KY-2012 (5 Axis CNC Breakout Board for Stepper Motor Driver with DB25 Cable) is popular. Often machines are made on the basis of Arduino.
Setting up and cutting
When setting cutting parameters, you need to check that the coordinate values of the X and Y axes in the program correspond to the same characteristics of the vector image. Next, you should set the operating speed of the machine and direct the laser head at the angle required to obtain the required volume of the pattern on the wood.
The last action required is to start cutting and enjoy the operation of your DIY laser machine.
Safety precautions when cutting and engraving
When working with a laser cutting device, you must adhere to safety regulations. The critical point is the potential threat posed by an operating laser. Contact of the laser beam with the skin causes burns even with short exposure. In addition, you should protect your eyes when working with this type of device, since radiation entering the retina can cause irreversible blindness.
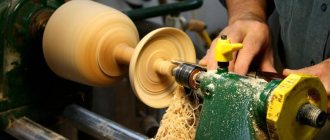
Nowadays, any idea of an inventive woodworking craftsman can be realized with the help of modern processing technologies, thanks to which it is possible to obtain works of art from rough material. If you want to save money on equipment, a little effort will allow you to assemble a laser machine with your own hands, and it will serve its owner for a long time, delighting with openwork and high-quality wood products.
The introduction of laser cutting technology in your own workshop allows you not only to produce products for your own use, but also to use it as a means of earning money.
Device arrangement
When assembling a wood laser cutting machine with your own hands, you should take into account the features of the device. Main criteria:
- laser;
- cooling system;
- Control block.
The laser is the main working element. Its head should rotate and move without restrictions in any direction. For this purpose, a set of parts is used - guides and special carriages;
The cooling system is a significant element. The correctness of its operation largely determines the quality of the products produced;
The control unit or electronic module of the device is a control mechanism that monitors the movement of the laser. Additionally controls its power.
The complex design of machines is necessary to achieve ideal results of the work performed. It is important that the required parameters can be entered using a computer. This will allow you to set the functionality of the modes, features of the patterns, and the duration of cutting.
Attention! It is necessary to organize a good ventilation system in the room where the wood laser cutting machine will be installed. Removal of combustion products is mandatory, since during operation a large amount of fumes harmful to health is generated.