Tree removal methods
The following methods of tree removal are currently known:
- Entire felling
. The easiest and cheapest way. The entire trunk is removed immediately; all subsequent work is performed on the ground in a comfortable position. The cut is carried out by creating two cuts and driving a wedge into one of them. - Removing a tree with a guy
. Helps avoid accidental deviations in the direction the barrel falls. It is better to entrust the procedure to people with certain experience. Used on trees with an undesirable slope. Large branches are removed before felling. Afterwards, the trunk is pulled back in the desired direction, followed by a cut from the side of the slope. The permissible fall error is up to 1 m. - Cutting down trees in parts (reset)
– work is possible if there is special equipment (truck crane or aerial platform) and sufficient free space for throwing off sawn pieces. The method is difficult and can only be done by professionals with special equipment. The best method for particularly large and heavy trees. The cut starts from the top, the length depends on the thickness of the trunk. - Piece by piece (descent)
– used in situations where reset is prohibited. In this case, the branches are tied and carefully lowered to the ground using a crane. Apart from this, the technology is no different from others. When the trunk is damaged and may split, the tree can be removed by first shackling it with chains. Only after this they begin to cut the segments from top to bottom.
Stump removal technology
Even the most modern equipment does not allow cutting trunks so that no traces remain: stumps always remain outside, and roots remain underground. If there is no place for the stump in the landscape design, then they get rid of it.
This is done in the following ways:
- By pulling. Depending on the capabilities of the property owners and the size of the stumps, they are removed manually, using a winch or tractor. The work uses shovels, cables, axes, tractors and cars. Initially, the stumps are dug up. Removal of tree roots is carried out before pulling out the remains of the trunk.
- Chemical. Holes are made in the stump into which a substance is poured or poured, causing destruction of the wood structure. Chemical destruction of stumps can take several years.
Stumps can be removed with an ax or special mechanical devices.
What do you need to cut down trees?
At first glance, these works do not require anything serious except strength and special equipment. However, this is only permitted when removing green spaces on private territory. In some regions, unauthorized cutting down of trees near a house is prohibited. When you are going to uproot or trim green space on city territory or behind a private fence, you need to have documents with permission from the authorities. For this purpose, a statement is written, a commission is assembled, which decides his “fate”. The verdict could be as follows:
- Emergency condition
– 100% tree removal. - Satisfactory
- payment of a certain amount for which young seedlings will be purchased as compensation.
Tree cutting tools
To carry out work on removing green spaces, in addition to a cutting tool (chainsaw), it is important to have the following items that will help cut down a tree:
- wedge made of wood or plastic;
- twine or cord;
- protective clothing;
- axe;
- a sledgehammer with a ribbed wedge;
- small hand saw;
- hand winch;
- machine for cutting the trunk in parts.
Wood cuts in the interior
Different-sized saw cuts make excellent decorative items for your home, office or cottage. This material will emphasize the eco-style of the room and give a feeling of unity with nature.
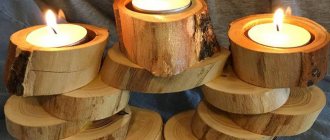
Wooden circles are used to make candlesticks, key holders, lamps, table lamps, frames for paintings, photographs or mirrors, flower stands and anything else you can imagine.
Design of mirrors and frames
To decorate photo frames or mirrors, it is better to take cuts of medium and small size:
- To work on such a decoration, you will need thin plywood on which to trace the contours of a mirror or glass frame.
- After that, a distance equal to the width at which the circles will be laid retreats from the contours. A mark is made.
- The base of the frame for the mirror is cut out along this mark. And a wall holder is attached to it.
- The resulting frame can be painted in a color suitable for the interior using special compounds that are resistant to moisture and temperature changes.
- Now you can start decorating directly. On a base lubricated with quick-drying glue or “liquid nails”, saw cuts of different diameters are laid out.
The work will look more interesting if the circles are alternated or laid out in a certain pattern. If desired, you can varnish the frame or leave it in its natural form.
The final point will be the fastening of a mirror or glass photo frame, which is recommended to be mounted on “liquid nails”.
Wall panel
A fashionable trend in interior decoration is wall panels. It can be placed on the entire wall or decorate the head of the bed. Panels made from wood cuts are an excellent alternative to hand-drawn paintings and canvases.
To make it you only need wooden circles and your imagination!
The saw cuts can be of the same or different diameters. Tree species can also be combined. This will give the finished work its own flavor.
If the panel is small, it is more convenient to create a frame from natural or imitation materials, and attach the saw cuts directly to the glue.
For “wooden paintings” of impressive size, it is enough to make wall markings along which the circles will be laid out. It is convenient to attach them with glue or self-tapping screws.
Then the panel is covered with drying oil or varnish. Voids and gaps are painted over or filled with clear epoxy or acrylic resin, and self-tapping screws are masked with wooden wedges that are driven over the metal and sanded.
Self-tapping screws can also be painted over with special metal paint of the desired “wood” shade.
Watch
A piece of furniture like a clock should be in any home. A saw made from sawn wood will help make the process of keeping track of time not only useful, but also aesthetically pleasing.
For this craft you will need:
- a good piece of wood with a round or unusual shape;
- Hands and mechanism taken from old “time keepers”;
- drill, grinder, wood burning machine;
- acrylic paints and brushes.
Progress:
- Sand the selected cut with a sanding machine.
- Using a drill, drill a hole for the arrows in the middle of the circle.
- Paint the sides of the saw cut.
- Draw, burn or glue the dial.
- Apply a pattern to the product (optional).
- Attach the clock mechanism.
- Hang the clock on the wall using a metal loop that is attached to the back of the cut.
Practical crafts for the kitchen
Using saw cuts in the kitchen is not only practical, but also useful. Wood helps to create coziness, which, as you know, begins in the kitchen, where a woman at home creates.
Crafts made from coniferous trees when heated will fill the house with their unique aroma. Stands for kitchen utensils and cutting boards are best made from hardwood.
To obtain such a board or stand, you can take either a large polished cut or make it from cuts of branches connected with slats and nails.
Kitchen crafts also include food trays, plates for fruits and sweets, salt and pepper shakers, napkin holders, and paper towel holders.
Tree cutting rules
To carry out quality work, you need to follow the advice of professionals. Tree felling must be carried out in accordance with the following rules:
- it is important to take care of overalls;
- inspect the instrument for technical condition;
- mandatory clearing of the area;
- the chainsaw is held with both hands;
- Tree removal is carried out starting from the lower branches;
- everything is removed to some distance;
- the first cut of the trunk is always made from the side of the natural slope;
- the second is carried out 2 cm higher, without finishing the first;
- drive a wedge and retreat some distance.
How to make an even cut of a tree?
You can carry out such work yourself, the main thing is to know how to handle the tool and have patience. Removing trees in parts or completely includes several rules that must be followed to carry out quality work. In order to make an even cut of a tree, you need to do the following:
- check the quality of tool sharpening;
- calculate the length of the tire, it should be equal to the size of the trunk;
- the chainsaw is placed vertically on the tree;
- movements are carried out smoothly without jerking;
- in case of clamping, try to push the barrel to release the chain.
In any case, after felling the tree, you can select pieces that will make even cuts for further use. When the trunk is blocked, it is easier to carry out the necessary manipulations even for a person without experience. It is important to raise it some distance from the ground surface so that the cutting tool does not touch it, this way the quality and service life of the saw will be preserved.
Uprooting a stump
Removing emergency trees also includes getting rid of the stump, and this is done as follows:
- the planting is dug in a circle at a distance of 60 cm from the trunk;
- all roots that come across on the way must be cut with a shovel or sawed with a hacksaw;
- thick roots are additionally dug in;
- tilt the trunk while simultaneously removing the stump.
Simple crafts
In order to make your first simple wood craft with your own hands, you first need to read the simple instructions on how to make it. To cut wood you need a tool. You can, of course, use a hand tool, but the cut will result in an uneven surface. It is better to use an electric tool: a jigsaw or a circular saw.
The cut pieces are processed with sandpaper to eliminate unevenness. You can immediately start making something from the prepared ingredients.
Small saws are primarily used to make stands. They can be glued together in groups. Such boards are used as stands for mugs, teapots and other hot objects.
A large number of sawn tree trunks can be used to decorate rooms and create interior items. For example, you can use the cut to make a base for a clock, candlesticks, decorate paintings, decorate walls, and make picture frames.
Cut tree sections can be used as blanks for further creativity. They are very successful in making a variety of toys and animal figurines (all kinds of foxes, ducks, bears, dogs, birds).
The scope for creativity is limitless. These products are best made with children. Making small items is also possible at home and in apartments. At the same time, the child will develop useful skills.
How to properly cut down a tree on your property? on the Nedvio website
If you have trees on your property, that's great. “Hedges” made of trees can serve as an excellent decoration and a natural fence from prying eyes, creating the necessary shade in the garden.
But sometimes there are too many of these trees, they prevent the sun from penetrating to the bushes growing in the dacha, preventing us from enjoying the rays of the sun. The roots of large trees interfere with the growth of the beds, uprooting the plantings. Often, old trees simply disfigure the landscape, not to mention the fact that tree branches can grow in very inconvenient places - for example, near a house, disfiguring the roof or its facade decoration.
One way or another, some trees have to be cut down, especially if they are large and bulky. Keep in mind that if a tree grows on your site, then you are your own masters here, but if it has grown on a common territory, then the consent of the neighbors is required for cutting it down. Of course, it’s worth soberly weighing and evaluating everything in order to make a decision about wood disposal. But if it is accepted, then the question arises - how to get rid of the tree in the country?
Wooden images of animals and birds
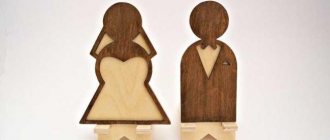
A good option for decorating your home or garden would be simple figurines of animals or birds.
Wooden owl
- You will need two round elements with a diameter of 20 and 15 cm. This is the basis of the crafts.
- 2 circles of smaller diameter must be attached to these elements using glue or nails. These are the eyes of birds.
- To decorate the wings, two rounded blanks must be sawn in half. They are fixed on both sides of the base.
- The pupils can be made from beads.
For a special effect, it is better not to remove the bark from the preparations.
Similarly, a bunny, a cat, a hedgehog, fairy-tale heroes and cartoon characters.
Cutting down a tree. What's better: do it yourself or hire a crew?
The first thing that comes to mind is to call specially trained people who will not just come and cut down the plant, dig out the stump and roots of the tree, but also take them away with them so that it no longer causes you trouble. But such services can be quite expensive, especially if your site is located far from large villages and gardens.
However, you can save on cutting down trees by doing everything yourself. If the tree is large, then it is best to take a chainsaw or electric saw - you don’t have to buy the tool at all, it is available at special rental points. It will reduce manual, hard physical labor for you and save time. But you can get by with regular push-pull hand saws.
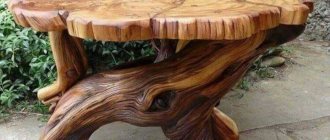
How to correctly make a cut (pancake) from a tree
Wooden slabs are wide vertical cuts of a tree trunk, similar to large slabs or horizontal parts of logs that have undergone special processing. They are made from hard wood, mainly oak or poplar. They are used for the production of original furniture products or as separate, independent parts of the interior of the room. With their help, product design projects are created that are unlike any other. And a room with such furniture looks creative, elegant and unique. The use of wooden slabs is very widespread.
Safety rules and preparation for cutting
Before you start cutting down a tree, the first thing you need to do is assess the safety of yourself and those around you. Having approximately calculated the height of the tree and the trajectory of its fall, estimate how close electrical wires, roads, and whether there are nearby buildings to this place.
Before the actual cutting process, put on a helmet - this headgear can protect you from injury in unexpected cases. In addition, it is better to wear gloves, thick shoes to prevent splinters and non-slip shoes. At the same time, it is better to choose a day to cut down a tree in calm, good weather, so that natural forces do not interfere with your work.
These rules for safe tree felling should be followed especially carefully if you want to cut down a tall and strong tree, such as a pine tree. Of course, it is better to entrust the disposal of such trees, especially if they grow in close proximity to houses, to a professional.
After the assessment stage, it is necessary to determine the height of the tree, at least approximately, the slope of the tree, if any. Within a radius equal to two heights, it is necessary to remove everything that could be damaged during tree felling. After this, it is best to cut down the large, lush branches of the tree - these can be reached using a ladder.
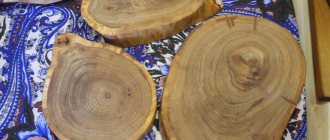
Preparation of cuts
You can prepare wood cuts of the required thickness with your own hands. To do this, you will need a gasoline or electric saw and a piece of wood in the form of a tree trunk or a piece of wood butt.
Thick branches and trunks of thin trees will also be used. They can be used to fill the space between large diameter wood rounds. You can cut them at your dacha or garden plot.
Such trimmings can also be ordered at the sawmill
All end cuts must be of the same thickness to avoid a situation with a traumatic “stump” sticking out above the general floor level.
If you do not have such an opportunity, then the necessary cuttings can be ordered for a certain amount by a worker at a sawmill or woodworking plant.
Recently, decorative wooden cuts can be found on sale in some construction supermarkets.
When choosing the thickness of the cut, you should remember that this is the amount that will reduce the height of your room, so you should not make too thick cuts - the recommended thickness of wooden “pancakes” is about 3-5 cm.
Thinner cuts are extremely fragile and will inevitably be damaged during processing.
If there is a choice, when making cuts, preference should be given to harder wood species - larch, oak, walnut, hornbeam.
Of course, such wood is more expensive than pine, alder or birch, but the service life of the flooring will be longer.
The table shows the hardness classes of various tree species.
Wood for cuttings should be taken well-dried, since wooden rounds made from raw material may begin to crack after being laid on the floor, and this will ruin the entire appearance of your decorative floors. Detailed instructions for making cuts are presented in this video:
It is not necessary to clear the bark from the trunks before sawing. This is usually done to remove the larvae of various woodworms that live under the bark. But in the case of pouring floors with a polymer composition, the larvae are unlikely to be able to survive, much less eat wood impregnated with epoxy resin.
It is necessary to remove the bark if you are going to fill the gaps between cuts with clay mortar.
We cut down the tree. Order and stages of the process
When cutting directly, it is better to call an assistant who will guide the tree when it falls - this work can be done with your hands, but if the tree is thick, then it is better to use a rope to grab it.
First you need to make one piece in the tree, it should be at a level that is comfortable for you, where it is most convenient to saw without particularly straining your back, arms or whole body. The cut is cut using both a saw and a hacksaw with large teeth on the side where the tree will fall.
The order of cutting the wood will be approximately as follows:
- First, cut a piece of wood from the top at a 45° angle to the ground, about a third of the thickness, but no more. Then cut it parallel to the ground;
- After cutting, you need to pull the tree in the desired direction. If the tree is thick, then you need to make a cut on the back side, slightly below the base of the previous slice. It should be at an angle of 45° to the corner of the first sector you cut;
- Pull the wood again, taking your time. If the tree has not started to fall, make another cut, deeper where you made the first, right on top of it;
- During cutting, the tree should not be pulled under any circumstances, since the trajectory of the fall in this case is unpredictable. If the tree has already begun to tilt, you need to quickly run to the side.
Drying end-cut wood at home
By Turbo4x4, October 9, in Technologies. There are several ways to dry wood, but as a rule these methods are industrial - if you have a log and it’s five to seven years old, then there won’t be any problems - I covered the butt with paint and forgot. But what about boards and blanks that I cut in the forest not in the spring, of course - When is the maximum amount of sap in wood in the fall? At the moment I need two axes with a natural bend in degrees per mm of the product. Can you imagine this crookedness? And with great difficulty, naturally, I found such a crook. Birch, perfectly clean when cut - like butter.
Path made from wood cuts
Neatly paved wooden garden paths will turn your daily stay on the property into a measured, contemplative walk, during which the dacha owner will be able to admire the landscape of the garden he grew with his own hands. In addition to functional tasks, paths made from cut wood also solve the issue of garden aesthetics - they give the landscape a holistic, complete look and make it visually attractive.
Preparing the subfloor
The next step is to prepare the rough subfloor and lay the cuts. The surface of the base should be almost perfectly flat, without holes or bumps. Otherwise, it will be difficult to achieve a perfectly flat surface of the decorative coating.
Using a building level, a flat metal profile or a wooden lath, we check the entire surface of the floors. In the right places, we remove the bumps with a grinding machine or a mason's pick, and fill the holes with plaster mortar.
If the rough base is too uneven, it will be easier to pour a leveling screed over its entire area.
To protect wood from moisture contained in concrete floors, floors are covered with rolled waterproofing materials or coated with water-repellent mastic.
Why is a boardwalk so popular among private developers?
For the construction of a garden path, the developer can choose any materials - from improvised construction waste to expensive types of natural stones. However, wooden paths at the dacha look most natural and harmonious, as they blend into the surrounding landscape and, as a result, look fantastic at any time of the year. In addition, the material used to build a path from cut wood or boards - natural wood - has other advantages:
— a large selection of wood species that differ in texture and density;
- ease of working with the material.
Flooring made from wood slices
Wooden materials are often used to cover floors. Round log plates are also widely used for this work. As a result, the surface is durable, environmentally friendly, aesthetically attractive and unusual.
So, let's see what technology is used to lay tree cuts on the floors in the interior. Floor tiling is reminiscent of working with ceramic tiles. Installation is carried out using a special solution. After installing the elements, they are sanded and covered with several layers of varnish. The surface should be decorated using the following wooden plates:
Under constant load on the coating (furniture) and other mechanical influences, the surface made of a thin layer of wood may become deformed
Softwood is not recommended for use, since such material is not resistant to stress. Oak and ash are suitable here. This coating will serve for many years without losing its attractiveness.
Subtleties of drawing up a project before constructing a wooden walkway?
How convenient and functional the constructed path from wood cuts will be depends on the skill of its routing. Landscape architects, when advising clients on garden paths, advise using a number of tips to ensure paths are safe, practical and durable.
First of all, experts recommend adding main paths to the project that connect the entrance to the site and the entrance of the house to the garden. Then additional paths should be laid leading to beds, a gazebo or an artificial pond.
Technology for laying garden paths made of wood
For craftsmen who are familiar with the specifics of laying paving stones, paving a path from wood cuts will be relatively easy, because the technologies have a lot in common. First, large-diameter round timber is laid out and compacted on a bed of sand, and then the empty space is filled with saw cuts with a smaller cross-section or a dry building mixture of sand and concrete.
All paved cuts are checked for level so that in the future the path remains stable and literally does not disappear from under your feet.
Preparation of materials for the construction of a wooden path
Before constructing garden paths from wood cuts, you need to decide on the type of wood used for paving. Since wood tends to deteriorate under the influence of moisture, you should pay attention exclusively to strong and durable species. So, a garden path made from wood cuts made from the following trees will last a long time on the site:
When the type of wood is selected, the raw materials should be checked for compliance with a number of requirements:
— the cut must be dry and clean;
— the material should not show signs of pests or rot;
— the height of the cuts should be the same, so a template should be used in the process of blooming the logs;
— saw cuts must be cleared of bark and free from damage in the form of cracks and deformations.
The optimal cutting height is about fifteen centimeters. It is enough to ensure that the paved wooden path is reliable and stable. Don’t forget about pre-treatment of saw cuts with special antiseptic impregnations. This could be drying oil, varnish, copper sulfate, hot bitumen, or professional antifungal wood products. After processing, the saw cuts must dry thoroughly, and only then can they be used for their intended purpose.
Selecting tools for work
All manipulations in the garden will not take much time if the developer has a special tool at hand. In particular, the work will require the following minimum set of gardening and construction equipment:
— a device for manual soil compaction;
- measuring tape, etc.
All these devices can be easily found in any yard, and if some items from the list are missing, a private developer will be able to borrow the missing tool from their neighbors.
How and with what you can paint branches
In order for the branches to be snow-white, they can be painted with ordinary white emulsion paint, and we will get such a wonderful basis for decoration. You can also paint the branches with white gouache with a brush and without water (pure paint), rather than with watercolors, since the consistency of the gouache allows the paint to dry on the branches. It is also applied evenly, clearly and has a snow-white color (compared to watercolors).
After you've given the branches one coat of paint, let them dry for about 15 minutes , then flip them over and paint the other side. You can repeat the process until all parts of the branches are completely covered with paint.
You can also use acrylic paint or spray paint (aerosol) to paint branches .
Aerosol paint in a can has some advantages:
- Very easy to use. There is no need to spend money on solvents or quality brushes.
- If you use brushes, you will not achieve such an even paint job as with an aerosol.
- Aerosol paint in cans is a simplified method of painting with a compressor. If used skillfully, you can achieve professional painting of any surface.
- Reliability and color matching.
Advantages of acrylic paint:
- There is practically no toxicity - you can work indoors, there is no unpleasant odor.
- High quality coating of the material, which makes it possible to apply fewer layers of paint.
- Dries very quickly. The drying time of acrylic paint on wood depends on the structure of the surface, the thickness of the layer, and the microclimate in the room.
- Good durability.
- Easy application (both manually and using a spray).
- After drying it is very elastic. The film that forms after water evaporates can change its linear dimensions, so cracks appear on the painted surface much less often.
- Extensive color palette and variety of textures.