Plywood is a universal material that is usually used in furniture production and private construction.
With a little skill and creative imagination, you can use this building material to make children's toys, decorative crafts for your garden plot, and small household items. It is noteworthy that this does not require special skills or knowledge.
Let's see what interesting plywood products you can make with your own hands, having a little free time and patience.
Rules for working with plywood
Plywood sheets are very popular among craftsmen due to the presence of obvious advantages:
- Low weight.
- Sufficient strength of finished products.
- Safety for humans.
- Possibility of pre-impregnation with moisture-resistant oil.
Plywood, unlike solid wood, has a lower cost, which determines many areas of application of the material. However, in all cases, you should remember the main nuances of working with plywood:
- You must first select the consumables. Today there are five varieties of plywood, each of which differs in thickness, appearance of veneer, and the number of possible defects. You can recognize the corresponding category by its letter designation. The quality composition also differs. For making crafts, it is better to give preference to birch plywood, which crumbles the least when cutting.
- Cutting out crafts from plywood is usually done with a jigsaw. At the same time, for large products you will need a stationary installation; light crafts from plywood are cut out with a hand jigsaw.
- It is better to securely fix the sheet of material so as not to accidentally cut off the edge or crumble the cut area.
- All manipulations should be carried out measuredly, without haste. Quite often, in photos of crafts cut from plywood with a jigsaw, you can see rough cuts, roughness, and defects.
- To obtain a clearer pattern and details when cutting, it is better to use templates, the outlines of which are shown on the back of the worksheet. Drawings of plywood crafts for working with a jigsaw can be found in the public domain.
- To make finished products moisture resistant, you can use not only oil, but also a mixture of drying oil, turpentine and melted wax. The cooled mixture is applied to the surface of the plywood.
- Before applying the design, the surface of the plywood is carefully sanded using a coarse grater and then polished.
The quality of grinding and polishing directly affects the quality of the painting of the craft. The paint lays perfectly evenly only on a perfectly treated surface.
Why is this necessary?
Quite often, manufacturing turns from a hobby into a profitable business.
Original colorful toys are used as:
- home interior decoration;
- decor for garden plots and flower beds;
- as memorable souvenirs;
- in the form of safe (environmentally friendly) educational toys.
In the photo there is a plywood toy as an element of a lamp.
Plywood is an inexpensive material that you won’t have any problems purchasing. Having mastered the basics, you will easily navigate the choice of sheet thickness for a specific toy.
Having insignificant weight and thickness, plywood is quite durable and can withstand serious loads.
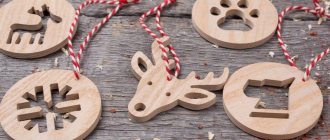
The qualitative characteristics of the material allow you to create toys of various levels of complexity and sizes:
- doll and children's furniture;
- houses;
- designers;
- original New Year's toys decorated with carvings.
If you decide to make a toy with your own hands, you need to start with the simplest product. As you gain practical experience, you can make the task more difficult.
First of all, you need to prepare diagrams of plywood toys with your own hands. This is the basis on the quality of which the external characteristics and functionality of the toy depend. The drawing must be made to a real scale, thus avoiding errors and inaccuracies.
Once you are sure that the drawing is perfect, transfer it to cardboard or paper. The next stage is transferring the image onto plywood.
Plywood painting
Perforated plywood paintings add unique charm and style to the interior of your home. To perform such work, you will need a jigsaw, including a hand tool (cutting out the smallest details in the image).
Instructions for the work performed:
- First of all, you should choose a sketch. Today, black and white portraits or shadow images are very popular.
- The sketch is drawn on the back side of the plywood using a pencil.
- The sheet of material is firmly fixed, for example, using clamps.
- The edges under the clamps should be wrapped with a soft rag or sponge so that the surface of the plywood does not crumble under strong pressure.
- The details are cut out according to the applied template, forming the desired image.
- Using a hard sponge, sand both the surface of the plywood and the edges of the cuts.
- The next step is to impregnate the material with a moisture-resistant composition (homemade mixture or industrial oil).
- After the impregnation has dried, you can begin decorating.
- A layer of stain and transparent acrylic varnish will not only protect the material from premature deterioration, but also create a beautiful glossy finish.
Subtleties that need to be learned to create quality crafts
Coloring toys is an equally exciting process
- When attaching transfer paper to plywood, you should position the pins or nails so that you can easily lift the drawing to check the quality of the image.
- Lay the thinnest elements along the grain to increase their strength.
- When cutting plywood, the jigsaw should not move exactly along the lines, but should pass next to it, from the outside.
- The diameter of the hole should be slightly larger than the nails used to allow them to rotate freely.
- You should not drive the nails in completely; you may need to move certain parts to improve the model.
Lampshade for table lamp
Complex but beautiful plywood crafts are also cut out with a jigsaw. An interior style such as country or modern will be favorably emphasized by a stylish carved lampshade.
To make it, you will need to first assemble the socket and lamp, and connect the switch key.
Plywood must be impregnated not only with moisture-resistant oil, but also with antipyrine, for safe operation.
Instructions on how to create a beautiful decoration for your home:
- The easiest way to make a lampshade is from several component modules. The master will have to carry out separate work on the manufacture of each module.
- Based on a previously prepared drawing, a future design is applied to the surface of each workpiece.
- The part is fixed with clamps or clips.
- Using a hand jigsaw, cut out the lines of a given ornament for a plywood craft, trying not to damage the edges of the cuts. If a large number of small cracks or mesh appear on the surface of the sheet, it is better to replace the part with new plywood.
- After cutting out the shapes, you should clean the prepared module from shavings, and then be sure to sand and polish.
The surface of the future lampshade is impregnated with oil and antipyrine, and only then it is opened with stain and acrylic varnish. To attach the modules to each other, you can leave joints and grooves on adjacent elements in advance, or you can use dowels or metal brackets.
Original flower bed made of plywood
Plywood is widely used not only for creating home crafts. This material is very successfully used for the manufacture of garden figures, decorations, and flower beds.
- Depending on the wishes of the owner, these can be hanging flower pots, beautiful carts for flower pots, or vertical flower beds.
- For work, choose a more durable material, the thickness of which is more than 3 cm. It is also important to pay attention to the condition of the plywood, for example, the absence of cracks, chips, defects, and signs of delamination of the layer.
In independent work, detailed attention is paid to impregnating the finished product with a mixture of drying oil, melted wax and turpentine, which will protect the product from moisture and seasonal rains.
Pre-assembly of the printed publication
So, the text is transferred to paper, the sheets are laid out in order. What's next?
- Prepare a thick brush and PVA glue.
- Fold the pieces of paper as evenly as possible (knock the stack on the table several times).
- Place the sheets on the edge of the table so that their left side protrudes beyond the furniture lid by 2-3 cm.
- Press down the stack of paper in several places with something heavy (dumbbells, vice, etc.).
- Soak a brush in glue and brush it over the edge of the paper sheets protruding from the table.
- Wait approximately 60 minutes for the glue to dry.
If the glue is liquid, or the paper does not want to dry out, then increase the exposure time on the sheets to 2-3 hours. Believe me, the future book will only benefit from this.