We will prepare everything you need
Before starting work, you should prepare the necessary tools, materials and place of work. You should choose in advance the shape of the stool, its color, determine whether the seat will be soft or hard, and draw up a drawing.
Laminated chipboard
The material you can choose is chipboard or laminated chipboard (chipboard). The advantages of the first one are that it can be painted in any color and its price is lower. Laminated chipboard is a sheet of chipboard, which is lined with paper-resin film. To make such a film (laminate), paper with a pre-created texture, color or pattern is used. The paper is given rigidity by impregnation with melamine resin, after which the chipboard is combined with the laminate. The advantages of laminated chipboard are as follows:
- protected from moisture;
- it can be washed if necessary;
- a large selection of colors, textures, imitations of various woods, etc.;
- more durable material.
Required Tools
For production you will need:
- Chipboard or chipboard;
- jigsaw or jigsaw;
- drill or screwdriver;
- drill (preferably countersunk);
- euroscrews or self-tapping screws;
- PVA glue;
- sandpaper.
Additional materials
If you plan to make a soft seat, you should prepare:
- upholstery;
- padding polyester or foam rubber.
The upholstery material can be leatherette or fabric. If the choice is made in favor of fabric, then it is advisable to give preference to dense materials - they are less amenable to wiping. It is also necessary to purchase finishing tape, which is glued to the edges of the stool parts. It is chosen according to the color and width of the chipboard.
Processing the stool
If necessary, the finished structure is processed. If mechanical processing consists of smoothing the surface with a cutting or abrasive base, then the chemical process involves:
- Antiseptic impregnation;
- Painting with water-based silicate paint.
The first treatment prevents damage to wood by wood-boring pests and rot. Painting gives the product a more expressive image. Although in fact it is better to refuse chemical treatment so that the array remains natural and hygienic.
Features of the stool design
A modern stool is a very simple attribute of any kitchen. It’s not difficult to make such a product with your own hands, because there are many ready-made drawings and photographs that even a beginner can use to assemble it. Plywood, waste wood and even finished timber are often used as the main material.
In essence, a classic stool consists of several elements that are securely fastened together. The product consists of the following parts:
- cover or base of the structure, which has a round or square shape,
- 4 identical legs made of wood,
- drawers, that is, elements connecting all the legs of the stool,
- a seat with rounded edges or covered with thick fabric.
Materials used
Despite its simple design, a stool can be high or low, solid or folding, traditional or tourist. The corresponding difference between the models would not be possible if furniture makers did not use different materials:
- Solid solid wood (timbers and boards) - used for seating, side frames and legs;
- Metal pipes - needed mainly for legs;
- Vine or twigs - the entire structure or individual elements are woven from them;
- Plastic - mainly used for smelting solid structures;
- Fabric and leather are relevant if the stool has a soft seat.
The easiest way to make wooden furniture at home. After all, lumber is well processed mechanically and chemically.
Stool made from chipboard scraps
To make a stool for the kitchen, you don’t have to buy chipboard. You can use scraps or take elements of old furniture. First you need to transfer the dimensions of all parts to the chipboard. The lines should be clearly visible so that it is convenient to cut along them.
If you are using a jigsaw, you need to cut with a fine-toothed file at maximum speed. After cutting out all the elements, it is necessary to clean the edges with sandpaper to avoid chips and burrs.
The jumper can be attached to the racks using self-tapping screws or a tongue-and-groove connection. In the latter case, you need to make a groove in the racks. To do this, use a drill of the appropriate diameter to make holes close to each other from the top to the bottom marks. Then use a file to align the groove so that the lintel tenon fits tightly into it.
If the design of the stool does not provide for such a connection, it is fixed using self-tapping screws or Euroscrews. To do this, use a drill to make guide holes in the marked places and connect all the elements together. To make the stool look more aesthetically pleasing, it is advisable to use a countersunk drill. If this is not the case, you can use a simple one, the diameter of which corresponds to the size of the cap. To hide the screws, use plugs.
All holes must be made strictly perpendicular and in the center
Particular attention must be paid to fastening the side posts. Poor fixation of the legs can lead to loosening of the entire structure and a fall from the stool.
After assembling all the parts, glue the furniture edge. This is done as follows:
- the tape is applied to the chipboard with the side on which the glue is applied;
- then iron it with a hot iron to melt the sticky mass;
- Press the tape with a clean rag.
The glue hardens in less than 1 minute. Lastly, the seat is covered with soft material. The upholstery fabric is attached to the chipboard with staples from a construction gun.
We make drawers and fasten them together
What is a tsarga? The drawer is a wooden frame that connects the legs of tables, chairs, stools, and beds. It gives rigidity and stability to the structure.
First of all, we make a blank for the drawers in accordance with the drawing. Then we cut it, having previously determined the length of the drawers: from the size of the side of the seat we subtract two lengths of the seat protrusion above the drawer and two thicknesses of the legs at the places where they are attached. Next, the attachment points for the brackets connecting the drawers are marked.
Be careful, ideally the drawers should rest against the middle of the legs, and the lower edges of the brackets should coincide with the lower ends of the drawers, this will increase the strength of the stool. The drawers are fastened together using furniture metal brackets and self-tapping screws.
Making a simple stool
Making a simple stool begins with choosing a model. A simple stool consists of a seat, legs, sides and footrests. To create a traditional stool 0.5 m high with a seat 0.45x0.45 m you will need:
- 4 beams for legs. The bars should be smooth, have the same height and a cross-section of approximately 5x5 cm. To give a more aesthetic appearance to the product, the bars can be narrowed down from the inside;
- plywood panel or boards 12-20 mm thick for the seat. If the seat is made of several boards, then they must be glued together into a single panel;
- 4 boards 441 mm long and 3x6 cm thick for drawers;
- 4 beams 441 mm long and 3x3 cm thick for footrests;
- 4 beams for dowels.
You will also need screws and wood glue.
The first step is to make the frame of the stool. To do this, in the beams prepared for the legs, places for the grooves are selected where the legs and drawers will be installed. Holes are made using a chisel or router. The edges of the drawers and legs also need to be processed and tenons cut on them. The height and depth of the tenons should be 1-1.5 mm less than the grooves. When all the frame parts are prepared, they are assembled in pairs. The tenons are treated with wood glue, and the resulting frames are tightened with clamps. After the paired legs have dried, the remaining drawers and legs are installed on them, the spikes of which are smeared with glue. The resulting frame is compressed in clamps until completely dry. After gluing, each connection is additionally secured with self-tapping screws.
Then glue is applied to the inside of the prepared seat. The seat is leveled and pressed. Holes are drilled in the corners of the seat. These holes are glued and then dowels are driven into them. The top of the dowels must be cut off and the installation areas sanded until smooth. After the glue has completely dried, the stool can be additionally painted or varnished.
Manufacturing of blanks
Before sawing consumables into bars and boards, you need to look at many photos of the stool with your own hands, draw a sketch of the structure and, according to the sketch, draw a drawing of the model. The dimensions of the entire product will allow you to determine the dimensions of each workpiece separately.
Note!
- Do-it-yourself wardrobe: a review of ways and methods on how to build a stylish and original wardrobe (video and 145 photos)
Do-it-yourself furniture restoration - removing chips and scratches, restoring surfaces. Instructions with photos and video tips
DIY ottoman: how to make it at home. The best ideas, master classes. Photo + video review of beautiful ottomans
The preparations should include:
- 4 legs;
- 4 kings;
- 4 leggings;
- 1 seat.
The last element is a single sheet or several boards connected to each other. As for the plugs, they are purchased separately.
Tool
Making a stool begins with preparing the tool and workplace. Don't worry, we won't immediately advise spending a decent salary on a wood milling machine, drilling machine, planer saw and lathe. Let's try to do without even a carpentry workbench. Maybe it will come to all this when a taste for work appears and income from it appears. For now, we will limit ourselves to the minimum that will allow us to work from a table on the balcony or in the garage, laying a film on the floor so as not to spread sawdust. And this minimum of tools should be useful on the farm in general, in case (everyone has their own inclinations) the first stool turns out to be the last.
Simple carpentry tools
So, to begin with, in addition to an electric drill, you will need a pair of C-shaped carpentry clamps for 180-220 mm (top left in the figure), one (preferably 2) F-shaped for 400-500 mm, at the top in the center, and, preferably, clothespin clamp, top right. They are inexpensive, and their range of applications besides carpentry is very wide.
Buying a jigsaw, of course, would be a good idea; it is not that expensive and is suitable for a wide variety of jobs. But at first, you can use it instead... a frame hacksaw for metal; These are also sold as mini hacksaws. Just don’t take entirely plastic ones (bottom left in the figure, pos. a). This is a tool for rare occasional use. Such a miracle can be found on the Internet for as much as 18 rubles, but the plastic sponges are quickly eaten up by the steel of the blade, and an “ultra-cheap” hacksaw is not enough for a good stool. You need to take a mini hacksaw with a steel frame, pos. b. It will cost about 50 rubles, but you can work with it for a long time and regularly.
To work on wood, the blade is inserted into the frame hacksaw “incorrectly”, with the cutting edges of the teeth towards you (upper insert in pos. b). Then, using a section of the canvas in the frame, you can saw across the grain, along and obliquely. In any case, the cut comes out even and smooth, literally mirror-like; When sawing layer by layer, only under-dried or newly damp coniferous wood becomes a little shaggy. In this way, for example, the tenons for the groove are filed, see below. Again, the “wrong” way to cut wood with a frame saw is to start from the corner, because wood is softer than any structural metal.
Using a protruding section (cantilever) of the blade to make a curved cut is slower than with a jigsaw, but, with some attention and accuracy, just as accurate. When working at home, it is advisable to thread the blade, as it should be in a mechanic’s fashion, with the ridges of the teeth facing away from you, so that the sawdust falls down, clogging the markings
In this case, you also need to saw like a metalworker: hold the tool level, without tilting it along the cut, do not lean too hard, and allow a swing (working stroke) of no more than 1.5-2 widths of the blade. Also, with the “wing” of the blade, the protruding ends of dowels and through tenons are sawed off no worse than with a special flexible saw, which is several times more expensive.
Next, wood files - rasps. You will need 2 of them: straight semicircular 200x20 mm, pos. in, etc. cabinet, also semicircular (250-300)x30 mm, pos. d. A cabinet rasp differs from a straight rasp not only in its narrowed end, but also in the method of notching. Both of them have a notch, of course, that is not at all the same as that of metal files; those on the tree instantly become clogged with sawdust. Depending on the properties of the wood and the area being processed (end, edge, face), it may be more convenient to work with one or another rasp.
Then, chisels. We will need simple straight wood chisels with a width of 6-8 and 20 mm. It would also be a good idea to purchase a set of 6-40 mm chisels, consisting of 3-5 samples. Often a set of chisels comes with a wooden mallet, which otherwise needs to be purchased separately. However, you can make a mallet, like a clothespin clamp, with your own hands from hard, fine-grained wood.
We turn out the legs
Since the legs of the stool are most susceptible to stress, they should be made only from hard wood , such as ash, oak or beech. The shaped legs are turned on a woodworking machine in accordance with the prepared drawing. If you plan to produce several stools, then it is better to carry out these manipulations on a machine with a copier, this will save time and effort.
The principle of making legs on a milling machine is shown in the video below:
Making a folding stool
A folding stool is very convenient because it can be removed if necessary. In addition, you can take such furniture with you when going outdoors, since when folded it does not take up much space.
For a folding stool you will need:
- seat panel. The dimensions of the panel are chosen at the discretion of the master, however, do not forget that the folding stool must be compact;
- bars for frame legs;
- a stud with double-sided threads and end nuts if through installation is intended, or a stud with blunt ends for installation in grooves;
- 4 furniture hinges;
- wood glue;
- stain and varnish;
- dowels and choppers;
- self-tapping screws
The dimensions of all parts are selected based on the intended dimensions of the product.
The first step in making a folding stool is creating the frames. Since it is assumed that one frame will fit into another, it is necessary to prepare bars of the appropriate length. In the two bars from which the outer frame will be formed, it is necessary to cut grooves for the movement of the pin. The grooves can be made blind or through. The width of the groove is selected based on the diameter of the prepared stud. Also. Based on this size, through holes are drilled in the other two bars that form the internal frame.
For the convenience of folding the stool, a curved hole should be made in the upper part of the seat, approximately 120 mm long and 20÷25 mm wide, so that it is convenient to grasp it with your hand.
The bars that form the internal frame must be carefully cut at the top at an angle of 30 degrees. This work is delicate, it must be done absolutely precisely, and therefore cannot be done “by eye”. The cross members, which are installed between the main beams of the frames, are attached to dowels.
The next step is to attach the legs to the seat. To do this, places for installing hinges are marked on the back of the seat. The loops are placed in the marked place and carefully outlined. Then the loops must be attached to the upper end sides of the legs. After this, the hinges are attached directly to the seat.
The last step is to install the stud. For a more aesthetic appearance, it is recommended to cover the stud with a wooden or plastic tube. If necessary, the finished product is covered with stain and varnished.
You should not start work on making a stool that is complex in design without having experience in carpentry. Although, if you have patience and desire, then you can start serious work, because the most important thing in any business is the mood.
What else is needed?
You can’t do without the necessary tools that you will need to create a stool. The minimum set includes a tape measure, a drill, a grinder or sandpaper, a carpenter's corner, a sawing tool such as a jigsaw, and a plane. The tool can be purchased at a store or borrowed from someone if you don’t have one at home.
If the stool is covered with fabric or carved patterns are planned to appear on it, then other tools and materials will be needed. Also, do not forget that to create the same carved patterns you need at least minimal wood carving skills, otherwise the product can be disfigured. Before starting such work, you should practice on a board that no one needs.
Carved stool
Do-it-yourself solid wood stool solid wood Option 2
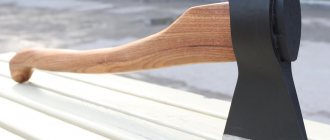
At the time when we begin to arrange the territory or interior around us. In general, with everything that surrounds us, we try to choose for it things that are pleasing to the eye, made from natural materials, and at the same time made with soul. Yes, we agree that this is an overly complex and biased attitude towards surrounding objects, but there is always a hunt for the best. So even ordinary seating, even if it is a country chair or stool, can look exactly like this. As we just described. We take a solid piece of wood, a chainsaw, a little time, skill and effort and we get a wonderful thing - an object for decorating your interior, and if you need a landscape for your site, it’s up to anyone as you please. Solid wood furniture has always looked decent, beautiful and practical, perhaps a little heavy, but as they say, everyone has their shortcomings. Well, if you have an idea to make a stool, and what’s more, to make it from a single piece of wood, then this article is just about that.
Manufacturing procedure
So, it's time to start making the stool. Prepare a sheet of plywood, blocks of wood (if you decide to make the legs from natural material). If you do not have the opportunity to purchase an electric jigsaw, you can use a manual one. As an option, buy a thin blade for a hacksaw for metal. With its help, you can easily cut a piece of any shape from plywood.
First of all, you need to cut out patterns from paper. These are templates for all parts made of paper or cardboard. They must exactly follow the contours of all elements. However, if you have a good imagination and eye, then you don’t have to make templates.
So, let's start making all the parts:
- First we prepare the legs with a square section of 50x50 mm. To do this, you need to saw off 4 identical pieces of 450 mm each from a whole block.
- Now cut out a blank from plywood for the seat - size approximately 380x380 mm. It is advisable to use boards 20 mm thick.
- Now you need to cut out the drawers and legs to connect the legs. In total you will need 4 elements.
- You will also need 4 bars to connect the seat and drawers. To do this, you need to cut tenons on the edges of the drawers, and grooves on the legs. The length of the grooves and tenons should be 20-25 mm. The same thing needs to be done with the legs.
How to make a stool with your own hands
Classic wooden stool
To assemble such a structure you will need the following:
- bars for legs or ready-made figured legs,
- kings,
- one-piece square seat,
- spacers
To prepare all these elements and assemble them correctly, you must strictly follow the drawing, which shows the dimensions. When the parts are ready, all that remains is to make the holes and do the dry assembly.
Simplified design
The easiest way to make a stool is using blanks. made in the workshop. A square made of laminate or parquet board is suitable as a seat. The drawers need to be glued to the finished base and additionally secured with screws. Then the holes for the legs are prepared here. A pair of legs are carefully inserted into the holes. Experts recommend fixing the finished structure using special glue.
Plywood stool
To make a stool that looks like a small bench, you can use pieces of plywood. It is necessary to prepare 2 pieces of thick plywood for the sides and one for the seat. In the upper part of the side elements there are holes for the drawers. Then you need to prepare places for fixing the spacers. All grooves are coated with wood glue. After this, you need to fix the drawers and work on the base of the stool. You need to prepare the holes here, insert plugs, apply glue and secure the top part. To make the structure really strong, you need to use 8 corners.
Making a stool from wood or other material with your own hands is very simple. It is enough to prepare a drawing and the right tools. When the structure is ready, you need to start decorating it. Various materials can be used for these purposes. The main thing is that the stool fits into the interior.
Barsukov Viktor Ivanovich
How to make a stool. DIY furniture #1
Description
: Friends, I present to you a new section on the “Making Furniture” channel, which many have been waiting for. In this video I will show you how to make a classic stool with your own hands. Of course, you can make a stool in a lot of ways and I have already used some of them: or but these videos were a long time ago and watching this format today is not an option for many of my subscribers)) Therefore, a new section about creating some kind of furniture will be in my new weekly format ( I hope, I want) and there will be a lot of interesting things in it. Homemade machines and devices will also not disappear from the airwaves.
This classic stool can be made on dowels, using regular drilling of parts or using some kind of attachment (for those interested) -
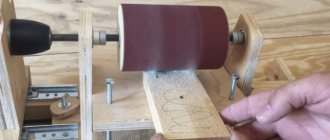
Triton Oscillatory Spindle Grinder -
My website - LIVE channel - VK Group -
How to make a wooden stool with your own hands.mp4
https://youtube.com/watch?v=8YDRC_TI2Zc
Description
: How to make a wooden stool with your own hands.mp4
Stool decoration
And the final stage is registration. It directly depends on the room in which it will be used. You can take a stencil to apply a design to the surface. The most convenient way to do this is to use an aerosol can. Of course, be sure to apply varnish on top.
Another option is to make decoupage. This is a complex process, but it is quite possible to do it yourself. To do this, you will need PVA glue, napkins with a beautiful pattern, and acrylic varnish. If you don’t want to spend a lot of time on decoration, just decorate one seat. And for inspiration, look at the photo of plywood stools.
Required Tools
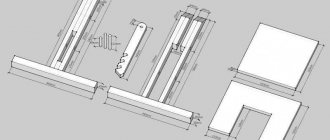
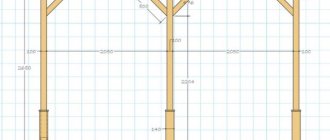
Diagram of the overall dimensions of the stool.
Such a chair is made using tools and materials such as:
- hacksaw; screwdriver; drill; ruler; corner; pencil; drill; brush; varnish; screws; sandpaper; glue; board; plate; screwdriver; jigsaw; ruler.
A chipboard stool is made according to a pre-made drawing.
Initially, you will need 2 sheets measuring 40x30 cm (stands), 1 sheet measuring 30x30 (seat) and 1 sheet measuring 2x12 cm (lintels). You can cut stool legs of a different shape from chipboard with your own hands. In this case, it is necessary to take into account that the width of the bottom should not exceed the width of the seat. Otherwise, the chair will be unstable.
Scheme for cutting the side of the stool.
Using a pencil, a sketch of the seat, uprights and lintel is drawn on the chipboard. These elements are cut out with a jigsaw. The main thing is that this device has a saw with a fine tooth.
This procedure is performed at maximum speed. In this case, you will get smooth edges without chips. When cutting out the seat, you will need to round the corners.
The next step involves assembling a stool from chipboard.
Holes are made on the racks to connect the jumpers. Pre-plastic corners are screwed onto the racks with self-tapping screws. In this case, a distance of 3.5 cm from the edge of the rack is maintained.
Then a jumper is applied to the rack and a hole for self-tapping screws is made in the last element. The jumper is fixed to the rack with confirmations.
The above steps are repeated with another stand. When performing this work, you need to ensure that the distance from the jumper to the bottom is the same on the 2 racks. Otherwise, you will end up with uneven furniture.
The legs and crosspieces are symmetrically screwed to the seat.
If you are making a stool with a soft base, then you will need to glue foam rubber to the seat and cover it with fabric. The dimensions of the material should be 41x41 cm. It is easily secured with a construction stapler or small nails.
To give the furniture an original appearance, you will need to nail a sheet of fiberboard from the bottom, the size of which is 29x29 cm. Then the thrust bearings are fixed to the nails. In this case, the stool will not scratch the finish floor covering.
If a chair is made from old chipboard sheets with minor defects, then they will need to be repaired with wood putty and topped with paint. To preserve the appearance of new chipboard sheets, you will need to glue a special edge to the ends of the chipboard, the color of which matches its shade. To do this you will need tools such as:
- iron; shoe knife; piece of material; sandpaper.
Initially, the edge is cut taking into account the length of the end. In this case, 1 cm is added on each side. The iron is set to the average temperature value.
The edge is applied to the end of the chipboard and pressed with an iron. Under the influence of temperature, the glue melts and the edge sags. It is smoothed out with a cloth.
Using a shoemaker's knife, excess edges are cut off along the entire plane and at the ends. When performing this procedure, you need to be careful not to touch the edge of the chipboard element. Sandpaper is used to clean the edge of the edge.
https://youtube.com/watch?v=fhXoBVkjImUrel%3D0%26controls%3D0%26showinfo%3D0
kuhnyamoya.ru
Making a seat
For the seat of the stool, boards 15-20 mm thick are used, which are glued together with special glue. After the glue has dried, a blank is cut out with a width equal to the width of the future seat (with tolerance for processing). This blank is processed on all sides on a planer (preferably a thicknesser) and sawn into the required number of seats.
Even if you plan to make only one stool, it is better to glue and process the boards whole, rather than pieces. To avoid injury when using the stool and to give it a noble appearance, the ends of the seat are rounded with a milling cutter or plane.
Types of stools
Stools can be used for different purposes. Before you start making furniture, you need to decide what your product will be used for. The most common types of stools include:
children's. Such furniture will be useful not only for children, but also for adults. This stool is lightweight, compact and low in height. It can be moved to any place where it is currently needed. In addition, even a small child can carry this item;
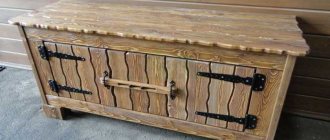
box. A box stool is vital when you need to rationally use a small space. You can store various small items in the drawer under the stool. In addition, the walls of the box will further strengthen the entire structure;
folding stool. A folding stool is ideal for small spaces. It can be kept folded at all times and unfolded as needed;
step stool. This type of furniture can serve not only for sitting. In the house, you often need to get something from the top shelves of the closet or from the mezzanines. Keeping a bulky stepladder in a small apartment is not very convenient; in this case, a step stool is simply irreplaceable. In its normal state, it is no different from a familiar piece of furniture, since the steps are hidden under the seat, pulled out and placed on the floor as needed. In addition, the steps can be used as a footrest when sitting.
Features of materials
The cheapest option is chipboard. It is worth noting that this material is not reliable. True, the slabs can be strengthened to reduce the pressure on them. But it is unlikely that you will be able to get rid of the second drawback - the formaldehyde resins contained in chipboards are constantly released into the surrounding space. And there is no way to completely get rid of them.
MDF board is much stronger. And most importantly, it is durable. But it is best combined with hardwood. As a rule, MDF is used only for making seats. An excellent substitute for wood is plywood. This is a durable and environmentally friendly material; all structural parts can be made from it. You can literally make a simple stool from just 3-4 plywood elements.
Selection of materials
Depending on where the stool is intended to be used, the materials differ. So, almost any durable materials are suitable for home furniture. You can use natural wood, chipboard, and plywood. But if the stool will be used outdoors, then only natural wood should be used. Larch or oak wood is best. When using other wood, it should be thoroughly impregnated with special water-repellent compounds before assembly. After the stool is ready, it needs to be painted.
When making outdoor furniture, gaps are made in the seat so that rainwater does not accumulate on the surface, and the parts are ventilated and dry faster.
Materials for production
When manufacturing, you need to use quality materials. The most reliable are forged products. But they are expensive and working with metal is more difficult. Wood is a fairly reliable material, as it is durable and easy to work with. But be sure to dry the wood at a temperature of 20-30 degrees before starting work. Drying wood in a chamber causes it to begin to crack.
Hardwoods perform well - birch, maple, hemlock, wenge. Another option is to make at least the legs out of wood. After all, these elements take on a huge load. The requirements for the seat are not so stringent, so it is possible to use plywood or chipboard. A stool made of birch plywood will be reliable, and the material is easy to work with.
Variety of ready-made models
There is a wide range of products on the market. Stools can have a soft seat, be part of furniture corners or sold separately, have a simple rectangular shape or figured cut, etc. A variety of color palettes allows you to choose a product for any interior. Poufs are also sold for hallways. They are boxes with soft seats. You can put small things or interior items in them.
A significant disadvantage of ready-made models is their high cost. The cheapness and availability of the material, the simplicity of the design allow you to make a stool with your own hands from chipboard.
Types of fastening
It is easier to assemble a stool from ready-made blanks by attaching the latter to each other. For fastening the following are used:
- Screws;
- Grooves-ridges;
- Wooden choppers and holes for them;
- Wood glue.
This list might include nails. But such simple and inexpensive elements do not guarantee reliable fastening. Unless you drive them in with a hammer at a slight angle.