Interesting facts and features
To deftly circumvent this problem, a fisherman over 40 years old just needs to remember his distant childhood, which most likely passed in the dense environment of “Young Technician” magazines and large-format supplements to it.
The modeling skills remaining since then will accurately tell you how to make a PVC boat with your own hands. Even a person who was not interested in modeling during his school years will cope with this task in just one or two weeks.
Workflow Description
Let us note right away that making a boat with your own hands is a rather lengthy process, and besides, you must have a room in which the work will be carried out, most often a garage or other building of sufficient size is used.
Construction of the building
The process is carried out in the following sequence:
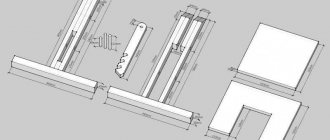
You can make boat drawings with your own hands from plywood, but it is much easier to find a ready-made version with the parameters that suit you, since there are many important nuances that those who are not specialists in the field of building boats do not know. It is best to consult with experts; most often they can suggest a project or recommend a good option;
It’s better to find ready-made drawings and patterns of a plywood boat - it’s not easy to make them yourself, and you can save a lot of time and eliminate mistakes and miscalculations
The work begins with the sheets being spliced together; this can be done by attaching an overlay, which is secured with epoxy and self-tapping screws; it is important that you end up with elements of the required length. The next day you can continue the work process; In order to build a boat from plywood with your own hands as efficiently and quickly as possible, it is necessary to apply a coordinate grid measuring 100 by 100 mm to all workpieces
This will simplify the production of elements, because they have an irregular shape and cutting them accurately without guidelines is very, very difficult;
Curved lines are the most important part of the work when cutting elements
After all the pieces are cut, you can proceed to the next stage.
Assembly
The process consists of these works:
- All plywood boat projects consist of the same elements, so the sequence of operations is always the same. First of all, the bottom elements are fastened together; for this, holes for the wire are drilled along the connection at a distance of 15-20 mm and the parts are pulled together. In this case, you should not apply too much force so as not to damage the material;
- Next, transverse stiffening elements are installed, which are called frames; they are easiest to cut from plywood 9-10 mm thick. They are glued with epoxy resin and additionally screwed with self-tapping screws. 50x20 longitudinal slats, called stringers, are also attached. You can immediately make cutouts for the logs in the frames, so that you don’t have to work in cramped conditions later;
- Then the side elements are installed, cutouts are made for the stringers and the stiffening elements themselves are installed, after which the plywood for the sides can be glued and screwed with self-tapping screws. For additional strength, connections from the inside are coated with epoxy resin and covered with one layer of fiberglass;
This is what the build process looks like
- After all the elements are fastened together, it is necessary to turn the structure over. To do this, the easiest way is to take it out and do it outside, since it is very difficult to find a room of such size to do it inside. In order not to damage the structure, it is easiest to lay it on old car tires;
- Next, you need to unscrew all the screws from the inside and seal them with epoxy resin, after which all joints are sealed to fill the cracks and make the surface as smooth as possible. After the first layer has dried, fiberglass fabric 10 cm wide is glued, then a strip of 17 cm is glued, and the third element should have an even larger width to overlap the first two, this makes it possible to give rigidity to all bends;
In order for plywood boats to be reliable, all connections must be carefully glued
- Next, the outer part is completely covered; it is better to do this in 2-3 layers. After drying, the surface is sanded and puttied to make it smooth;
- When the surface is leveled, you can turn the structure over in order to fill all the cavities with foam and line them with sheets of plywood from the inside. The construction of the cabin is carried out according to a pre-selected sketch; it should be remembered that the more complex the configuration, the more time it will take to assemble the structure.
The cabin is also covered with fiberglass for reinforcement.
The last stage is priming with moisture-resistant compounds and painting. It is important to use high-quality compositions, their price is higher, but you should not save money here. If you don't need a boat and want to know how to make a boat, then everything is done the same except that the construction of a cabin is not required
How to make a boat drawing
It should be noted that for all the fun of small shipbuilding, this process can hardly be called creative. He should rely solely on do-it-yourself boat drawings taken from the library, specialized literature or on a trustworthy website.
No fantasy regarding geometry and dimensions is completely acceptable. A fishing boat built “on a whim” will capsize immediately after launching.
Boat testing
The boat is tested in several stages:
- Test the waterproofness in your own yard. The boat should be turned over and placed on a support, such as a chair or table. A large amount of water should be poured onto the top of the boat; it is convenient to use a hose. After treating with water, the boat is returned to its normal position and checked to see if water has leaked inside.
- After making sure that the boat is made of high quality and does not let water through, it can be sent to real water. When you first go to depth, you should not swim far from the shore. At first, it is better to look at the condition of the swimming device.
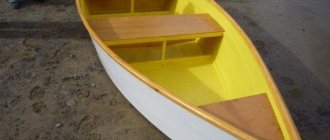
The option of buying a boat is not always acceptable. That is why, with a minimum of skills, you can make your own boat without extra costs.
Good to know! Such a boat will be useful not only for fishing, but also for recreation. Assembly takes a little time, but requires care. Therefore, you should approach the process responsibly so that the watercraft does not fall apart during operation.
Materials for a homemade boat
In terms of the choice of raw materials, you will have to limit yourself to small ones. However, the materials that can be bought at any construction supermarket are quite enough even to build a large motor launch.
First of all, for the needs of the garage shipyard you will need
- Aluminum;
- Solid wood;
- Lightweight, durable polymers;
- Rubberized textiles;
- Steel profiles;
- Plywood sheets.
Advantages of a wooden boat
Every building material has a number of advantages and disadvantages. However, judging by the fact that most often craftsmen choose wood for their purposes, it is most suitable for these purposes.
The obvious advantages of a wooden boat over its analogues are
- Environmental friendliness;
- Excellent buoyancy;
- Ease of rowing and steering;
- Extremely low cost;
- Long service life with proper preparation for water and winter storage;
- Easy installation of oarlocks, motor, sailing mast.
Punt boat: distinctive features
As mentioned above, the main difference is that such a boat does not have a keel. In addition, the sides of the punts are somewhat narrowed, and all parts are fixed with wire. The bottom of such boats, after being fixed with clamps, is filled with resin, which ensures good sealing of the craft.
Since a boat can be made of any shape from boards, a punt differs little from any other boat. The construction process itself is almost the same, the only difference is in the structure of the bottom. These boats are perfect for shallow waters.
Types of boats
Currently, two options for small wooden vessels are most widespread:
- With keel;
- With a bottom in the form of a plane.
Flat-bottomed boat
The second variety is much more popular, which must be taken into account when making a wooden boat with your own hands. This fact is explained by their impressive stability, which makes fishing possible in a standing position.
On top of that, such watercraft easily maneuver among reeds and snags. They completely suit the fisherman in terms of capacity. The interior space of the punt is quite enough for many different fishing rods and bottom fishing rods, a net, boxes with bait and hooks, several knives, and buckets for the caught fish.
Boat care
In order for a wooden boat to serve you faithfully for many years, it needs to be properly cared for.
- Paint the boat before the start of the new season, and try not to miss a single centimeter.
- At the beginning of each season, try to tar the bottom with bitumen, sealant or heated resin. This should be done from the outside of the boat after it has completely dried. Therefore, when you are not using the boat, try to keep it upside down in the sun.
- Before treating the bottom of the boat, clean off the old layer of bitumen or resin. Keep in mind that bitumen cracks in the cold, so check the boat carefully after each winter.
- After bitumen, you can treat the bottom with drying oil or used machine oil and only after it has thoroughly dried, paint the bottom of the boat.
- For painting, choose oil paints and do not skimp on layers - the more you apply, the lower the risk of leakage.
If you do everything right, a wooden boat can serve you for many years. But some take a different route - they simply paint the boat every spring, and after two or three years they quickly build themselves a new boat. Which option to choose is up to you.
Boating skills
That’s why we make a small boat with our own hands with a keel if there is a need to make forced marches along the coast, move far away from it, or catch a bull in a light storm. The only drawback of keelboats is the need for the fisherman to acquire rowing skills.
Such a boat tends to rock, so the rower will have to sit in the middle of the bank, that is, the boat bench. When working with oars, you will need to clearly maintain the center of gravity, otherwise the pitching will easily lead you off the chosen course.
DIY wooden boat - step-by-step instructions
First stage
During preliminary preparation, you should cut the bars for the side walls of the boat. Then you should form the nose and bottom.
It is recommended to make the bottom according to ship construction technology, making it in a rounded triangular shape.
Making the bottom
- Galvanization is used to make the bottom. You should trace the outline of the bottom with a marker. It is important to leave room for a reserve, about 2 cm. Use special scissors for metal to cut out the shape.
- The boat is turned upside down and the sides are chamfered. The edges should be treated with an antiseptic. You should wait until the impregnation dries.
- The bottom of the side parts is treated with silicone sealant; special devices can be applied on top to protect against leakage.
- The metal bottom blank should be laid and leveled. Fastening is carried out using galvanized screws or nails, moving from the middle to the edge.
- Excess metal should be trimmed off.
Bow of the boat
- To begin with, you should take a board of the required size and saw off the edge at an angle of 45 from the nose side. A chamfer is removed from the sawn edges so that when pressed, no gap is formed. The ends are coated with an antiseptic.
- The base of the nose is made using a triangular block. At the end of the work, it should be treated with an antiseptic.
- The “nose” of the boat should be assembled; to do this, the two sides and the block are smeared with glue and finally fastened with self-tapping screws.
- All excess parts should be cut off.
Painting
Painting is the final stage of boat production. For this purpose, water-repellent paints are used. Before applying paint, the surface of the boat is carefully inspected for scratches and cracks. If there are defects, they must be removed using putty.
Some people prefer to cover the entire body with fiberglass and then paint it. The first layer is a primer, and the second is paint.
How to make oars?
Oars can be easily and quickly made with your own hands. The only drawback is the fragility of such products and their heavy weight, about 2 kg.
Making an oar includes the following technical operations:
- You need to take several flat boards with a cross section of 20 x 30 mm. You also need to have epoxy resin, fiberglass, waterproof plywood and pine block on hand.
- The shape of an oar is cut out of plywood. It is important that the material is of high quality, without knots or holes. The plywood fibers are directed across the oar. The design of the blades is applied to the plywood and cut out using a jigsaw. The blades should be sanded using sandpaper.
- Using a plane, the slats are given a rounded shape. Then you should sand them. If there is excess material, it should be cut off. The length of the oars should be selected based on your height, landing and size of the boat.
- The workpiece is assembled using screws and glue. An oar handle is cut out of a pine block. The handle is attached to the handle using screws.
- Using a rasp and sanding paper, the final shape of the oar and handle should be processed. After processing is completed, fiberglass fabric is applied to the blade in two layers.
- A ribbon about 35 mm wide is cut from fiberglass. With its help, you should wrap the oar handle, then treat the attachment point with the handle in order to strengthen this place.
- Using sandpaper, the final treatment of the surface of the blades is carried out. For greater reliability, the bottom is made of aluminum strip casing.
- The last step is to putty and apply primer to the surface. Use paint if desired.
Selecting boat dimensions
It is the size of the craft that determines such important parameters as
- Weight;
- Capacity;
- Load capacity;
- Stability in choppy waters.
Choosing boat sizes
Basic recommendations for choosing sizes can be summarized as follows.
- The optimal height of the sides is half a meter, while lower sides are suitable for river fishing, and for the sea it wouldn’t hurt to add 10-20 cm.
- The choice of length must be made based on how many people will be traveling on a small craft. For one fisherman, 1.8-2.5 meters is enough. For two crew members, it is advisable to provide more space, for example, a three-meter length. For five people, a 4-meter length is quite enough. True, it will be difficult for everyone to catch at once, so at least one should become a simple passenger enjoying the river scenery.
As for the width, experienced craftsmen suggest stopping at a value of a meter and a half. The wider the boat, the more difficult it will be to control, but stability will increase noticeably.
To accurately select the width, it is necessary to take into account the total weight of fishermen and passengers, the mass of all gear, boxes and buckets, and the estimated number of fish caught. In order for the boat to be obedient to the steering wheel and oars, the width must strictly correspond to the length. Simple shipbuilding formulas will help you find their appropriate ratio.
How to choose wood?
The first thing you need to pay attention to, and on which 80% of the result depends, is choosing the right wood. Before learning the basics of legal proceedings, you need to learn as much as possible about the wood that is suitable for making wooden boats
Not only the type of wood will be of great importance, but also even the part of the trunk that you will use for construction.
The end section shows that any wood is heterogeneous. A tree trunk consists of three parts: pith, core and sapwood. The core is the strongest part of the trunk, which has good natural protection against decay. This is what is used in the construction of the boat.
In addition, before building a boat, you need to dry all the lumber so that the connection of the parts is not disturbed. Lumber should have a moisture content of no more than 15-18%. After assembly, it is necessary to saturate the finished boat with moisture-protecting agents so that the boat does not warp over time.
Larch is considered the best tree for building boats, but other coniferous trees, such as pine or spruce, are also suitable. The main requirement when choosing lumber is the absence of knots.
Create or search for a boat blueprint
Having found a complete compromise regarding the dimensions, it will be possible to begin designing. In the absence of the necessary skills for this, it is enough to find a ready-made drawing of the watercraft and proportionally increase or decrease its parameters.
The easiest place to find professionally designed drawings is on the Internet. You just need to enter the search query “boat drawing”. It wouldn't hurt to visit the technical library.
It is enough to spend a couple of weekends there to get a lot of useful information about both dimensions and rigging. In magazines devoted to small boats, it is easy to glean knowledge about how to make an anchor for a boat with your own hands.
Repair
For boats that you have built, your best option is to do the repair work yourself. You should first inspect the boat, find the cause (hole, etc.) and be sure to correct the existing defect.
You can repair the hole with pieces of boards, after degreasing the surface and gluing a new piece of wood. If the problem is more serious, then it would be best to contact a specialist who can carry out professional repair work.
Thus, now you know how to make a boat yourself and repair it at home.
Checking boards for defects
It is important to ensure that there are no cracks or knots on the boards. Any splits will expand in the future, and the knots will tend to fall out, which must be taken into account by a fisherman who is interested in how to make a boat out of wood with his own hands.
You can identify the presence of dangerous damage by applying several blows with a hammer to questionable areas. Strong boards will easily withstand such a test, but cracked ones will begin to split.
It is believed that lumber that has been lying in a dry warehouse on flat racks for a year is best suited for building a boat.
Drawing
Before making a wooden boat from planks, you need to prepare a drawing of the future watercraft on a scale convenient for you. If such a task is beyond your capabilities and you have absolutely no understanding of drawings, then you can ask for help from a person who has a technical education and can prepare a drawing according to which you can assemble a wooden boat. Before you make a boat out of boards, you need to clearly imagine how many and what parts will be needed, their size, shape, etc. Therefore, when choosing a ready-made drawing, make sure that it is not just a hand sketch - it is necessary that it be indicated scale, shape of parts and their quantity, as well as other necessary parameters that you will need in further work.
List of accessories
In addition to boards for work you will need:
- Antiseptic for wood processing;
- Beam;
- Dye;
- Self-tapping screws, nails and hammer;
- Ground coating;
- Drill and screwdriver;
- Glue and syringe for gluing joints;
- Yacht varnish;
- Iron sheets for lining the bottom;
- Emery;
- Resin;
- Polypropylene for forming sides;
- Roulette;
- Vise;
- Saw on wood.