Application area of dovetail connection
This type of fastening is intended for wooden parts, and therefore is used mainly in 2 areas: construction and furniture assembly.
Construction
Dovetail was invented when there were no wood glues and fasteners yet. It is still used in the construction of wooden houses, bathhouses and other buildings due to the reliability and strength of fixation of elements and the ability to impart the necessary rigidity to the structure. It is used to connect profiled timber or logs into the crowns of a log house. The joints fit so tightly to each other that heat loss in the finished house is minimal.
Furniture manufacture
Most often, this type of fastening is used in carpentry to connect parts of drawers made of solid wood or plywood, as well as:
- tables;
- cabinets;
- whatnot;
- shelves;
- caskets;
- chests and other furniture.
Description of the manufacturing process
The design of this carpentry lock is a tight joining of two parts. At the end of one block a V-shaped protrusion is made, reminiscent of a dovetail (hence the name). A cut is made on the second block according to the shape of this protrusion. The thickness of this spike can be the entire width or half of the tree. The tenon and cut are made at an angle of 10-12 degrees.
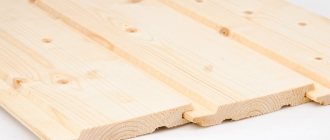
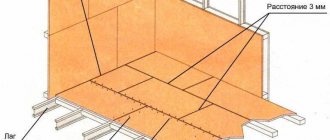
This article describes the process of making this wood floor joinery. The type of product that should be produced in the end is shown in the figure.
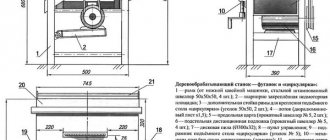
The production of blanks is shown in the figure.
- Using a circular saw, cut out 2 identical bars.
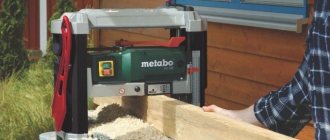
- They are processed using a grinding machine.
- The ends of the bars are trimmed using a miter saw.
Next, using a carpenter's square, a ruler and a pencil, mark the dimensions of the joint tenon on the workpiece 1.
Advice! If you need to make several connections, it is recommended to make a dovetail template from a thin, dense material, which increases productivity. The example described shows a single production of this design.
After marking, to make the required V-shaped protrusion, the excess parts of workpiece 1 are cut off using a band saw.
When the tenon is cut, it is clamped in a carpenter's vice, trimmed with a chisel, and brought to perfect condition with a file and sandpaper.
When the protrusion is ready, a slot must be made under it on the second workpiece. To do this, markings are made on the second workpiece using the first one as a template. It is necessary to make the markings as accurately as possible, since any play between the parts is not allowed. The design will be unreliable. For this reason, the top lines are drawn with a cutting knife. The middle is marked with a pencil.
Clamping the workpiece in a vice, use a hand jigsaw to make cuts along the marked lines of the 2nd workpiece. The depth of the slots is the middle of the block, marked with a pencil.
Next, you have to select a slot for the tenon in the block, according to the marks made with a jigsaw. This can be done in two ways. In the first case, the slot is selected using a chisel, cutters, file and sandpaper. Here you need to be extremely careful, because... It is necessary to maintain a perfectly flat surface for joining and gluing parts.
If you have a hand router, it is much easier to make a dovetail with a router, since in this case it is much easier to get the perfect result than by hand.
Without removing the workpiece from the vice, using a hand router, carefully and carefully select a part of the wood in the space between the slots. A 10 mm finger cutter is used.
In order to complete the dovetail connection and ensure a tight and reliable connection of the parts, carefully trim the edges of the sides on workpiece 2 using a chisel, periodically trying on the tenon and trying to insert it into the slot. The tenon should be inserted tightly, but without excessive force.
Important! After the spike has entered the intended place, the parts should be separated. In order to do this, you need to clamp workpiece 2 in a vice, and using a wooden hammer, carefully knock out the bar with a tenon from the slot, as shown in the figure. If you try to do this by hand, you may break the tenon.
Finally, wood glue is applied to the surface of both parts being joined. The parts are connected to each other and pressed tightly using a clamp.
After a certain time required for the glue to harden, the part is cleaned of adhesive residues using a chisel. Using a hand eccentric sander, the surface of the finished structure is brought to perfect condition. The structure is ready.
Design features and advantages of the connection
- Resistance to deformation. The wood at the joints is less subject to natural changes under the influence of high humidity or, conversely, dampness.
- Saving material. There is much less wood waste when creating this type of connection than with other methods.
- Ensuring high strength. No additional fasteners required.
- Low cost. To assemble the structure, you do not need to buy screws, nails, or staples.
- The ability to create an even angle of the log house, which allows you to sheathe the finished structure with panels, siding or other facing material.
- Aesthetics. This type of fastening is decorative and therefore does not require masking with decorative overlays.
Residue-free corner joining methods
To install timber without the presence of residues, the “paw” method is often used, which is represented by variations:
- Butt;
- Key (wedges);
- Thorns are indigenous;
- Dovetail.
Butt-butt
The most popular option for fixing into the paw is the butt joint.
All elements are joined together and securely fixed using nails and special steel plates. Before joining work begins, all ends must be carefully aligned.
This method is not suitable for the construction of bathhouses and residential buildings, since the insufficient strength of the corner connections is characterized by high rates of heat loss.
Keys
Connecting a beam into a paw with dowels involves the use of an auxiliary liner, which is made from hard wood.
Dowels or wedges ensure the strength of the joining of elements in the corners.
To use dowels, special recesses are made in the laying logs, which prevent possible displacement of the finished structure. Dowels are of longitudinal, oblique and transverse types.
Root spines
Such a fastening is called a warm corner. This option provides for angular alignment of individual wooden elements, provides additional strength, wear resistance and reduces heat loss of the finished structure.
The technology for this type of paw is performed as follows: a groove is prepared in one of the materials, and a spike of the appropriate size is prepared in the other.
When joining the elements, wood insulation - jute or felt - is placed in the recesses. To increase the stability of the finished structure, it is recommended to alternate the angular placement of grooves and tenons and connect them with round dowels made of wood.
When using undercuts, fat tails, dowels for the tongue/groove installation method, a prerequisite is the presence of vertically located slots, which are necessary for proper shrinkage of the walls.
Do-it-yourself technology for joining parts using dovetail
To make this fastener yourself, you need to accurately design the dimensions of the tenons and grooves, taking into account the load on the parts and some other factors. To facilitate the work, you can use ready-made templates and drawings.
To work you will need:
- Reimus;
- chisel;
- carpenter's square;
- mallet;
- fry;
- jigsaw;
- axing saw;
- pencil.
What to consider when designing a connection
When creating a drawing, you should calculate the distance between the tenons. The greatest strength is provided by spikes located at equal intervals from each other. However, cutting out the elements will take a lot of time. Most often, a 2 to 1 or 3 to 1 scheme is used - this is quite enough to securely fasten the elements.
Important! When fixing long parts, you will need to make additional tenons along the edges to prevent warping of the wood.
It is also important to determine the angle of the studs. For soft woods, proportions of 1:6 are used to prevent deformation, for hard woods - 1:8.
Marking
It must be done as accurately as possible - the strength of the connection depends on this. For this work you will need a square and a grinder. To make the task easier, you can use a special template. There are different types designed to create angles of different sizes depending on the hardness of the wood.
Work begins by marking and sawing out the side on which the spikes will be located. Subsequently, it will be used to transfer the drawing to the side where the spikes are located.
Using a rimus, draw a line of shoulders and apply them on all 4 sides. Using a template or a carpenter's square with a sharpie, mark the contours of the tenons at the end, then on the front and back sides of the part. Areas of the board that need to be removed are marked with a cross.
Cutting grooves
The grooves are cut using an axle saw. First, make even cuts up to the shoulder line. To avoid curvature, the blade must be held perpendicular to the end and moved with your hand evenly, without sudden movements.
Connection "in the paw"
Fastening the timber “into the paw” is the easiest way to build a log house; reliable grip is ensured by a trapezoidal tenon, which is cut out at the end of each row of the crown. A correctly made and assembled lock reliably fixes the crowns of the log house in all planes. The fastening is universal, it is used for the construction of a log house from timber and rounded logs; the “claw” connection is most often used in shrinkage construction.
The design is distinguished by the absence of ends protruding beyond the corners of the building; such a lock is called a “clean corner”. The spike in this design is a load-bearing element and carries the main load. To build a log house in a “clean corner”, it is recommended to use timber of the maximum standard sizes, with a side of at least 250 mm.
Making dovetail fasteners with your own hands is quite difficult; to avoid mistakes, use a full-size dovetail tenon template for timber; the sample can be cut out of tin or thick paper. The template is applied to the end and outlined, the boundaries of the cuts are marked with a hammer and chisel. The cuts are made with a hand-held circular saw. The easiest way is to make inclined cuts every 10-15 mm, squeeze out the trim with an ax and clean it with a chisel.
The advantage of the technology is the ability to work with lumber of natural moisture; in this case, the tenon is made with an allowance of 5-7%. The allowance will lead to the formation of gaps between the rims, which will be eliminated naturally during the shrinkage process.
Disadvantages and features of dovetail joints:
- A “clean corner” has through gaps that can expand over time;
- The log house does not have closed crowns, the masonry on each wall is shifted by half a beam, the structure must be reinforced with dowels;
- The corners of the building have an unpresentable appearance and do not decorate the facade;
- The developer is limited in choosing the standard size of lumber.
Using the dovetail log house technology, economy-class country houses, bathhouses and outbuildings are built; such construction is low-cost and accessible to mass developers.
Types of stoppers used
A rather important nuance of dovetail fastening is the presence of stoppers. Many air rifles boast zero recoil, but what about firearms? When recoil occurs, the gun moves in the direction of the shooter, if you remember Newton's law, it will become clear that the reverse force moves the sights in the opposite direction. With fairly large recoil, the sight can move along the bar, thereby disrupting zeroing. To prevent the sight from coming off, there are several options:
- Retaining "wall". It represents a small barrier to prevent the sight from “walking.” It is located mainly at the end of the bar relative to the shooter's eye. When installing optics, you must move the bracket close to the stopper.
- Locking pins. Designed for recesses in the bracket for mounting optical sights or collimators. Can be located anywhere on the landing strip.
- Stopper holes. Designed for the presence of retractable bracket stops. Possible location in any part of the landing strip.
There is another way - limiting the grooves. A fairly common option for ensuring installation strength. The edges of the seat go to zero; during installation, the brackets move towards the end of the grooves, thereby locking. Most often found on planks with a rounded shape.