The ancient art of carving wood and plywood has always been considered a fascinating activity; with the help of carved decorations, towers and huts of unique beauty were erected, most of which are still classified as architectural monuments. Woodcarving, or wood carving, is becoming a popular skill; it is used to make large and small masterpieces. Beginning craftsmen are helped to create masterpieces by ready-made stencils for wood carving - special templates from which three-dimensional ornaments and patterns are created.
The ancient art of wood carving has always been considered a fascinating activity.
Stencils for wood carving: ideas
Stencils for woodworking are used to transfer ready-made identical patterns onto a three-dimensional plane. Most often, such work is done to decorate walls and window frames, which is why sketches for working with wooden surfaces are considered the most common.
Carved patterns made using a stencil are divided into several types by craftsmen:
- ribbon carved ornament;
- carved platbands;
- carved balusters;
- pilaster;
- towels;
- brackets.
Using such ready-made templates, even a novice master can arrange and independently create a unique design and a real masterpiece of carved art. Using a ready-made stencil you can easily decorate any wooden product. Artistic cutting and openwork designs are usually useful when decorating:
- pieces of furniture;
- dishes;
- picture or photograph frames;
- boxes.
If a master wants to convey certain national motifs or features of an object in his work, he should first study the subtleties and nuances of ornaments and patterns.
Sketches for patterns: instructions
Beginner carvers are recommended to decide before starting work what technique they plan to use for engraving and choose the right ornament or pattern.
For those craftsmen who have recently picked up tools, experienced craftsmen recommend taking into account the following nuances when preparing for work:
- the engraving template should be as simple and understandable as possible, without complex or ornate elements;
- each type of thread has its own templates for work;
- lines from the existing template to the material for work are transferred as accurately as possible, since this is the only way to achieve accuracy in the work.
You should not start working without first creating a sketch.
When choosing a design for subsequent transfer to the material, it is worth considering a number of subtleties that will help you make the product professionally and skillfully.
- For a large product, you should not choose an openwork pattern or a pattern with small details. Such a design will be lost on the finished item and will not make it unique.
- Small items are not decorated with patterns with large elements and ornamental details, so as not to hide the shape and uniqueness of the product.
- Proportions when transferring details to fragments of the product should be observed to the finest detail so as not to disrupt the integrity of the finished ornament.
You should not start working without first creating a sketch, which you can make yourself or download ready-made photographs from the Internet.
How to choose and where to find a stencil
There are a large number of different wood carving patterns for beginners: from simple ornaments to sculptural carvings of an animal, bird, person or an entire painting. When making a choice, you must remember the following rules:
- if you are holding carving tools in your hands for the first time, then do not purchase a template from an old painting or engraving, since it is quite difficult to work on it and you can ruin the original material;
- There are stencils for a certain type of carving;
- In order to complete the work accurately, all lines are transferred accurately to the source material.
Carved frames for mirrors: an interesting idea
Lovers of Art Nouveau style interiors will appreciate carved frames that frame paintings or mirrors.
Such interior items not only look rich and unique, but also add a special “zest” to the interior of the room. When cutting out mirror frames, experts recommend using a few basic styles to work with.
- The double baroque style contains two contours inside and outside, represented by openwork curls. The craftsmen included a feather profile in this style; it reflects some of the lightness and grace of the rectangular-shaped product.
- For mirrors, the feather profile with a back is ideal, providing a dense back part where the mirror is attached.
- The refined profile also has a dumbbell style, despite the somewhat massive frame. It is these frames that hold a heavy and massive mirror well.
Lovers of Art Nouveau style interiors will appreciate carved frames that frame paintings or mirrors.
Special decorating methods are also used to make mirror frames:
- gilding with pre-polishing;
- varnishing with a transparent material;
- patina, or artificial aging of wood;
- antique decoration with cracks called craquelure.
In order to transfer the pattern from the stencil to the product, use soft pencils, transferring the pattern as accurately and accurately as possible.
Picture stencils for jigsaw and wood carving in pencil: how to make
Those craftsmen who are just starting to try themselves as a wood carver should understand that high-quality cutting can be done only after the template for cutting has been correctly prepared.
When creating a stencil sketch, it is recommended to follow a certain sequence of actions:
- Initially, you should decide on a blank for carving. For beginning craftsmen, geometric carvings on a plane or a simple wooden figurine are better suited.
- A sketch is made on paper with a pencil, and the main zones and places where the carving is planned are clearly defined on it.
- Using special drawing devices, the image is transferred to graph paper.
- Repeating parts are made of thick paper or thick cardboard.
- The finished paper pattern is attached to a wooden base and copied.
When creating a stencil sketch, it is recommended to follow a certain sequence of actions
When making stencils for carvings made using the slotting technique, craftsmen recommend initially using thick paper for patterns.
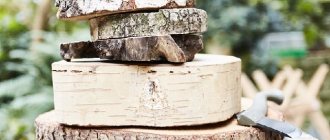
Photos of carved wooden houses
For Russia, slotted carving is of particular importance as a decoration for building facades. Since ancient times, ornaments carved on birch bark and other similar materials have been decorating huts, bathhouses, and churches, as photographs colorfully demonstrate.
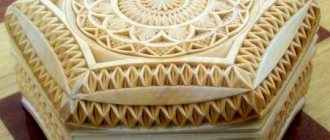
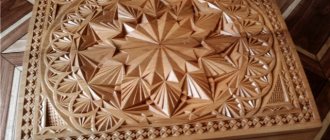
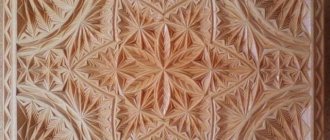
Geometric and flat-relief carving: what is it?
The name of geometric wood carving comes from the main details and elements at the base of the pattern: geometric shapes, figures and their elements. Such ornaments are used to decorate furniture and household utensils.
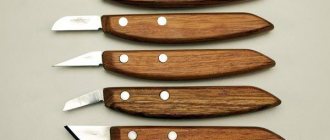
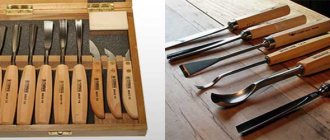
To create this engraving you will need a simple set of tools:
- a piece of soft wood board;
- special knife-jamb;
- simple soft pencil;
- ruler.
When making the product, you will not need an applied paper blank, since the elements of the geometric pattern can be applied directly to the wooden blank.
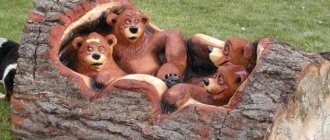
Flat-relief carving is made in a similar way, but the design elements are not geometric shapes, but images of animals, elements of nature, and people. This type of carving is also used for making backgammon.
The finished product can be treated with colorless varnish
For such a wooden engraving you will need the following materials:
- set of wood cutters;
- soft wooden blank;
- sandpaper, pencils.
The product is manufactured following a certain sequence of actions.
- The wood is cleaned and prepared for work in advance. The design is applied to carbon paper and transferred to the workpiece.
- Contour carving is made according to the drawing; the relief and frame of the product are pre-selected.
- Upon completion, the work is treated with stain, dye or simply watercolors. Cleaned with sandpaper.
The finished product can be treated with colorless varnish.
Details
How to choose a stencil
Wood carving patterns are so unusual and varied that they can be used by both beginners and the best specialists. They are used to create simple ornaments, as well as works of art at a high level. The main thing is that you make the right choice. To do this you need to adhere to certain rules:
If they began to use cutters relatively recently, then you should not choose unusual or difficult ornaments, because they are quite difficult to work with and can also damage the workpiece.- For each type of wood carving, their own stencils are chosen.
- Before starting work, it is necessary to apply stencil designs to the surface of the workpiece, and the lines should be clear and neat.
Finding different templates today is not so difficult. This can be done if you use an electronic library. Each decorator will be able to appreciate the convenience, as well as the large selection of such a source. Here you can choose drawings from the past era, as well as masterpieces of modern art. When choosing, be sure to measure the dimensions of the workpiece, as well as the actual image. In addition, it is important to choose a sample that will look great on interior elements. Pay attention to the following nuances:
- For a large-sized product, there is no need to choose stencils with small elements or even openwork patterns.
- For small-sized items, templates with large-sized drawings are inappropriate.
- Proportions must always be observed.
All recommendations will apply to any drawings.
Types of wood carvings
Wood carving (using stencils and templates) does not have a narrow direction; it will have several varieties:
- Embossed.
- Flat-relief.
- Proreznaya.
Let's look at everything point by point.
Slotted carving on plywood
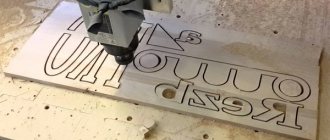
The key to success when carrying out slotted type carving is a competent choice of ornament. Due to this, carving on a sheet of plywood will begin to set the basic concept, and will also add aesthetics to the product. Ornaments and designs on animalistic or floral themes are common representatives of the classic style, and are also suitable for any direction in interior design. Also quite often used are slotted wood carvings (with templates and stencils). In this case, ready-made stencils are quite difficult to find, because they will be created individually for certain cases. This will be due to the fact that it is necessary to maintain the size, font style, and always a different set of words.
Please note that things will be completely different with animal, plant and even fantasy style patterns. Most options for this theme can be found on the Internet, and certain options are presented in the photo below.
House wood carving
So, house wood carving is the main focus of the design of huts, which is extremely common in the Nizhny Novgorod region. It is she who can boast of all kinds of lace-type patterns. To do it yourself, you need to select the appropriate sketches. The main condition for house-type carving is to avoid small parts. They will get lost on the house facade, and will not last long there. Options for carving in the house can be selected on sites that are dedicated to wood carving. But there are also craftsmen who are able to make a template to order. In this case, you can implement your idea and get unusual patterns.
Interestingly, patterns for house-type carvings are applied using tape stencils.
Through wood carving
The beautiful thing about through carving is that it completely removes the wood from the inside of the design. Through carving can be in the following styles:
- Simple, in which elements are cut out along the contours of the design.
- Openwork, when the design is created with a three-dimensional effect thanks to multi-level cutting.
Through carvings are used to make frames, all kinds of overlays, door panels, as well as elements for decoration. Through carving in oriental style is made using an electric jigsaw.
How to cut with an electric jigsaw
The cutting process using a jigsaw is mainly carried out on plywood. In order to perform high-quality work, you need to have at least a little experience in working with tools. Another important factor will be the presence of an original stencil depicting animals.
These types of templates (with images) are often used:
- Butterflies.
- A horse that stands on its hind legs.
- Cockerels on a knitting needle.
- The head of a wolf or even a deer.
- A couple of swans.
Everything will depend on the interior style, which needs to be supplemented with decorative elements. You can find examples of templates in our article. The most suitable material for cutting will be birch plywood, which has a thickness of 0.3 to 1 cm. Moreover, the work requires preparation:
- Copy paper to interrupt the pattern.
- Specialized paper for sanding parts.
- Adhesive carpentry composition for fastening parts together.
- Transparent paint and varnish composition in order to give a decent visual appearance.
Before starting work, you need to thoroughly sand the workpiece with glass paper, and only then begin transferring the design.
Floral ornament
There are other templates for wood carving. Quite often, foliage or floral patterns are made in the form of borders or stripes, which consist of repeating patterns. They can be made in an individual composition, which will contain images of trees, fruit-bearing plants, all kinds of floral elements, etc. The work is carried out using various methods:
- Display in kind.
- Plant elements in a simplified form.
A plant-type ornament for carving wood will be in second place in popularity after a geometric type pattern. Everyone's favorite thematic elements at all times are grape leaves, lilies, berries, hops, oak, ivy and more.
Flowers: wood carving for beginners
Flowers are one of the main elements of many wood carving patterns. It is not difficult to cut out this element; it is important to follow the sequence of actions and the principle of operation.
- A pattern in the form of circles is applied to the wooden surface and the details of the future flower are marked.
- The central circles are cut in a circle, after which they are cut from the outer circle to the center.
- After marking the petals, they are cut along the contour, cutting off the triangles between the petals, after which the outer contour of each petal is cut.
- An incision is made inside the flower, rounding the center of the design element.
You can decorate the drawing with any additional motifs; the geriola base of the product provides ample opportunities for toning.