Wood carving has centuries-old roots, reflects national traditions and is currently popular. Figurines, panels, and other carved decorations fit perfectly into any interior. To create amazing masterpieces, professionals do not use super-devices; all the main work is done by ordinary wood carving knives, which, although they have the same shape, differ from each other in size. A cutter, a Geismus, a cranberry, or maybe a graver – let’s try to figure out which of these tools is suitable for a novice craftsman.
Basics of Geometric Wood Carving
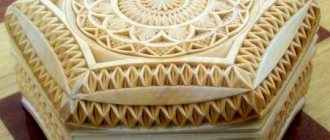
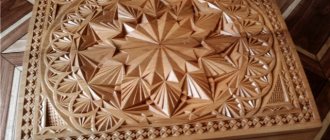
Triangular-notched carving gets its name from the fact that almost all elements of the design are formed thanks to triangular notches. Ordinary geometric shapes, intertwining with each other, form a complete pattern.
To learn wood carving with elements of geometric carving, you need to master the technique of cutting simple elements from wood, gradually moving on to more complex patterns and combinations of straight and smooth lines.
Complex geometric wood carving begins from the moment when you need to master a complex of elements that are simple in terms of execution. Here you need precision in the distribution of each part of the part.
A novice master will definitely not be able to cope with such a design, but if you practice, then with experience you can achieve a high level of skill.
Basic patterns
Triangular-notched wood carving can be represented by combinations of any geometric shapes or lines. The main elements are the following notches:
- dihedral wedge-cutting (segment, sector, wedge);
- triangular wedge-cutting (triangles);
- tetrahedral (rhombus, square, rectangle);
- curvilinear (bracket, spiral, circle).
Each recess is characterized by its own parameters. In particular, it has its own configuration, depth and width, and angle of inclination relative to the base.
By mixing and matching notches at equal intervals (reports) of construction, more complex patterns are created in the form of geometric shapes.
Working with wood cutters
Wood carving is a complex, but quite interesting technique for decorating products, which has been known since ancient times. At the beginning of work, it is necessary to create blanks, in other words, blocks or blanks. After this, rough surface treatment is carried out, during which the surface is leveled and all kinds of defects are eliminated.
After this, you can begin artistic work, which is carried out using wood carving cutters. In fact, this is a selection of part of the wood, which allows you to give the workpiece relief and volume. This is the main stage, because the appearance of the object depends on it. The final finishing of a decorative product consists of sanding the timber and impregnating it with antiseptic agents and paint coatings.
To implement manual work of this type, cutting devices with different blade configurations are used. Their quality has a direct impact on the purity of the ornament; for this reason, you need to carefully ensure that the chisel blade is sharp and without jagged edges.
Tools
You first need to prepare a workplace with enough free space. Good lighting should be provided.
To get started you need to prepare special tools:
- Graphite pencil and ruler for drawing contour lines of the future pattern on a wooden base.
- A compass for dividing a complete sketch into separate fragments to simplify the work.
- A jamb knife used for direct cutting.
- The file is needed to form the wooden workpiece itself on which the carving will be made.
- A straight chisel can serve as an auxiliary tool for a jamb knife.
A set of necessary tools has been collected. It remains to determine the width of the working part of the knife. This parameter is selected in accordance with the size of the picture. Additionally, you may need an eraser and fine sandpaper.
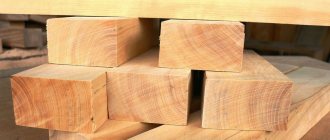
Wood
To get the job done efficiently and simplify the carving process, you should initially choose the right wood. Each type of wood has special properties that may become relevant when making a specific pattern:
- Hardwood trees are chosen for processing by professionals with extensive experience. Creating patterns on such a basis is difficult, but the result justifies the effort.
- The hardest rocks are difficult to process even for specialists. This option is usually chosen in extreme cases, if the product must have high aesthetic properties.
- Soft wood from linden, pine or alder will be an excellent springboard for a novice craftsman. The material is easy to work with. The carving elements turn out smooth and neat even without much effort.
Linden is the most popular type of wood among professionals. Wood fibers form a beautiful pattern on the base, the base does not split during operation. Working with pine can become more difficult if the grain begins to splinter under the chisel. The best option would be aspen.
What a beginner carver can't do without
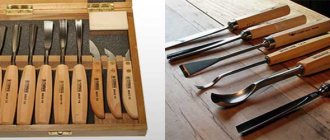
Anyone who is lucky enough to be in the workshop of a real master of wood carving will be horrified - he uses so many different tools. My eyes just widen. The master will easily determine how to perform this or that stroke, what is best suited for this or that detail. Choosing the right carving tool largely determines the quality of the product.
A novice carver does not necessarily need to purchase a full set of tools; to make entry-level products, you can get by with a few of the most versatile knives and chisels. This will give you the opportunity to gain work experience, develop your own style, and then acquire exactly the instrument that will really be in demand.
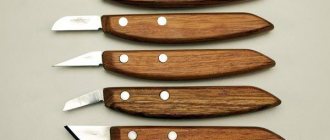
Blunt knives
The most common knives for wood carving are jamb knives. They are used by both seasoned professionals and beginning carvers. Knives of this type have a beveled blade, making them convenient for creating small recesses. Their use is justified both for flat-relief sampling and for creating volumetric compositions.
A separate type of joint is a flag knife. It looks like a triangle, one corner stuck into the handle. This knife is universal; all areas of the blade are used in work.
Blunt knives differ in the angle of the cutting edge and the width of the blade. Based on the type of sharpening, a distinction is made between single-bevel and double-bevel. A beginning carver's toolkit should have several of these knives: at least three of different widths.
Geometric thread cutters
When making relief panels, you cannot do without another common carver's knife - a cutter knife. Thanks to the longer blade, this knife is ideal for creating ornaments in the shape of geometric shapes. They are convenient for processing curved shapes and roundings. So, triangles and other shapes are cut out with a hatchet knife.
In addition to creating flat reliefs, cutters are widely used for three-dimensional products. In skillful hands, a small cutter can be compared to an artist's brush.
Bogorodsky knife, “Tatyanka”
The phrase “Bogorodskaya toy” is familiar to many. This is a handmade wooden figurine. Almost the entire carving process, from preparing the workpiece to smoothing out small irregularities, is performed with a special knife, also called a Bogorodsk knife. Such a knife should definitely be in a carver's workshop.
A modification of this knife, popularly called “Tatyanka,” is widespread. When cutting soft wood, the full cycle of work can be completed with one tool. It is excellent for power carving; thanks to its comfortable handle, it ideally transfers force to the blade.
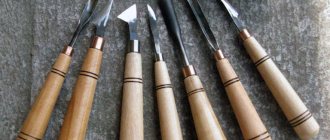
Chisels for wood carving
It is convenient to make samples of various configurations using chisels. Carvers use a variety of tools, but the most common are:
- straight chisels;
- semicircular or radius;
- cranberries, semicircular chisels with a bend at the cutting edge;
- stapled, having a U-shaped profile;
- corner
Unlike knives, the use of wood carving chisels allows you to make a groove of the required depth and profile in one pass. When working with soft wood, the chisel is pressed in by hand; carving on hard wood requires a striking technique. Here a wooden hammer or mallet will come to the aid of the master.
In addition to differences in profile, chisels also differ in size. There is a tool with a working edge from two millimeters to several centimeters.
In addition, there is another type of tools for engraving and wood carving - a graver. They can produce beautiful artistic works.
Other necessary tools
A carver cannot get by with knives and chisels alone. It is necessary to acquire another tool designed for processing wood. The list can be very extensive, it all depends on the qualifications of the master and the list of products that he plans to produce. In any case, you will need:
- hacksaw or electric saw for cutting the workpiece;
- hatchet for roughing;
- plane and rasp for preparing the surface of the board;
- a set of patterns for transferring an image onto a workpiece;
- drill, manual or electric;
- nichrome wire for burning thin elements;
- sandpaper of different grain sizes for final finishing of the product.
It would also be a good idea to worry about safety when carving with a sharp tool. To fasten small products, a carpenter's vice or several clamps are needed. A protective glove made of steel wire will help protect your hands from injury; this is especially important for beginning carvers. If the work involves multiple movements of a sharp knife towards yourself, it is worth purchasing an apron made of thick leather.
Preparing for work
You can start creating a pattern on a wooden base only after preparatory measures have been carried out. Preparation consists of several stages:
- Preliminary preparation of the wooden base.
- Preparing the field for the future sketch.
- Creating a sketch on the “canvas”.
Next comes the actual carving process.
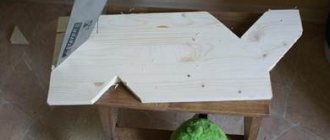
Preparing a wood blank
You need to cut a board of the required size from a piece of wood. For the first time, it is enough to take a small canvas with a thickness of 2 cm.
The surface must be sanded with sandpaper. There is no need to rub it too hard - just remove small chips and splinters. Removing such defects will allow the tool to glide easily across the surface. Additionally, there will be no splinters left on your hands.
Field preparation
A flat, smooth surface needs to be outlined. Using a ruler and pencil, divide the entire area into cells with a side of 5 cm. The parameters of the cells depend on the size of the pattern and its “details”.
Draw the workpiece around the entire perimeter. Each cell will become the basis for the formation of an element of the future ornament.
Sketching a pattern
Passing between the cells, a pattern is formed, which will later be cut out with a knife. You can use the one presented above, or a more complex one - it all depends on the skill level of the master.
More complex versions of the design use smooth, curved lines.
Varieties of Chisels
Chisels are used for many operations:
- preparation of grooves
- chamfering
- carving along drawn contours
- carving bas-reliefs.
The shape of the tip corresponds to the task that the tool performs. It can be straight, curved, with different shapes.
Angle chisels
It looks like the letter V - it is formed by two planes that connect at different angles depending on the task. With the help of such a chisel, recesses are made. For deep recesses, chisels with a smaller angle are used.
Flat chisels
Chisels with a flat cross section. They vary in blade thickness; the cutting edge is straight or beveled.
Semicircular
This tool is a must in a carver's basic kit. The blades are semicircular and are used for cutting ornaments, making notches and cuts.
The range of sizes is very large - in height and bend radius of the blade.
Bracketed
They are also called box-shaped - by cross-section. They are flat chisels with sides. The width of the chisel and the height of the side vary.
Geometric carving technology
The technique of geometric wood carving is as follows - the wood is cut along the grain and the grain is cut against the direction of the grain. The play of light of simple geometric shapes combined into a single composition depends on the angle of inclination of the wood cuts.
Cutting out simple shapes
You can learn geometric wood carving only after you have mastered the basics of making the simplest figures. Manufacturing technology of some elements:
- Skolishek. The first cut is formed perpendicular to the line of the design, and the second - at a certain angle to the first. In this case, the knife comes from another line of the drawing. It turns out to be a triangle.
- Rhombus. The first part of the formation of the rhombus completely corresponds to the production of the peg. And then a second similar peg is made in a mirror image.
- Viteika. This is a sequential chain consisting of pegs offset at the same distance from each other.
The principle of cutting out such elements is mastered at the very beginning.
Techniques for performing more complex figures
To get a full-fledged geometric pattern on wood, you need to master the technique of forming more complex elements of triangular carving:
- Pyramid. A figure consisting of three triangles that touch at one point at the same angle relative to each other. When manufacturing such an element, precision is required.
- Star. The figure is formed due to the distribution of several pyramids in a circle.
- Square. You need to cut a piece of wood at an angle to its base. The chips need to be split off vertically with a knife.
- Socket. Using a compass, draw a circle. In it, sketch out several of the same figures, but with a smaller diameter. Then diametrical lines are formed.
Making a square and rosette requires experience. Even a master with an average level of skill may not be able to cope with such a task.
Having mastered the production of basic patterns, you can create real masterpieces. It is important to skillfully combine the simplest geometric shapes with each other.
Security measures
Safety measures include the ability to correctly hold the knife while working in different directions. There are several points that a beginner needs to know:
An additional safety measure will be to secure the wood piece so that it or the knife does not come off during work. Also, the knife blade must be sharp. If you have to press hard on the knife, there is a huge risk of it jumping off.
Geometric wood carving is considered a simple type of woodworking, but still requires certain skills. Additionally, you need to skillfully wield a knife for working with wood. If you understand the construction of patterns and the creation of certain elements, then everything will work out.
Adolf Yuriev – Chisels for geometric carving
Most recently, STRYI began close cooperation with the famous cabinetmaker of our country, Adolf Yuryev, on whose recommendations we developed a targeted tool for volumetric, semi-volume and frontal geometry. How does our instrument differ from the entire wide range available on the world market? The main difference is its intended purpose and use. This tool is perfect for people who are looking for themselves in art and want to try to realize themselves in wood carving. The use of the “AYU” tool will make it possible to make a new round of development not only in the field of geometric carving, but also in a modern interior. This tool is ideally used for decorating furniture and interiors, in which the richest national artistic traditions of wood carving are now being rethought in a new way, and the use of new techniques, techniques and elements makes it possible to obtain products that not only captivate with their extravagance and splendor of appearance, but also have high artistic value. The “Adolf Yuryev” tool is divided into 3 categories: 1) Flags - multifunctional knives that leave far behind the functionality of jamb knives, Bogorodsk and others, carrying versatility, mobility and practicality in all types of wood carving. This category is in turn divided into 2 subcategories:
1.1 The slotted flag is the founding knife of all future work performed. It is they who make the first cuts in the wood, draw lines, create contours and frames.
1.2 Sliced flag - used for trimming parting in a variety of actions.
2) Short chisels are an indispensable type of chisels, the shape and dimensions of which were ideally selected based on the needs of geometricians and artistic design. This tool is used to design a wide range of works regarding pinning at specified positions of the drawing without a capital moment. These chisels have shortened blades and are divided into angular and semicircular. In turn, both semicircular and angular ones are divided according to the type of sharpening - with a straight sharpening and an oblique (beveled) sharpening. Working with smooth sharpening is intended for creating three-dimensional cuts; it is also used to design on-board systems. Oblique (beveled) sharpening, in turn, gives the irreplaceable effect of working in already cut volumes, without damaging the completed drawing, allowing you to make geometry within geometry.
3) Capital corner chisels are one of the main types of tools for geometric carving, with the help of which originality is added to the design of the work. They are used to emphasize and describe geometric patterns, shapes, elements, and fragments.