Wood cutters
To work on a wood lathe, you need not one cutter, but several. Moreover, all incisors have a different shape and purpose. There are two main types of such incisors:
- For rough, initial processing.
- For shaping and finishing.
Despite the nuances of application, all cutters for working on a wood lathe have common manufacturing principles and shape requirements. Any cutter consists of a blade (about 30 cm in length) and a handle (at least 20 cm). In turn, the handle consists of a wooden holder and a metal ring for fixing the metal cutter.
The main working plane is divided into three parts: the blade is the sharpest part, the body is the plane of the cutter, which is used for holding and resting, and the shank is the narrow part used for fastening in the handle.
The set of wood turning tools includes different tools. According to their functionality, cutters are divided into four main groups:
- To cut the workpiece, cutters are used.
- To give a cylindrical shape - boring.
- For turning dihedral recesses and protrusions - scoring.
- To create oval recesses - shaped ones.
How to sharpen a tool yourself?
To sharpen cutters, you can use a hand or electric tool. The second method is preferable, since sharpening with a good power tool is faster and sometimes even better.
Required Tools
To sharpen the blade you will need:
- whetstone;
- abrasive stone.
The initial rough cleaning of the blade is carried out on an abrasive stone. At the end, use a sharpening stone with fine grit.
You can also sharpen the blade on an electric sharpening machine.
Peculiarities
To straighten or sharpen the blade of the tool, you can use an electric sharpening machine. It is better to choose models with two grinding wheels.
At first, you can do rough cleaning and processing. On the second - finishing sharpening. Accordingly, the wheels should have different sizes of abrasive chips.
During operation, it is necessary to cool the blades in machine oil. Otherwise, it may overheat and lose its performance. Also, cooling in oil helps to harden the tool.
Features of sharpening
When sharpening you need to consider:
- Correct sharpening angles for each cutter.
- For beginners, it is better to take more developed, rather than sharper, sharpening angles. As your skill increases, you can decrease the angle.
- For rough cleaning and primary processing, sharpening with a more developed angle is also used.
- The initial sharpening of the blade and the formation of the cutting edge are done before working on an electric sharpening machine.
As the master masters the tool, he will come to his own sharpening angles for a particular cutter, which will be convenient to use.
Manufacturing scheme
The choice of metal for the working blade plays a big role in the quality of the cutter. Many craftsmen use old files, rasps and other tools made of high-quality steel for this. Car springs can be a wonderful material for a future wonderful tool. However, such a cutter should be hardened after sharpening.
To make the handle, it is better to use hard wood (pear, plum, apple, oak, beech). Having prepared the materials for the future tool, you can proceed to the following steps:
- Grind out the handle.
- Place the locking ring on the handle. Make sure that the ring fits tightly to the surface.
- Drill a small hole in the end of the handle to insert the main blade.
- If the steel for the blade is not hardened, then it’s time to harden it.
- Sharpen the shank on a sharpening machine. It should be sharp at the end.
- Hammer the blade into the handle. Check the reliability of the fastening.
- Sharpen the blade of the blade to the desired configuration. Use grinding wheels of different grits for sharpening. The sharpening angle can be from 20 to 60 degrees, depending on the purpose of the tool and the personal preferences of the master.
- Visually check the finished cutter for cracks, chips and other defects, which should be corrected immediately.
Start working with cutters on soft wood species (poplar, birch, linden). After making sure that the tool is reliable, move on to processing harder rocks.
Regularly check wood lathe chisels for reliability and strength. Your safety depends on it.
Meisel (oblique incisor)
A turning tool with a flat blade and a sharpened blade at an angle of 45-55 degrees. Meisel is necessary for almost all types of work: turning, trimming, finishing parts. The width of the lathe chisel can vary from 10 to 40 mm, the thickness within 4 – 6 mm, despite the fact that the wider the blade, the thicker it should be.
Reyer (semicircular chisel)
Semicircular turning tools are needed for rough roughing of the workpiece. A very useful cutter if you need to remove a large thickness. This type of chisel is very difficult to make on your own, because it is not easy to find a semicircular blank made of high-quality steel.
Flat cutter
The cutter is designed for turning smooth areas. The chisel blade is flat and comes in different widths depending on your needs. The thickness of the canvas is 4 – 6 mm.
Rounded cutter
It also has a flat blade of the same thickness of 4 – 6 mm and the width you need. Rounded turning tools are used for both rough roughing and finishing of concave areas of the product.
Parting lathe cutter
A cutting turning chisel (cutter) is needed for cutting products and processing cone-shaped recesses.
A significant advantage of purchased turning tools is that they are made of high-quality high-speed steel. It is the lack of high-quality material and tools for its processing that makes it difficult to make chisels at home.
I'll give you an example of how I made chisels myself. A turning chisel consists of a blade and a handle, which are naturally made separately. Let's start with making the canvas.
The main and probably the only tool I used when making a turning chisel was a grinder (angle grinder). But for work, I needed the following consumables:
- cutting wheel
- grinding wheel
- Velcro plate
- sandpaper of different grits (from 80 to 600)
As a blank, I took an old file.
Why a file? It's simple: fairly strong steel, blade thickness 6 mm and width about 40 mm, the file has a shank, which will make attaching the handle much easier.
I will make a reservation: if the length of the file allows you to make 2 blades, then by cutting the source on the second half you can use a grinder to cut out the shank. By the way, the length of the blade without a shank should be 150-180 mm.
I’ll tell you using the example of making a meisel - an oblique turning tool . The procedure is as follows:
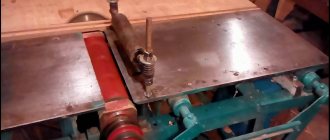
Take a file and use a grinder to cut it at an angle of 40 degrees. Then, using a grinding wheel, we roughly sharpen the blade. Before you start, make sure you have a container of cold water to cool the blade you are sharpening.
In order not to overheat the steel, cool the workpiece more often and do not sharpen for too long. After the rough grinding is completed, we begin sharpening the blade using sandpaper. In order to work using this method, you need to fix the grinder on the workbench.
As you sharpen the blade, change the abrasive wheels to smaller ones, not forgetting to cool the workpiece.
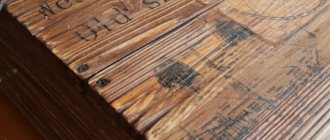
When sharpening is finished, you need to round the bottom edge of the turning chisel and the face - the wide sides. For this job, I preferred using sandpaper.
Oddly enough, sandpaper did a much better job than a sanding wheel. The rounded bottom edge is needed so that the chisel can move more easily along the tool rest.
Do not forget that we used a file as the starting material, which without smoothing will be very difficult to move along the tool rest.
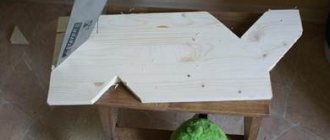
The next step will be making a handle for a turning chisel .
It turns out to be a small vicious circle: we need turning tools to make turning tools . I had a couple of similar chisels of simply terrible quality. One is rounded from an old chisel, the other is a meisel from a piece of raw metal, which became dull almost from one blow on a branch.
It's just a sad sight, but, nevertheless, with their help I managed to turn out several handles. The materials I used were: larch, apple, cherry, pine, cedar.
Based on my experience, I will say that it is better not to use pine and cedar, because they make the handle very light, which makes the turning chisel very inconvenient.
The design of the handle was partially looked at on the Internet, and partially made for myself. The length turned out to be 280 mm. You can download the drawing of a handle for a turning chisel from the link and use it both for clarity and as a template. Do not forget that you will need a copper or brass ring approximately 20 mm wide so that the handle does not burst when inserting the blade.
So. When both the handle and the blade of the turning chisel are ready, all that remains is to connect them. We stuff the prepared ring onto the neck of the handle. We take a drill and a drill with a diameter slightly smaller than the diameter of the shank. Drill a hole exactly in the center with a depth equal to the length of the shank. If the hole is not made exactly in the center, then the handle and the blade will connect at an angle.
Application in practice
Tools made by yourself are a joy, and the question arises of what can be done on a lathe with their help. Turning works are in great demand in construction and design, as well as decorative arts. For example, figured balusters for stairs inside a house or porch. A beautiful candlestick on a fireplace or coffee table can decorate and diversify the look of any interior. Chiseled chess pieces are a dream for fans of this ancient game.
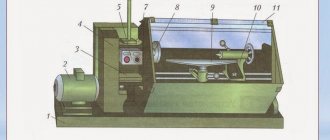
Before you begin, you need to check the reliability of the frame on which the machine is installed. The fastenings and strength of the headstock, tailstock, tool rest, and serviceability of all fasteners are also inspected. The correct operating mode is immediately needed so that the uncentered workpiece is not torn out by high rotation speed.
After the master has decided what he is going to do, he needs to prepare a blank for the future product. Determine the dimensions from the drawing and, in accordance with these data, select the required workpiece.
Center the ends of the block. For greater safety and convenience, plan the edges of the block with a plane and give it an octagonal shape.
When switching to finer processing, safety comes first. Make sure to set the recommended machine rotation speeds correctly. Violation of established processing standards can lead to an accident if it is work on a machine with a large range of rotation speeds. Remember that safety rules are written for the benefit of people, so that they can carry out wood turning work without problems for life and health. You can ruin everything with your own hands if you don’t follow time-tested recommendations.
Having made his first cutter, the master usually wants to continue to improve in this difficult task. Remember that a properly made and sharpened tool is the key to effective work on a lathe. Follow useful tips and constantly learn new techniques and devices.
Types of incisors
All wood cutters necessary for manual work have the same design and consist of a metal blade with a shank on which a wooden handle is attached.
To cut simple geometric patterns on a flat surface, you can get by with a couple of simple cutters, but to create complex volumetric and openwork works from wood, you will need to use a large number of special cutters.
The most widely used types of these instruments are:
- jamb knife - a tool like a shoe knife with a short triangular blade, the bevel angle of which can be different, which makes it universal and suitable for a wide range of jobs;
- The chisel is the most common type of wood cutter. It performs the bulk of the work when creating most carved products; it has a smooth blade with a cutting edge at the end, which can be straight, oblique, semicircular or angled in the shape of the letter V;
- cranberry - a tool similar to a chisel, with a blade that has two bends of one hundred and twenty degrees (so that the handle does not catch the plane being processed when working). With a variety of cutting parts - semicircular, bracket, straight and others;
- spoon cutter - a cutter for cutting spoons and other utensils, made in the shape of a ring or half ring with a sharpened side edge;
- a hatchet is a knife that looks like a slightly beveled ax blade, which is a fairly universal tool, the corners of which can make cuts both towards you and away from you, and with the middle of the blade you can cut off bulges.
For those who are just starting to master the technique of wood carving, at first it will be enough to buy 5-6 cutters - a jamb knife, a flat chisel and two semicircular and corner ones with different radii and bending angles. But you need to take high-quality, professional tools, despite their rather high price. Cheap kits for beginners are made of poor steel, they become dull very quickly and working with them will not bring pleasure to the carver.
Experienced craftsmen prefer to make wood cutters for themselves. Making them is not very difficult and can be done by anyone, even at home.