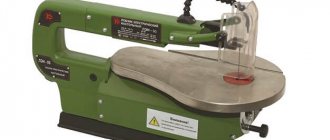
Tenon-groove connection: tenoning device and cutters for a hand router
Knowing how to make a tenon and groove with a hand router, you can even at home make not only beautiful but also reliable furniture, but also various wood structures characterized by excellent load-bearing capacity. The tongue-and-groove system connects not only elements of various furniture (tables, chairs and shelves), but also frames of low-rise buildings that experience significant loads during operation.
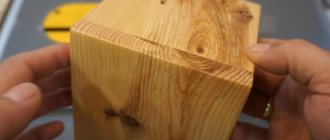
A tongue-and-groove joint made by hand
In order to make a tenon on a wooden beam using a hand router, several conditions must be met:
- securely fix the workpiece and correctly orient it in relation to the guide sole of the router;
- set the height of the working part of the cutter so that the tool removes a layer of material of the required thickness from the surface of the workpiece.
Even using the simplest tenoning device for a router when performing such processing, you can not only increase its productivity and quality of the result, but also make the technological process safer. It is especially important to use such a device, which can be made with your own hands, in cases where furniture is produced not in single copies, but in series (in this case, the craftsman has to perform a large number of similar operations both with the same type and with wooden pieces of different shapes and sizes details).
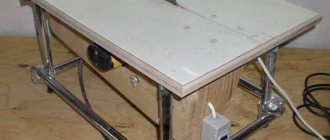
The use of devices will speed up the process of making joinery joints using a router
Making a device for picking out a tenon
Unlike a professional machine, the working tool is not fixed in space. It is fed onto a stationary workpiece with both hands. Therefore, the manufacture of a device for clamping the part at the first stage is a justified necessity. The simplest device for this is a design (Fig. 2) of fixed guides (upper, lower, side) and a movable bar, which adjusts the length of the sample. To assemble it, you need to perform the following steps:
- fasten the side vertical elements of the same height with the central cutouts to a piece of plywood (along its edges);
- cover them with guides along which the router sole will move;
- install side bars, limiting the movement of the power tool along the upper guides;
- install a movable element on the bottom plywood that regulates the overhang of the edge of the workpiece that is being milled.
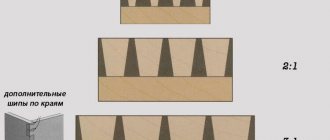
Figure 3. Scheme of tenon sampling.
To fix the movable bar, use a standard wing screw or special fasteners. The dimensions of all structural elements are selected individually:
- the height of the upper guides is equal to the thickness of the workpiece in which the tenon is made, taking into account a small gap for installing the fixing wedge;
- The width of the cutout in vertical elements depends on the length of the tenon created by a hand router.
Read also: Impact stamping of metal
A manual milling cutter of any modification, manufacturer, is suitable for working with this device, since most models provide adjustment of the cutting speed, feed, and reach of the working body.
For a dovetail tenon, a device with the opposite principle is used:
- a power tool is fixedly fixed in a sheet of plywood located horizontally;
- its body is located at the bottom, the cutter comes out from the back side of the sheet into a through hole;
- a block of hard wood (beech, birch, oak) is attached to the desktop;
- A 2.5 cm piece of board is attached to the block, which is a consumable material (used once with a certain cutter diameter).
Structurally, fixing a hand router in a sheet of multi-layer plywood can be solved with several options - clamps, self-tapping screws. It is important that the fasteners do not protrude onto the working side of the plywood. The sheet itself can be attached to a workbench, rest on a couple of chairs, or be fixed on several rows of timber, trestles, or scaffolding.
Connection application
This fastening method is used in various fields where it is necessary to securely fasten two parts or assemble an entire structure. For example, in mechanical engineering, dovetail joints are used to fasten blades to disks in various compressors, in individual units of metal-cutting machines, and in optical devices to ensure precise linear movement.
This type of fastening is most widespread in construction and furniture production.
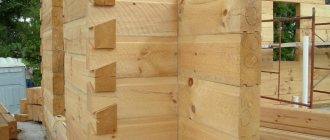
In construction, when assembling wooden houses, dovetail elements (teeth and grooves) are made at the ends of the logs being fastened together. It is advisable to use it for connection beams that have a rectangular shape. The dimensions of the groove and tenon determine the reliability of the entire future structure.
In addition, in construction it is used in the production of various joinery products:
- window frames;
- windows, vents and transoms;
- doorways and the doors themselves;
- interior partitions, arches, various recesses.
In the manufacture of furniture, it is used to assemble the frame and individual elements (drawers, doors, collapsible lids). Mounting two parts in this way provides good resistance to external and internal influences. The design maintains structural integrity and prevents cracking. In order to improve fixation in furniture structures, it is glued. Thanks to the large contact area and complex configuration, the fastening is reliable.
Dovetail is used in the manufacture of containers of various sizes (boxes, boxes, containers).
Features of warm corners made of timber
The quality of a wooden house depends on how well its assembly is carried out. The more airtight a timber house is assembled, the longer it will retain heat. When assembling log houses, warm corner technology is used to avoid the formation of gaps and cracks.
Most often, the places where heat escapes in wooden houses are corners. To create a hermetically sealed connection between the beams, a special assembly technology is used to ensure tight joining of the crowns. Those who are going to build a house from timber themselves should study different types of assembling a warm corner in order to build a durable and warm wooden house.
Areas of application
Such devices are very widely used for profiled timber. Therefore, it is extremely difficult to do without them in private housing construction. Most often this means a connection with manual cup-cutting machines. This best meets the requirements of the geometry of finished products and the main characteristics of the cutters themselves. Without any particular difficulties, it will be possible to make T-shaped connections between walls of different thicknesses.
This use of a cutter for making grooves is necessary, in particular, when cutting partitions, as well as when making extensions to the main structure. It is customary to prepare grooves in the main logs of the structure, and connecting parts - in secondary nodes. This is exactly the case when a cup cutting device is needed. The wood cutter for the groove is equipped with knives made of hard alloys.
With its help (subject to further improvement) it is possible to obtain a cutting end edge.
The knives are secured with screws inside the housing. Each of the knives has a pair of working edges. It is possible to reduce energy consumption when cutting thanks to two varying angles relative to the torsion axis. Dovetail connections are actively used:
in the construction industry;
in furniture production;
in some units of metal-cutting equipment;
in individual optical devices.
Connection types
Depending on the task at hand, dovetailing can be performed in various ways:
- Corner connections.
- Separating.
- Through.
- Decorative.
- Bevel connection.
- Through connection with rebate.
All types of connections have their strengths and weaknesses, but, one way or another, they form a reliable connection between two parts. To work you will need the following tools :
- Mallet (wooden hammer).
- Chisel, chisel.
- Reismus.
- Jigsaw or hand saw.
- Jigsaw.
- Pencil, tape measure, sandpaper.
- Square.
- Malka.
With these tools, you can easily make the connection. If it is possible to use a hand router, then the need for the listed tools disappears.
Through connection type
This type of connection is widely used in the manufacture of both cabinet and upholstered furniture.
It is also called “box”. To begin with, the workpiece must be processed with a plane and excess wood removed. The next step will be marking the nests. Everything here is individual and depends on the width of the board, as well as on the tasks assigned. It is necessary to draw lines across the workpiece at a distance of 6 mm from both edges. Then you need to divide the distance between them into an even amount, set aside 3 mm on each side and draw lines across the end.
Now you need to mark the slope of the spikes with a small marker. The excess that remains should be marked to avoid confusion in the future.
Alternating cuts along the crowns
To increase the strength and density of the connecting segments, round wooden dowels should be used. Lay joints with a lock, alternating even logs with a tenon, and odd logs with a groove.
The first corner connection is made using a dressing with a half-tree root tenon. The following crowns are attached using the ligation technology with the lowest beam - then it will fit tightly into the lock. Afterwards, the connection should be strengthened using a dowel with the lower and upper rows.
A tenon is made in the first beam 1/3 of the width of the beam. In other crowns, the width of the tenon should correspond to the width of the groove.
Marking diagram for creating joints of a log frame made of 6x9 meters of timber: letters A and C indicate longitudinal walls, D and B – transverse walls, E – internal partition; number 1 – timber joints.
When erecting crowns, you should avoid splicing and longitudinal connections of timber, which will not be strong. Professionals suggest that novice carpenters choose a straight tenon to connect timber.
To use it, you need to create a template where you need to provide 5 mm gaps for the insulation. The cut on the tenon must be done from the side that will look inside the log house. Other walls should have spikes with left and right cuts. To do this, you just need to turn the template upside down.
You can strengthen the connection using a wooden dowel, placing it diagonally from the edge of the outer corner.
When making a warm corner during the construction of a country house or bathhouse, site owners who do not have carpentry experience should purchase ready-made timber with grooves or tenons, which will cost more than usual. You can also invite qualified craftsmen who will process the ends using the tongue-and-groove system and assemble the frame without technical errors.
In the next video you will learn about innovations in the corner connection of profiled timber.
Source
How to make a dovetail with a router
For mass production of parts with such a lock, it is advisable to use mechanized methods. The best option in this case is to use special templates, in which one side is intended for milling dovetails, the other for creating tenons.
Dovetail templates require the use of two different cutters. The first is a cone cutter for cutting trapezoidal dovetails. The second is a straight wood cutter for creating tenons.
- Aligning parts
We position the part with the “tails” so that its edge is located strictly in the center of the slot. We install the second part (with spikes) flush on the reverse side. To accurately fit two pieces, we use a carpenter's square.
We fix the assembled structure in a horizontal position, clamping it with clamps or in a vice.
- Dovetail milling
For convenience, we mark the waste part with a pencil. We set the desired offset of the cone cutter and cut out the gaps between the dovetails.
- Milling a part with tenons
On the corresponding side of the template, use a straight cutter to cut out tenons along the entire length of the part.
Cutting off excess thorns. We release the clamps and move the template so that each tenon is in the center of the slot.
We mark the unnecessary elements and cut them off with a router.
factory plate for making a tongue and groove connection
Used with a router to cut the corresponding grooves and tenons, it is installed in a vice and the part is pressed against the device with a clamp. Typically sold in stores.
connection appearance
Consider devices for milling grooves
Cut out the top part - a tabletop from 18 mm plywood, 40 cm long and sufficiently wide to process the thickest workpiece that you plan to join with a tenon.
Cut two 5x10 cm bars, sawing them to the same length as the top. The bars will subsequently play the role of pressing the workpiece and centering it relative to the groove in the tabletop. To prepare the top, draw a line down the center of the top, then rout a mortise along the line at one end.
schematic representation of equipment
To use our equipment, draw a groove on the workpiece and mark the center line on it. Loosen the screws and place the workpieces between the bars so that the center line is connected to the top line of the jig, check that the edge of the workpiece is opposite the edge of the top.
Pinch the lambs. Align the router bit to one end of the mortise drawing, then mark guide lines on the top surface of the table along the edge of the router base.
How to work correctly with tongue and groove equipment
Repeat this again to mark the lines of the other end. Route the slot by starting the cut at the bottom by aligning the router base with the first construction line, and stop routing when the insert reaches the second construction line.
Manufacturing of equipment for box connection
This product allows you to mill box joint grooves one at a time on a milling table. In our case, it is simply an additional board, screwed onto an angle stop and having a key, with which we will determine the exact interval between the grooves.
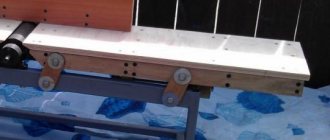
simple device for making box joints
Install a straight cutter with the diameter of the required groove width; Place the router on the table. Set the routing depth equal to the thickness of the existing board and mill a groove into it. After this, unscrew the board from the miter gauge and move it so that the gap between the groove and the cutter is equal to the width of the cutter.
Mill a groove in the board again, this time the second one (on the right). Cut a key out of the wood so that it fits exactly into the first groove and place it on the glue, so that it will be approximately 25 mm from the groove on the additional board.
Milling grooves in the first workpiece
Place the workpiece with its front surface against the additional miter fence board, pressing one of its edges against the key. Turn on the router and, holding the workpiece firmly against the fence, move it onto the cutter, milling the first groove. U
place the first groove on the key and make a second pass. Continue routing in the same manner until you reach the opposite edge of the workpiece.
Milling slots in a mating workpiece
Install the last groove of the first blank onto the key. Press the edge of the mating second piece against the edge of the first and move the entire set to rout the first groove on the second board; Keep both workpieces pressed against the miter gauge. Mill the remaining workpieces using the same technology as when making the first one.
The tenoning device makes it easier to select grooves of any configuration, including dovetail - video
There are too many dovetail patterns to talk about each one in this article. Shall I just provide a link to the document? by downloading which you will find all sizes? and even drawings for making a dovetail template with your own hands.
Tools used
In this case, the sampling of material is carried out on the surface of the beams and boards from the side. The main thing is that the proposed connection maintains its dimensions in terms of geometry.
To complete the process using a milling cutter, it is possible to use tools equipped with shanks with a diameter of 8 or 12 millimeters. The so-called groove cutter will become a universal option when performing any type of work. The device is equipped with a cutting part, the basic operating principle of which is described as follows:
- The side surface is involved in the formation of the sides of the tenon, the wall part of the grooves.
- The side with the end part is used when processing the bottom. After this, the required layer of material is removed from the base of the spike.
The result is the simultaneous formation of both tenons and grooves on the surface on the sides. The sizes can be individually adjusted, and the owner has quite a wide range of options in this regard.
Sometimes for grooves and tenons they choose not a rectangular shape, but the so-called “dovetail” type. This option is relevant if increased requirements are placed on connection reliability. Accordingly, the cutter used is also called a “dovetail” in this case. Such work can be easily done with hand tools if the need arises.
Connection application
You can connect two sides of a wooden structure using high-quality wood glue or affordable fasteners, so many believe that the use of traditional joining methods is justified only by the aesthetic side of the issue. But for the dovetail connection, this statement is only partially true. This type, of course, speaks of the carpenter’s skill, since it is not so easy to do it well, but the finished product will look beautiful and expressive. But the dovetail also has a number of advantages:
- No natural wood deformation.
- The structure of the material is preserved and cracks do not form.
- Effective when joining large solid elements.
- It is easy to adjust the power of the connection by selecting the required number of spikes and the angle of inclination of the eyes.
- The strength of the product is increased due to the large gluing area.
The use of a dovetail connection is recommended in all areas where it is necessary to obtain securely fastened elements or a solid structure at the output:
- Mechanical engineering – for fastening parts of compressors, optical equipment, metal-cutting machines.
- Construction – joining timber during the assembly of wooden houses. This type of fastening is also used in the manufacture of all kinds of carpentry products: windows and doors (frames, openings), partitions, arches, niches.
- Furniture production - for connecting frame elements, various structures (doors, lids, drawers). As a rule, the parts are also glued together, which provides even greater fixation and strength.
The dovetail joint is used during the assembly of various wooden containers (boxes, containers, crates).
Fastening with trapezoidal key
The dovetail connection scheme was further developed in a keyed connection. A butterfly dowel formed by two trapezoidal shapes is made from hardwood. The groove is cut on modern milling machines. With a dovetail keyway, the fastening dimensions are minimized, but this design ensures reliable fastening of wooden structures of any complexity and allows the production of wood products to be streamlined.
Features of keyway technology:
Dowel fastening is used by manufacturers of finished wooden houses made from expensive laminated veneer lumber and allows the implementation of the most complex house designs.