Circular saw device
Being a truly useful tool, the circular saw has a fairly simple design. Its main components:
- bed – frame on which the main units are mounted;
- tabletop with a slot for a disk;
- engine with rotation transmission system;
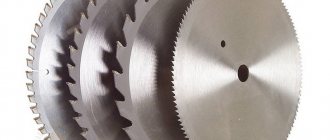
- cutting tool, disc with teeth.
Optionally, the device can be supplemented with a pusher, which ensures progressive movement of the workpiece towards the disk, and various lifting mechanisms that regulate the cutting depth.
The principle of operation of a circular saw (circular saw) is that the rotation of the electric motor shaft is transmitted to the cutting tool, a disk with sharply sharpened teeth. The center of the disk is located below the level of the tabletop, only a segment of it is removed from it. The workpiece is brought to the rotating disk, the teeth bite into the wood, creating an even cut.
A simple circular saw from a grinder or circular saw
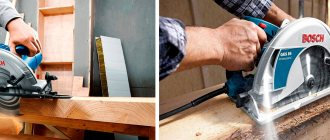
An angle grinder (grinder) is one of the most popular home craftsman tools; with its help it is easy to cut metal and clean welds. In addition, using a wood disc instead of a standard abrasive disc, the grinder can be turned into a hand-held circular saw (it is also called a parquet saw), and by making a frame with a table, it can be turned into a stationary circular saw.
Required accessories
To work you will need:
- multilayer plywood with a thickness of 10 mm or more;
- switch and wire;
- countersunk head bolts;
- screws;
- wooden block 40x40 mm.
You also need to prepare a drill or screwdriver, hammer, screwdriver, pliers, ruler and pencil. Using these tools you will have to make a circular saw with your own hands.
Of course, you must not forget the grinder itself or the hand-held circular saw. At the first stage, it will help to cut the material, and then it will take its place as the working body of the circular saw.
Sequencing
The first step is to make the body of the circular. Thick plywood is perfect for this; you can use any pressed wood boards. You will need to cut four rectangular sheets, size 40 x 80 cm. They are used to assemble a box with a square 80 x 80 cm at the base. For ease of assembly and reliability of the structure, four bars are installed in the corners.
The resulting box is closed on top with a table top. It can be made from the same plywood, but it is better to use some sheet material with a laminated coating. This guarantees the durability of the machine and ensures ease of use of the homemade circular saw.
A cut is made in the tabletop to allow the disk to come out, and holes are drilled on the sides for attaching the tool.
The grinder must be securely fixed under the tabletop. The design of the latch can be very diverse, it all depends on the configuration of the machine itself. The main requirement for fastening is that it must securely hold the angle grinder without allowing it to move.
The simplest fastening may look like this: two metal squares, a grinder is fixed between them with a steel clamp.
For additional strength, it is recommended to use the thread of the side handle; a bolt with a suitable thread is screwed into it.
Two holes are drilled in the upper shelves of the angles holding the angle grinder. The structure is secured from below to the tabletop using countersunk bolts. All that remains is to block the power button and connect the angle grinder via an external switch.
In the same way, you can make your own circular saw from a circular saw. In this case, the work is noticeably simplified due to the fact that there is no need to invent a fastening. It is enough to make a cutout for the disk, drill holes along the holes of the plate with a hand-held circular saw.
Recommendations for simplifying the assembly process
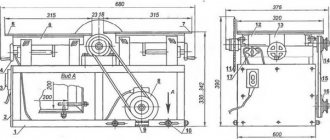
To regulate belt tension, the electric motor must be installed so that it can be moved. The easiest way to achieve this is by creating larger slots than required for the motor mounting bolts. In this case, the expansion of the holes should be carried out in the direction of belt tension.
If you completely follow the drawing, you will need to make a more complex belt tensioning mechanism. The process will be carried out by pulling up the platform with the electric motor using studs and fixing it with locking bolts in the desired position (in the drawing these structural elements are indicated by the number 10).
The entire design and assembly process can be greatly simplified if you make a circular saw from a circular saw. In this case, there is no need to install a number of parts (motor, disk, shaft, belt, starter). But the capabilities of the created model will be limited by the power of the tool used.
In any case, a homemade circular machine must be grounded. It is also additionally recommended to install a residual current device or differential circuit breaker in the panel. These measures will protect against electric shock if the machine body is energized, for example, due to breakdown of wire insulation. It is better to select components for the electrical part of a circular saw so that they are suitable for repair and easy to maintain. Free access to equipment components will help you easily replace failed parts.
Miniature machine made from a washing machine engine
The circular is distinguished by its extreme simplicity and availability of materials for its manufacture. Perhaps its only expensive part is the electric motor. Stationary machines are equipped with a powerful asynchronous motor, which ensures cutting of thick wood of any species, but in a home workshop you can limit yourself to less power.
Note! To cut boards of medium thickness, it is enough to make your own circular table driven by a washing machine motor.
This design has a number of advantages. An engine from an old washing machine is inexpensive; moreover, a similar unit can probably be found in a home craftsman’s household. Connecting this motor is not particularly difficult; there is no need to look for circuit diagrams or do soldering. With all this, the power of such a unit is quite sufficient for most types of work.
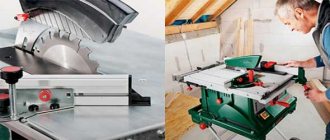
Stationary machine
Those who plan to get serious about woodworking should think about making a full-fledged stationary circular saw. This should be a separate unit installed on a workbench, equipped with a powerful motor, with the ability to quickly replace the disk. Making such a circular with your own hands will take time, but it will definitely pay for itself.
Despite the apparent simplicity of this device, before starting work it is worth creating a drawing of the machine. This will allow you to clearly see the future unit and choose its optimal configuration.
bed
The basis of any machine is the bed, the frame on which all the main parts are mounted. The frame of the circular saw must be stable and reliable, which is why it is made of metal. It is preferable to use a profile pipe or a thick-walled angle. Welding is used to connect parts. If a collapsible structure is planned, a bolted connection is suitable.
Buying a suitable material will not be difficult; in any specialized metal store you can pick up both pipes and an angle. Those who want to save money can be advised to contact scrap metal buyers. You can buy the same thing from them, only cheaper.
Tabletop
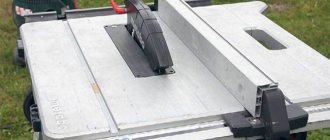
The best material for making the tabletop of a professional circular table is metal. Steel and aluminum-based alloys are excellent. For a budget option, you can limit yourself to thick multi-layer plywood covered with sheet iron. In any case, the surface of the tabletop must be smooth, resistant to friction and not bend under a weight of up to 50 kg.
A groove is made in the tabletop for the disk. It can be done in two ways. You can make a cut in a single sheet, or you can assemble a tabletop from two halves. The second method is preferable for a metal tabletop, which is difficult to cut into at home.
A parallel stop is attached to the tabletop. The best material for this, regardless of the table material, is angle steel. To secure it, grooves are made or powerful clamps are used.
Motor
The engine of the future circular machine is selected depending on the existing disk. If you plan to work with small disks with a diameter of 150-170 mm, you can limit yourself to an electric motor with a power of about 0.5 kW. For disks with a diameter of 350 mm or more, you need to look for a unit of 1 kW or more.
If desired, you can make a sawing machine for work outside the workshop; for this it is enough to provide the possibility of installing a low-power gasoline engine; it can be removable.
Rotation transmission
The optimal drive for a circular saw is a V-belt drive. Two pulleys are used, one on the engine and one on the drive shaft. It's convenient and safe. There is no direct connection between the motor rotor and the disk; if the tool jams, the belt will begin to slip, signaling the need to turn off the power. In addition, using pulleys with several grooves of different diameters, you can adjust the speed of the saw, choosing the optimal mode for different types of wood.
Rotation from the motor rotor is transmitted to the shaft. This is one of the most important parts of the circular. It is unlikely that you will be able to make a shaft yourself; it is better to buy a ready-made one or order it from a turner.
The shaft is mounted on bearings. They must be of a closed type: a circular saw is a sawing place and open ones will not last long.
Machine with pendulum engine suspension
Those who can boast of the ability to work with metal can be advised to make a circular saw with a pendulum engine suspension. The main feature of the device is that the motor, shaft and cutting disc are installed in one common frame. On one side it is hinged to the frame, the second is held in place by a screw with the ability to adjust the height. By changing the length of the screw, you can adjust the height of the disk exiting the tabletop.
This system allows you to adjust the cutting height, as well as use discs of different diameters. If, instead of an adjusting screw, you use a probe placed on the tabletop, you can get a simple copying machine. The feeler gauge will allow you to adjust the cutting depth according to a certain pattern. This fairly simple modification will turn a simple circular saw into a real woodworking machine. With this device you can not only cut the board into the necessary pieces, but also make precise cuts and make various selections.
Selection of materials and parts
When creating a homemade circular saw, it is necessary to maintain an optimal balance between its functionality, safety during operation and manufacturing costs. To achieve this, you should select materials and parts with the desired characteristics. To reduce costs, you need to start from old or unused equipment that is available.
Materials for making a bed with a table
To make a bed (frame), you can use a channel or metal corners (sizes from 25×25 mm to 50×50 mm are sufficient). If these materials are not available, then the most economical option is to purchase them at a scrap metal collection point. The legs of the machine will use water pipes or profile metal pipes.
Advice! Frame elements must be connected to each other using electric welding, because bolted connections unwind under the influence of vibrations.
When assembling the frame, it is also necessary to weld spacers at the corners to impart rigidity to the structure. To make it easier to move the machine, you can equip it with durable wheels (with a metal rim) equipped with locks. It should be borne in mind that the more massive the unit being created, the more stable it must be in order to avoid injury.
Metal pipe frame
The main requirements for a table for a circular saw: resistance to mechanical influences (vibration, shock), the ability to withstand workpieces weighing more than 50 kg without deflection, and surface smoothness . These properties characterize sheets of the following materials:
- become;
- duralumin;
- silumin;
- PCB;
- moisture-resistant plywood;
- organic glass.
If you use moisture-resistant plywood, then it should first be covered with zinc-coated sheet metal. The use of chipboard or OSB is not recommended due to the instability of these sheet materials to vibration influences.
Important! The strength of the table is of great practical importance. If it cracks or becomes distorted due to deflection, the disk may jam. This can lead not only to damage to the workpiece, but also to injury.
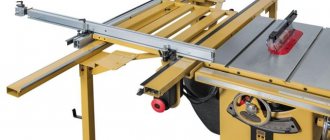
To carry out various work (for example, cutting logs into boards), you need to equip the table with a side support. It performs the same function as a guide bar for a hand-held circular saw: it ensures even sawing of lumber. Moreover, its use makes it possible to obtain workpieces of different sizes.
Operating conditions for a circular saw on wood
A circular saw is necessary, first of all, in order to make a long cut in solid wood, precise and even, like a stretched string. It is possible to ensure high quality of cutting only by fulfilling three conditions:
- High speed of movement of the cutting edge of the saw. Ideally, you can obtain a cut quality comparable to a surface sanded with emery cloth;
- The sharp cutting edge of a circular saw tooth. Some brands of discs are made of high-speed steel, but it is best to use a carbide-tipped tool;
- High rigidity of the “circular saw blade – work table” system. The higher the rigidity, the more accurate and smooth the cutting line will be.
Any saw with a working tool in the form of a toothed disk poses a serious danger to the worker, so they try to make the table for a circular saw with their own hands as durable and easy to use as possible.
Making a table top for a circular saw
Assembling the table begins with making the tabletop.
The plywood sheet is marked so that the two edges of the lid are the same size as the edges of the iron sheet. Plywood is cut out using a hacksaw or jigsaw. The edge of the cut can be processed with a milling cutter, but this operation is not necessary. Since the main parameter in the frame is reliability, and not an attractive appearance. The tabletop is rubbed “roughly” with sandpaper.
At the bottom of the tabletop there is a slot for a circular circle . To do this, you first need to measure the dimensions of the sole of the unit. The easiest way to do this is to unscrew the disk from the device and simply circle the desired part of the saw. These measurements are required to determine the seat.
Using a hand cutter, the bars are selected to a depth of approximately 0.9−1.1 cm. If you do not have a cutter, then this work can be done using a chisel, but it will take much more time.
Then, when the seat is made, try the saw on and, if necessary, adjust the recess. Mark the slot locations for the circle and fixing the fasteners. If you need the circle to rise and fall, then you need to install a pendulum mechanism for the tabletop.
In this case, the slot must be made in the shape of a truncated pyramid. In this case, the hypothetical top of the pyramid will be directed downward. The frame itself for the lifting mechanism is best made from steel corners , which are welded to each other.
Making a table frame
The markings for fixing the transverse and longitudinal slats, which serve as stiffening ribs, are best installed on the underside of the tabletop. The planks themselves are made from timber. You will need:
- Two transverse parts, length equal to the width of the table top minus 7-9 cm on each side.
- Two longitudinal ribs, the size equal to the length of the lid minus 7-9 cm on each side.
Then you need to make nests for the screws . The slats must be fixed on the lid so that the tabletop extends 7-9 cm beyond the edges of the frame. The fasteners must be as reliable and durable as possible.
The first fastener should be installed approximately 40-50 mm from the edge of the rail. The distance between the screws is approximately 23-25 cm. All parts must be drilled through . The self-tapping screw is attached to the side of the lid so that its head is completely recessed into the wood.
First, the transverse ribs are secured. To make the table top as strong as possible, the edges of the slats must first be coated with wood glue . The structure is fixed with clamps, and without removing them, screws are screwed in.
Allow the tabletop to dry completely. Afterwards, the longitudinal slats are installed in the same way. Then the parts of the frame are pulled together, installing two fasteners on each side. Now the clamps can be removed.
Attaching the legs (supports)
The table legs are made of timber. The height of the supports is selected individually. In practice, it is most convenient to work at the machine when the tabletop is located at hip level .
Before fastening, each support must be planed so that the leg goes down to an angle from below. So, the area of the base of the support should be slightly larger, in contrast to the area of the top. It is best to secure the legs using steel corners. They need to be pressed a little so that the base of the machine is in the “spacer”. This gives the table additional stability . Bolts with washers are used as fasteners; they are secured with their heads facing outward. Otherwise, during work you can be injured by the protruding parts of the fasteners.
The whole structure will be more stable if additional supports are tightened with diagonal slats. They are attached in pairs on each side of the machine.
The surface of the lid is polished and varnished or a steel sheet is used for coating, which is attached to self-tapping screws. At the very end, the instrument is attached directly to the prepared place.
additionally make markings on the table top ; this will help you cut the wood smoothly and correctly. The control panel of the circular saw is located on the outside of the machine. As a rule, it is mounted on one of the table legs. That's all, your DIY circular saw is ready.
Circular manufacturing options
You can build a circular saw in a home workshop using one of four schemes:
- Install an asynchronous electric motor of 1.0-1.5 kW on a table welded from metal, make an overdrive belt drive onto the shaft, onto which the cutting disc is secured using a flange;
- Make a small wooden table for a low-power washing machine motor;
- Install an industrial-made hand-held circular saw on a machine assembled from a wooden beam;
- Use a conventional angle grinder, in which the abrasive disc is replaced with a steel cutting tool, as a drive to build a circular saw.
All of the above schemes are used in practice with varying effectiveness. If you need to cut thick beams and logs up to 100 mm thick, you will need a circular saw with a powerful engine and a steel frame.
A grinder is well suited for trimming small parts made of wood, but it is practically not used for a stationary circular saw due to the limited time of continuous operation. A circular saw made from a washing machine motor is relatively weak and inconvenient. Low power - 500 W and low speeds require the manufacture of an overdrive V-belt transmission and a system of two shafts. There is a lot of hassle, but the quality of the cut and productivity with such a circular saw are low.
Algorithm for assembling a homemade circular saw
The assembly of a woodworking machine according to the drawing given earlier is carried out in the following sequence:
- a rectangular frame is made from the corners;
- four legs are welded to it at the corners of the required height;
- at a height of about 200 mm from their lower edge, they make a binding from the corners;
- a shaft is mounted on the upper frame;
- fix the driven pulley on one side and the disk on the other;
- a table with a lifting mechanism is made and attached to the frame;
- on the lower frame they make a platform from corners or sheet metal for the electric motor;
- the drive pulley is fixed on the motor shaft;
- put the belt on the pulleys;
- On and off buttons and an electrical panel are mounted on the side panel of the unit;
- using wires of a suitable cross-section, connect the elements of the electrical circuit of the equipment (motor, buttons, protection);
- supply power to the machine from a stationary network.
The final stage is to check the functionality of the assembled equipment. First, you should make sure that all moving parts rotate freely: to do this, simply twist the drive pulley by hand. After which you can start the unit in test mode. If strong vibration is detected, you will need to check the reliability of the bolted connections and fixation of the disk.
You can make a circular saw with a table consisting of two halves or a solid one. In the latter case, you will need to cut a rectangular slot in it for the disk. The design of the machine with a table consisting of two halves is shown in the video below. This video also demonstrates the design of the lifting mechanism for these parts.
Important! To prevent the possibility of the saw jamming due to the connection of fragments of the workpiece being cut, it is recommended to install a riving knife. It should be located at a distance of approximately 3 mm behind the disc.
From the Bulgarian
Making a homemade stationary circular saw at home is not difficult. First of all, you should decide on the project, draw a diagram and make a drawing. The differences between a stationary and tabletop DIY circular saw are the height of the base. Before assembling the instrument, you should think about creating a “table”. It is usually made of wood (board thickness - 3 cm) and covered with tin or aluminum sheet. Steel sheets up to 6 mm thick can also be suitable for these purposes. Cross members are made from angle iron (up to 80 mm).
The working disk protrudes beyond the table usually by 35%, that is, for a beam 120 mm thick, the diameter of the disk should be 370 mm, respectively. The power plant required will be 1000 watts (possibly more). If the workpieces are more massive, then a homemade circular saw may not “take” them. The support is created from the angle “8” - this is a fairly massive and durable structure that can withstand quite significant loads. The stop extends beyond the table by 4-5 cm. One shelf is processed on both sides, the remainder in this case should be equal to the length of the table.
Building a home circular
According to reviews of many home-made carpenters, the easiest way is to convert a manual model of a circular saw into a stationary one, or, more correctly, an easel one. In this case, you can kill at least three birds with one stone:
- Firstly, hand-held circular saws have high rotation speeds, which means good cutting quality is ensured;
- Secondly, in a commutator motor the shaft is mounted on bearings designed for radial load;
- Thirdly, the cantilever mounting of the cutting blade allows you to relatively quickly replace it with a new one, without disassembling the circular saw.