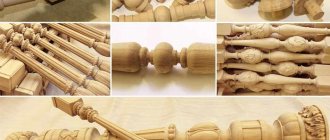
Many of us love to create something with our own hands, including interior items. In order to diversify the decor and add new details to the comfort of your apartment, you can knit a carpet, sew a fashionable bedspread or decorative pillowcases, or paint a landscape. Or you can resort to a form of creativity such as pyrography, or simply wood burning. If you're not good at painting, this option is just for you because you can find a lot of wood burning stencils online. You just need to download them to your computer, print them, cut them out and transfer them to wood.
Anyone can use this simple method of applying a design to wood; it is suitable for both children and adults. However, you can come up with sketches yourself, but this can be done by people with a rich imagination or experience. Therefore, we suggest you use templates.
Progress
It is best to use soft and light wood species for burning, these include poplar, birch, and chestnut. The surface must be sanded with sandpaper, treated with furniture varnish and sanding repeated. This way you will avoid unwanted splinters getting into your fingers or your child’s fingers.
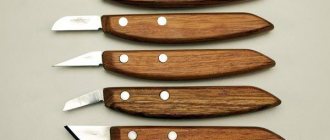
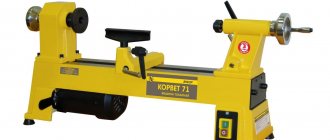
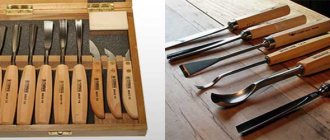
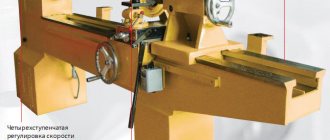
You will also need a pyrograph. This is an electric burner and can be purchased at hobby and craft stores. These stores also sell special kits for wood burning; they usually already include a pyrograph, a wooden block, and the drawing itself, which you will use as a stencil. For beginners, it is better to choose just such a set to try your hand at a new business, especially since it includes everything you need.
Related article: DIY superhero mask
Make sure the board is dry and that your hand has something to rest on as you work. Support is very important because one wrong move can ruin the entire design or, even worse, the hot tip of the pyrograph can burn you. The hand must stand firmly.
Then draw the design using a pencil. If you are using a stencil, simply trace the outline of the cut out design. If the picture you choose is multi-layered, that is, it includes additional details (for example, hair, eyes, facial features or muzzles), then it is better to use carbon paper or tracing paper.
Advice for beginners: choose fairly simple and easy subjects for paintings until you get the hang of it. It’s better to do it simpler, but more effectively, than to take on an impossible task.
It is not entirely correct to put all the stencils under the same comb, so we divide the ready-made templates into different categories.
Such different pictures – what to choose?
The most difficult question that a craftsman faces before starting work is the choice of a picture or pattern for wood burning. If there are no plans or obvious ideas, you can turn to different sources: the Internet, books, advertising, fabrics, toys, etc.
Beginners should choose simple images for burning, which do not have complex elements and have a minimum number of lines. In such cases, you won’t be able to spoil the picture – you can always play with the line thickness in case of an error.
Wood burning designs can be anything you want:
- Children love cartoon pictures for wood burning. For beginners, you can choose simple heroes and characters, for experienced masters - more complex ones.
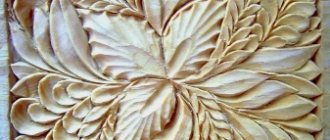
- Nature in all its manifestations is the most frequent choice of craftsmen. Flowers, animals, natural phenomena look very interesting burned on the board.
- You can create entire paintings or transfer existing ones. The theme depends solely on the wishes and skill of the master artist.
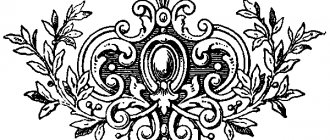
- Patterns for burning in the form of an ornament are used both as an independent image and to create a frame, filling some depicted object. Floral, geometric, abstract patterns are always in demand.
- Photography is the most difficult design to burn. To implement such an idea requires the skill of the performer and a replaceable set of attachments to accurately convey all the contours and shadows.
As already mentioned, sketches for wood burning can be downloaded from the Internet or made yourself. We offer several ready-made templates for children and adults with different skill levels.
You can easily draw simple pictures for burning yourself, or even involve children in the process. If the child himself goes through the stage of preparing a sketch, then burning is much more interesting for him.
When finished, a beautiful drawing should definitely be placed on the table, hung on the wall, or given to relatives or friends. A small masterpiece burned with your own hands will definitely not leave anyone indifferent and is guaranteed to attract attention.
Pyrography is the process of burning a design into wood using a special soldering iron. This type of craft continues to exist for a long time and still remains popular. To learn how to burn drawings correctly, you need to prepare special tools and show a little desire. This is quite enough to achieve a good effect. There are special stencils for wood burning for children.
Create letters
Letter stencils are ideal for creating lettering on wood. For example, on cutting boards or any other wooden panels with congratulations.
Beginning pyrographers can practice their skills by first burning out letters, then whole words and sentences. You can download a whole set of different fonts to suit every taste.
Nature images
Anyone who has recently started practicing this art will not be able to immediately take on complex works, so it is important to start with simpler ones. It will be easiest to burn out drawings with a special device, creating a natural style. In this case, the basis of the composition can be a cozy country look or a simple stencil of any pet (cat, dog). To create such images, it is important to use your imagination and try to experiment. Natural phenomena look more advantageous when burned on a wooden base.
Bright flowers
Flowers are a known antidepressant, whether real or painted. Now there are even special anti-stress coloring books depicting various floral patterns of any complexity. You can use this coloring book, or you can download the desired picture on the Internet. Beautiful flowers will always cheer you up!
Such works can be painted with acrylic or watercolor and then covered with wax to preserve the colors.
Creating an image of icons
Since only particularly talented artists can create an icon and burn it with their own efforts, it will be much easier for beginners in printing to create such a picture using ready-made sketches for burning. Creation principle :
- It is important to prepare in advance for the fact that working on such an idea will require a lot of free time, since icons are very complex artistic compositions. But the final image will be worth all the effort and time spent.
- The painting can be adjusted to a certain size using a special digital painting program. You can find images of icons for further burning on the Internet.
- The finished stencil must be printed on a printer, and then transferred to a wooden surface using carbon paper or another more suitable method.
- When burning a design on wood, you need to start with the main contours and only then move on to smaller lines and marks. If you particularly wish, you can make a special frame for the icon in the form of jute filigree - the user will be very pleased with the result.
Outline animals
Animals depicted on a tree will perfectly complement the houses in which pets live, because you can transfer an outline image from a photograph of your pet onto the tree and burn it. It can also be a stylish gift for animal lovers, hunting lovers or professional breeders.
Related article: Crochet tunic for girls: patterns with descriptions for beginners
Proud Tiger
Unlike more complicated stencils, even a child can burn out an animal if you use a more simplified version of the sketch. Experienced craftsmen can use something more complex, with a large number of small lines. Drawing a tiger on a board is best suited for training a beginner pyrographer.
To help your child better develop his skill, it is best to choose a picture with additional details - plants, flowers, other animals. Such designs are most often used to decorate cutting boards in the kitchen , and also form an entire composition. Over time, the baby will begin to improve his skills and develop the ability to create more complex images in pyrography, and then he will be able to burn portraits.
Holiday drawings
These can be any holiday motifs: for the New Year - Santa Claus with deer, gifts, a Christmas tree, snowflakes, and so on. For Easter - Easter eggs; various Easter patterns on wooden eggs will look especially cool. For Defender of the Fatherland Day, you can burn military equipment or shoulder straps, and for March 8, bouquets of flowers.
Such home decorations, made by yourself, can be hung on the walls or given to loved ones for the holidays. The main thing is that it is very simple and exciting. Happy creativity!
Elegant airplane
Easier burning images for children aged seven to nine years are outline sketches that can be simply transferred to a wooden surface using carbon paper.
As you develop your technique, you can begin to do more difficult sketches.
For example, on Internet sites you can find a large number of passenger and military aircraft models - pictures for wood burning. After selecting the desired stencil, you need to print it, draw it, and then burn it.
With the help of templates and sketches you can very quickly learn all the basics of pyrography. It is important to start with the simplest, improving your skills and abilities over time.
Pyrography has long been one of the variations of folk art - many people of different age groups and professions are fond of this type of decorative art. This is because anyone can learn this technique. The main thing in this case is to show more patience, caution and desire to learn something new. It is important to remember that burning with fire does not like to be rushed, as this can lead to bad results. In addition to the main tool (pyrograph), it is also important to clearly represent your idea.
More professional pyrographers (this usually includes designers and artists) most often use interesting images for their work that they come up with on their own. But it will be much easier for novice pyrographers to draw pictures from ready-made sketches and images. It is best to start with simpler subjects (for example, contour animals or equipment) and move on to more labor-intensive work over time. With diligence and care, burning the required workpiece onto a wooden surface is quite simple.
Flower pictures
Flower stencils for wood burning are best suited if the artist has already mastered the technique of painting with fire at home and is confident in his skills. In this case, you can come up with a design in the form of flowers in a basket or beautiful vegetation in space. In this case, you can find a large number of ideas. For lighter images of flowers, it is allowed to use primitive crops (tulips or bells).
But if the user knows how to draw well, then it is allowed to burn more significant flowers - gladioli, roses and others. Such sketches for burning on a wooden surface can be easily found on websites on the Internet. Flowers always look attractive on various cutting boards and decorative items. You are also allowed to create your own unusual composition, which can then be installed in the room or presented as a gift.
Snowflakes and snow figures
For burning, you can use more neutral images (geometric shapes, still lifes, small animals and other pictures), as well as a specific theme. Thematic ones include thematic drawings or holiday stencils. The most common ones include New Year's ones (with the image of Father Frost and the Snow Maiden, a special postcard, a garland, a gift or a decorated Christmas tree). This list of thematic images can be very long.
You can quickly find a more suitable sketch on the Internet, download it (if necessary, you can further change the drawing in Photoshop), print it and carefully transfer it to a carefully sanded surface made of plywood or other wooden blank. Attractive New Year's images, burned out with your own hands, will not only attractively decorate the house during the holidays, but will also continue to delight the owner throughout the next year.
Kitchen cutting board
The easiest and simplest option for a beginner in pyrography would be to draw different designs based on the finished image on a kitchen cutting board.
This hobby will appeal to everyone, regardless of gender: boys and girls. In this case, it is allowed to use wood and any types of sketches and patterns for ornamentation.
It is much easier for beginners to hone their skills on a cutting board, because it is soft and is best suited for this task - paintings are quickly transferred to it through carbon paper (everything is drawn quickly and easily), unlike harder woods.
Even a beginner in pyrography will be able to create especially attractive patterns on wood and share their achievements.
At first, nesting dolls were created by burning, but after this type of work began to be called pyrography and used in folk art. Now there are many modern devices that can be used to work with other types of surfaces (paper, bones and leather). The simple device is used for drawing simple outlines and tinted pictures.
Numbers on the stencil
Burning inscriptions on wood in the form of numbers is best suited for boys, since they are unlikely to want to draw various patterns, circular curls, floral designs or cartoon princesses on the wood. Most of all, they enjoy architectural structures, cars, ships and other equipment.
The best option for a boy who likes pyrography would be images not of still life or painting, but of architecture, transport, airplanes, and weapons. For example, a parent can download an image of a house (a summer house, a large high-rise building or a plot of land). The boy will transfer even an easy-to-apply license plate at home onto a wooden surface with passion and enthusiasm.
How they do it
Having understood the variety of raw materials for making signs, it is worth moving on to a variety of technologies. So, plastic products are produced:
- By the casting method, when the plastic mass, under the influence of elevated temperature and pressure, acquires the required size, shape, texture. You can cast either unpainted raw materials or pre-tinted ones with special color-setting pigments. This also includes obtaining finished products on 3D printers;
- One of the simplest methods of industrial and home production is to stick a design or font formed by a polymer film onto a plastic base. In production conditions, the film is cut with a plotter, at home - by hand;
- Mechanical processing of a plastic workpiece, consisting of machine milling, engraving or carving with hand tools.
Glass plates are produced by etching or mechanical processing, which, due to the high hardness of the glass sheet, is performed with superhard materials or abrasives. As a result, in combination with painting with high-strength compounds, you can obtain a specified design, inscription, textured background or design. About the same can be said about natural stone, however, with the adjustment that etching in this case is practically not used, and the inscriptions and texture are set by mechanical action on the surface with cutters, milling cutters and other carbide or diamond tools.
A word from Experienced! It should be noted that in the case of glass and stone, casting is practically not used due to the complexity and energy consumption of the technology.
Metal products are obtained using the following method:
- Stampings, if steel or its stainless steel analogue, titanium and other metals other than cast iron are used. This also includes metal forging, cold and hot forging;
- Casting, if the raw materials are non-ferrous metals and cast iron;
- Mechanical processing, which is widely applicable in all variety of products and is milling and engraving;
- Erosion and electrochemical processing. It consists of imparting the necessary texture to a metal surface under the influence of electrical discharges in a conductor or dielectric medium. It is used extremely rarely due to the complexity of the equipment used and is used mainly in the production of forming punches and matrices for subsequent stamping of plates in a mass series;
- Chemical etching, which involves dissolving an unprotected area of metal with chemically active substances;
- Metal processing using innovative methods based on numerically controlled equipment; the executive body can be based on a plasma torch, a waterjet cutter, or a high-pulse laser. Like erosion, this is also quite an expensive pleasure and is justified in conditions of mass production of serial products;
- Applying non-volumetric inscriptions using the coloring method is cheap and cheerful, but truly surprising visitors with an exclusive product is very difficult, although it is possible.
Wood is processed by high-speed machine or manual milling or hand carving, as well as thermal treatment, when a design, inscription, or texture is burned out with a hot nichrome thread or a low-pulse laser.