The final stage of working with wooden products is always its final cleaning and painting. Without these procedures, the tree quickly absorbs moisture and can even change its shape. Manufacturers produce dyes of different colors, suitable for both internal and external use. Compliance with the recommendations will significantly improve the performance characteristics of cleaned and painted wood.
The importance of the procedure
So, the last two stages of working with wood are cleaning and painting. Initially, the wooden workpiece must be thoroughly cleaned of debris, dust, shavings, grease and any other type of dirt.
The methods used for this are as follows:
- Mechanical. Any visible plaque can be removed with a brush, including a hard one. In the latter case, the surface is scraped.
- Chemical. Those wooden products that are already painted or varnished can be wiped with soapy water. And the fatty layer is removed with products that contain alcohol. Treatment against mold is carried out using fungicidal solutions.
If a person comes into contact with even perfectly sanded, but unpainted and unvarnished wood, there is a high probability of getting a splinter and ripping clothes. Untreated products quickly get dirty, break, are exposed to fungi, mold and other bacteria and become unusable.
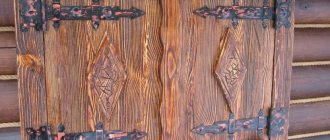
By cleaning and painting, you can radically change the color of the wood, emphasize its texture and, if necessary, even age it.
Spraying the garden
The next stage of processing garden trees with your own hands in the spring occurs in April. Spraying of tree trunks and branches is already taking place here.
Spray products are chemical and biological preparations for protection against adverse effects and diseases.The tree buds should swell, but not yet have time to bloom - this will be the ideal time for spraying. It is worth spraying in the morning or evening on a day with dry weather.
In order to successfully spray all the trees, use a special pump with a telescopic handle to reach the entire crown.
Copper sulfate is the most suitable composition for treating trees. Urea, colloidal sulfur, and Bordeaux mixture are also suitable. All these preparations are applied in the same way, with the hose directed at the crown at least a meter away from it.
- Do-it-yourself vertical flowerbed - learn how to make a beautiful and original flowerbed yourself (photos and videos)
Unpretentious flowers for the garden - a review of the best types and ways of combining flowers for a beautiful garden design! (Photo and video)
Pruning plants in landscape design - 125 photos and video master class review of the best tools for beginners
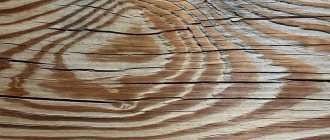
Wood burning
Structuring allows you to highlight the natural beauty of wood. The main condition is that the tree must be of low density, with well-defined annual rings. After drying and cleaning, it can be fired.
It is performed with a special gas burner. It should be held at an angle of 45 °, without staying in one place. After firing, the surface can be cleaned with a stiff brush. Work strictly according to the location of the fibers.
The process does not require any costs and is quick. The appearance of the product becomes original.
The video will show you how to decorate a wooden beam using firing:
What you need to get started
Treatment of trees in autumn and spring will be different; we will consider the spring period. As soon as the snow melts in spring, you need to wait a little for the soil to warm up.
The first step to prepare trees for fruitful time is to get rid of old branches from the entire garden. Under the trees, old branches that have fallen during the winter and previously are collected and placed in one pile for further disposal.
Next, you should carefully examine all the trunks and branches of the trees for dryness and diseases. Dry bark is removed from trees using a knife or a special brush, as well as damaged areas and dirt that has accumulated over the winter.Next, take a pruner and start removing black and dry branches, all of them are already dead and can only harm the tree.
Everything that was removed and the branches found are put together and burned. It is better not to use the ashes in the future as fertilizer, but simply throw them away.
Next, you can start digging up the soil in the trunk circle of each tree in the garden. This is required in order to loosen the top layer of soil and saturate it with oxygen.
Wood bleaching
Wood bleaching is the process of oxidation of those substances that give it its natural color. This process can be carried out before assembling a new product, as well as after years of use. The goal is to change color, eliminate defects, and smooth out the pattern. All this leads to the fact that bleaching improves the decorative properties of wood and also extends its service life.
The process that changes the color of wood to a lighter color can be done in several steps. But even after the wood product becomes completely white, bleaching will only affect the outer layers of the wood. Thus, the white color will be at a depth of several millimeters and through this light layer you can see the darker core.
How can you bleach wood? Traditionally, ready-made compositions and bleaching products are used to lighten it. It's quite easy to make them yourself. Bleaching agents are divided into those containing bleach, sodium hypochlorite or chlorine dioxide, and those containing ammonia, hydrogen peroxide, oxalic or other non-perchloric acid.
You cannot mix products. If the process was started without chlorine liquid, then all layers must be applied with the same liquid. Discoloration occurs due to the oxidation of natural wood dyes, which occurs after contact with oxygen radicals.
Bleach is poured onto the cleaned surface of the wood, trying to apply it in an even layer. This is necessary to ensure that the finished product is the same color. After application, some time must pass for the solution to be completely absorbed. Then you can repeat the procedure again.
This process is quite simple and does not require large financial costs. After bleaching, the wood can be varnished or easily painted in any other, even radical, color. It is easy to age it until it acquires the required texture. In addition, such wood can be used for further bending and gluing.
Types of flat-notch processing
It can be geometric, contour, nail-shaped or black-lacquered. Each of these techniques will require its own sketches and a set of tools in the form of a knife and chisel.
The process of creating a carved geometric design consists of cutting out squares, rhombuses, hexagons, etc. at certain angles. If the design is created using circular or triangular grooves, we are talking about the contour carving technique. If the surface is coated with black paint or varnish before starting work, the finished drawing will look unusually impressive.
Waxing
Cleaned, perhaps even bleached, wood shows off its grain quite well. You can highlight it even more using the waxing process. Materials for it are selected depending on how the product will be used.
If used as utensils, then waxing can be carried out only with products that are environmentally friendly. For example, natural beeswax.
In order for any wax to be evenly applied to the surface, it must first be treated with impregnation. It will create additional protection for the top wooden layer and prevent the wax from being absorbed.
The simplest impregnations are vegetable oils. Impregnation can be applied in several layers, after complete drying, as well as subsequent sanding of each previous one. Next, the product is coated with factory-made mastic or a self-made wax solution. Both must be heated to a certain temperature (it is different for different types of wax, but on average 82 – 91° C.
Wax can be diluted with oil (used for food products), turpentine, rosin and any dye. The heated and prepared solution is applied with a cotton pad or brush, first along the fibers, and then across the next application. The smoother the waxing is, the more beautiful the product will be.
The process is inexpensive and uncomplicated. If the technology is followed, it makes it possible to improve the appearance of the tree and extend its service life. By the way, waxing is not carried out on painted wood. It has its own technology and working methods.
Waxing wood with beeswax and linseed oil:
Types of artistic wood processing
The main types of artistic wood processing include:
- carving
- mosaic
- turning
- burning
- embossing
Mosaic is the creation of ornaments or plots using individual elements. Such an image is assembled from small pieces of one or several types of wood on any surface.
To create a mosaic pattern, a wide variety of types of wood are used, differing in shade and texture. Wooden mosaics can be classified as works of decorative and applied art. It is used to decorate rooms and household items: furniture, jewelry and souvenir boxes, paintings.
The mosaic contains the following varieties:
- inlay
- intarsia
- block mosaic.
Inlay is the decoration of a surface with pieces of wood cut into them. When the inserts differ from the main color or texture, the inlay is called intarsia. Decorative pieces of veneer of different types of timber are used in the design of mosaic canvases. In this way, you can get a solid, as if painted canvas, called marquetry. Block mosaic is distinguished by the presence of thin plates with the same pattern, which are glued to the surface to be decorated. Mosaics will be easy for those who have carpentry skills, namely, creating pieces of furniture. Furniture decorated with mosaics looks very beautiful and compares favorably with standard furniture. Certain compositional and technological techniques that are used to create a mosaic pattern will be useful when laying parquet.
Wood carving is the process of creating a design using cut out elements. This type of processing can be called the most ancient. But today many artists and craftsmen are engaged in wood carving. Flat notched, for example, outlines the contours of the design using notches, and contour creates a pattern using straight lines. The most interesting effect can be achieved using relief carving; the resulting pattern will be voluminous.
Slotted thread can be called the simplest type of thread; it is performed using a jigsaw or jigsaw. Carved carvings with a relief pattern are used to decorate pieces of furniture in the Baroque and Rococo styles.
One of the most popular and easiest methods of processing timber is burning. Using heated metal pins, a pattern, ornament or inscription is applied to the wood. It is a pity that not many people know about the wide possibilities of this type of artistic processing.
Some timber species have very soft wood that is easy to cut. The main type of wood cutting is sawing with a jigsaw. This is a simple type of processing that does not require expensive tools and extensive experience. It is with this type that the training in artistic processing begins.
At the end of the last century, the scope of use of laser technologies increased significantly. Scientists have invented various devices whose operating principle is based on the operation of laser radiation. Lasers are also used in machines for cutting and engraving various materials. Laser machines can cut a wide variety of materials, including wood.
The laser beam has a number of interesting properties. It is characterized by great heat and is capable of punching a hole in any material.
The laser is used for artistic decoration of souvenirs, burning emblems and trademarks from expensive types of timber, as well as artistically inlaid parquet boards.
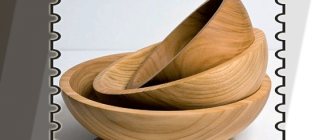
Turning is attractive due to its ease of processing and the ability to obtain a product with a smooth surface and a beautiful surface appearance. This method is most often used to make children's toys. They create turned objects on a lathe, which was invented by ancient Egyptian craftsmen. The very first machines worked in such a way that the master’s workpiece had to be rotated using a rope, one edge of which was fixed to the string of a bow mounted on the ceiling of the workshop, and the other to a wooden pedal. In the process of evolution, the machines were constantly improved. Today they are equipped with an electric drive, and there are even mechanical and automatic controls.
The turning technique makes it possible to achieve a rounded section with different profiles. You can also get twisted columns and hollow parts.
The choice of wood material is determined by the purpose, parameters, design, as well as the conditions of use of the item. Most often, craftsmen use pear, apple, maple, ash, oak, linden, pine, and spruce timber.
Embossing can also be called an important method for creating relief decoration. This process involves extruding a design onto the soft surface of the timber. The ornament is created under conditions of high pressure and temperature in special molds.
In order to soften the wood, it must be steamed or treated with a solution of hydrochloric acid. After this, a mold, most often metal, containing an engraved negative of the pattern is placed on the surface. Next, the pressing process takes place under a pressure of 200-250 N per 1 cm2. Beech, spruce, birch, linden, and oak wood are used for embossing.
Products prepared in this way are not sanded; for this reason, they can be treated with urea-melamine film.
Painting
Wood can be painted for decoration and to protect it, including from pests. The principles of painting in both cases are similar, the methods of execution are the same.
Wood coloring process
Different paints and preparatory agents are used for interior and exterior work. Wood cannot be called a capricious material.
However, its coloring requires compliance with certain conditions:
- The cleaned wood must be soaked in an antiseptic solution.
- Avoid contact with bright sun.
- Carry out painting in a dry room with normal or low humidity.
Painting can be painting (this means that existing cracks and gouges in the wood need to be filled with putty) or finishing (decorative). Often, during decorative processing, paint is not used, but only oil is used.
Oil painting
Oil as a protective layer can leave the original color of wood, preventing it from darkening over time, clearly highlighting its structure and protecting it from the damaging effects of sun, water and air.
Before applying oil, you must thoroughly sand the surface with sandpaper, apply antiseptic agents, and allow the necessary time for them to dry completely. And then start the painting process.
For this you can use:
- special oil sprayer. It is necessary to spray the oil evenly, without leaving untreated areas on the surface of the wood;
- thick brush. It is necessary to apply the oil evenly. It is important that no hairs from the brush remain;
- soft cloth or sponge. Pour the oil into small portions and spread it evenly over the surface.
Before covering the wood with oil, it can be mixed with a small amount of varnish. This will give the surface more shine. It is possible that after oiling, painting is done.
The process is short, quite simple and not expensive. However, after such treatment, the wood is not one hundred percent protected from aggressive environmental influences. It doesn't become any more durable either.
Sanding after brushing
After using the brush, the wood takes on a textured, very beautiful appearance. But its texture becomes very rough. It needs to be smoothed before treating with stains and varnishes.
For grinding, after brushing, sandpaper of varying degrees of hardness is used. You need to sand along the grain of the wood, starting with coarse-grain sandpaper, then fine-grain sandpaper.
Decorative processing
This is the most thorough painting that does not allow errors. You can perform the work with the same tools as when applying oil. It is permissible to paint small-sized products with a small sponge, applying paint pointwise to the surface, while trying not to leave unpainted parts.
Acrylic paints are used for decoration. Before starting work, the paint must be mixed well. The brush should be dipped no more than a third. After drying thoroughly, the surface should be coated with oil varnish. Given its thickness, application is not easy. It is important to distribute the varnish evenly so that the surface is even.
The color range of paints for decorating wooden products is quite diverse. The paint is easy to apply and dries quickly. For the final coating, varnishes are used - mostly colorless, although they can also be tinted. After varnishing, the surface becomes smooth and more protected.
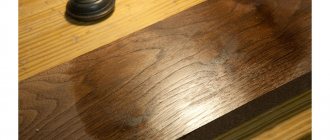
One of the methods of decorative wood processing is firing followed by brushing. To emphasize the contrast between the fibers, the board is treated with white oil:
Wax
Another wood treatment option is waxing. Wax is used in pure form or mixed with turpentine and rosin. Such compositions are popular when restoring wooden products. You can make a mixture of linseed oil and beeswax by melting the ingredients in a water bath and then applying to the surface with a brush or soft cloth.
Wax is convenient to use - it can be applied to both a clean surface and one treated with oil.
There are products of natural origin - plant and bee.
Wax, like oil, is applied to the prepared surface:
- clean the wood from dust and dirt;
- carefully sand with sandpaper (P220-240);
- impregnation is applied (for example, from vegetable oils).
When cold, the wax is rubbed into the surface with a soft cloth. To treat large areas, it is melted in a water bath and applied with a wide brush. The procedure is repeated several times. After drying, the surface is carefully polished with a woolen rag to make it shiny.
An example of waxing with a mixture of linseed oil and beeswax:
A waxed surface is smoother than an oiled one. In addition, wax protects wood from moisture better than oil. It has minimal effect on the color of the wood and is easy to apply.
Disadvantages of waxing - wax is not resistant to high temperatures, so it is not advisable to leave products treated with it where the sun regularly shines brightly. Do not place hot dishes on a waxed surface. This will damage the coating and will have to be renewed.
Wood tinting
You can preserve the texture of wood by giving it a certain shade. This is done with various paints, including stain. Lighter woods are easier to stain, just like hardwoods.
To ensure that the paint is distributed evenly, you need to:
- sand the wood;
- wet it;
- remove lint;
- degrease.
Natural wood looks better than wood that has been stained. Exception: stain coating.
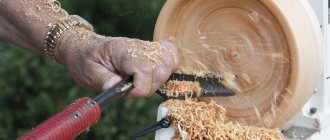
Material and tool
Please note that not all types of wood can be brushed. Species such as maple, pear, cherry, and beech are not suitable. Choose larch, pine, oak, ash, walnut, those species that have an easily processed structure.
As for the tool, a hand brush with stiff metal bristles is suitable for a small area. And to process a large area, as a rule, they use a drill with the same metal attachment.
Staining
Wood can be stained (painted with special dyes) in 2 ways:
- deep;
- superficial.
Mordant - etching (deep staining) of wood is carried out separately for each part before joining them into one. Oppression may be used. After the wood has been soaked in paint, the parts are hung to allow excess liquid to drain. All this can be done even at home. You just need to provide ventilation. Most often, stains of natural colors or stains are used.
By painting you can imitate valuable types of wood. Moreover, the desired shade can be achieved using even fabric dyes. The depth of color is achieved by repeated staining.
Stainless steel stain
Mordant stains tint the surface of the wood. This brown stain can be:
- water based. Suitable for fine-pored wood;
- waxy Used for treating pine varieties;
- hydrocomponent. It is used for spraying;
- combined. Simultaneously water-based and also solvent-based;
- water-alkaline. Used for oiled surfaces.
It is quite easy to stain products even at home, and the quality should be the same as when stained at a furniture factory. The color of the wood is uniform and rich. The process is not labor-intensive and inexpensive.
Staining wood at home using stain stain, using the example of a box:
Tips for a newbie
Before starting complex work for educational purposes, you should work on some of the simple sketches for carving, familiarize yourself with specialized literature, look at classic diagrams and sketches with their detailed descriptions. It wouldn’t hurt to look into GOST standards for artistic wood processing.
Beginning carvers should start carving small figures with minimal detail. To move on to products of complex shapes and master the art of artistic wood carving, constant hard training will be required.
Glazing
Coloring wood by applying a tint pigment to the main base color allows you to highlight its original texture. Widely used in decorating wooden products. Paints of different colors can be applied repeatedly.
But only after the previous layer has completely dried. Brushes, fabric, and sponges are used for this. The technique requires high skill and expensive paints. The appearance of the product is original and not everyone likes it.
So, people have learned to change the most ancient building material, wood, beyond recognition and use it in a variety of industries. Treated wood has an increased service life and an original appearance.
What's easiest?
The simplest type of carving is slotted. It is performed with a jigsaw, which is used to cut out the contours of a variety of shapes where something needs to be seen through the slits (doors, screens, cupboards, window casings). This wooden product has no background. In some cases, it can be replaced with bright fabric.
The technology for performing artistic wood processing (wood carving of this type) is quite simple: a pattern is transferred onto a workpiece with a surface prepared in advance (sanded or planed) according to a template. It is also possible to use tracing paper.
Several holes are drilled along the contour of the future design, into which a jigsaw file is inserted and the entire contour is carefully sawed on a special table called a sawing table.
Staining and varnishing when processing wood
Wood in its natural form does not always look attractive compared to surrounding objects and furniture. It turns gray when exposed to ultraviolet light. Wood that is not coated with any protective compound is very hygroscopic. It begins to warp even from the difference in winter and summer air humidity. In this regard, wood processing is a necessary procedure to preserve the consumer qualities of wooden products. The finished item has a more attractive appearance compared to the natural one.
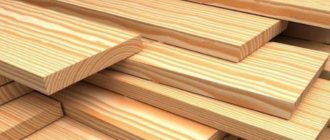
You can process wood of any species from oak to birch. Although different types of trees look different after finishing. For example, the natural pattern of birch is quite uniform. It is devoid of contrasting transitions and annual rings around knots. Pine and spruce look beautiful, especially their “knot” parts. The natural pattern of chestnut, oak, and beech is considered the most attractive.
Before finishing, it is necessary to thoroughly sand the wooden part with sandpaper (sandpaper). Moreover, movements with the sandpaper should occur strictly in the direction of the fibers and without strong pressure. The resulting transverse risks after varnishing and staining will become easily visible.
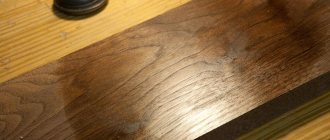
Wood stain
To remove microscopic dust particles from the fibers, it is recommended to thoroughly vacuum the wood after sanding. After this, the part can be coated with stain. It can be non-aqueous and aquatic. Water, as the name suggests, on the water. This type of stain is used quite rarely, mainly for staining small parts. Non-aqueous (solvent based) is used for any parts. Non-aqueous stain dries and absorbs quickly and has a wide range of colors.
The treated wood is heavily impregnated with stain. Small parts are mostly stained, completely immersed in stain. When staining large items, use a regular brush. Wood stain should be applied in excess. It is necessary that it is absorbed as deeply as possible. After this, the items are dried and proceed to the second stage of finishing - washing. When washing, all excess stain that is not absorbed and remains on the surface of the wood is removed. After this, the texture of the wood appears with significantly increased contrast.
Non-aqueous stain is washed with acetone. Usually a large thick brush is used for this. To facilitate the washing process, it is recommended to use the following method. The wooden part must be positioned at an angle of 20 - 30 degrees. Dip the brush into acetone and use smooth movements from top to bottom to remove excess stain from the part. In this case, it is necessary to place some hygroscopic material under the part, for example, paper napkins. Wash off the stain until the color of the part becomes uniform. After this, the part must be dried again.
Varnishing of wooden products
At the final stage, the part is varnished. Varnishing of the part is carried out in two stages. At the first, the pile is raised. As you know, wood is hygroscopic and easily absorbs any liquid that gets on it. At the same time, its geometric dimensions change and the wood swells. After washing and staining, wooden objects are not as polished as before finishing. This can be felt by running your hand over the surface. For this purpose, the pile is raised, subsequently removing it by sanding.
The pile can be raised using quick-drying varnish (for example, NTs-222). Using a soft wide brush, you need to coat the part with varnish, while moving the brush along the fibers, and dry it. After drying, small wood fibers form on the surface, separated from neighboring cells (lint). After this, you need to sand the part again using fine sandpaper.
After sanding, the part must be vacuumed. After this, you can move on to finishing the wood. Depending on the place of use and purpose, the product is varnished the required number of times. When using at home, it is enough to cover with one or two layers of varnish. In this case, the part will acquire a semi-matte surface.
This method of finishing wood does not require large financial costs and allows you to obtain an attractive appearance of wooden objects. The only drawback of this processing method is the use of materials with a strong odor (acetone, varnish). In this regard, all work must be carried out outdoors or in a room with good exhaust hood (well ventilated). It must also be taken into account that these materials are flammable. It is unacceptable to carry out work in the presence of open fire nearby.
Sometimes when sanding wood, small pieces of wood get scuffed up and sometimes lost. In most cases, these loose or flaky angular pieces are the most beautiful parts of the texture design. Peeling can occur during the sanding stage or when the stain dries. Typically, chips peel off from the plane by 1.5 - 2 mm, and after varnishing even higher. If this happens, before further processing it is necessary to glue the capricious petal with any means suitable for gluing wood. Also for these purposes, instead of glue, you can use varnish prepared for further coating. The gluing procedure is similar.
And restoration of wooden products can also be
If there are defects on the workpieces (cracks, chips, traces of insect activity), a simple restoration can be made. For these purposes, at the sanding stage, it is advisable to collect the resulting wood dust. It can be used as a filler when preparing “putty”. Wooden blanks are well puttied. The mixture for restoration work can be prepared as follows. It is recommended to take colorless furniture varnish as a base and use already prepared wood dust as a filler. If the quantity is insufficient, you need to take a piece of the same material and use a grinding machine to obtain the required volume. The color will be stain.
First, it is recommended to thoroughly mix the wood powder with the varnish. Then add color until you get the desired shade. As a “spatula” you can use any tool you think is convenient. For example, you can take poster feathers of the desired width.
Restoration of wood products should be carried out only after staining and washing the part, since the hardened mixture is practically unable to take on color. It is also not recommended to prepare the mixture for the entire amount of work. A large amount of time is usually spent on color selection, and the “putty” prepared in this way quickly hardens. It is recommended to prepare the mixture in the quantity required for the restoration of a specific fragment. Upon completion of the restoration (after the “putty” has hardened), it is necessary to clean the repaired areas with sandpaper.