What is needed for the process
To obtain high-quality products, be sure to use well-dried material. Raw wood does not sand well; paint and varnish quickly become cracked. Drying boards is an important stage in the preparation of lumber.
There are several options for naturally drying wood with your own hands. The methods describe how to properly dry the boards to rid the wood of excess moisture. In addition to lumber, you also need to have auxiliary means:
Description of some workflow options
Raw lumber always creates problems. The use of such wood leads to a low-quality end result. At home, freshly purchased boards can quickly turn black if stored improperly. It is necessary to ensure high-quality natural drying in the open air. When planning construction, it is necessary to take into account the time for the drying process of lumber.
When exposed to open air, the moisture content of wood reaches a certain value (air humidity). In the process, moisture evaporates from the wood, then the workpieces take it from the external environment (the dimensions of the material change slightly). There is a cyclic process of taking and releasing moisture from the surrounding air. The wood goes through several of these stages (shrinkage/swelling) and reaches the desired condition, but almost no change in size is observed. Naturally dried lumber is less susceptible to cracking and warping (the process occurs smoothly).
Drying in stacks
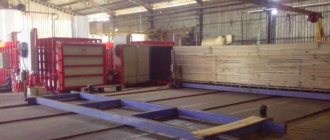
When choosing a method for drying boards, outdoor drying is considered the most effective option. It is suitable for large volumes of wood. It is important to choose the right place so that it is open and ventilated. The middle of the garden and the flat roof of an outbuilding are well suited for these purposes. The prepared area should be covered with pieces of roofing felt (a large overlap must be made to prevent moisture from being drawn out of the soil).
Before laying lumber, it is necessary to determine the prevailing wind direction in order to lay the boards crosswise. The stack should be made up to 1.2 m (optimally choose 0.8 meters) in width. Otherwise, the boards located inside will take longer to dry. The height of the stack can be made to any height (if it is convenient to lay it out).
It is important to maintain the distance to the bottom of the stack from the ground (optimally 0.5 m). The easiest way to lift the bottom lumber off the ground is to use a lumber. The beams from which the supports for the stack are made must have a length equal to the width of the stack.
Bottom gaskets (made of bars with a cross-section of 20-50mm) are laid on the finished supports (the distance between them is 1.5 m). The spacers are positioned perpendicular to the direction of the boards. Planed spacers within one layer of boards must have the same thickness. The ends of the boards absorb moisture from the air faster than the rest of the surface, so they should be treated with a lime solution (a creamy mixture containing wood glue). Can be coated with drying oil, oil or paint.
To prevent lumber from drifting, the finished stack must be loaded or pulled vertically. Spacers are placed on the top layer of lumber. The ends of the upper and lower gaskets are tightened with a rubber band (30-40mm wide). In this position, the boards dry out in a few weeks (the process naturally accelerates in the summer). This method is distinguished by preventing the occurrence of cracks in wood.
The finished stack should be reliably protected from precipitation (especially slanting rain). It is important to cover the lumber so that moisture continues to evaporate. Several fairly thick pads are placed on the top of the stack (full length). After this, the roofing iron is laid overlapping so as to build a canopy of 15-25 cm around the perimeter of the stack. The tin is pressed against a pair of bars, which are tied to the spacers for strength. A ventilated gap of 10 cm should form under the iron. Other roofing materials may be used. It is necessary to choose a hard coating that should not touch the boards being dried.
Construction of a canopy
The drying technology is the same as the previous method, but the canopy is built in advance and reliably protects the stack from precipitation and direct sunlight. You can build a simple structure from bars on which a roof made of any roofing material is built. A flat base is constructed under the canopy, on which the workpieces are laid. There should be a distance of 30 cm from the ground. Before arranging the base, the ground is covered with roofing felt to avoid the penetration of moisture from the soil.
Drying on the vine
To dry standing wood, it is necessary to remove a ring of bark that is fairly wide in height from the root. It is recommended to start work in the spring. During this period of time, the tree lends itself especially well to natural drying. After removing the bark, the flow of water through the trunk to the crown stops, and the tree gradually dries out. The foliage helps dry by drawing out moisture naturally. Then this tree can be felled and sawed into boards.
Other options
Natural types of wood drying also include the option when the tree is first felled, then cleared of bark (the crown remains), the foliage draws out moisture for about two weeks, the tree is dried in a fairly short period of time (while boards stacked in the open air dry in months ).
Concrete absorbs moisture well. There is a method of drying wood based on this. Lumber is laid in one layer on a clean concrete floor, which should be turned over regularly.
When you need to quickly dry small-sized wood, the workpiece is wrapped in 7-14 layers of paper. From above everything is covered with a layer of polyethylene, in which holes are made. The workpiece is placed next to the heat source. Drying occurs evenly by regularly turning the board over.
The paper absorbs all the moisture, so it needs to be changed regularly. If the thickness of the board is 3 cm, then drying will take 4 days. If at the end of this process the lumber becomes warped, then the resulting defect can be corrected by using a plane.
Small pieces of wood can be dried using steaming methods; two weeks after drying, such pieces can be processed.
Recommendations for drying wood
If lumber is dried naturally, the duration of this process should be taken into account. The tree must be protected not only from precipitation, but also from direct sunlight.
When wood is dried indoors, good ventilation (no drafts) must be ensured. Drying should not be done near powerful heating appliances. Avoid contact of boards with metal. This causes the wood to darken.
Source: brusder.ru
How to dry boards quickly but correctly at home
Regardless of the quality of wood processing, over time its surface may become rough, which will make the finishing process more difficult. The master faces quite a big problem when sanding such boards. And the varnish soon after application cracks and begins to crumble.
Wood roughness most often occurs due to improper drying. Such defects are a consequence of uneven drying of the layers. The fact is that the upper layers, when dry, become smaller in volume than the inner ones. And surface deformation occurs.
How can you dry wood?
When approaching the matter directly, the question immediately arises about how to remove moisture from wood. To prevent the boards from warping, it is important, first of all, to choose the right time of year. Autumn or winter is most suitable for this. It is at this time that the largest number of blanks falls. This is due to the small amount of moisture in the trees, and, therefore, the high quality of the prepared boards. Thanks to this, you won't have to do most of the work. Just dry the boards a little. But as? There are several easy-to-use options, the decision to use which will depend on the conditions under which the workpieces are produced.
Remember that home drying is different from industrial drying. Of course, self-dried boards will be inferior to the same ones, but processed by industrial equipment. However, do not be upset: with some effort, you can achieve excellent results.
- The first method of natural drying of wood is standing drying. If you decide to use this method, we recommend starting work in the spring and then continuing in the summer. It is at this time that the tree is most susceptible to natural drying. You need to remove a fairly wide ring of bark near the root. This will stop the flow of water to the crown. Gradually the tree will dry out. And the foliage will help him with this by drawing moisture from the trunk. After some time, you can fell this tree and saw it into boards.
- There is another option for naturally drying wood. In this case, you need to first fell it, then clear two-thirds of the bark, leaving branches and leaves. For two weeks, the foliage will pump out moisture, drying out the trunk. This is a fairly short period of time, considering that simply leaving the boards in the air would take months to dry.
- However, the most effective method at the moment is considered to be drying the boards in the open air. You need to place them under a canopy, protecting them from precipitation and direct sunlight and first installing a flat base made of logs, thick pipes or bars under the canopy. You lay the boards on a pre-prepared base. They should lie across the base bars. Pay attention to the distance from the ground to the bottom boards. It should be at least 30 cm. It is preferable to cover the ground with roofing felt, straw or hay before installing the base and laying the boards in order to protect the boards from the penetration of excess moisture from wet soil.
Try to lay out the foundation beams so that the bars or pipes are in the same plane. It's okay if it is not positioned strictly horizontally. It is much more important to maintain one plane. This is necessary to avoid deformation of the boards due to heavy load.
In this state, the boards dry for months. However, this process accelerates during the summer months.
Don't forget to trim the ends of the boards. This can be done with a lime solution of a creamy consistency with some addition of wood glue. Drying oil, oil or paint can also help you when processing the ends.
The sides of the stack must be covered to avoid moisture from slanting rain. It is also necessary to protect the boards from blowing. A covered stack can handle this easily. Use spacers between the boards, spaced 1 m apart.
This method is good because it prevents cracks from appearing in the wood.
- Did you know that concrete is excellent at drawing out moisture? Then you will not be surprised that the next method directly uses concrete for high-quality drying of wood. The boards are laid on a clean, dry cement floor and then turned over several times throughout the day. So, the boards will dry much faster. If you are a craftsman who knows the mechanical properties and structure of wood, then using an axe, chisels, saw and other tools you can direct the drying process at your discretion.
When drying boards at home, do not forget about the sufficient duration of this process. Do not forget to protect the boards from precipitation and direct sunlight. If you decide to dry wood indoors, ensure that it is regularly ventilated. But avoid drafts. After all, wood doesn’t like this. Then you will not be able to avoid cracks. It is also unacceptable to have any heating devices in the room. Being in close proximity to metal boards can cause them to darken.
You can safely dry small boards in your apartment. But not on the balcony or loggia! The ideal place for them is the mezzanine. They are stacked in stacks, arranged with slats and bars. Keep in mind that boards that have just been sawn darken upon contact and then begin to rot.
How microwave drying of wood works.
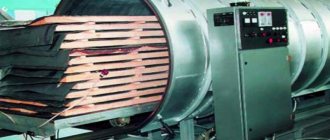
Microwave drying technology is simple. The basic principle of operation of microwave installations for drying lumber is to remove moisture from wood under the influence of an electromagnetic field created by ultrahigh frequencies. With the help of microwave waves, the moisture in the wood warms up and boils, the pressure that is created in the wood pushes the moisture out from where it evaporates under the action of fans.
The microwave installation consists of a large metal chamber, which is equipped with a generator that produces microwave waves, wave transmitters (waveguides), a radiating system, a powerful fan, an exhaust system, a power source, and humidity meters. The installation is controlled automatically from a control panel installed outside the chamber. Using this installation, microwave drying of wood occurs in industry. At home, an ordinary household microwave oven is used to dry wooden products and small wooden parts; it works on the same principle.
Advantages and disadvantages of microwave drying
Let’s first consider what advantages microwave drying of wood has:
- drying time. Large volumes of material can be dried very quickly using this method. This happens due to the fact that when using microwave drying, unlike other methods, there is no need to initially heat the material and the drying agent before proceeding directly to drying. Microwave drying begins immediately and does not require any additional preparation.
- copes well with drying large-sized lumber. Microwaves penetrate deep into the structure of the material and allow even very thick logs to be dried efficiently.
- After drying, we obtain high quality material. Microwave drying of wood allows you to dry the wood evenly both inside and outside. Due to the fact that water molecules in wood absorb microwave heating waves and, accordingly, drying proceeds evenly, the level of humidity is equalized. Wetter areas of wood absorb more microwaves, heat up more, and therefore dry out just as quickly as less humid areas. Since the material is steamed during drying, you will not encounter such a phenomenon as overdried wood. This allows you to avoid such defects as cracking, warping, discoloration of the material, etc.
- improvement of wood properties. Since wood is well steamed during microwave drying, it becomes more resistant to changes in humidity levels in the environment.
Disadvantages of microwave drying of wood.
- high cost of the process. Microwave drying of wood requires a lot of electricity to operate the installation, and the installation itself cannot be called cheap. Therefore, using this method is advisable and economically beneficial only for large enterprises that are engaged in the procurement of large volumes of large-sized lumber. For small forestry enterprises, this method will be extremely unprofitable.
- installation dimensions. The large size of the installation for microwave drying, the complexity of its design and the need to connect to a high-power electrical network do not make it possible to move it and use it in other places.
- need for control. Although the control of microwave drying is automated, this process cannot be left without human control, since overheating of the material can cause a fire in the chamber.
As for the use of microwave drying of wood at home, it also has a number of disadvantages:
- Microwave waves in a household microwave are much weaker than those used in industry, and accordingly, the drying time of products increases.
- small loading volume. Using a regular microwave you will not be able to dry large volumes of material; it is only suitable for small wooden parts. And if you consider that drying in a microwave will entail significant energy consumption, then sometimes it will be more advisable to use more economical options for drying wood.
We invite you to see more details about how microwave drying of wood takes place in the following video. Enjoy watching.
How can you dry boards quickly?
There are also times when you need to quickly dry the boards. Is there such a way? Yes, sure. Wrap the board in 5-15 layers of paper, one layer of cellophane and make holes in the latter.
After this, place the board on a warm radiator. A window sill is perfect for an apartment. Considering that the paper absorbs all the moisture, change it several times during the day. And turn the board over. With a thickness of 3 cm, 4 days will be enough for drying.
The main disadvantage of this method is that the board warps. But you can easily fix the situation with a plane.
What is the result of drying boards this way?
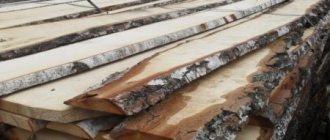
Perhaps someone has a question: why are there so many body movements? But for this reason: I then used these boards for various works for three years, and there were no “sabers” or “helicopters”, and the boards were (in color) like gold. (The blackness that can be seen in the photo is nonsense and does not affect anything.)
Important! Let me remind you of one more important thing: before using dried boards, be sure to remove all the wane! (Ideally, it is better to rip off the wane right away. Or at least in the same year.)
I do this with the same favorite knife:
- I use it to split bars, sharpen pencils, cut insulation, roofing felt. and even cakes