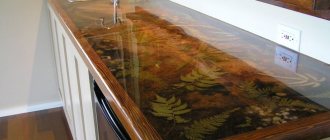
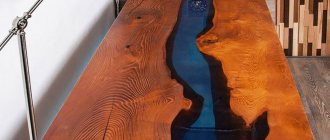
Examples of a river table made of slab wood with epoxy resin (photo)
- two sanded wooden boards with a live edge (unedged boards) of the same thickness
- Sander
- sandpaper grit P 50 – P 1200
- building level
- screwdriver with self-tapping screws
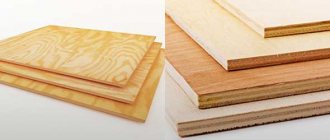
- plywood
- desktop, workbench
- plastic film
- clear epoxy resin and hardener
- dyes for epoxy resin
- plastic container for mixing resin
- wooden or plastic spatulas
- gas-burner
- silicone glue
- gloves
- respirator mask
- apron
Let's be honest about slabs
A slab is a wooden product that preserves its natural shape and natural geometry as much as possible. During its production there is minimal intervention in the processing of workpieces
.
Many people believe that a wooden slab and an ordinary, long-known unedged board are one and the same. The idea of using untreated boards to make products is clearly not new. Who and when first looked differently at second-rate material is unknown. However, longitudinal and transverse cuts of wood, that is, slabs, have become very popular today.
Table River
Source:
Tools used to make a Coffee Table in the style of Live Edge River: - screwdriver - circular saw - miter saw - grinder, you can use an orbital sander - wood router, diameter 22 mm. and 10 mm. – hand router – wood carving taps – lamellar router Materials used to make the Live Edge River Coffee Table: – epoxy resin – oil and wax – bolts for attaching the legs – slab of wood – felt pads for the bottom of the legs
2.
Features and production of slabs
Before you create slabs of wood with your own hands, it is worth learning about the specific characteristics of the material:
- thickness – from 50 to 150 mm;
- location in the tree structure – the lower part, the widest, strongest and most massive;
- integrity – only an array, any types of connection of elements are excluded;
- edges – untreated, with a natural bend;
- ramifications - the more, the better.
Slabs are often made by hand - using professional tools or the capabilities of commercial sawmills for cutting and leveling. But this is not always the best option. It is much more practical to purchase ready-made slabs and use them to create masterpieces of furniture and decorative art.
How to choose suitable table materials
Most often, people choose an epoxy resin with a general idea of the desired end result, however, some go step by step, interested in the resin substrate itself. In this case, the question often arises - what base material to choose for the countertop? I would like to get the most interesting, fresh, and most importantly, time-resistant table. First, let's consider the option of adding a layer of epoxy resin to a regular tabletop; most often for tables we choose wood, ceramics, plastic or stone.
We will place stone and ceramics in one group, the main problem of which is the need for very high-quality material, otherwise, if the density of such a heavy layer is uneven, cracks are possible in some places. Wood and plastic materials are relatively lightweight, and their resin layer will easily withstand. Plastic is practically not used in such work, because with it the same type and uninteresting works are obtained (but a creative approach to the matter can change everything).
Most often, hardwood is used - a relatively light and durable material with an unusual combination of patterns. Combinations of various materials are available, the preparation of separate compositions from organic materials (stones, leaves, flowers), but here you will have to make a lot of effort to prepare additional components and place them in the thickness of the resin, it is convenient to dry and varnish fragile materials, so it is convenient to work with them, not without harming words.
Transparent Epoxy Crystal Resin
How to dry slabs correctly
Before slabs can be used for a specific purpose, they must undergo multiple levels of processing. When a person decides to make them himself, he must be prepared for some difficulties. One of which can be drying. Otherwise, there is a risk of throwing away the entire batch of harvested material without turning it into furniture products. So how to dry slabs correctly?
If you cut down the wood and cut out the slabs yourself, drying can take place under natural conditions in the fresh air. However, it is important to plan for weather conditions to prevent rain from getting them wet. Therefore, it is better to prepare the material in the summer.
No less responsible is the storage method. The slabs must be placed in stacks so that air circulation is not obstructed and at least a small gap remains. It is not recommended to expose it to direct sunlight, as the material may warp significantly. There is also no need to cover the stoves in dark rooms: access to light and air should be constant. Buildings with high humidity and significant levels of dampness are excluded.
Ideas
The beauty of homemade epoxy furniture is the variety of options.
The tabletop can be square, rectangular, round, oval and even asymmetrical. An impromptu river does not have to be placed in the middle and continuously from edge to edge. It can take on a winding channel, be interrupted along its course, and be decorated with additional elements. Leaves, flowers, pebbles and other decorative elements can be placed in resin for decoration. It is quite difficult to choose a suitable option for your interior, the variety of river tables is so great. It is even more difficult to find a master who will carry out high-quality work at an adequate price and get the desired result. In most cases, it is enough to turn to professionals with your idea to make yourself a unique thing.
However, there are also people who want to try everything in practice. Some for the purpose of planned savings, others out of a great desire to do the thing themselves, with their own hands. It is important for them to decide on the algorithm of work and understand where to start.
DIY wooden slabs
Solid wood furniture is a very expensive pleasure, so the question of how to make a slab yourself is of interest to many who have access to dead wood. In our latitudes, oak, elm, larch, poplar, and less often birch, aspen, and even pine are most often used for these purposes.
To cut a massive trunk (1 m or more in diameter) into planks without using specialized equipment is an almost impossible task. This procedure is carried out directly in the forest on a prefabricated band sawmill using loading equipment.
It is more realistic to prepare a wooden slab with your own hands by choosing oversized logs for cutting. For these purposes, they usually use mini sawmills - devices based on a chainsaw for longitudinal dissection of logs.
River table - dimensions
Modern technologies have led to the fact that similar furniture began to be made for different rooms. Due to this, the products differ in shape and size. All parameters are selected depending on the area of the room in which the slab river table will be located. If you can be creative in the size of coffee tables, then dining and office tables should correspond to recognized dimensions. For work, the table has the following standard parameters: height – 76 cm, length – 110 cm, width – 68 cm.
For a person to sit normally while eating, he needs free space, so proper dining tables should have the following dimensions:
- for 4 people: 120x90 cm;
- for 6 people: 150x90 cm;
- for 8 people: 200x110 cm;
- for 10 people: 260x110 cm.
Cost of materials
The costs of materials for making a table from wooden saw cuts with your own hands have been compiled as follows.
- two saw cuts with a total area of 1.6 m2 = 1.6 x 6500 rubles. = 10400 rub.;
- steel corner 40 x 40 x 6000 mm – 2 pcs. = 12 m x 116 rubles = 1392 rubles;
- glass 400 x 10 x 2000 mm – 1 pc. = 1.6 m 2 x 1200 rub. = 1920 rub.;
- figured cutting of glass insert = 500 RUR;
- tint film for glass 500 x 3000 mm = 150 RUR;
- screws 40 mm – 20 pcs. = 10 rub.;
- metal paint – 1 aerosol can, 520 ml. = 200 rub;
- furniture varnish PF 170 – 1 can, 0.5 l. = 50 rub.;
- BF glue 2 – 1 tube = 66 RUR;
- emery grinding wheels – 4 pcs. in stock;
- metal cutting circle – 1 pc. in stock;
- electrodes for welding – 6 pcs. in stock.
Total costs were: 14,538 rubles.
Creating a Template for Glass
Source:
Next we need to create a template for the glass. We place the boards opposite each other (observing the size) and randomly draw a line of the river with a pencil along the wild edge (not trimmed). Take a piece of cardboard, place it on top and roughly cut it with a knife. We take the blank cardboard river to the glass workshop, where the master will cut the glass according to the template and polish all the edges.
6.
Working conditions
It is necessary to work with resin in a dry (very important!) and warm , well-ventilated room. High air humidity can have a critical effect on the surface of the finished product after hardening. It is highly recommended to use personal protective equipment when working with resin: respirator mask, gloves, safety glasses. We also recommend using work clothes - it is very easy to get dirty with resin, and it is almost impossible to wash it off the fabric.
We offer the following range of protective equipment:
Step-by-step instructions for pouring a river table with epoxy resin
- First of all, study the instructions for the materials you use. General recommendations may differ from those given by a specific manufacturer. Therefore, carefully study your materials, as the final result depends on this. Select compatible resin and hardener. It is convenient to buy them in a set. It is also important to choose dyes that are suitable specifically for epoxy. Make sure you work in a well-ventilated, heated, dust-free area.
- Make sure that the bark is completely removed from the edges of the slabs and that both parts are the same length and well sanded.
- Place plastic sheeting on your work surface and floor to protect against epoxy and dye stains.
- Using a building level, check that the surface is strictly horizontal. This is important because the resin can form a coating of uneven thickness.
- Place the slabs on a work surface, with the live edges facing each other to form a river bed.
- Along the perimeter of the slabs, assemble a mold for pouring from plywood. Secure the walls of the mold to the work surface with self-tapping screws, glue or double-sided tape. This shape will serve as a restriction for the epoxy resin to spread. Remove the slabs from the mold.
- Seal the joints of the mold with silicone adhesive or caulk, and then seal the inside of the mold with sealing tape.
- When mixing epoxy for the first time, do not mix the entire volume at once. Start with a small amount, enough to fill the mold in a 1mm thick layer.
- Place the slabs in the mold, press down with weights and clamps so that the boards do not float in the resin. Pour a layer of transparent epoxy approximately 1 mm thick into the river bed. This is the base layer and is needed to seal the bottom surface and reduce the formation of air bubbles during the main pour.
- Use a gas torch to remove bubbles. When heated, the bubbles rise to the surface and burst. Some bubbles take time to rise, so heating can be repeated after 10-15 minutes. Keep the flame 5-10 cm from the surface and move it quickly to prevent overheating. Otherwise, the epoxy may become cloudy, form bubbles, boil, and become unusable.
- Mix the resin to fill the first layer of the river. This layer should not be thicker than 20 mm, since in a large volume the resin quickly heats up and hardens sharply, which can lead to the formation of cracks.
- Add colorants to the epoxy. The dyes are highly concentrated, so add them carefully drop by drop, mix thoroughly, check the color and add more until you achieve the desired shade.
- Pour the first layer between the boards into the center of the river. Pour slowly to avoid the formation of air bubbles.
- Fill all cracks, crevices and knots with epoxy using a putty knife. The resin will be actively absorbed into the wood, so resin will have to be added to these places after a few hours.
- Allow the epoxy to dry until tacky for 7-12 hours before pouring the next coat. If the first layer has dried to a hard state, it must be sanded with P 220 grit sandpaper to create a roughness for better adhesion of the next layer.
- Mix another portion of epoxy resin with pigment, add a second layer up to 20 mm thick.
- Fill in as many layers as needed. Apply the last layer in excess, as some of the resin may be absorbed into the wood. Remember to remove air bubbles by heating.
- After you have poured the final coat, allow the epoxy to completely cure. Total cure time may vary between manufacturers, but is typically around 48 hours. However, be guided by the time specified in the instructions for your resin.
- Remove the tabletop from the mold, sand it step by step with grain from P 50 to P 240, remove resin stains and scratches. The epoxy surface can be sanded up to P 1200. When sanding, form chamfers around the perimeter of the tabletop.
- Thoroughly clean the surface from dirt and dust and apply a finishing coat: oil, wax or varnish.
- Your epoxy resin river table is ready! We hope you enjoyed the lesson. Leave your questions in the comments and check out our other epoxy resin tutorials.
Depending on the design and materials, the work process may vary. Therefore, we recommend that you familiarize yourself with video tutorials of various techniques in order to choose the most suitable one for your tasks and equipment.
Dissolving logs into slabs
It is quite possible to cut even the largest logs into thick boards without the use of industrial equipment. For these purposes, mobile sawmills are traditionally used - sawmill equipment based on a powerful chainsaw.
Naturally, such a manual sawmill will not provide the productivity of an industrial sawmill. But having this equipment at your disposal, you can prepare slabs exclusively on your own without involving third-party resources. Well, the main advantage is, of course, that with such equipment it becomes possible to work directly on site. Consequently, there is no need for complex loading and transportation of logs.
Another possible strategy in this matter is to contact a commercial sawmill, where for a certain amount they will cut the logs into slabs of the desired size.
Two methods of slab dissolution
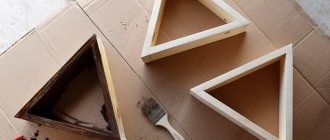
A classic slab is a solid cut with a thickness of at least 50 mm. When cutting a log into wooden slabs, the core is traditionally left thicker - 100-120 mm. This is due to the fact that due to high internal stresses, this part is most prone to warping and cracking. However, even an increase in thickness cannot guarantee the integrity of this workpiece during the drying process.
To get a wide blank from two small boards, you can simply glue the two halves together, having first sharpened the edges well. In this case, dissolution is carried out according to the scheme shown in the photo. Gluing such a shield, although it contradicts the philosophy of a real slab, is a convenient opportunity to get a wide wooden slab from small boards. And, more importantly, in this case you will effectively get rid of excess internal stress in the wood.
6
The pros and cons of epoxy resin tables
When looking closely at a particular building material, you always wonder how good it is, and whether its advantages really outweigh all the existing disadvantages. The positive qualities of epoxy resin are as follows:
- increased strength to mechanical damage and moisture resistance;
- long service life;
- ease of care;
- the ability to implement various design solutions;
- accessibility for independent work - only a little skill and knowledge of a certain technology is required;
- low cost - epoxy resin for pouring countertops is relatively inexpensive if we consider it on a par with concrete, solid wood or stone. And in terms of quality characteristics it is in no way inferior to them.
Epoxy resin is not an ideal material in every sense. Products made from it also have disadvantages:
- sensitivity to treatment with any abrasive compounds - unpleasant scratches remain;
- improperly prepared resin can subsequently compromise the quality of the final product;
- some types of epoxy resins are not resistant to ultraviolet radiation and begin to turn yellow over time;
- release of toxins. They begin to be released into the atmosphere only with prolonged contact with high temperatures, so there is no need to be afraid of placing a hot dish or a cup of coffee on an epoxy table. But soldering or burning on such countertops is highly not recommended.
Materials
Having prepared a list of necessary materials, I went to a construction supermarket and a lumber warehouse. The shopping list looks like this:
- two longitudinal cuts each measuring 40 x 4 x 200 cm. Total area 1.6 m2;
- steel corner 40 x 40 x 6000 mm – 2 pcs.;
- glass 40 x 1 x 200 cm – 1 pc.;
- tint film for glass 40 x 200 cm;
- screws 40 mm – 20 pcs.;
- metal paint – 1 can;
- furniture varnish PF 170 – 0.5 l;
- emery grinding wheels – 4 pcs.;
- BF 2 glue in a tube – 1 pc.;
- metal cutting circle – 1 pc.;
- electrodes for welding – 6 pcs.;
I placed all the tools and materials in the workshop. I have previously compiled instructions for assembling a table from sawn wood with my own hands.
Remove the bark and clean the outer edge
Source:
Remove any bark, use a chisel to shape the bottom edge and then sand with an orbital sander. With the glass installed, I could trim the excess from the ends of the slab so that the glass would be flush with the slab. I marked the line using a square and then cut to the line on the miter saw.
11.
Loading and transporting logs
For industrial procurement of slabs, large-capacity trucks and special loading equipment are used. But, if we are talking about single logs of relatively small size, then loading and transportation is quite possible without the involvement of serious special equipment, limiting ourselves to a reinforced trailer and a winch with a cable. One of the algorithms for such loading is shown in the photo.
Two reinforced ramps are attached to the side of the trailer. The distance between the slopes should be such that the log is as stable as possible and its weight is distributed evenly.
The essence of this method is to roll the log. To do this, one end of the cable is attached to the far side of the trailer, and the other is passed under the log and fed into a fixed winch.
Before loading, the log must be positioned strictly parallel to the trailer. Large wedge-shaped wooden supports are used for safety nets. They are also useful for additional fixation of logs during transportation.
To secure logs during transportation, in addition to wedges, tie-down straps with a ratcheting mechanism must be used.
5
Composite table - river made of epoxy resin and wood
Of course we will need boards. At the same time, boards are often “helicoptered” and this is not very good. If so, you will have to level it either manually with a plane or take it to a machine. As a result, the straightness of the boards in terms of thickness is important, since without this there is simply no way! But if they are not quite the correct shape in width or length, then this is quite acceptable.
So, when the boards are ready, we lay them on a flat base surface. We base them. At the same time, we seal the hole between them at the bottom with a flat board. To prevent the board from sticking, we use polyethylene. If you have a table with a twist, that is, with lighting, then we place the LED strip immediately in the cavity between the boards.
Now it is important to choose the desired color of epoxy. The epoxy resin itself is transparent.
Color can be dialed using a dialer. Such dyes are sold in the same place where you will buy the resin itself. It’s better to experiment with small volumes and then decide. The thing is that resin is expensive and it would be very disappointing to end up with the wrong color choice!
This is what the resin itself looks like without fillers and dyes.
Pour resin into all cavities and crevices. At the same time, we expel the bubbles using a needle or thin rod. Before pouring, it is better to warm up the resin; it will become more plastic.
When dried, the resin practically does not decrease in size, which is actually beneficial.
Pour the resin evenly and push out the bubbles.
Of course, it is possible and sometimes necessary to decorate the tabletop. You can use everything from pebbles to flies and dragonflies. You just need to know that it is very difficult to work with light and complex-shaped objects. Firstly, there will be a lot of bubbles around them. Secondly, they will not sink in the resin, but will float. They will have to be artificially submerged with something.
Well, in the end, we fill in the resin and all the composition we need and wait. Of course, before pouring, we prepare the resin solution as it should be, that is, we add not only the dye, but also the hardener.
After the resin has dried, coat the boards with varnish or the same resin using a brush. After drying, polish everything in place.
Another view.
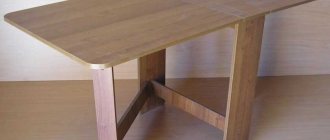
The legs for the tabletop are very simple; they are made from a square pipe. Then we simply clean it and paint it. Although you may have something more serious.
Final result…
And the lighting from the tabletop is pleasing to the eye. Very beautiful and original.
Now there is a version of a river table with glass.
Oil or varnish? Making slabs
Published by Sano October 29, 2018
3,702 views
In principle, the answer is obvious, everyone wants the tree to be alive both to the touch and to the sight. It’s like music connoisseurs, tube sound is better than any plastic rubbish from similar speakers and mp3-level formats.
But in contrast to the same music where tube quality is much more expensive than plastic, the situation with wood is different, here varnish is more expensive.
No, of course, good oil and good varnish are about the same in price, but they are very different in how they work.
Let's start with the fact that varnishing requires equipment of about the same level as for painting a car, if you think that you can throw snot on it from a can and that's it, then thinking like that is a big mistake.
Second, you need a prepared, clean room, ideally a painting booth.
Third, here, as everywhere else in a complex matter, your hands should not be out of your belt.
Fourth, as I said, the price per liter is comparable, but the consumption is different, much more varnish is required.
The fifth varnishing is a multi-stage complex and lengthy process, it includes careful preparation, application of several layers, necessary drying breaks, intermediate grinding, final grinding and finally polishing, and all this is not in one pass, but a gradual smooth reduction of the abrasive grain, from 400 up to 2000 and then polishing paste 3000 and 4000. So that in the mirror, as in the photo