Grinding technology
Working with wood to achieve the required roughness involves performing several main steps. They are as follows:
- Preparing the coating.
- Primary roughing.
- Fine grinding.
- Putty of the smallest elements.
- Final polishing and grinding with application of a finishing coating.
The final stage involves polishing. Through such actions, high surface quality can be achieved.
Coating preparation
The preparation stage involves primary surface treatment. Among the features of this process, we note the following points:
- It is recommended to work with P120 and P150 abrasives before polishing. The choice is made depending on how severe the defects are.
- The next stage is sanding with sandpaper P180 and P240. Due to this, the required roughness for coating the product with paint is achieved.
Primary preparation
At this stage, the main thing is to remove all defects that will not allow the paint coating to be evenly distributed over the surface. If the wood is properly prepared, it will look attractive after the finishing is applied.
Primary grinding
Primary removal of defects involves the use of sandpaper with a small grain size. This is due to the fact that fine sandpaper can wear out quickly.
Fine grinding
The degree of wood roughness can be reduced by using a fine abrasive. When carrying out such work, it is worth considering the following points:
- The skin will wear out quickly.
- It is necessary to ensure rapid movement of the abrasive.
After fine sanding, in most cases the wood is coated with varnish or paint. Further processing is carried out only when higher quality is required.
Filling gaps and small defects
The most problems arise with filling gaps and smaller defects. As a rule, such work is carried out manually. Let's call its features the following points:
- The skin with the finest grain is selected.
- Hard-to-reach places are treated by hand.
- During operation, dust generated should be removed periodically.
Wood putty
Such work is carried out extremely often in the case of making furniture and other utensils from wood.
Final sanding
This stage is often the final one. Among its features we note:
- All defects are removed.
- Consumables are carefully selected depending on the roughness that needs to be achieved.
- It is carried out using manual and automated equipment.
Final sanding allows you to obtain a very high-quality coating that can be covered with paint and varnish material.
Priming and finishing coat
The topcoat can be applied in various ways. Most often the process is carried out as follows:
- With a spray gun.
- With brushes.
- Soft material.
Priming wood
Priming is carried out to smooth out unevenness; the topcoat prolongs the life of the wood.
Should you grind it yourself or trust the experts?
Working independently usually takes a lot of time - especially if you lack experience and skills. There is always the possibility of making a mistake in technology, for example choosing the wrong type of abrasive.
When grinding, fine dust is generated, which can get into the eyes and respiratory system, so additional protective equipment must be purchased. You will also need special tools, but not everyone has them, and buying them for one-time use is impractical.
ProGermetik company provides grinding services. Our specialists know all the nuances of rough, fine and finishing sanding of wood, and use professional tools and sanding materials. The work is done quickly, efficiently and accurately. Order turnkey house sanding with or without subsequent painting.
What is polishing
As a result of polishing, the wooden surface retains its natural color and acquires a mirror shine. To polish, you need to apply a special compound called polish to the wood several times. Unlike alcohol-based varnish, the polish contains three times less resins, which makes it possible to obtain a thinner and more transparent decorative coating.
The technology for creating beautiful textures requires high-quality surface preparation, in particular grinding and removal of lint and dust particles. Then the wood is treated with a primer emulsion, polished, and polished as a final step.
What types of rocks can be polished?
It’s worth noting right away that not all breeds are suitable for polishing. For example, loose wood is difficult to polish.
It is more effective to polish dense rocks:
- Red tree;
- birch;
- boxwood;
- nut;
- pear;
- hornbeam;
- apple tree;
- maple.
Beech wood gets a beautiful texture Oak is characterized by its hardiness, so it is also difficult to polish. Pine is rarely polished due to the friability of the wood; it is mainly sanded and varnished.
Three, screwing, varnishing
Polishing different types of surfaces - untreated, painted or varnished - has its own nuances. You will definitely need special substances and devices to achieve good results. In general, the process involves applying several layers of varnish, followed by drying and sanding each but the last.
Sand each crevice
A job done brilliantly
Before polishing varnish on wood, you need to prepare polish, pumice, a swab/velor roller (ideally a spray gun), and denatured alcohol.
- Polish is thickly applied to a dry varnished surface with a swab and polished with pumice until shiny.
- After 3 days of drying, a second layer follows to level out roughness and is left to dry for 5 days.
- The third portion of polish is applied.
- Polishing with alcohol is carried out to a mirror shine.
The photo shows how to hold the tampon and what movements to apply the material with
Old beautiful furniture definitely needs, if not repair, then restoration of the varnish layer, which is wiped out and becomes covered with bald patches.
The restoration process includes the following surface treatment steps:
- Removing the old varnish layer using ammonia, denatured alcohol, turpentine or other solvent.
Note! Polishing varnish after painting involves the use of toxic substances - do not forget to protect yourself as much as possible. Do not neglect gowns, gloves, goggles and respirators or gauze dressings
Health comes first
- Processing with coarse and then fine-grained sandpaper.
- Rub in the filler (in a circular motion).
- Treat with stain several times, allowing each layer to dry completely.
- Direct polishing of varnish on wood - with wax, varnish (in several layers, each is dried, sanded; do not sand the last layer).
Technologies from time immemorial
I wonder how, in ancient times, woodcarvers, carpenters, and architects managed to preserve their products from moisture and drying out? The secrets of distant ancestors have survived to this day and naturally fit into modern production.
It has long been known how to polish wood with wax, which gave the product a soft, calm glow and was guaranteed to protect it from the vagaries of the weather.
The waxing procedure looks like this:
- The material is applied to the wood with a cloth or brush.
Liquid wax is easy to apply with a brush
- The wax dries out slightly.
- Rub it in until the grains disappear.
- Final polishing with a clean cloth until shiny.
There are no problems with wax - scoop it up and rub it in
The second way to polish wood without harm to health is to use natural drying oil, the main component of which is linseed oil. It is simply rubbed in until it stops being absorbed. It does not give shine, but protects the surface, making its color more saturated (see also the article “OSB on a wooden floor: preparation and installation of the coating”).
Why is grinding needed?
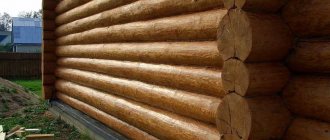
Any wooden floor is assembled from many elements. When laying new parquet blocks or large-format slats, it is very difficult to achieve a perfectly flat surface. The most common occurrence is changes, minor defects, scratches, and areas with sapwood.
Almost the same set of problems occurs with old flooring that has been in use for more than one year. Sanding a wooden floor is designed to eliminate all these shortcomings, the essence of which is polishing the wood and preparing its surface for varnish, oil, wax or any other decorative protective agent.
Thus, the goals of grinding are:
- Leveling the floor;
- Elimination of surface defects;
- Removing old paintwork and dirt.
Sanding a wooden floor correctly is not an easy task. A number of hand tools or electrical units are used for this. But the secret to good performance is to gradually reduce the grit size of the sanding attachment. That is, first of all, rough processing is carried out with sandpaper with a grain of 40-60 units, then fine - 100-120, 140-180 units. Following this simple rule will allow you to achieve excellent results even in difficult cases. For example, if the wooden flooring has multiple surface damage or differences between planks of more than 3 mm.
There is no need to sand the floor in the following cases:
- The width of the gaps between the planks or slats is more than 0.7 cm. These are very large gaps that are difficult to fill with putty or fill with sealant. As a rule, to eliminate such defects, it is recommended to reassemble the floor with simultaneous processing of each element, replace the damaged area, or seal the canvas with bars adjusted to the size of the gap. The work, of course, is expensive and labor-intensive, but without such preliminary preparation the floor cannot be sanded.
- The depth of abrasion in the most loaded areas (passage areas) is more than 4 mm. In this case, you will have to remove a solid layer from the rest of the floor. It is also necessary to take into account that the useful thickness of the wooden planks (depth from the surface to the ridge of the lock) is from 3 to 7 mm, so it is more advisable to replace the damaged area completely. The same applies to areas with deep scratches, cracks, dents, chips, grooves gnawed by woodworms and other defects.
- Swelling of parquet or plank floors due to contact with water, the appearance of moldy, rotten areas. The wood is loose, and it will not be possible to sand it in any case. Therefore, such a coating must first be replaced, at least locally.
Lesson 4. Tools for preliminary and intermediate grinding
Wood has many useful qualities and aesthetic properties and thanks to them it is the most popular material in the construction and decoration of houses.
When producing wooden finishing panels, it is not always possible to obtain a perfectly flat surface; there are practically unnoticeable (but clearly visible after painting) waves from the machine on the boards; in the case of a wooden floor, there are differences at the joints.
All these errors can be easily corrected by grinding; a medium abrasive will smooth them out, and a finer abrasive will completely remove them. And in this article we will analyze which tool is best to use to effectively solve various problems.
- Tools for pre-sanding wood
- Belt sanding machine (LSM)
- Straight grinding machine (DSM)
- Eccentric (orbital) sander (ESH)
- Angle grinder (angle grinder)
- Grinding and calibrating machine
- Abrasive stone
- Rules to follow
Tools for pre-sanding wood
Belt sanding machine (LSM)
With its help it is good to do rough grinding on molded products. By the way, the larger the lower part of the machine on which the belt runs, the smoother the grinding will be, and also pay attention to the speed; too low in inexpensive models will not allow you to achieve the standard.
» > Photo 1. Belt grinding machine (LSM)
Straight grinding machine (DSM)
Or vibration is an excellent option for fine processing. The reciprocating movements of the sole with the abrasive plate quickly remove the top layer of wood. For corners, you will need a variation of it - a delto-grinding tool with a sole in the form of an iron.
» > Photo 2. Straight grinder (DSG)
Eccentric (orbital) sander (ESH)
The option is even better than PShM. Thanks to the reciprocating movements and the displacement of the center of rotation, it allows processing at a very high level. Circles for it can be purchased from 80 to 320 units, i.e. This tool allows you to complete all the steps yourself.
» > Photo 3. Eccentric (orbital) sander
Angle grinder (angle grinder)
Using a grinder, you can remove a fairly large layer of wood or old paint (for example, during restoration). There are also a great variety of attachments for this type of tool (brush, disk, petal). This means that even the most inaccessible places can be sanded, for example, between two chamfers of imitation timber.
» > Photo 4. Angle grinder (angle grinder)
Grinding and calibrating machine
In production, it is used for preliminary grinding. The pressing iron allows you to remove a fixed layer of wood and open the pores. Not suitable for intermediate work.
» > Photo 5. Grinding and calibrating machine
Abrasive stone
Sandpaper of different grain sizes on the pads, metal wool - all this is indispensable for various chamfers, curves, hard-to-reach places and corners. And with the help of these simple things, you can easily perform intermediate sanding and shake off raised lint from the surface.
» > Photo 6. Abrasive stone for grinding
Applying polish
After the coating of a mixture of polish and pumice powder has hardened, it is treated with a roll of fine steel wire or lightly sanded with 220-grit sandpaper. Then the dust is removed.
The part is now ready for polishing. But first, you should lightly saturate the swab with solvent and thoroughly wipe the surface with it, making figure eights with your hand. The solvent slightly dilutes the previously applied layer of polish and pumice powder, which allows the next layer of polish to adhere better.
Then, making movements in the form of “eights”, the entire surface is covered with polish diluted with solvent in a ratio of 1:1. This layer should dry slightly, after which almost undiluted polish is applied to the surface with a swab, again making movements in the form of “eights”. To prevent the swab from sticking to the surface (this happens when the polish is used in pure or almost pure form), the surface is wiped with a special polishing oil. Take just a little bit of it - a few drops, but this is enough for the tampon to easily glide over the surface.
The first layer of polishing is left to dry for 24 hours, then the procedure is repeated.
Tampon elasticity
In between work processes, the tampon should be stored in a hermetically sealed container so that it remains elastic. If after some time you need a tampon again, then before using it, move the outer layer of fabric so that there is a clean section of this fabric on the lower, that is, working, side of the tampon. If, despite proper storage, the tampon becomes calloused, replace it with a new one with an outer layer of very thin fabric. Make sure that the fabric on the underside of the tampon is well stretched and free of wrinkles.
Beginners should not be confused by the fact that after applying polishing oil, “clouds” appear on areas of the surface that have just been coated with polish. This is a consequence of uneven evaporation of the solvent. However, the cloudy spots that appear soon disappear.
polish varnished wood
Only with skillful, careful polishing does the surface become smooth and mirror-shiny.
How to choose sandpaper for working with wood
When choosing a consumable, quite a few different points can be taken into account. Let's take an example:
- Grain size.
- Type of abrasive used.
- For what purposes is the consumable material intended?
As a rule, the marking indicates the abrasive grain size according to ISO. When selecting, special tables can be used. Wood is processed with fine-grained sandpaper for a small number of defects and before polishing. Dry or wet sanding
Dry grinding is most often carried out. This technology is easy to implement and consumables are cheap. There is also wet sanding, which involves the use of special paper.
Wet grinding and polishing involves supplying water to the processing area. Due to this, the wood softens. Today, such technology is used extremely rarely.
Application of polishing for finishing
Polishing is often done as a finishing touch. This technology is characterized by the following features:
- There is no need to apply a finishing material as polishing makes the product smooth.
- It is used when it is necessary to preserve the texture, since polishing does not deform the texture.
Polished wood
Today, polished products are found on sale extremely often. They look quite attractive and are comfortable to use.
Stages of work
The wood polishing process consists of several stages. In order for the surface to look perfect after polishing, it must first be sanded, then covered with a layer of primer and only then thoroughly polished.
This procedure does not cause any particular difficulties, but it takes a lot of time to give the tree a perfect look.
The surface must be free of chips, burrs, cracks and other defects. First, the wood is treated with sandpaper No. 46-60, then with abrasive material No. 80-100 and finally sanded with sandpaper No. 140-170.
After sanding, the wood becomes clean, smooth, without protruding fibers or lint.
Padding
At this stage, the prepared wood is primed using shellac polish and a linen swab. It is not recommended to use cotton or wool fabrics for these purposes; they leave behind small fibers and lint, which are clearly visible on the polished product.
To apply the primer, put a small amount of polish on a swab and begin rubbing in different directions. With this approach, small cracks and pores are most effectively filled, and impregnation occurs better.
Note! First, make a smear on a test surface. The polish should dry quickly and not form bubbles.
If there is a lot of it, then the excess is removed by wiping the test surface.
The primed product is left to dry for 2-3 days. After the varnish has dried well, it is necessary to sand the wood with a fine-grained abrasive material. The resulting dust is removed with a rag.
After priming, the so-called polishing is performed. A couple of drops of vegetable oil are applied to a tampon made of linen fabric (this facilitates easier sliding) and a little liquid shellac polish is poured. For work, you can further dilute the shellac-based composition (usually an 8% solution is used).
Place the tampon on the side and make smooth circular movements. Polishing is carried out in three passes, where each layer must dry, sand with fine-grained sandpaper and be cleaned of dust. A slight gloss can only be seen after applying the third layer of the product.
To polish the wood, that is, to obtain the perfect shine, you should treat the surface of the wood with a fine-grained abrasive material (sandpaper) soaked in vegetable oil when the third layer of polishing is completely dry. After this, drip a little vegetable oil and polish onto the tampon.
The strength characteristics of a polished coating can be improved by applying not one, but several layers. At the end of sanding, it is recommended to treat the product with a soft cloth soaked in a solution of polish and water. Excess oil can be removed by wiping the wood with ethyl alcohol. At the same time, the surface becomes smoother.
Considering that the quality of polishing is affected by compliance with all the subtleties of the process, you should not reduce the number of layers applied and the time for their drying. Otherwise, this will lead to a deterioration in the decorative qualities of the coating.
Polishing of varnished wood must be carried out in strict accordance with the technological process; only then can you obtain the most effective, fairly durable surface with a mirror shine. If you have no experience in this area, then it is recommended to first practice on small samples and then move on to more expensive products.
Chic, sparkle beauty
What can and should be polished, with what and in what way are exciting questions for those who want or are forced to take up this difficult but fascinating task. Polishing wooden products - brand new walls or a restored countertop - performs an aesthetic and protective function (see also the article “Underlay for a wooden floor: purpose, types and installation features”).
Pros and cons of varnish
Take a closer look, you are surrounded by many things made of wood, the treated surface of which shines or glows matte:
decorative crafts;
From knight to queen - everything is varnished
- decorative cutting boards, spoons;
- walls/floors;
- furniture;
- laminate (there are also such fans).
But polishing wooden products is not always appropriate and safe, this includes:
- spoons, if they are intended for food and not decoration;
- kitchen knives - a very smooth handle is more difficult to hold, and if dropped, the decorative layer will inevitably crack;
- gun stocks (for the same reason).
The stock is impregnated with linseed oil
Finishing agents
The choice of varnishes is huge and each of them has its own specifics:
- luxury furniture is coated with alcohol - their price is high, the most luxurious varnish is shellac;
- alkyd – wear-resistant, used to cover parquet;
- acrylic – fragile, requires re-application;
- polyurethane and alkyd with the addition of fungicides are good for outdoor use;
- water-soluble are remarkable for the absence of harmful fumes;
- solvent-based, resistant to detergents, but does not ozone the air;
- oil - cheap, “healthy”, but gives the surface a yellowish color;
- nitro varnishes dry the fastest - from 15 to 25 minutes, give a strong shine and are very durable.
A few words about wax
As already mentioned, the use of varnish or polish is not always advisable - for dishes and children's furniture it is better to use drying oil or wax paste. It’s great that it’s not difficult to prepare wax paste at home, and the main ingredient can be bought from “honey cakes” at the bazaar.
The wax paste can be made liquid or solid at will, depending on the amount of turpentine - solvent. In the classic version, the components are mixed in a 1:1 ratio. The wax is heated in a water bath, but a microwave is also suitable, then turpentine is poured into it with constant stirring until a homogeneous consistency.
Note! The procedure for preparing the material yourself at home will require increased safety measures. Ventilation and absence of sources of fire are mandatory - turpentine has a pungent odor and is highly flammable.
Wax and almond oil in a 1:1 ratio
If you choose any oil as a solvent, you will get an absolutely harmless substance, suitable for treating even children’s furniture. The proportions will be slightly different: wax and olive oil – 2x6/8; with jojoba oil – 1:3.
The manufacturing instructions will be slightly different:
- grate the wax;
- mix with oil;
- heat and stir.
Wood polishing wax is used to restore color on old items and enhance it on new ones, as well as to remove worn stains. If you add orange or jasmine essential oil at the mixing stage, a magical aroma will linger in the room for a long time.
Wood polishing compounds
The market offers a fairly extensive range of products designed for processing wooden products. You can purchase the composition ready-made at any specialized retail outlet; if desired, it can be made at home using varnish or wax.
To prepare a working mixture for polishing wood with your own hands, you will need crushed shellac resin in the amount of 60 g and 0.5 liters of alcohol. The components are mixed in a glass container, closed tightly with a lid, and stirred periodically so that the shellac is completely dissolved. After which the working fluid is filtered and poured into a clean container.
For finishing children's furniture and dishes, it is more advisable to use drying oil or wax paste . It is prepared from wax, turpentine (solvent) in a 1:1 ratio. First, the main component is heated in a container in a water bath, and then a solvent is added to it. To achieve a uniform consistency, the mixture must be stirred constantly. A felt swab is suitable for working with wax. This is a safe type of wood polish that does not emit harmful substances and is absolutely harmless.
If there is varnished wooden furniture in the house and it needs to be refreshed, then you can use wood polish in an aerosol or a liquid product. In this case, compositions with silicones give a good effect.
Note! Furniture wax for polishing is applied to wood without a varnish coating.
You can prepare a polish from olive oil (2 parts) and lemon juice (1 part or a little less). The products must be mixed and applied from a spray bottle to varnished furniture or by dipping a cloth into the polish.
A polish is also prepared from turpentine and beeswax , taking them in equal quantities, heating them in a water bath and mixing. The furniture is polished with even movements until it shines, paying attention to all the curves and nooks and crannies.
About grinding pads and making them yourself
The simplest tool can be called sanding pads. They can be used to work with a wide variety of workpieces. Among the features of common pads, the following points can be highlighted:
- Most versions consist of three main parts: the shoe and the locking mechanism and the handle. The body is used as a base; the fixing element does not allow the sandpaper to move during operation.
- Branded pads are made in a variety of shapes and types. In most cases, plastic is used in the manufacture of the case, which is characterized by low weight, but also low strength.
Homemade sanding block
If desired, you can make such a tool yourself. For this, an ordinary wooden block is used, to which the skin is attached using nails or screws. The handle can be attached to a block to simplify the grinding and polishing process.
When making a homemade structure, it is worth considering what size the workpiece will be processed. If the size is too large, the working area should be larger, but problems may arise with selecting the most suitable skin.
Belt type sander
As previously noted, a belt-type grinding machine is characterized by high productivity. In this case, wood sanding occurs at high speed, but the equipment used is expensive. Among the features of using a grinding machine, we note the following points:
- The impact on the surface being processed is a round sanding belt. In this case, the grain size can be very different.
- The design removes wood along the grain.
When using a draw frame, it should be taken into account that the design cannot handle corners, since the belt has low flexibility. The tool is often used for sanding floors, walls and furniture.
What is the best way to sand wood?
A wide variety of tools can be used to process wood. In many workshops and garages you can find almost everything you need to carry out such work. There are several tools that answer the question of how to sand wood:
- Drill.
- Bulgarian.
- Belt sander.
- Surface grinder.
Sanding wood with a grinder
The grinder has become quite widespread. It is a universal tool; grinding requires a special flap-type attachment. Other features of the process include the following:
- To make the nozzle you will need pieces of sandpaper. They must be secured to a rigid base.
- There are wheels on sale with different hardness levels, each suitable for a specific case. An example is the use of a No. 40 wheel to remove paintwork. To give smoothness, use a wheel with grain No. 120.
Grinding wheels
Another common question is how to sand wood when using a drill. Such a tool can be equipped with a special attachment, which has a pin for the cartridge in the central part. Among the features of using such a tool, we note the following points:
- All circles have a small diameter, the largest is 125 mm.
- Different grain sizes also allow for various types of work: from roughing to finishing.
There are several types of drill wheels. Most have a hard base, some have a rubber base. An adhesive substance, as well as various Velcro, can be used to adhere the sandpaper to the base. By increasing the flexibility of the disk, the processing quality can be improved.
You can also find a surface grinder on sale. This mechanism is characterized by the fact that the fixed sandpaper quickly performs a reciprocating movement. Many abrasive attachments are designed so that the sandpaper can be quickly replaced if necessary. Compared to a drill, the tool is characterized by high productivity, but it is difficult for them to process a large surface area.
Processing wood with a belt sander
The belt sander is characterized by the highest productivity. It can be used to process a wide variety of wood. The main disadvantage is the high cost, since professional equipment in this category costs 7,000 rubles or more. A special attachment can be used as a working belt, which can have a different grain size.
Types of grinding devices
The grinding attachment for a drill is made according to the same principle as replaceable blocks for polishing machines. The only difference is in the installation - the drill is connected to additional equipment using a pin for fastening, while specialized machines use a thread.
Their shapes and designs are varied and adapted for different types of work. Based on this feature, they can be classified into several groups.
Sanding wood with a drill attachment
Plate
A round nozzle with a flat base on which sandpaper is glued. The main difficulty in working with this tool is the need to hold the drill at a right angle to the surface, which is not always possible. Because of this, defects appear on the wood. To reduce the risk of damage to products, it is better to choose rubber attachments rather than plastic ones. Also, when purchasing, you need to make sure that there is a soft layer between the base and the sanding coating.
This attachment for sanding wood is used in the process of preliminary or finishing processing - it depends on its hardness and grain size. For ease of use, variations are available with the ability to adjust the angle of inclination.
Cup
This bowl-shaped variety helps remove old paint from the surface, sand the wood and bring out its texture. For each type of work you can find a special brush. When processing wood, metal ones release its fibers.
Therefore, after using it, you should sand the surface using a plate attachment, then you can apply a layer of paint or varnish. The natural wood grain will stand out on the product. The soft-filled cup attachment is convenient for cleaning and fine polishing.
Disk
Their device resembles a cup nozzle. But they have one feature - the bristles are directed from the center of the disk to its edges. Interaction with the surface occurs by the end method. They are also similar to the fan variety, when the blades are installed parallel to the base.
Their main purpose is to treat hard-to-reach places and remove old finishes. Using them requires some experience and dexterity, so it’s better to practice on an unnecessary product.
Drums
Such grinding attachments for drills are made in the form of cylinders, on the side surface of which sanding paper is glued. They are used for stripping wood, metal or glass. Most often they are used for sanding holes inside and for the end parts of the product.
Fan
They can also be called petal. This attachment is a grinding disk on which many blades are installed along the entire plane. They are petals of sandpaper; other abrasive material can also be used.
There is another variety, which is made in the shape of a cylinder, and the petals are fixed along the entire side surface of the drum. Such drill attachments are convenient for processing wooden parts of complex shapes.
Soft
They are used where gentle polishing is required. Such attachments are made of foam rubber, leather, felt or twisted rope. Suitable for processing varnished or painted products, as well as for removing dirt on surfaces that are sensitive to abrasion.
Face Grinding Wheel
This is a grinding stone made in the shape of a ball, cylinder or cone. There are variations made from soft material. It is most advisable to use it on small parts, in hard-to-reach places.
The abrasive attachment on the drill is used for metal and glass products. The principle of operation is like a file, only because of the speed, productivity increases.
Soft polishing discs are needed for finishing the product.
Primer
The sanded surface should be thoroughly cleaned of wood dust. It is better to do this with a stiff brush. This is the only way to remove dust from the pores of the wood. While the fabric removes only the surface layer of dust. And with dust remaining in the pores, perfect polishing will no longer be possible.
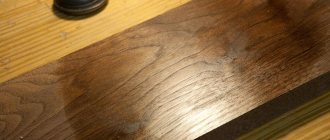
Wood not treated with stain sometimes looks pale. Perhaps there are scratches visible here and there. But after applying a layer of primer, the picture changes.
Solid base
The primer coating ensures uniform hygroscopicity of the wood, as it closes the pores at the very surface. At the same time, the tree begins to “play” slightly: its color becomes more intense, and it no longer seems pale. These color changes must be taken into account if you want to stain the wood first: the color that the wood acquires as a result of staining will become slightly darker after applying the primer.
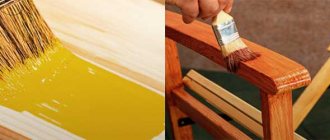
The primer is applied in an even layer in the direction of the wood grain. Please note that the coating dries quite quickly. Therefore, to ensure that the primer layer is not too thick, it must be applied as soon as possible, otherwise you will have to remove the excess by sanding, and this is not only an additional, but also a very labor-intensive operation, which can cause mechanical damage to the wood.
The primer (also called hard base) is applied in an even layer using a large brush, brushing it in the direction of the grain of the wood.