Pros of DIY
The advantages of making a dollhouse with your own hands from plywood include the following:
- A product made according to an individual drawing involves the use of its own dimensions, design and functionality. The main advantage of such a toy is its uniqueness and the ability to take into account the child’s wishes when arranging and decorating rooms, choosing layout and furniture, accessories and decor.
- The house can have the necessary and convenient size, which is selected taking into account the free space in the children's room and the wishes of the child. This can be a tabletop or floor-mounted design.
- You can involve the child in decorating and arranging the interior space even at the stage of drawing development - joint work brings the child together, allows him to reveal the creative potential of the child, teaches him to make independent decisions and bear responsibility for them.
- Working with plywood is a creative and fun process that the whole family can participate in.
If you make it yourself, you can give the house any appearance.
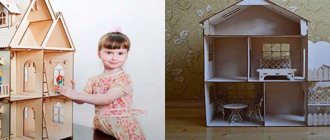
No. 2. Plywood house
A real mansion where all the dolls can live is a dream for many children, especially girls.
If you know how to craft and have a little free time, then you can build a realistic home for dolls from plywood, as the Joker from the site yaplakal.com did. The author did it in one week.
For work you will need the following materials:
- two 8 mm sheets of plywood;
- jigsaw;
- furniture nails;
- acrylic sealant;
- hot glue;
- pieces of linoleum and wallpaper;
- acrylic paint.
Instructions on how to make a dollhouse with your own hands from plywood:
1. A construction scheme is being developed. You can take a simplified plan of a real house as a basis. It is important to correctly calculate the proportions so as not to make a mistake in size.
2. Next, you need to make markings on the plywood and cut out the components using it.
3. The structure is assembled using small-diameter furniture nails. For reliability, you can coat the seams with acrylic sealant; this technique will add strength to the structure.
4. The size of the house turns out to be quite large. Dimensions: height - 1000 mm; width - 1100 mm; depth - 400 mm.
5. Next, the structure needs to be covered with suitable wallpaper. For exterior decoration, wallpaper that imitates brickwork is suitable. The outer top of the roof can be left unchanged.
6. The inside of the house is covered with the remains of paper wallpaper, and the ceiling is painted with acrylic paint to match.
7. Linoleum is glued to the floor with hot glue. If you don't have leftover linoleum, thick wallpaper or fabric suitable for the floor will do. You can also arrange carpets instead of carpet or linoleum.
8. Doll furniture can be purchased in special toy departments.
9. Home lighting using an LED lamp:
10. You can make rooms in the house according to your taste: for example, a bathroom, living room, kitchen, bedroom, etc. depending on the furniture purchased.
Barbie dolls and smaller doll models will fit perfectly into a house with such dimensions.
Advantages of plywood
Any materials can be used to make a dollhouse yourself, but plywood is used more often, as it has a number of advantages:
- A whole category of toys for children are made of wood, in particular plywood, due to its pleasant to the touch, warm surface.
- The light weight of the material allows you to create large structures that even a child can move from place to place.
- Plywood is a durable material, so structures made from it are reliable and durable.
- The material is affordable, which allows you to make a toy no worse than the one sold in the store, but for much less money.
- Working with plywood is easy, it is easy to process and does not require the use of special tools or professional skills.
- After assembly, the house can be painted or left as is, covered with transparent varnish - the surface of the plywood is smooth, with a pleasant natural pattern and shade.
Plywood has an attractive appearance and natural shade
Note! E0 grade plywood is an environmentally friendly and safe material. This type of material is used in the manufacture of goods for children.
Preparatory work
At the first stage, you will need to decide on the dimensions of the structure. To do this, you should take into account the size of the doll the child is playing with - the toy should fit freely at full height with a margin of a few centimeters to the ceiling. There should also be enough space for arranging toy furniture - a crib, a table with chairs, kitchen furniture.
Houses for Barbie
The number of floors in the house depends on the size of the toys and the height of the child. If the figures do not exceed 20 cm in height, then the house can have up to 3 floors. If the structure is assembled for a standard Barbie doll, then it will not be possible to make more than 2 floors - then it is better to arrange the rooms horizontally.
Floor-mounted 3-storey house for playing with small figures
Having decided on the concept, you can begin to develop the project in more detail by drawing a design drawing to scale on a piece of paper.
Project details
Drawing
The drawing of the details of the house must be done to scale - you can draw it on a sheet of paper or in a special computer program. This will allow you to reflect the dimensions of the product, the number and sizes of parts, and determine the methods and locations of fastenings. Also, at the stage of creating the project, you should decide on the internal layout, shape and design of the house. This stage of preparatory work should not be skipped, as it allows you to determine the required amount of material and the sequence of assembly of the product.
Basic elements of a dollhouse
Note! To make a house, you can use a standard drawing. It is worth remembering that when changing (increasing, decreasing) one size, a proportional change in the remaining sizes follows.
When developing a drawing yourself, you will need to consider the following:
- The shape of the rear wall is a rectangle or pentagon, which allows you to make a gable roof.
- To make the assembly process easier, the base is made slightly wider than the space inside.
- The ceilings of the upper floors should have smaller dimensions than those at the base.
- The main structural elements also include sidewalls, interior partitions and roof parts.
Sketch diagram of the house
Plywood dollhouse, photo
A plywood house is a real challenge. Plywood is more difficult to work with than cardboard. It is worth preparing for work in advance. What is important is the plan, the design of the house, drawn on a sheet with dimensions. Below are instructions on how to build a dollhouse out of plywood step by step.
Drafting
It is advisable to draw the project on a sheet of paper in a checkered pattern. The scale may look like this: 2 cells on a sheet = 10 centimeters. It's so easy to calculate the actual dimensions of the house. The house can be made small or a larger structure - with 2-3 floors.
- The small house in the diagram has dimensions: width - 60, height - 57 centimeters.
- The large house shown in the picture is 120 centimeters high and 80 centimeters wide. Depth – 22 centimeters.
Calculation of the amount of materials, necessary tools
Below is a calculation for the production of a large house.
Necessary materials:
- hardwood plywood 4 mm thick, dimensions 90/22 centimeters (side walls) - 2 pieces;
- plywood 4 mm, dimensions 80 × 22 centimeters (lower and upper parts of the structure) - 2 pieces;
- plywood 4 mm, dimensions 79.2 × 22 centimeters (floors) - 2 pieces;
- plywood 4 mm, dimensions 50 × 22 centimeters (roof) - 2 pieces;
- plywood 4 mm, dimensions 30 × 22 centimeters (internal walls) - 2 pieces;
- plywood 4 mm, dimensions 60 × 20 centimeters (facade wall with chimney);
- laminated fiberboard 3 mm 120 × 80 centimeters (back wall);
- acrylic paint for wood.
Tools and accessories:
- wood glue;
- hammer, nails;
- jigsaw;
- sponge roller;
- ruler;
- pencil.
Step-by-step instruction
- Painting plywood. Plywood elements need to be coated with acrylic paint. The finished product is much more difficult to paint. Hypoallergenic paints are now available that dry in 20-30 minutes. The paints are non-toxic, odorless, and can be used indoors.
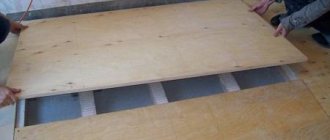
- Construction of a rectangular frame . When the paint is dry, you can begin building the rectangular cottage. You will need: 4 mm plywood, dimensions 90 × 22 cm (side walls) - 2 pieces; plywood 4 mm, dimensions 80 × 22 cm (lower and upper parts of the structure) - 2 pieces. You need to apply glue to the tangent edges of the individual plywood elements, aligning them with each other at right angles, and fasten the joint with small nails. 4mm plywood is very fragile, so precise nailing is important. Attention, the use of glue is necessary! Without its binding properties, the nails will fall out of the plywood, and the work will be done in vain.
- Construction of individual floors . The next step is to attach the shelves, which will serve as the floor for the individual floors. The shelves consist of 2 sheets of plywood measuring 79.2 x 22 cm each. In the project, each floor has a height of 30 cm. On a rectangular structure, measure 30 cm from the base, then another 60 centimeters from the base. Draw a horizontal line marking the place where the first shelf is attached, draw it with glue, and attach the shelf to the line. Do similar work 60 cm from the base. Then nail the 2 shelves to the side walls.
- Rear wall cutout. It's time to make the back wall from laminated fiberboard measuring 120 x 80 cm. On the long sides of the board, measure 30 cm from the top edge. Mark the center of the top edge - this is the future roof. Draw 2 lines from the top of the roof to the places marked at a height of 30 centimeters from above, you will get the outline of a triangle. Using a jigsaw, cut out the shape of a house along the drawn lines.
- Rear wall mounting. We cover the edges of the fiberboard with glue, attach it to the house, and secure it with nails.
- Roof. For the roof we used 2 pieces of plywood 50 × 22 centimeters each. Coat the triangular edges of the fiberboard and one shorter edge of the plywood with glue. Glue the roof to the edge of the house by joining both sheets of plywood at right angles. Strengthen the structure with nails.
- Chimney. From plywood measuring 60 × 20 cm, we cut out the shape of a chimney with a fragment of the facade. Don't forget to cut out the bathroom door. The first element needs to be glued, then nailed to the edge of the top shelf and roof.
- Dividing walls. The last stage of construction is the insertion of dividing partitions to form separate rooms. Use 2 plywood 30 × 22 centimeters. You need to place the plywood in the space of your choice between the floors. You can move them freely, changing the size and location of the rooms.
Below are several unique hand-made plywood dollhouses.
Tools and material
Making a plywood house is carried out in several stages. Particular attention should be paid to acquiring the necessary tools and materials.
List of materials and tools:
- Plywood sheets, the number of which is calculated in accordance with the drawing, taking into account the size and number of parts. The resulting value is rounded up. On average, it takes 3 sheets of plywood to make a dollhouse.
- The roof of the house is made of plywood, corrugated or regular cardboard.
- To ensure strong fixation of plywood parts, use quick-drying wood glue.
- For temporary and additional fixation of parts, you can use mounting tape.
- Sandpaper is used to sand parts. Particular attention should be paid to the ends of the elements.
- The parts are cut using an electric jigsaw.
- The parts are fixed when assembling the house using self-tapping screws.
- At the stage of preparing the material for cutting, you will need a ruler, tape measure, and pencil.
Required Tools
After assembling the house, it needs to be decorated. To do this, use scraps and other remnants of finishing materials: wallpaper, film, colored paper, pieces of linoleum, fabric, felt, laminate. Window openings are filled with transparent plastic or plexiglass.
Master class No. 1. Cardboard box house
A house that can accommodate the entire doll family can be made from a cardboard box, as suggested by the author of Goobla from the website yaplakal.com.
Any large box of household appliances will do: an old TV, a vacuum cleaner or a microwave oven. The larger the box, the larger the design will be, so it is recommended to choose the largest one possible.
Materials you will need for work:
- large cardboard box;
- glue;
- stationery knife;
- wallpaper trimmings;
- colored and white paper;
- matchboxes;
- Styrofoam;
- scraps of fabric;
- foil.
Next you need to follow the instructions:
1. The empty box must be placed on its side with the empty side facing you. One of the side walls will become the ceiling, the bottom will become the floor, and the bottom of the box will become the back wall of the home. There will not be one wall, as it will be inconvenient to play.
2. Next, you need to cut out windows in the walls using a utility knife. First you need to outline the drawings for the windows in pencil. To ensure they are the same size and at the same level, use a ruler. Cut out an arbitrary number of windows, depending on your ideas about the design of future rooms.
3. The windows must be covered with white paper to create the impression of window sills and window openings. You can “glaze” the windows with thick polyethylene from document files.
4. Windows need to be decorated both outside and inside. You can use white paper.
5. To make two rooms below, you need to make a partition from a piece of cardboard. You can glue it using thick paper, which will replace the construction corners in a paper house. You can also decorate the ceiling on the second floor. To do this, use the remains of real wallpaper.
6. Then you need to attach the base of the second floor. In order for it to hold well, you need to use the same principle of corners. The walls in the house are covered with ordinary wallpaper.
7. The floor on the second floor can also be pasted over so that it looks organic and holds up well. You also need to put a wall on the second floor that will separate the two rooms.
8. The outside of the structure can be covered with paper to make the house look beautiful. Use wallpaper that imitates natural exterior finishes.
9. If there is no such wallpaper, then you can cut out “bricks” from colored paper. By gluing the blocks onto a white background, you will get a brick wall of the house.
10. Don’t forget to paper all the external walls so that they look harmonious.
11. After the “finishing” work has come to an end, you need to leave the structure for a while to dry the glue. This will take a couple of hours or less.
12. When the glue has dried, you can continue working.
13. The house must have a roof. We make it from cardboard. To ensure that it sticks well to the base, you need to bend the ends.
14. The roof also needs to be covered on all sides so that it matches the house. You can make an attic in the attic: cut a window, glue balcony railings and add other elements as desired.
15. Furniture is also made from cardboard, matchboxes and scrap materials. You can cover the set with colored paper. I'm going to mold food out of plasticine.
16. Use polystyrene foam for the bathroom; it makes good plumbing fixtures.
17. Foil is suitable for mirrors in the bedroom and bathroom, and a piece of suitable fabric for carpet.
18. The chest of drawers, bed and table are made from matchboxes, the sofa is made from polystyrene foam.
19. The house with a balcony and attic is ready! It's time to populate the characters.
Filling the house
- Scraps of tulle make excellent curtains that can be mounted on rigid wire curtain rods.
- A round or square piece of fur fabric or any other dense fabric with patterns or plain color looks great as a carpet.
- Sofa and sleeping pillows can be stuffed with padding polyester or cotton wool.
- The child can draw pictures for decoration independently. Then carefully cut them out and glue them onto thick cardboard that will imitate a frame. The width and length of the cardboard should be larger than the drawing.
- You can fill upholstered furniture yourself with padding polyester or cotton wool; the frame will have to be made of plywood.
All kinds of materials are suitable as the basis for doll furniture - from paper to plywood scraps. The most realistic looking options are those made from plywood.
Topic: how to make your own toy storage box
Step-by-step instructions for making and assembling a plywood house
The sequence of making a dollhouse from plywood is as follows.
Table 1. Making a dollhouse
| Illustration | Description |
Step 1 | In accordance with the drawing, the dimensions of the parts to be cut are applied to the surface of the plywood. |
Step 2 | Fragments of large size and simple shape are cut out on a machine. |
Step 3 | In accordance with the drawing, the required number of floors is cut out. |
Step 4 | To cut out smaller parts, use a jigsaw |
Step 5 | The junction of two roof elements (slopes) on one side is taped with tape. |
Step 6 | The parts are turned over and the ends are coated with glue at the points of contact. The parts are pressed and installed in the required position. |
Step 7 | Glue the pediment. |
Step 8 | A jigsaw is used to make window and door openings. |
Step 9 | To insert a jigsaw file and start cutting out the window opening, first drill a small hole. |
Step 10 | You will have to drill a hole on all sides of the window opening. |
Step 11 | The inside of window and door openings is sanded using sandpaper. |
Step 12 | For large parts, use a grinding machine. |
Step 13 | Holes for self-tapping screws are drilled using a countersink drill so that the screw head is subsequently recessed into the solid part. |
| Step 14 | The parts are painted in the selected colors. |
| Step 15 | The house is assembled using ordinary self-tapping screws, the heads of which are subsequently painted to match the color of the part. |
Note! The method of fastening plywood parts depends on its thickness and the size of the elements. When the material is thin and the house itself is not large, the elements can be fixed using wood glue or using special grooves.
Assembling a small house
Video - How to make a plywood dollhouse
DIY dollhouse
All materials from which you can build a home for a doll have their positive and negative sides. What the house will be made of, everyone decides based on their needs and possibilities: open or closed, one or two floors, what furniture is needed.
Each option can be discussed in more detail.
From plywood
Making a house for a doll out of plywood requires certain skills, so a mother alone cannot cope with the job. First you need to prepare:
- plywood sheet;
- hammer, jigsaw;
- sandpaper, cloves;
- PVA glue;
- primer for wooden surfaces, paint;
- special adhesive tape;
- scissors, ruler and simple pencil.
Step-by-step construction:
- According to the drawing, measurements are taken on plywood and the resulting templates are cut out. Immediately cut out window openings and doors. The shape of the windows may be different. Sandpaper must be passed over the entire surface of the plywood to remove any protruding parts. In this case, the girl will play without fear of driving a thorn into her hand.
- According to the plan, the parts are connected to each other with glue or nails. They apply a primer and paint the house.
- Then they move on to creating the interior. The walls are painted or covered with wallpaper. You can put carpet on the floor. If you need a staircase, you can create it from wooden rulers.
Furniture can be bought or made from cardboard and other available materials.
From felt
The house, if it is voluminous, should not lose shape. And since the material is soft, the walls of the building must be made multi-layered. All cladding is made of felt: decorations on windows and doors.
The inside of the home is reinforced with thin foam rubber, covered with polyethylene, so that moisture does not leak out. It is better to make the floor out of cardboard to make the structure stronger. Any interior decoration can be done.
From a cardboard box
The easiest and fastest option is a dollhouse made of cardboard boxes. Their number depends on the number of rooms in the future home. You will also need glue, a knife, a ruler, cardboard and finishing elements. How to do:
- cut off the lids of the boxes, then glue them together two at a time and wrap them on the sides with adhesive tape;
- the roof can be cut out of cardboard or the corner of a box;
- windows are cut out on the side of each floor;
- The inside of the walls is covered with colored paper or remnants of wallpaper.
Window sills and baseboards are optionally made from scrap materials. Curtains can be made from scraps of fabric.
From paper
A nice house can be made from plain paper. For this you need to prepare:
- yellow, orange and red paper;
- pencil with ruler;
- scissors, glue and black felt-tip pen.
Further work goes according to plan:
- the base of the house is made of red colored paper, A4 is cut in half;
- then the workpiece is also folded in half lengthwise;
- a bend is made at an angle at the edge on the left, and also on the right;
- the protruding part at the bottom is cut off;
- the corner of the triangle formed at the top is bent down (part of the roof);
- on the sides the corners are also bent towards each other;
- the workpiece has received all the necessary bends;
- The template is cut along the upper fold line;
- excess squares on the sides are cut off;
- the upper part of the corners is folded towards the middle and secured with adhesive tape;
- a door is cut on one part;
- windows made of yellow paper are glued on the back side of the workpiece;
- use a felt-tip pen to draw frames and outline the outlines of openings;
- then glue the two pieces together;
- the roof is made of orange paper 5x10 cm;
- cut out a rectangle and bend it in half.
All that remains is to glue the resulting roof onto the house. Everything is very simple and fast, but such housing is not durable.
From laminate
When building a house for their child, parents strive to ensure that it is harmless and durable. If you choose laminate, you can make housing for all the dolls. It will be strong and original.
It is necessary to prepare patterns in advance; the laminate should be 7 mm thick. Then trace the templates and cut them out. For fastening, small grooves are made on the parts, which are coated with glue and nailed down with nails to be sure.
When the house is assembled according to the diagram, the interior is decorated with self-adhesive paper.
From plasterboard
It’s easier to choose material for a dollhouse when mom and dad are doing renovations. There remains a certain amount of building materials that are suitable for craftsmanship.
If there is any drywall left, it will turn into a whole apartment in miniature. Just to start, you should make a diagram of the future structure.
Cut it carefully so as not to crumble, and fasten it with corners. Then all the walls are puttyed and painted. You can use wallpaper instead of paint. The layout is done like in a real house.
From foam plastic
The material can always be found in the house, for example, there are boxes of household appliances. But foam plastic is fragile, so you need to work with it carefully. First you need to prepare the necessary elements:
- large sheets of foam;
- sushi sticks, toothpicks;
- glue;
- wooden rulers;
- corrugated cardboard;
- remnants of wallpaper and baseboards.
Then they begin to create the structure step by step:
- Constructing a diagram, cutting foam plastic according to layouts. To prevent the material from crumbling, it must be cut with a hot knife. Doors and windows are cut out.
- Divide the toothpicks in half, use these parts to fasten the foam, and first coat the joints with glue.
- The floor and ceiling are made stronger by gluing bamboo sticks as cross beams.
- They make a staircase from rulers, a railing from toothpicks, and then build it into the house.
- The roof is made of corrugated cardboard.
- The outside of the resulting housing is painted with acrylic paint using a dish sponge.
- If a balcony is provided, it is made in the same way as a staircase.
- The inside of the room is covered with wallpaper, and baseboards are glued on top.
- You can make curtains and rugs.
From shelves and cabinets
It is not necessary to construct a house; it can be made from an old cabinet or bedside table that is lying in the attic or collecting dust in the basement. Such designs are suitable for large dolls.
If there are a lot of shelves, you can remove them or, conversely, add a partition. Everyone does the finishing and arrangement of furniture at their own discretion.
Features of product decoration
Paint the dollhouse with environmentally friendly paint, such as acrylic. You can get a bright, rich or soft, pastel shade by adding tinting paste to the base composition.
Material for painting plywood
After the house is assembled, you can begin to decorate the interior walls, floors, and arrange plywood doll furniture.
Internal filling of the dollhouse
To make the structure more realistic, it is electrified using autonomous lamps powered by batteries, which are secured with double-sided tape.
Autonomous lamps
Plywood growth house
This design can be used both outdoors and in the apartment. The house is easy to assemble, literally within 5 minutes it can also be easily disassembled into convenient fragments that can be stored in the pantry.
On a hot day, such a house on the site will provide comfortable conditions for playing outdoors.
Play structure for home
In essence, it is an enlarged copy of a dollhouse. Therefore, its production takes place using the same technology.
Table 2. Step-by-step instructions
| Illustration | Description |
Step 1 | First, a drawing is made with details: determining the dimensions, shapes, number of parts, fixation points. |
| Step 2 | Patterns of individual fragments are made on a scale of 1:1 and transferred to sheets of plywood. After this the material is cut out. |
| Step 3 | The parts are polished. |
Step 4 | If necessary, parts are painted. |
Step 5 | The house is being assembled. |
Particular attention should be paid to the interior decoration of the house. The design may provide for a bench and a folding table, or a shelf on the wall. Furniture can also be portable plastic or wooden.
When operating the house outdoors, it is necessary that the base be dry, so the structure is placed on a podium or dry grass
Plywood is often used in the furniture industry and for the manufacture of a large number of boxes of various sizes and other very beautiful and functional crafts. What plywood products can you make with your own hands? Read in the special article.
Inside the house, you can lay a soft mat or mattress on the floor, on which the child will feel comfortable.
DIY cardboard floor house
Before you start work, choose the appropriate house plans, you should figure out what material is best to use, how you need to cut holes, glue rooms together so that the structure is strong and stable.
How to choose cardboard, boxes?
An important material is boxes, or rather the cardboard from which the boxes are made. The difference between different types of cardboard is shown in the photo below:
The cardboard structures shown in the left photo are strong, stable, and do not deform under the weight of subsequent floors. The cardboard floor shown in the right photo may sag under the weight of the next floor, and the work will have to start again.
How to cut out rooms correctly?
Cutting out rooms is not easy. After looking at many photos of houses, you can see that some of the openings have a frame. This is the most convenient hole option. Removing the entire side is a mistake! Such a room will tremble, fall apart, and look unsightly. The frame (albeit without the bottom part) needs to be cut out and in cardboard boxes, which need to be combined, increasing the interior of the rooms. To understand what we are talking about, it is worth looking at the visual aids in the form of pictures below.
Here's how to create a room from one box: you need to mark the future access hole, leave 5 centimeters for the frame, and cut the hole.
Step-by-step drawings of a house consisting of two boxes
- In the first box with the "access hole" cut out, mark the hole connecting the rooms. You need to leave 3 centimeters of the frame without the bottom part, cut along the marked lines.
- In the second box you need to cut access holes on the opposite side, with a frame without a bottom threshold.
- After combining both cardboard boxes, the building structure of 2 rooms is ready.
- Cutting out windows and doors connecting rooms. We cut out the windows in the same way as the access holes, only much smaller. The door connecting the room is cut in the same way as the connecting holes (without a threshold), only smaller in size.
Connecting rooms - stitching walls
To prevent the dollhouse from falling apart, you need to ensure a strong connection between the rooms. A reliable way to connect rooms from cardboard boxes is stitching.
Required:
- gypsy needle,
- thick thread,
- pliers.
The cardboard is sewn together using simple large stitches.
Regardless of whether boxes are combined with an open connector or with a door opening, we always follow the rule: sew along the edge!
It is necessary to “immobilize” the boxes in work areas, where they can move or move apart under the influence of the applied glue, which will make it difficult to work and easily spoil the final result. Below are 3 examples of stitching rooms.
| In the drawing, 2 boxes without holes are connected. You need to “grab” the middle in several places so that the cardboard does not move after gluing. |
| The second drawing shows an example of stitching boxes with a hole. Note. In this and the following drawings, for better visibility of the seams, some of the walls of the rooms are “hidden”. |
| The third drawing shows an example of stitching boxes with a hole for a door. |
Connecting ceilings to floors
- The ceiling and floor need to be sewn close to the edge - this is the same rule for walls and ceilings.
- There is a second rule: you need to immobilize the “dangling” elements - the parts indicated in the figure below:
Now let's start sewing. The outer edges are sewn first, then the inner ones.
At the end, we fasten the dangling elements and sew along the line of their contact.
Attention. Dangling elements located on the floor of the upper floor and on the ceiling of the lower floor, if they do not overlap, we hem each one. The diagrams below represent this situation:
What to do if the dangling elements do not touch each other, and you get a hole?
- If the situation occurs on the ceiling, it’s okay.
- If there is a hole in the floor, it needs to be closed.
There are 3 ways to close the hole.
- The first is to choose a different box.
- The second is to rotate the cardboard box 180 degrees vertically (the hole will move to the ceiling).
- The third is to fill the hole, you need to insert a piece of cardboard of the appropriate size (the same thickness as the whole cardboard), then sew it on as shown in the diagram below.
Shapes and sizes
Above is the basic knowledge about sewing a dollhouse from cardboard boxes. Which option to choose depends on the builder. By choosing boxes, you can manipulate the size, distribution of rooms, create a tiny one-story house or a huge multi-level villa. Below are several diagrams depicting adding further floors to the dollhouse. Boxes can have different heights, widths, depths, giving the house a special shape.