A box is a very useful item in everyday life. Buying a designer box is an expensive pleasure. If you want to become the owner of an exclusive item or give a loved one a handmade box, bringing your idea to life is quite simple. How? Make a box yourself. If you have never worked with wood before, choose plywood as your material. Even a novice craftsman can make something out of plywood with his own hands when he adheres to simple and understandable rules.
A handmade box is a very expensive pleasure, but if you want, you can make it yourself if you have the necessary materials, tools and drawings.
Peculiarities
This is how plywood is characterized by those who like to independently make the little things necessary for a comfortable life. It won’t take much time to master the skills of working with plywood. Having made a box from plywood, you can easily make shelves, frames and other objects from this material that will become an exclusive decoration of the house and the pride of its owners.
The choice of material affects the quality of the product, so it is better to choose grades 1 and 2 of plywood.
The correct choice of material for such a necessary thing is the main issue that must be resolved before starting work. Veneer comes in 4 grades. Only grades 1 and 2 of plywood are suitable for the box. When purchasing material, you must pay attention to how well its sheets are glued.
Plywood must be dried before work. If you bypass this rule, you can break the instrument when making the box. Is veneer color important? It all depends on how the finished product appears. If the plywood box is not subsequently varnished or painted, attention should be paid to the color of the veneer. If you are going to cover something with paint or varnish, then the color of the base material does not matter.
The thickness of plywood is an important issue, which usually confuses beginners. The thickness of the plywood and the dimensions of the box are closely interrelated. The larger the item, the wider the plywood is needed. Such products are usually made of plywood, whose thickness is from 4 to 6 mm. Why is thinner plywood not recommended? Because the ends of the box will be more difficult to process. Thin plywood can delaminate when subjected to mechanical stress.
What will you need for work?
Selecting materials
Naturally, to make a box with our own hands, we first of all need plywood:
- The quality of veneer should be maximum (first or second grade). Blisters, knots, resin streaks, etc. are not allowed on the surface of the sheet.
The higher the grade, the better the result!
- It is very important that the veneer sheets are glued over the entire area of the workpiece, especially if the walls of our box are carved.
- Before work, plywood should be dried, since raw material often leads to tool breakage.
- The color of the veneer will only play a role if we leave all surfaces without painting or varnishing. If any processing will be used, then it is better to focus on selecting plywood according to quality, and achieve the required color through the use of pigments.
- The thickness depends on the dimensions of the product. As a rule, plywood with a thickness of 4-6 mm is used for decorative desktop drawers.
Advice! Plywood thinner than 4 mm should not be used: this will cause difficulties in processing the ends, since thin sheets of veneer delaminate when cut.
To connect individual parts together, small nails with hidden heads, self-tapping screws, or furniture glue can be used. Also, for the final processing of the plywood box, we will need paint or varnish.
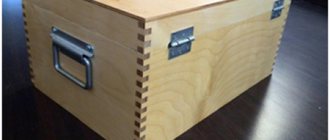
Photo of an easy-to-make model without varnishing
Tools
Working with plywood does not require powerful and bulky tools. Here, rather, devices for “fine” work would be appropriate:
- Jigsaw (manual or electric, but always intended for figured carving).
- A supply of jigsaw files.
- Wood saw for rough processing of workpieces and cutting plywood sheets.
- Screwdriver (if self-tapping screws will be used).
- Hammer.
- Set of wood files (round, flat and triangular).
- Sandpaper for sanding.
- Paints, rollers and tampons for finishing the product.
When all materials and tools have been purchased and prepared for work, you can begin making our plywood box.
Tools and drawings
To make the box you will need the following tools and materials:
Drawing of a box with dimensions.
- plywood;
- jigsaw with a supply of files;
- screwdriver;
- hammer;
- set of files;
- sandpaper;
- varnish;
- rollers;
- pom-poms;
- tassels.
To make such an exclusive product, you will need a jigsaw and a supply of files for it. A wood saw is used to cut plywood and roughly process blanks for the future item. If the box is made using self-tapping screws, you need a screwdriver. A set of files for woodworking, a hammer, and sandpaper will also be needed. If the finished product is to be painted or varnished, you must initially take care of the availability of varnish, dyes, rollers, tassels, pompoms and other devices with whose help the operations are carried out. To make a product look aesthetically pleasing, you need a drawing and a drawing.
The first step is to draw a sketch of the item, where the estimated dimensions of the plywood box are indicated. If you are making a box for the first time, there is a high probability that somewhere in the calculations there will be an inaccuracy. To avoid wasting time, it is best to first make the box (its layout) out of paper. If you like the paper box and its dimensions are considered suitable, the drawing of the item is transferred to graph paper.
Diagram of parts of a multifaceted box.
Plywood is cut based on this drawing. The parts that will make up the box are placed closer to each other. This will make cutting much easier. Plywood can also be cut using paper templates. To speed up and simplify the production of the box, it is better to draw the templates using a computer and print the drawings on a printer. As soon as the wall, bottom, and lid of the future item are cut out, they begin to assemble it.
DIY plywood box: instructions and video
A do-it-yourself plywood box is made quite quickly and without much expense. For those who are passionate about crafts, instructions on how to choose the right material, what tools you will need, and in general, how to make a plywood box with your own hands.
Instructions for choosing material
Instructions for choosing plywood
:
- When choosing a material, you need to pay attention to its quality. To make the box, only first-grade/second-grade plywood is used. Other varieties are not suitable. All layers of the sheet must be well glued.
- To avoid breaking the saw blades when cutting the material, you need to dry the plywood.
- Next you need to decide on the color. If you are going to varnish or paint the box, then the color of the plywood can be any color.
- In order to avoid difficulties with processing the edges, you should choose plywood with a thickness of at least 4-6 mm.
What you need for work
To make a box with your own hands you will need:
- plywood sheet (base material);
- jigsaw and files;
- screwdriver;
- files, sandpaper and hammer;
- roller, brush and cloth;
- PVA glue.
Instructions for making a box
Making a box from plywood with your own hands, master class for beginning craftsmen:
- Four parts measuring 100x80 mm are cut out of plywood.
Cut out parts
- The cut rectangles (sidewalls) are installed at an angle of 45 degrees. This is necessary in order to make the future box more attractive. To do this, you need to make a trim mark inside the part.
- Using a knife, make a cut at an angle of 45 degrees. The edges are treated with sandpaper.
Treat with sandpaper
Important!
When connecting the sidewalls, the angle between them should be 90 degrees. Otherwise, the craft will turn out oblique.
- The walls are connected using glue. The result is a frame.
- The bottom is glued to the resulting quadrangle. Then attach the top, similar to the bottom.
Glue the parts
- Then you should wait 24 hours. This is necessary to ensure that all parts are securely glued to each other. The next day, if there is glue left somewhere, it is removed and the corners are rounded.
- A straight line must be drawn on the front side of the sidewall. In this case, you should retreat two centimeters from the edges. On each side, along the drawn line, cuts are made using a jigsaw/circular saw (a regular saw will do). The result is a base and a lid.
- All parts are sanded. Then chamfer the hinges. You can either purchase ready-made hinges or make them yourself , for example, from a tin can:
- four small rectangles are cut out of the can with metal scissors;
- wire is used to make an axle;
- the axis is placed in the center of the rectangle;
- Use pliers to clamp the workpiece.
Attach loops
- Small holes are made in the middle of the front wall and the lid (also in the middle). This is necessary so that the lid does not move in the future. Then a dowel is inserted into the hole made (into the walls) and the lid is attached using self-tapping screws.
Decor
There are several ways to design a product. For example, you can design it using decoupage technology, or you can make carvings. The finishing depends on the style the master wants to see it in.
The simplest way to decorate a box is artificial aging. A product designed using this technology looks very interesting and elegant.
Coloring
In order to finish a box using this technology, you will need a stain.
Process:
- The box is covered with a layer of stain.
- Then the product is sanded with sandpaper.
- Next, you need to repeat the first and second points three more times.
- Paint the box in the chosen color. The paint must be applied in several layers, and each layer must be allowed to dry.
- All edges are treated with a coarse sanding sponge. The result of the work should be a product that looks like it has been used for more than twenty years.
- The cover can be decorated. For example, you can apply a carving or it can be finished using decoupage technology.
It is also possible to design “gilded plates” using modern technology.
Process:
- The sign is made from a small piece of wood, the thickness of which is about three millimeters. The size of the block should be approximately 10x40 millimeters.
- A layer of bronze paint is applied to a piece of wood.
- Then a layer of gold paint is applied.
- Externally, the sign should look like it is made of a piece of metal. The inscription is scratched with an awl. The result will be a craft that can be given as a gift. On a sign, for example, you can scratch the name of the birthday person with an awl.
- A sign with the inscription is glued to the lid or side.
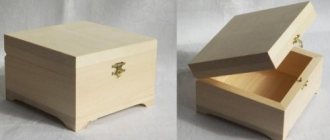
Ready
If the box does not have hinges, the lid can be equipped with a handle for easy opening. Most often, a handle is attached if the product is large in size. For such boxes, both a regular plastic handle and a wooden handle are suitable. It all depends on the design of the product itself.
If you use a plastic handle, then it is pre-painted with model paint. The result is an elegant, eye-catching handle that will serve as a decorative element.
As for the interior decoration of the box, it can be trimmed with velvet, suede or some other pleasant material.
If the box is intended for a teenage girl, then the product can be decorated with beads/beads. In addition, you can attach a small lock. The box can also be decorated with acrylic paints.
Interior models are most often painted to match the color of the furniture/walls. If you are going to store medicines in such a craft, then you can depict a doctor, a syringe or a red cross on the lid.
If you are going to use the box for sewing accessories, then in this case it is better to divide the inside into several sections. You can use old postcards or photographs as partitions.
If the box will be used for cosmetics, then it would be important to place a small mirror on its lid. You can also use a jigsaw to write poems, quotes, or any other meaningful inscriptions.
If you like visual aids more, you can watch how to make a plywood box with your own hands in the video below
https://youtu.be/GCKsbjuL9-w
To make the inside of the box smell nice, drop a couple of drops of essential oil inside.
Side assembly
First of all, the plywood fragments must be sanded and their edges cleaned. Patterns for cutting are transferred from the templates to the material. Starting holes are drilled with a drill, and patterns are cut out with a jigsaw.
If the box is decorated with openwork components, they must be further processed, removed from splinters, and chamfered.
Before starting assembly, you need to cut out all the parts.
The box is assembled from the sides. You can limit yourself to adhesive connection of elements, but it is better to increase its reliability using nails or staples. The bottom is attached to the frame, the metal hinges are fixed with self-tapping screws. Once the lid is on, the finishing stage of the box begins.
Its surface is again treated with sandpaper, the joints are sanded. This operation is also performed with dried putty. Then the outside of the box is treated with a primer, on top of which paint or wood varnish is applied. If you need to make a box in a vintage style, giving it an artificially aged effect, craquelure is added to the paint.
Plywood selection
For work you will need several pieces of plywood in A4 format. The thickness of the plywood provided for in the drawing should be from 2.5 to 3 mm. Depending on the plywood thickness you choose, cut along the inner contour of the drawing at a thickness of 2.5 mm. With a thickness of 3 mm, cut along the outer contour. This is true for grooves into which craft elements are inserted.
Before transferring the drawing to plywood, sand the workpiece with coarse sandpaper and then fine sandpaper. To do this, wrap a block of wood in sandpaper and then start sanding. Sand the prepared plywood along the layers, not across. A well-polished surface should be flat, completely smooth, glossy-matte in the light and silky to the touch.
Pay attention to grain placement, knots, dents and other imperfections. Quality and color
If the plywood is not of very high quality and delaminates when sawing, read the recommendations for improving the properties of the plywood.
Decoration of the box
The technology for decoupaging the finished item is quite simple. The box is covered with decorative napkins, and varnish is applied to its surface. At the last stage of work, various fittings are secured. The inside of the item is sanded, varnished or finished with satin or velvet fabric. Rhinestones and beads are popular today as elements of the external decor of things. A plywood box trimmed with satin ribbons is considered to be no less a stylish decorative element, as is one decorated with shells and sea stones. If you need a trendy box in a retro style, black and white copies of old photographs are glued to its outer sides.