drawings, jigsaw, how to make, carved, for beginners, how to decorate, photo
A box is a very useful item in everyday life. Buying a designer box is an expensive pleasure. If you want to become the owner of an exclusive item or give a loved one a handmade box, bringing your idea to life is quite simple. How? Make a box yourself. If you have never worked with wood before, choose plywood as your material. Even a novice craftsman can make something out of plywood with his own hands when he adheres to simple and understandable rules.
A handmade box is a very expensive pleasure, but if you want, you can make it yourself if you have the necessary materials, tools and drawings.
Peculiarities
This is how plywood is characterized by those who like to independently make the little things necessary for a comfortable life. It won’t take much time to master the skills of working with plywood. Having made a box from plywood, you can easily make shelves, frames and other objects from this material that will become an exclusive decoration of the house and the pride of its owners.
The choice of material affects the quality of the product, so it is better to choose grades 1 and 2 of plywood.
The correct choice of material for such a necessary thing is the main issue that must be resolved before starting work. Veneer comes in 4 grades. Only grades 1 and 2 of plywood are suitable for the box. When purchasing material, you must pay attention to how well its sheets are glued.
Plywood must be dried before work. If you bypass this rule, you can break the instrument when making the box. Is veneer color important? It all depends on how the finished product appears. If the plywood box is not subsequently varnished or painted, attention should be paid to the color of the veneer. If you are going to cover something with paint or varnish, then the color of the base material does not matter.
The thickness of plywood is an important issue, which usually confuses beginners. The thickness of the plywood and the dimensions of the box are closely interrelated. The larger the item, the wider the plywood is needed. Such products are usually made of plywood, whose thickness is from 4 to 6 mm. Why is thinner plywood not recommended? Because the ends of the box will be more difficult to process. Thin plywood can delaminate when subjected to mechanical stress.
Return to contents
Tools and drawings
To make the box you will need the following tools and materials:
Drawing of a box with dimensions.
- plywood;
- jigsaw with a supply of files;
- screwdriver;
- hammer;
- set of files;
- sandpaper;
- varnish;
- rollers;
- pom-poms;
- tassels.
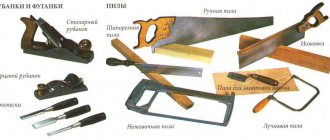
To make such an exclusive product, you will need a jigsaw and a supply of files for it. A wood saw is used to cut plywood and roughly process blanks for the future item. If the box is made using self-tapping screws, you need a screwdriver. A set of files for woodworking, a hammer, and sandpaper will also be needed. If the finished product is to be painted or varnished, you must initially take care of the availability of varnish, dyes, rollers, tassels, pompoms and other devices with whose help the operations are carried out. To make a product look aesthetically pleasing, you need a drawing and a drawing.
The first step is to draw a sketch of the item, where the estimated dimensions of the plywood box are indicated. If you are making a box for the first time, there is a high probability that somewhere in the calculations there will be an inaccuracy. To avoid wasting time, it is best to first make the box (its layout) out of paper. If you like the paper box and its dimensions are considered suitable, the drawing of the item is transferred to graph paper.
Diagram of parts of a multifaceted box.
Plywood is cut based on this drawing. The parts that will make up the box are placed closer to each other. This will make cutting much easier. Plywood can also be cut using paper templates. To speed up and simplify the production of the box, it is better to draw the templates using a computer and print the drawings on a printer. As soon as the wall, bottom, and lid of the future item are cut out, they begin to assemble it.
Return to contents
Side assembly
First of all, the plywood fragments must be sanded and their edges cleaned. Patterns for cutting are transferred from the templates to the material. Starting holes are drilled with a drill, and patterns are cut out with a jigsaw.
If the box is decorated with openwork components, they must be further processed, removed from splinters, and chamfered.
Before starting assembly, you need to cut out all the parts.
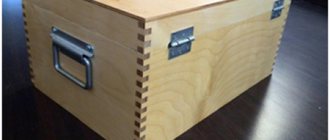
The box is assembled from the sides. You can limit yourself to adhesive connection of elements, but it is better to increase its reliability using nails or staples. The bottom is attached to the frame, the metal hinges are fixed with self-tapping screws. Once the lid is on, the finishing stage of the box begins.
Its surface is again treated with sandpaper, the joints are sanded. This operation is also performed with dried putty. Then the outside of the box is treated with a primer, on top of which paint or wood varnish is applied. If you need to make a box in a vintage style, giving it an artificially aged effect, craquelure is added to the paint.
Return to contents
Decoration of the box
The technology for decoupaging the finished item is quite simple. The box is covered with decorative napkins, and varnish is applied to its surface. At the last stage of work, various fittings are secured. The inside of the item is sanded, varnished or finished with satin or velvet fabric. Rhinestones and beads are popular today as elements of the external decor of things. A plywood box trimmed with satin ribbons is considered to be no less a stylish decorative element, as is one decorated with shells and sea stones. If you need a trendy box in a retro style, black and white copies of old photographs are glued to its outer sides.
Preparation of the workplace
First, you need to arrange your workplace - the table where you will work. Rules to follow:
- there should be no unnecessary things on the table
- All tools should be in place and within reach.
Not everyone has their own desktop, and you’ve probably already thought about creating one. Making a table is not difficult, but finding a place for it in the house is more difficult. One of the options is an insulated balcony, where you can start working on your product at any time. If you have a specially equipped room with a workbench, then you are lucky. In one of the articles you can read about preparing a workplace where I describe the entire process of creating it. After the workspace is ready, you can proceed directly to your future craft.
Where to begin
Making any craft begins with a project, a diagram.
The master imagines exactly what his masterpiece will be like, and, starting from the drawings, stocks up with the necessary materials and tools. For many ordinary people, a wooden box appears as a rectangular box with a closing lid. This is true, but not entirely. A box is a real work of art, and even a handicraft made from scrap materials can look like an expensive antique.
Any box has its purpose in the house. Based on this message, the master thinks over the shape of the product. The following options are possible here:
- for jewelry. Such wooden models have a traditionally rectangular shape, but the internal surfaces are lined with velvet, and the lid is complemented by a mirror. As a result, jewelry is not scratched and is convenient to try on;
- for jewelry, trinkets. A characteristic feature of this product are drawers that move freely inside the case. The number of retractable elements is unlimited, and a tight fit does not require special guides;
- A small box for treasured and memorable items. Made in the shape of a heart and great for storing letters, cards, photographs and other things;
- Puzzle. A rather complex product that simultaneously serves as a decorative decoration and a children's toy. A system of wooden gears, reminiscent of a clock mechanism, is installed here, and the lid opens after rotating the handle or one of the wheels;
- to hide a small amount of money. It is made in the form of a rectangle, but the external decoration is made to resemble a book;
- for needles, threads. Such wooden boxes usually have several compartments where you can store sewing supplies. The case is often complemented by a carrying handle.
In addition, there are boxes with watches, locks and secrets, original boxes and drawers for storing cigars, and products that make melodious sounds when the lid is opened. The shape is not limited to rectangular. In fact, with modern tools for woodworking, it can be anything, including round.
It is noteworthy that all of the above options can be done independently at home. But it’s still better to start learning how to make wooden boxes with your own hands with simple designs, complicating the task as skills develop.
Plywood selection
For work you will need several pieces of plywood in A4 format. The thickness of the plywood provided for in the drawing should be from 2.5 to 3 mm. Depending on the plywood thickness you choose, cut along the inner contour of the drawing at a thickness of 2.5 mm. With a thickness of 3 mm, cut along the outer contour. This is true for grooves into which craft elements are inserted.
Before transferring the drawing to plywood, sand the workpiece with coarse sandpaper and then fine sandpaper. To do this, wrap a block of wood in sandpaper and then start sanding. Sand the prepared plywood along the layers, not across. A well-polished surface should be flat, completely smooth, glossy-matte in the light and silky to the touch. Pay attention to grain placement, knots, dents and other imperfections. Quality and color. If the plywood is not of very high quality and delaminates when sawing, read the recommendations for improving the properties of the plywood.
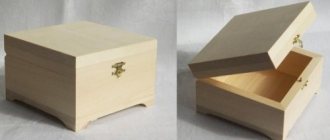
Making a decorative box
To make a plywood box with your own hands, take the usual available tools (a jigsaw, PVA glue, sandpaper, etc.), which can be found in almost every home. You don’t need any specific skills in working with different materials, you just need to have the necessary patience.
First of all, determine what height and thickness the walls of your product should be. The type of plywood and its technological features will depend on this. Please note that the quality of the material affects the durability of the final product. Below is a creative project using plywood box technology with dimensions of 10x10x8 centimeters.
Instructions
All the stages are shown in sufficient detail in the video, but below we will describe some of the main points of how to make a plywood box:
- First of all, using a jigsaw or hacksaw, we cut out 4 side walls measuring 10x8 centimeters;
- We create the lid and bottom of our product with equal sides of 10 cm;
- The side walls must be connected to each other at an angle of 45 degrees. In this way, you can achieve a more neat and attractive appearance of the product. To do this, first make markings for cutting (drawings of a plywood box are shown below). It is very convenient to make such a cut using a jigsaw;
- Then attach the fitted edges to each other using PVA (pay attention to the instructions in the photo below);
- The plywood walls are placed in such a way that a frame is formed;
- Attach the pre-cut bottom and lid to the finished base. You should end up with a parallelepiped;
- It is best to leave this structure for about a day to completely bond the walls together. If necessary, after this you can remove excess glue and slightly round the edges;
- Using a ready-made template, draw a line on the front wall so that it is two centimeters away from the edge. To make a beautiful plywood box, use a jigsaw, a circular saw or a hacksaw to make neat cuts on all sides of the base. Pay special attention to this stage, as the final result depends on it;
- After this, from the back of the plywood base, you should remove the chamfer for the hinges. This procedure is necessary so that they sit more neatly and do not stick out too much. All professional woodworkers do similar actions, and if you decide to construct a plywood box yourself, then you cannot do without it. Thanks to this simple procedure, the final appearance of the product looks much more attractive. Cutting a chamfer from plywood can be done using a jigsaw or other available tool.
Currently reading: Wood jigsaw: types. Selection of files and operating rules
Now you should pay attention to the loops. If you decide to construct a plywood box yourself, you can use store-bought fittings or make it yourself. The last option is cheaper. There is no big difference between these loops. If you wish, you can create them from an ordinary tin can.
To do this you will need special metal scissors. We cut out blanks from the form as shown in the photo below. As an axis, you can use ordinary dense wire or an unnecessary piece of wire. After this, we place it in the center of the tin hinge blank and use pliers to clamp it along the edges.
The cover is attached to the base using regular short-length self-tapping screws. We screw them through the hinges to the walls. After this, you can further decorate the product.
If you want to surprise your friends and family with an original gift, you can create a homemade plywood box. If you strictly follow the recommendations in this article, it will take you a minimum of time and effort.
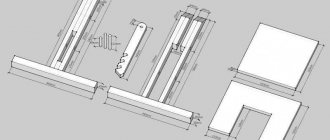
Do-it-yourself wooden box, drawings of parts, assembly units, detailed description of the product, which can be made from solid or laminated wood; you can also use moisture-resistant plywood.
Horizontal position – the first working compartment is closed and the second one is open
At an angle of 135° from the horizontal position - the second is closed and the first working compartment is open with a mirror panorama on the inside of the lid
1. Side wall.2. Rotary cover.3. Front wall.4. Bottom with figured legs.5. Intermediate dividing wall.6. Back wall.
Overall dimensions of the product.
SIDE WALL
Serves as a support for two working positions of the rotary cover. The side surface can be decorated with different selections and decorative inserts, the texture of which will be combined with the texture of the main material for production, while do not forget that there will be two side walls - one is a mirror image of the second.
LID
1. Middle panel of the cover.2. Pin 3 x 20 (mm).3. Upper decorative insert.4. Bottom decorative insert.
A mirror is built into the lower decorative strip. The middle panel of the cover rotates about the central axis of a corrosion-resistant metal pin. One end of the pin is inserted into the lid, with minimal play, the other is inserted into the hole in the side wall of the wooden box, with a slight interference fit.
The central panel is connected to the upper and lower decorative inserts using glue.
FRONT WALL
A board measuring 10 x 70 x 200 (mm), in which tenons measuring 10 x 10 (mm) are cut along the edges. The distance between the spikes is 10 (mm).
It is a board milled around the perimeter, to which four legs are glued.
INTERMEDIATE WALL
A board measuring 10 x 66.5 x 186 (mm), which is inserted into the grooves of the side walls.
BACK WALL
Do-it-yourself wooden box according to the drawings - made. This constructive solution to the location of the lid will give the product its originality and uniqueness. You can experiment with the geometry of the product and various decorative inserts.
Plywood sheets of various thicknesses are an almost ideal material for the manufacture of a wide variety of decorative elements. Having mastered the skills of working with this material, you will be able to make different shelves, frames, boxes for storing small items, etc. with your own hands. At the same time, each product can be given a unique appearance, since plywood is processed simply and without the use of complex tools.
In this article we will tell you how to make a small plywood box, but the techniques used for this can also be applied to other home decor items.
Drawing and cutting
To make a beautiful box, first of all, we will need fairly detailed drawings: we will describe how to make a box from plywood below, but you will have to decide on its appearance and dimensions yourself:
- First, we select a design, which we then transfer to a sheet of paper in the form of a sketch.
- We indicate the estimated dimensions on the sketch. To avoid unpleasant surprises, experts recommend folding a simple paper layout. This way you will know for sure that the product will “fit” into its intended place, and will not be too big or too small.
- If the dimensions satisfy us, we draw a drawing of a plywood box on graph paper.
- Based on the drawing, we form a cutting sheet, arranging the details of our future box on the workpiece as compactly as possible. This can be done using paper templates, but it will be easier to use a special computer program.
- Using the cutting sheet, we cut out the walls, bottom and lid of the box from the blank. This can be done either independently or in a company that specializes in cutting fiberboard, chipboard and similar materials. True, not all companies will undertake such minor work, and the price of the product in this case will increase.
Currently reading: Miracle jigsaw for artistic cutting
Once we have the required number of blanks cut to size, we can begin creating the box itself:
- We process the cut plywood strips with sandpaper. We pay special attention to cleaning the edges.
- We apply the printed templates to the blanks and transfer the drawings to the plywood base for cutting.
- For through cuts, we drill starting holes with a drill, and then cut out the pattern using a jigsaw.
- We additionally process the openwork parts with files and sandpaper, removing splinters and chamfering.
When the preparatory work is completed, we begin to assemble the box:
- First, we fasten the side walls together. The most reliable will be an adhesive connection, reinforced with furniture nails or staplers.
- Then we attach the bottom to the frame.
- We fix the metal hinges in the upper part using self-tapping screws. We hang a lid on them (flat or assembled in the form of a box).
Finishing
Before us is an almost finished box, which, however, needs to be slightly modified. Here the instructions largely depend on what we want to get in the end:
- We re-process all surfaces and corners with sandpaper, removing all burrs formed during the installation process.
- We putty the joints of the plywood sheets and the fastening points, hiding all the irregularities. We grind the dried putty, achieving a perfectly smooth surface.
- We apply a layer of primer to all external surfaces, which will ensure reliable adhesion of the wood to the varnish coating.
- We carry out varnishing by applying varnish in several layers. If a varnish mixture with pigments is used, then we place a darker varnish on the base layers, and cover the surface with an almost transparent one.
- An alternative to varnishing can be painting the box with special paints for wood.
- Another way to traditionally decorate plywood boxes is decoupage. This technology consists of covering the workpiece with decorative napkins and then varnishing it.
- To complete all the work, we attach fittings to the surfaces: handles, latches, etc.
Transferring the design to plywood
The next step is to translate the drawing, do it accurately and carefully: place a carbon copy under the drawing and secure it with masking tape, or simply hold it with your left hand. Check if the drawing fits the dimensions. Arrange the individual parts so that you can use the plywood sheet as economically as possible. There is no need to rush, because your future craft depends on the drawing. If time is short and the craft needs to be done faster, then you can save a little time by using the article: Transferring a drawing to wood.
What will you need for work?
Naturally, for production:
- The quality of veneer should be maximum (first or second grade). Blisters, knots, resin streaks, etc. are not allowed on the surface of the sheet.
- It is very important that the veneer sheets are glued over the entire area of the workpiece, especially if the walls of our box are carved.
- Before work, plywood should be dried, since raw material often leads to tool breakage.
- The color of the veneer will only play a role if we leave all surfaces without painting or varnishing. If any processing will be used, then it is better to focus on selecting plywood according to quality, and achieve the required color through the use of pigments.
- The thickness depends on the dimensions of the product. As a rule, plywood with a thickness of 4-6 mm is used for decorative desktop drawers.
Currently reading: Compact and versatile chainsaw Husqvarna 137 (Husqvarna)
To connect individual parts together, small nails with hidden heads, self-tapping screws, or furniture glue can be used.
We will also need paint or varnish for final processing.
Tools
Working with plywood does not require powerful and bulky tools. Here, rather, devices for “fine” work would be appropriate:
- Jigsaw (manual or electric, but always intended for figured carving).
- A supply of jigsaw files.
- Wood saw for rough processing of workpieces and cutting plywood sheets.
- Screwdriver (if self-tapping screws will be used).
- Hammer.
- Set of wood files (round, flat and triangular).
- Sandpaper for sanding.
- Paints, rollers and tampons for finishing the product.
When all materials and tools have been purchased and prepared for work, you can begin making our plywood box.
Cutting out a plywood box with a jigsaw
There are many rules for cutting with a jigsaw; in order to cut out a box from plywood yourself, you should first cut out the internal elements, and then start cutting out the outline. There is no need to rush when cutting. The main thing is to always keep the jigsaw straight at a 90-degree angle when cutting. Saw out the parts along precisely marked lines. The movements of the jigsaw should always be smooth up and down. Also, do not forget to monitor your posture. Try to avoid bevels and unevenness. If you go off the line while cutting, don't worry. Such bevels and irregularities can later be removed using a flat file or “Coarse-grained” sandpaper.
How to make a classic box
Even a teenager with minimal skills in handling woodworking tools can cope with this task. Such a box is made from multi-layer plywood, and the selected sheet should not have visible damage: knots, cracks.
At the initial stage you will need a pencil and a ruler. In order not to complicate the task, it is better to choose the correct geometry of shapes for the walls, lid and bottom, for example, a square or rectangle. On a sheet of plywood, draw the outlines of four walls: 2 side walls are shorter and 2 front walls are longer.
Then all the drawn elements are carefully cut out with a jigsaw, the irregularities are processed with sandpaper. To ensure that the end and side walls are beautifully connected to each other, small grooves can be made at the edges of the ends, corresponding to the thickness of the plywood sheet. This tip will help give the case a monolithic look and overall make the structure stronger.
After this, they begin to make the lid. To make the design more original, it is better to choose not a flat, but a deep lid. For this, the scheme described above is used. A large blank is cut out, which will directly serve as the lid, end and side walls. In essence, it turns out to be a smaller copy of the casket body.
In a similar way, you can make a box from solid wood. A wooden board is used for this. It must be sanded and cut into pieces of the required size. It is more difficult to cut wood with a jigsaw; it is better to use a circular saw. Curly edges can be made with a router.
Varnishing crafts
If desired, the “Bird” box can be varnished with stain, recreating valuable types of wood, or simply use transparent varnish. It is not necessary to varnish the product, but this will add greater individuality to your craft. Try to choose a good and high-quality varnish. Varnish the wood using a special brush, take your time. Try not to leave any visible streaks of bubbles or lint from the brush.
How to decorate with carvings
Carved boxes look much more original and interesting, but such work requires certain skills and knowledge. For beginners who decide to try their hand at wood carving, experienced craftsmen recommend starting with simple geometric shapes and large patterns. With a certain amount of patience, even a novice master will be able to cope with such a task.
The drawing is applied to the surface with a pencil, each line is well drawn. After this, the pattern is carefully cut out with an oblique knife or chisel in strict accordance with the applied markings. Small flaws and irregularities can be corrected with a file or fine sandpaper.