DIY epoxy resin and wood table is very popular nowadays. This increased interest is associated with the excellent appearance of the piece of furniture, which can decorate the interior of any room. The lake table, which involves the use of only resin and wood, looks especially impressive. A craftsman can make such a piece of furniture independently, knowing the rules for using resin and the stages of fixing it to wood.
Wood preparation
Making tables from epoxy resin has become a hobby for many men and a good opportunity to earn money, since such items are not cheap. Making a table from epoxy resin and wood with your own hands is not very difficult, but there are many subtleties. A special tree is selected to make a piece of furniture.
To make a table, you can use the following designs:
- Combined, which involve the use of synthetic material and natural wood.
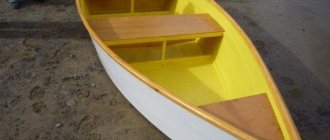
- With support. Resin is only used to fill the top of the table. Various decorative details are used for decoration.
- Without support. Only resin is used to obtain the finished product. In this way you can make low, small tables.
Colors used in the production of the product:
- has no color;
- one color is used;
- Several colors are combined (black, blue).
The most popular are light turquoise and blue shades.
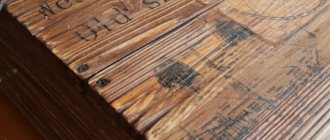
Making tables from resin and wood must begin with a careful approach to the choice of material. Wood that has a distinct wood grain will look best. In addition, they select seasoned, dry, thick-cut wood and interesting edges. The choice of material is best made in favor of chamber-drying slab, which is most often made of oak. A blank made from burl poplar looks good.
After choosing a tree, you need to decide how to lay out the workpiece. Then, using tools, check how tightly the board lies on the device.
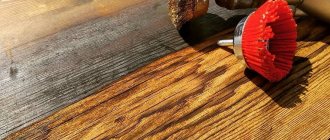
After determining the future appearance, wood processing begins. Processing includes: removal of bark, removal of defects. The result should be clean wood, sanded, with a clearly visible wood grain. It is better to sand twice on both sides. The first processing is carried out with a router; it makes the wood even.
The second processing is also carried out with a milling cutter; it is lowered a few millimeters lower. During the second treatment, those defects that could spoil the appearance of the future table are removed. The board is also sanded. During the second treatment, excess bark is removed using a grinder, a screwdriver and other devices.
Before starting the process of pouring wood, it is primed with the mixture that will subsequently be used in the production of the product. At the very beginning, all the not very large cavities or recesses discovered during the initial processing of the board are filled in to create a unique appearance of the product. After filling the areas, they are left to dry for two to three hours. Treated areas must be periodically heated to release air and remove bubbles. After drying, the sections are compared with a wooden blank.
Table base
To make a table with a support, 2 types of bases are used:
- A wooden base is often used to add a special style. Such bases are environmentally friendly, easy to process and very stable. Oak, beech or larch are often used in such structures. Often you can take a ready-made wooden table or its legs as the base.
- Metal supports. They can be made in a workshop by welding. No need to paint or sand. Almost any thing can be used as a basis, and the older and more vintage, the better. The main advantage is strength and stability. The main materials are: steel, aluminum and cast iron. The form chosen is different. There may be ready-made or homemade legs, frames or stands. You can choose ready-made designs: an old tricycle, a car engine, rims.
Creating a Shape to Fill
A solid board is placed on a slab table using epoxy resin. The shape of the table made of wooden slab, using epoxy filling, can be chosen in any way. It depends on the form of filling made.
The mold for pouring is made taking into account the design of the board and its size. The length of the form coincides with the wooden base; the amount of liquid that will be used when working on the table depends on its width.
For the mold, prepare a flat sheet of material with a surface without depressions or cracks. The mold is made with sides several centimeters high. After the mold is assembled, it must be sealed so that liquid cannot leak out of the workpiece. The board is pressed tightly against the workpiece so that there are no cracks or gaps between the sides and the wooden workpiece.
What epoxy resin to use for countertops
The epoxy resin that goes on the tables is selected depending on the chosen shape of the tabletop or the general appearance of the finished product as a whole. It should be matched to the type of wood that will be filled with a solution suitable for it. Experts who manufacture furniture from epoxy and wood note that it is better to use more expensive items. The resin does not lose transparency so quickly and is not susceptible to yellowing from sunlight.
Typically, high quality epoxy fluid is clear and does not become cloudy quickly. Often, resins that are suitable for the production of a table using a composition that includes epoxy resin are allocated in a separate group.
You can use epoxy, which is sold together with a composition that allows the mass to harden. Before mixing the composition, you must carefully study the instructions, which indicate the proportions and process for preparing the composition.
To add color, color is added to the solution, and after that the solution is heated to 30 degrees and mixed slowly and well. After this, a hardener is added to the solution. Then the mass is mixed to a state where there is predominantly one color and no foreign inclusions. If air bubbles appear in the liquid, they are blown out with a heating device.
To make your own products from a wooden blank and epoxy resin, you need to mix the liquid so that it meets the required consistency. The quality of the manufactured item depends on this. Known viscosity grades:
- Liquid. This liquid can be used to treat wood before pouring.
- Semi-liquid. Such a solution is convenient for the production of round-shaped products or if there is a need to make decorative parts.
- Thick. Liquid of such thickness is not used for filling. It is used to renew oak tables or produce small parts that serve as decoration for the finished product.
It is important to use the following data to produce a high-quality table made of wood and epoxy resin:
- smallest layer;
- largest layer;
- the amount of time before introducing the next layer;
- time until final hardening.
Such parameters must be taken into account when pouring the table. There is a liquid that can be poured only in a small layer, and it dries for a day. Making a table can take a long time. Among epoxy liquids there are those that can be poured up to 6 cm or more. In this case, the production of the table will be significantly reduced.
For those who are just starting to experiment with liquids for making furniture, it is better to start by pouring a small layer of resin. In this case, it is easier to avoid the formation of air bubbles when the layers harden.
Expensive epoxy fluids are favored by their longer shelf life and lack of shrinkage. Expensive resins do not decrease in volume when drying and the mixture does not deteriorate.
If you need to give the resin a certain color, you need to add special dyes.
If the liquid is poured in layers, then color inclusions are prepared in one of the compositions before adding the hardener. You need to ensure that the color is closer to natural.
Among the epoxy resins presented are:
Review of epoxy resins
| Brand | Properties |
| EpoxyMaster 2.0 | High fluidity, moderate reaction. Has the property of alignment. Does not delaminate, does not crack, there is no effect of “whitening” of layers. Mixes with any filler. The thickness of the layer filling is 5 cm. |
| Art-Eco | Suitable for creating a thin coating |
| EpoximaxX (Epoximax) Decor | Transparent. Sold complete with hardener. Reacts poorly to direct sunlight. It takes 2 days to cure. Pouring a thick layer requires more time when it hardens. |
| QTP-1130 | Transparent. Self-leveling. Suitable for filling layers up to three millimeters. |
| Crystal Glass | Highly resistant to ultraviolet rays. The finished product does not turn yellow or become cloudy for a long time. |
| PEO-610KE. | Has high resistance to ultraviolet rays. The finished product does not turn yellow or become cloudy for a long time. |
| MG-EPOX-STRONG | High quality resin. Has no color. |
Epoxy resin has positive and negative characteristics that you should know when working on the product:
| Advantages | Flaws |
| Durable, weakly reacts to chemicals. Has no smell. Shrinks little after the material hardens. Stable structure. The polymerization process is carried out at temperatures from -15 to +80 degrees. Has a small percentage of moisture permeability. Resistant to physical damage and scratches. Does not require expensive maintenance. | When exposed to significant heat, harmful substances can form in the air and on surfaces. To work with the material, you need to have certain experience and adhere to certain stages and production requirements. High-quality material has a significant price. |
How much resin is needed
Epoxy resin tables require different amounts of consumables to prepare the finished product. The largest amount of epoxy goes on the table without including wood or other decoration.
The amount of liquid that can be used to produce a finished table is determined depending on the height, width of the tabletop, and its thickness. If most of the tabletop consists of wood, stone, decorative material and only a small part of epoxy liquid, then it will not take much resin to make. To make a “river” table, 4-6 liters are enough.
The tabletop, which is made entirely using only epoxy without the use of wood parts and measures 100 x 60 x 5 cm, requires approximately 30 liters of resin.
Tables made of wood, where the tabletops are made of oak, have the shape of a rectangle with a size of 100*60 cm and a thickness of 7 cm, you will need to use less liquid. For example, the main part is occupied by oak, stone inserts - about 2/3 will be filled with epoxy resin.
We convert the values into meters and multiply: 1.0 × 0.6 × 0.07 = 0.042 m3. To convert the resulting amount into liters, you need to multiply the data by 1000. The result is 42 liters. This amount is needed to fill the table mold, which consists entirely of a composition where epoxy resin predominates. If 2/3 of the table is filled with a wooden blank or decoration material, then fourteen liters will be needed. That is, to produce a table 100x60 cm it will take about 14-15 liters of epoxy solution.
Consequently, solid wood tables with embellishments filled with resin in between require less pouring compound than pouring a table top that is entirely epoxy.
Manufacturers of epoxy resin often indicate in the instructions: what is the approximate liquid consumption for manufacturing the product. Since epoxy resin does not shrink, it must be poured exactly in volume, and it will dry that way.
Technology of pouring epoxy resin onto a countertop
Work on the production of a table using resin should be carried out in a separate room. It is better if a table is prepared in this room, on which a mold can be placed for pouring and then drying the product and where the varnish is applied. In addition, you need water to flow in and direct light not to fall on the countertop.
The production of tables made of epoxy resin and wood is carried out strictly according to technology. Making your own product should begin by studying the description of the epoxy resin. The recommendations for the material used indicate which layer of liquid consisting of epoxy can be poured as minimally as possible and which as maximally. Solid wood tables can be poured with a thin layer of resin on top. The resin layer depends on the height of the tabletop and the type of wood base, as well as the support on which the tabletop is mounted. Oak requires a small amount of resin. It is better to pour the liquid in a smooth, not strong stream when using a device, which can be an ordinary stick.
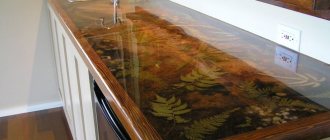
A thin layer of resin is poured onto the bottom of the wooden blank, then decorative elements are placed. You can use glue to fill light decor: wooden decorations, leaves. Select the layer in which the decor will be located and fix it there until it dries completely. Heavy decor is used to fill the tabletop. It doesn't require glue. For example, you can use stones. The prepared composition is poured into the mold; if the pouring height is no more than five centimeters, then everything is poured at once.
You can use a spatula to level the resin. The manufactured table is covered with polyethylene so that dust and small particles of debris do not fall on the formed product. After the finished piece of furniture has dried, you need to start sanding, polishing and varnishing.
It is better to sand the product after all layers have completely hardened. Sanding is carried out slowly, paying attention to every centimeter of the finished product.
Liquid is periodically poured onto the top of the object to prevent overheating. After finishing the sanding process, the table is sprayed with varnish.
To make a table made of solid wood beautiful, you need to adhere to technological recommendations and observe all the nuances of using the finished composition:
- the resin very quickly loses its plasticity in heat;
- You cannot direct a hot stream of air onto the top layer, as it loses its original shape;
- during the period of hardening of the top coating of the tabletop, it is not necessary to allow direct sunlight to fall on the finished product, as the liquid may turn yellow;
- when working with the composition it is necessary to use protective equipment;
- The epoxy compound must be mixed slowly.
How to pour without bubbles
How to fill a table with epoxy resin without bubbles is usually indicated in the instructions that come with the product. In order to avoid bubbles, the resin must be poured in a thin stream into one place. It is best to use a stick for this, which needs to be lowered into the mold.
In order to avoid voids in the corners or inside the form where the decor is located, these places must be treated in advance with a solution, which is subsequently poured there.
To avoid the appearance of bubbles in a product whose thickness is more than 6 cm, it is necessary to fill it in two stages. The interval between pouring layers should be one or two days.
If bubbles did form when the product was in a cool room. In this case, the upper part of the product, which is filled with resin, is heated with a construction hairdryer. Sometimes spraying with acetone helps get rid of bubbles.
Heating and sprinkling with acetone reduces the surface tension, allowing bubbles to escape from the layer. If the product has not yet completely frozen, you can pierce the bubbles with a plastic fork and carefully release them. Then the place is leveled with the rest of the layer.
Polishing and finishing to a glossy shine
The product is considered ready after it has completely hardened or post-curing has occurred. The product must gain strength. Sometimes this takes from 5 to 7 days.
After final post-curing, you can begin sanding and polishing the product. During these operations, the finished product is given evenness and the piece of furniture is brought to a glossy shine.
During polishing, you need to constantly moisten the product with water so that it does not overheat. If overheating occurs during polishing, the resin will begin to melt and clog the abrasive paper.
When polishing, pay attention to the speed. An insufficient amount will result in poor polishing, and an excessive amount can ruin the epoxy layer of the finished product, the appearance of the countertop and overheat the surface.
During polishing, special attention should be paid to the end side of the tabletop. If there is stone exposed at the end, it would have to be sanded down before the final pour. When polishing, you need to carefully walk over the surface and then apply varnish.
If a piece of furniture is cast, that is, it consists entirely of epoxy material, it must be polished with special care. The hardened resin is polished using a special machine. The polishing procedure can be carried out by the master himself.
Treatment with polyurethane varnish will give the product a glossy shine. Polyurethane varnish will not only add a glossy shine to the polished resin, but will also prevent the tabletop from yellowing when exposed to sunlight.
Varnish treatment should be carried out in several stages. After each application of varnish, intermediate sanding must be carried out. All this will give a bright glossy shine, greater than with just sanding without the use of varnish. The tabletop can be polished to a mirror finish, which looks very impressive on furniture.
Reviews from those who took the courses
Anastasia, Kemerovo
I wanted to learn how to make jewelry from epoxy. True, I read somewhere that it is harmful to women’s health, so the first thing I did was ask the master. She laughed and said she has three children, all healthy. But you need to work with gloves, then nothing is harmful. The result was cute sky-blue beads, right to match the color of the eyes.
Alexander, Chelyabinsk
Took courses in making countertops. The master showed how to make one normal table out of several pieces of wood. I reconsidered my views on uneven boards - now they are not garbage, but an almost finished slab, if modified. Working with fiberglass is easy. I brought home the result - my wife is happy, but the cat is not.
Natalya, Omsk
I recently took a simple course on epoxy. At first there was a lot of theory, discussions about labor protection, safety precautions, the difference between epoxy and epoxy glue. But I wanted practice. But the master said that without theory I would make mistakes in practice. The products turned out to be simple, but without flaws.