How nice it is to relax in the fresh air in good weather after a hard day at work. This is especially appreciated by owners of private houses and summer cottages. One of the options to create a convenient and comfortable place to relax is a swing. Do not assume that this entertainment is only for children's amusement. If you take into account the total weight expected for the structure and make the swing correctly, then they will not only be suitable for adults to relax, but will also become an excellent decoration and part of the exterior of the area.
There are many types of products that differ in design, purpose, material and principle of operation. We will look at the classic option - a swing made of wood. What is special about this material? What are its advantages and disadvantages? How exactly to make a wooden swing with your own hands?
Features of the tree
No one will deny that wood is the most popular material for construction purposes. He has been like this for many centuries. Its peculiarity is its affordable cost, practicality and ease of operation. Even a beginner can handle it, let alone professionals. For processing you do not need to have specialized tools and skills to work with them. In addition, wood is a natural material that will look great in landscape design and complement the exterior picture. To find out the full picture about a tree, you need to familiarize yourself with its advantages and disadvantages.
Pros and cons of wood
We have listed several obvious advantages above. But that's not all. Below is an expanded list of the benefits of working with wood to create a swing:
- Ecological cleanliness. The material is absolutely harmless. And if you take into account the fact that children or adults will constantly be in contact with the wooden parts of the swing, then you don’t have to worry about their health. In addition, they can be organically combined with flowers, bushes and trees.
- Great appearance. The tree looks noble, and the same will apply to the swing. There will be no shame in showing them to everyone.
- Low cost. It is clear that this depends on the type of wood, but inexpensive products that everyone can afford are suitable for swings.
- Long service life. Although it is not metal, the structure, with proper protection and proper operation, can last quite a long time.
- The swing can be given any shape, making it original and beautiful.
- Wood is much warmer than the same metal. Therefore, it is much more comfortable to use. The seat and arms will not be cold.
However, wood also has its obvious disadvantages. They are related to the properties of the material. Note the fragility of the products. If there is a strong mechanical impact, the mechanism may break. In addition, caring for a tree is more difficult, because it constantly needs to be protected from external factors, such as:
- precipitation (fog, rain, snow);
- influence of ultraviolet rays;
- mold and mildew;
- influence of insects and rodents;
- temperature changes;
- natural process of decay.
This means that the tree will have to be coated with protective compounds every few years: stain, antiseptic, impregnation or varnish.
But whatever one may say, a wooden swing for a summer house is the simplest option, so many people prefer to use it.
The final stage of construction of the structure
The next stage of construction will be the final one. In order to protect the finished structure, the swing must be treated with a varnish. It will provide a smooth surface, preserve the natural beauty of the wood and extend the service life of the product.
Depending on personal wishes, the swing can be painted in any of the colors you like or a small canopy can be installed. Show a little imagination at this stage, and you will be able to create a unique product.
Finished designs can be decorated with pillows, blankets and other decorative elements.
For greater comfort, you can place pillows or a small mattress on the bench to reduce the rigidity of the landing. Its size must match the size of the seat. Anyone who is familiar with the technology of making upholstery for furniture can be advised to apply these skills when creating a swing. Make soft not only the seat, but also the back, as well as the armrests, if they are present in your design. Do not forget that upholstery is only possible if the product is located under a roof or canopy.
Wooden and metal parts of the swing must be periodically treated with protective compounds.
Choosing a wood species
There are different opinions about which breed to choose. Experts agreed on coniferous species such as pine and larch. However, the price of the second one is quite high, so not everyone can use it to create a swing. What remains is pine. The material is strong, does not crack and does not suffer from insects.
Advice! No one protected the product from rotting. Therefore, during the work process it will be necessary to protect the products with antiseptics against fungus and mold.
Oak has high density and strength. Products made from it are durable. However, the downside is its high cost. Linden is considered an alternative. Usually it is not used for weighty buildings. But to create a garden swing made of wood with your own hands is what you need. Although linden does not have proper protection from the cold, it looks beautiful, has good strength and an affordable price.
The second important point concerns the choice of strength. It all depends on the crossbar on which the swing will be suspended. You need to take into account the thickness, height and length of the crossbar. Below is a table showing the approximate loads that the support can withstand at different values.
As you can see, wooden swings are an excellent solution; they are practical, beautiful and amaze with their variety. You also need to consider several different product options for your garden.
Varieties of wooden swings
Before building them, it is important to decide on the design, because there are many of them. Let's start with the installation method. There are these types of swings:
- stationary swing made of wood;
- portable swing made of wood;
- hanging swing made of wood.
Let's start with a stationary swing made of wood. Their peculiarity is that the design is done once and for all time. They will stand in the chosen location all year round, throughout their operation. The peculiarity is its practicality, reliability and stability. The disadvantage is that they are tied to one place on the site.
Portable ones are mobile and can be installed anywhere on the site. If you feel hot, you can move them to a shady area. If it's cold, it's the other way around. The advantages are obvious and many people prefer this particular swing design. In addition, some species can be collected and transferred to another site.
A hanging swing made of wood is the simplest option. They are light, attractive, functional, and it won’t take much time to create a swing. You just need to find a strong tree on the site and hang the swing. However, the disadvantage is insufficient strength. And many people won’t fit on it.
Other products can be divided by purpose:
- for family;
- wooden children's swing;
- adult swing made of wood.
A family swing made of wood is an excellent relaxation option for the whole family. They can accommodate 4 people. The design is based on a large bench that can accommodate both children and adults. The main requirement is reliable and powerful fasteners, which are made of durable wood. After all, the weight of four people can reach up to 300 kg.
A children's wooden structure is a small product that can withstand the small weight of a child. In this case, it can be made on the bottom of the seat or on two. They serve more for entertainment than for decoration. Such children's wooden swings in the photo:
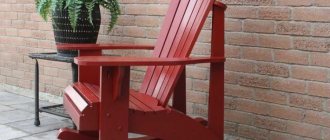
As for swings for adults, this is one of the indispensable attributes of a country house. They do not swing widely, but have canopies that protect those swinging from the hot sun, wind or rain. And to protect yourself from insects, a mesh is attached to the structure. With such a wooden swing you don’t even need a gazebo.
Drawings of a wooden swing
Proper creation involves creating a project in the first stage. It will serve as a guide and help with the work. To do this, the design is worked out in detail on paper. Here are the parameters that need to be specified on the diagram:
- Main dimensions: length, width and height of the swing.
- Height of vertical support posts.
- Vertical beam size.
- Dimensions of the mounting bars that will support the vertical stand.
- Distance between the seat and the side beams installed in a vertical position.
- Size from seat to ground.
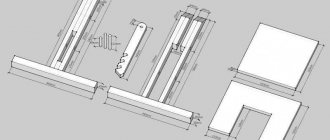
Below is a project that will help you make a wooden swing for your garden with your own hands. The drawings can be changed or left as is.
It would be a good idea to clarify the thickness and cross-section of the wooden board on which the wooden structure will be located. As you can see in the picture above, the drawing consists of two angles. This will help avoid mistakes in the future. Now we can look at step-by-step instructions on how to make a garden swing from wood.
Construction of a wooden swing for a summer house with your own hands: drawings and selection of materials
At the initial stage, materials are prepared to create a garden swing with your own hands, the photo of which you liked the most. Based on the drawings, you can easily understand how many blanks will be required to assemble the structure and what dimensions they should have.
Dimensional table for creating blanks:
| Detail in design | Dimensions of the transverse part of the workpiece, cm | Final length, cm | Required number of blanks, pcs. |
| Frame part of the structure | |||
| Spacer (upper) | 4.5x14 | 23 | 2 |
| Spacer (lower) | 4.5x14 | 96 | 2 |
| Leg | 4.5x9 | 198,7 | 4 |
| Rigel | 4.5x14 | 210 | 1 |
| Seat parts | |||
| Rear pillar | 3.5x7 | 60 | 2 |
| Bar (support) | 3.5x7 | 95,5 | 2 |
| Bar (for seat) | 3.5x7 | 120 | 2 |
| Armrest | 3.5x7 | 60 | 2 |
| Back strap | 2.5x7 | 130 | 2 |
| Armrest support | 3.5x7 | 27,5 | 2 |
| Seat bar | 2.5x7 | 128,4 | 8 |
| Upper bar | 2.5x9 | 130 | 1 |
In addition, to connect the above blanks together into a single structure, fasteners with different parameters will be required.
From theory to practice
It all starts with choosing a site for construction. If it is a mobile swing, then the location does not matter. However, for stationary patients, you should choose the optimal place in which it was comfortable to be. In addition, it is recommended to choose a flat terrain, without holes or drops. Otherwise, it will be more difficult to align the wooden swing.
Now you can start creating a wooden swing according to the drawings. The instructions are as follows:
- First, we create a side vertical part consisting of pillars. We will have 2 of these. To do this, we need two bars, 3.1 m long. Finding out the length of the throws (“a”) is easy if we know the height of the swing (“b”). So, the height of the swing is 3 m, and the angle of connection of the bars at the top point is 30° (“β”). In this case, we get the formula: The length of the base is 1 m 56 cm.
- Next, between the vertical posts you need to insert a horizontal board, to which in the future the chain with the seat will be fixed. The length of the board is 3 m. After which you need to drill a solid hole from the top of the support beam and secure it all with a screw and nut to strengthen the structure.
- Now you need to tilt the swing to one side and drill two holes through the horizontal beam. In this case, you need to retreat 75 cm from the edges. They are needed to create a suspension. You need to screw the bolts and washers into the holes made, and screw the eye nuts onto the ends. The wooden swing can be turned back over.
- To strengthen the structure, spacers made of wooden blocks must be installed between the support beams. They can be fixed using 5 mm screws and metal corners. The upper spacer is fixed using corners. The diagram is shown in the photo below.
- In our case, we will not concrete a wooden swing. Therefore, the ends need to be protected with bitumen and buried. This will extend their service life. As for the structure itself, it needs to be covered with stain. It will add color to the swing and make it protected.
- It's time to make the seat out of wood. To create a backrest you need beams, the size of which is 30x13x457 mm. For the seat frame you need beams measuring 51x152 mm. Two frames are required, for the seat and back. Slats are attached to the frame, the seat and back are tightened using corners. To make swinging more comfortable, you can create armrests. Eye bolts are screwed to the sides. You need 2 pieces on each side, one for the seat, the other for the back.
- All that remains is to hang the wooden swing. You need to attach carabiners to the eye nuts, and then attach two strong chains to them. The required length of the chains fixed to the seat is 1.65 m, and the length of the chain fixed to the back is 1.2 m. This is easy to calculate, because when swinging, it is important that the person’s feet do not touch the ground.
- To make swinging on them more comfortable, the swing seat should be modernized. To do this, you can sew soft covers with foam rubber. If necessary, they can be removed and washed.
This was one of the options for making a wooden garden swing. Their variety can be seen in this video. It indicates how the creation work is carried out.
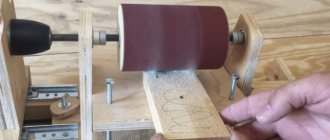
Cutting the supporting part of the structure
To saw off material using a hacksaw, you must first place it on the edge and clamp it in the saw sawhorses. The cutting is carried out strictly according to the markings. Remember to control the sides. This is especially true for the upper cut area. Sometimes it becomes necessary to straighten the bevel. To do this, it is enough to process the end part of the cut with a plane.
Wooden swing bench, step 4: installation of the back and seat of the structure.
To form the second leg, you need to put the first one next to it, joint to joint. After this, all marks on the bevels and length are transferred to the second leg and sawed off according to the markings.
Then both legs are placed on the edge so that the end parts of the vertices are located on opposite sides of the cross beam. The lower part of the legs is moved to the sides until a distance of 1.2 m is formed. The upper part of these parts must be adjacent to the crossbar. To check the bevels, use a ruler, applying it to the ends. Make adjustments if necessary.
Wooden swing bench, step 5: attaching the armrests.
A distance of 50 cm is measured from the base of the legs and the lower block is applied. Next, the lines of the legs, as well as the upper and lower parts of the bar, are transferred to the corresponding parts. After this, the top block is placed on the legs. This must be done so that it is located 15 cm lower than the cross beam lies, and is parallel to the first bar. The marking is carried out in exactly the same way as in the previous version.
After this, the bars are removed, and the markings are aligned on the surface. At given points, these elements need to be cut to the required length.
Wooden swing bench, step 6: hanging the structure.
Wooden swing made of timber
Timber is an excellent material that combines attractive appearance and reliability. The design is original and rustic. Similar wooden garden swings in the photo:
What are the advantages of such designs? They are stable and durable. It will be difficult for both adults and children to damage the swing. And weather conditions do not have such an effect on the product. True, there are also disadvantages. This is sensitivity to insects, as well as the property of rotting over time. And it is more difficult to process timber than boards.
But still, the material is used to create a swing. We will look at detailed creation instructions. First you need to prepare the tree. The preparation is as follows:
- Sand the surface.
- Make notches and notches along all the beams.
- Cover them with the first layer of stain, leave them to dry, cover them with a second layer and wait until dry.
Now everything is ready to make a swing with your own hands from wood, as in the photo:
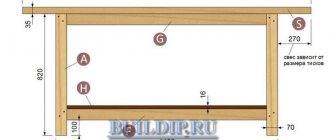
The first step is to prepare a flat area on which the swing will be installed. Use a construction meter and pegs to mark the boundaries of the product. To create, you can use the drawing that we prepared for this task.
For work we will need 4 beams, 2 m long, 10 cm in cross section. This will be the support of the wooden swing. They are connected in the same way as the previous ones, at an angle of 30°, forming an isosceles triangle. The length of the base is 1 m. The length of the base partition is the same 1 m. The length of the additional partition is 45 m, with a 2 cm protrusion from each side. The total width of the swing is 4.5 m, and the width of the bench is 1.5 m. It is suitable for several people.
Creation instructions:
- The first two steps are taken identically as with the previous version of the swing. It all starts with vertical racks. To do this you need to take 4 beams, 2 on each side. They need to be placed on the ground like an isosceles triangle. Then you need to take a compass and a pencil to mark one circle on two bars, the diameter of which will be 10 cm. It turns out that on each bar there will be a semicircle with a radius of 5 cm. You need to cut out this hole with a grinder and sand it. All that remains is to check the correctness of the cutting. To do this, a beam is inserted into the hole in a horizontal position. If necessary, the hole is corrected.
- The racks are installed in a vertical position, after which the horizontal beam is fixed with long bolts with washers and nuts. Manipulation is done on each side to create the body of the wooden swing.
- Horizontal partitions are created from wood. On vertical posts you need to make recesses for them using a chisel and hammer. It should look like in the photo.
- The first of the partitions will be A-shaped. First of all, a recess is created in it so that the diagonal support fits into it. Recesses are also made in the vertical pillars where the upper and lower partitions will be installed. After that, the diagonal beam must be adjusted to fit the hole in the A-shaped beam. Finally, you need to cut it at the end at an angle of 45°, and then secure it with a bolt.
- The upper spacer is located at a distance of 1.11 m from the base, and the lower one, at a height of 5 cm. The structure is installed in the normal position. Stepping back 1.5 m from the end, you need to drill a hole and insert two bolts. Everything is tightened with eye nuts.
All that remains is to hang the bench and the wooden swing is ready for use. It’s better not to make it yourself, but to take a ready-made one. It is installed in its place.
In this video you can see instructions on how to make something like this swing with your own hands.
Features of creating a wooden swing for a summer residence: characteristics and types of structures
To create a garden swing, three main materials are most often used. This list includes wood, plastic and metal. Undoubtedly, each of these materials has its own advantages and disadvantages. But when it comes to drawings of a garden swing with your own hands, you will not find a more practical and convenient raw material than wood.
Wooden swings have only one drawback, which concerns the operation of any products made of wood. Such structures without the use of appropriate protective measures can be severely damaged by the influence of negative environmental factors.
Original round garden swing with a soft mattress
These factors include the impact of:
- rain;
- snow;
- direct sunlight;
- fungi and mold;
- insects;
- sudden temperature changes;
- decay processes.
You can make a variety of swings with your own hands and turn your own ideas into reality
Advantages of making a wooden garden swing with your own hands
Wood has excellent technical and performance characteristics. Thanks to the properties of this material, you can create a truly comfortable and beautiful design.
Wicker swings in the form of spheres are quite spacious and comfortable
Features of a DIY garden swing made of wood:
- environmental friendliness. Since wood is a natural material, products made from it are completely safe for human health;
- external aesthetics. The structures can fit into any landscape and garden design, since the main part of the environment consists of natural materials (stone, wood) and vegetation. Compared to metal products, structures made of wood significantly benefit in aesthetic terms and can support the exterior of any country house;
Pillows and blankets will make the swing softer and more comfortable
- safety. Due to its softness, wood is convenient to work with and use, and can reduce the number of injuries. This advantage is most beneficial if you intend to design a children's swing;
- simple installation system. Anyone with basic skills in construction and handling wood can start building a swing;
A canopy over the swing will protect you from the scorching rays of the sun in the summer.
- versatility. This type of material lends itself quite easily to various types of processing (grinding, cutting, cutting). Thanks to this, any of the DIY garden swings made of wood, the photo of which you like the most, can be made by you yourself without involving specialists in this process. Wood allows the construction of single-seat structures or swings with large capacity, made in the form of sofas.
Adults also don’t mind relaxing and unwinding, swinging imposingly on a swing
Choosing covers, mattresses and pillows
Particular attention should be paid to the choice of pillows and mattresses. They are often used to make operation more convenient. To begin with, bright colors are usually chosen for wooden swings. This cannot be called wrong, but it is important to remember that such fabric will fade greatly in the sun. For garden swings, waterproof fabric such as raincoat or tarpaulin is better suited. Then the pillows will not be afraid of moisture.
It must be remembered that the material will constantly be in contact with humans, and not just with the influence of natural forces. Why not make the material more enjoyable. For this purpose, you can use fabric with natural raw materials such as cotton/viscose. It will be more pleasant to sit on such fabric.
As for the size of the covers, they should be 4 mm larger than the seat, this will make it easier to adjust the covers. To fix the cover to the bottom of a wooden seat, it is better to use a stapler.