An exclusive do-it-yourself wooden chandelier will become a worthy interior decoration. An unusual wooden lamp is selected taking into account the style of the room. The variety of ways to design lighting fixtures is amazing. It is not at all necessary to purchase expensive models from recognized design specialists. It is quite possible to assemble an original wooden chandelier with your own hands. The proposed ideas will make it easier to choose the shape of a wooden lamp.
Timeless classic
Massive wooden ceiling chandeliers appeared at the dawn of the 16th century. Most often, the main ones were tree branches, the edges of which were crowned with candles. Castles of wealthy gentlemen and churches were the main areas of application for unique lighting devices at that time. But if previously wooden chandeliers performed a purely practical lighting function, now more attention is paid to the appearance from the point of view of decorating the room.
The emergence of new practical materials and the development of technology have not weakened interest in natural sources. The tendency to care about the environmental friendliness of surrounding objects and one’s own health is one of the reasons for the growing popularity of wooden chandeliers.
Attention! The variety of forms of wooden lamps allows them to be used not only in traditional rustic styles, but harmoniously introduced into more modern interior trends.
For country and chalets, antique wooden chandeliers are still relevant. Adherents of a brutalist interior can easily assemble a simple chandelier with their own hands, where the frame is a powerful wooden beam. For lovers of original configurations, the designers have prepared a lot of interesting ideas, many of which can be implemented independently.
Concern about the high cost of a chandelier is justified only when choosing complex configurations that require jewelry processing of the array or where additional expensive materials are present. In most cases, the price is in the budget category.
A variety of wooden chandeliers are shown in the photo:
A simple homemade chandelier made of wood: manufacturing instructions
Photo from Instagram. Author mebel_tumen
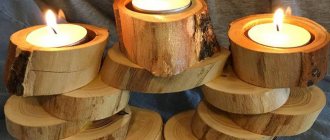
A step-by-step master class will help you make a lamp from driftwood or any large unprocessed piece of wood:
- it is advisable to immediately remove the covering tissue (bark, root membrane), since pests most often live under it;
- polish the surface, revealing its texture and pattern (you can use a brush with metal bristles to achieve a floaty effect);
- coat the workpiece with wood oil, wax, varnish (optional).
Advantages and disadvantages of wooden lamps
A wooden lamp is always stylish. Purchasing a ready-made model is not difficult. But if you decide to decorate a wooden chandelier with your own hands, it is better to familiarize yourself with all the positive and negative aspects of such a choice in advance.
Main advantages:
- Compared to glass and metal, working with wood is not particularly difficult. With certain skills, wooden blanks can take on any shape.
- Wood is one of the most environmentally friendly materials. In addition to the absence of harmful compounds, it emits a pleasant aroma that has a beneficial effect on the body of those present.
Comment! Spruce and pine are the best choice when trying to create a relaxing environment with a wooden lamp. These wood species deserve special attention in case of problems with the respiratory system, including asthmatic attacks. - A wooden lighting fixture will cope better than others with the task of creating a cozy atmosphere in a room, bringing the interior as close as possible to natural origins.
- Most options for wooden lamps do not require significant financial investments, but at the same time they look original and add individuality to the room.
- The variety of wood species from which you can make a chandelier with your own hands allows you to choose the desired shade of the lamp without the use of artificial dyes.
- Wood combines well with metal. The combination of a wooden chandelier with glass and even plastic can give an unusual effect that cannot be achieved when using other materials.
The numerous advantages of chandeliers are overshadowed by some disadvantages:
- Initially, wood is a flammable material and therefore requires special treatment. Protection with fire retardants and insecticides will prevent the lighting fixture from igniting or damage to the frame by insects.
- If you want to make it yourself or purchase a chandelier made of oak or mahogany, you will have to part with a large sum.
- The use of insufficiently dried wooden blanks or poor-quality pre-treatment of the material will lead to deformation of the chandelier.
- Even despite reliable protection, the use of wooden lamps in rooms with high levels of humidity is undesirable.
Attention! When designing a lighting fixture, you should think in advance about the type of lamps used. For these purposes, LED spotlights or fluorescent lamps, which are not prone to heating, are optimally suited.
Wooden ceiling chandeliers of various models are shown in the photo:
The process of creating an original chandelier
Prepare a plastic bottle. First of all, you need to get rid of the label and bottom, and also dry it properly.
Remove the spoons from the plastic and use a knife to remove any handles that are not needed. The only thing you need to do is leave a couple of centimeters above the so-called “scoop” level.
Glue the blanks to the base of the prepared bottle. On the “tail” that remains, you need to apply as much glue as possible and then press it to the surface.
It is very important to continue to cover the entire bottle in this way directly in a circle until the entire prepared perimeter is “occupied” with plastic spoons.
It is best to arrange them in a classic checkerboard pattern and move them slightly together.
This way it will be possible to reduce the number of “free spots” to a minimum.
The shade is removed from the old prepared chandelier and placed in a dried bottle. If desired, decorative ones can often be done in a similar way.
That's all. All that remains is to install the chandelier in the chosen location, and also check its operation by connecting it to the power supply.
Another interesting chandelier option is a chandelier with decorative butterflies. It is worth noting that when going to almost any master class on making a chandelier, designers always offer to learn how to create it, which is not surprising, because it can fit perfectly into almost any interior of the room.
Note!
Window decorations for the New Year - 150 photos of new items!
Step-by-step instructions and a master class from the pros! DIY lamp: instructions for creating decorative lamps for the home (68 photos + video) DIY crafts (70 photo ideas): a guide to traditional and modern crafts In addition to the fact that this option looks like - truly luxurious and expensive, even a child can make it with the help of an adult, so its popularity is easily explained.
Antique chandeliers
Antique wooden lamps can be divided into groups according to the category of complexity. Some are presented in simple forms and can be made by hand even by novice craftsmen. Others are more complex and require specific woodworking skills and special processing tools.
Studying the wide range of models will give you an idea of the possible options for decorating a room with a wooden chandelier.
Simple geometric shapes connected by chains and decorated with spotlights are quite easy to assemble yourself. The deliberate roughness of a wooden chandelier will look trendy in a village hut or a simple country house.
Another original model of a wooden chandelier, demonstrating the simplicity of a rustic style. The highlight of the lamp is given by light ropes, contrasting in color with the dark wood. The configuration is ideal for DIY assembly. A suitable setting for such a lamp is a country-style interior.
Another example of a chandelier made of wood with a laconic shape, which does not require significant effort to make yourself. A couple of bars, a small piece of chain and 4 LED lamps - and the main part of the kit is already at hand.
Artificially created contrasting veins are part of the designer’s intention. You can assemble a similar model of a wooden chandelier in one weekend. The only thing you should take care of in advance is to find suitable lampshades; classic glass would be inappropriate here.
Working on numerous lampshade strips can take a lot of time and effort, so if you don’t have enough experience, it’s better to purchase a similar wooden lamp ready-made.
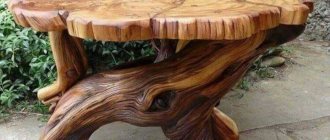
A chandelier that harmoniously combines wood, metal and glass invisibly immerses you in the atmosphere of the Middle Ages, where you can meet a knight in armor along dark corridors. This lamp will fit perfectly into the interior of a spacious living room in a country house or a cafe, where the theme of antiquity is interestingly played out.
Candle-shaped lamps most closely match the antique theme. A ceiling chandelier made of wood with numerous hanging elements can dispel the darkness even in a large room. If you have experience working with metal, you can assemble such a wooden model yourself.
Another example of the designer’s original concept, where everyday objects become an accent element of the interior. A hunting lodge or a village tavern is a suitable place for a non-trivial wooden chandelier.
Comment! Such wooden models on chains are best hung in rooms with high ceilings. The standard height of 2.5 m will not be enough.
Unique torches are another easy way to find yourself in a medieval setting. The finishing of the wooden lamp with metal and the lamp in the shape of candles fully corresponds to the idea of antiquity.
The wooden chandelier, where the frame resembles the steering wheel of a ship, looks more sophisticated than previous examples. A similar wooden model will harmoniously fit into an interior with a Mediterranean style. It will be difficult to translate the idea into reality with your own hands due to the presence of small parts and glass shades.
Experienced craftsmen will be able to make such a chandelier from wood. The lamp is ideal for interiors where eco style prevails.
Horns of wild animals as the frame of a wooden chandelier - what could be more interesting. It will be difficult to find such a base, so it is better to satisfy the idea you like with a ready-made lamp.
The section of antique wood chandeliers ends with a photo of a unique combined example of the two previously presented models.
Step-by-step process for making lamps
In the form of a pallet
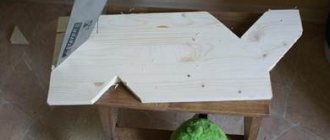
The simplest wooden lamp is made from one or two boards. The instructions present a slightly improved version with a shape similar to that of a pallet leg.
Stage-by-stage execution of work:
- Drawing up a diagram and measuring the boards.
- Next you need to cut out two identical boards and 6 small square elements.
- After this, the material must be sanded and holes for the cartridges drilled in it.
- The cartridge is inserted into the structure.
- Everything is held together with screws.
- A wire is attached to the top board, which is connected to the bottom through holes.
- The assembled structure is covered with paints and varnishes.
- Next you need to screw in the fasteners, in this case these are hooks.
- Chains are attached to the hooks, light bulbs are screwed in, and electricity is connected. The lamp is ready for use.
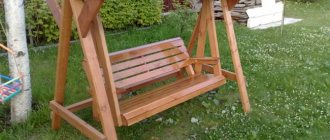
Retro style
A massive antique lamp can be made from pine timber. The design does not include small elements, so pine would be an excellent choice.
Instructions:
- The timber of the required dimensions is cut.
- The wood is sanded.
- The structure is folded, all dimensions are checked, and the entry points of the upper ones are marked on the lower beams.
- According to the previously made markings, cuts are made in the beams.
- Using sharp tools, the product is shaped.
- The elements are folded like a construction set so that the protrusions fit into the grooves. After this, the beams must be covered with paints and varnishes.
- Next you need to make holes for the light bulbs.
- All that remains is to insert the cartridges and connect the electricity. Additionally, metal frames of light bulbs and rope can be used to decorate the structure.
Oriental design
The slatted design will fit perfectly into oriental styles; it takes a little longer to make, because it consists of small parts, but the result will please you.
Instructions:
- On long wooden blocks, segments 22 cm long are marked.
- The next stage is cutting the material along previously marked sections.
- After this, sand each strip separately. Then on their surface the places for the holes are marked, in which the connecting elements in the form of toothpicks will be located.
- Toothpicks need to be moistened in PVA glue, inserted into the holes, and the next two strips installed, but on other sides.
- In this way, the entire body of the lamp is assembled; an additional strip is attached to the top layer, in which the place for the socket is marked.
- Coating wood with stain.
- After varnishing, you need to insert the cartridge and connect the electricity.
- The hanger can be made from a small piece of wood and a rope, which is attached to the top bar.
- As a result, the slats create an original and beautiful lamp.
Original design ideas
Country, chalet, eco style are not all areas where wooden lamps are applicable. An interior in the Art Nouveau style often includes non-trivial solutions for common household items. This tradition extends primarily to chandeliers.
Everyone will determine the place and suitable design for the original models presented below on their own.
The laconic outlines of a wooden chandelier, topped with LED lamps along the edges of the branches, are optimally suited for an interior where minimalism and functionality are at the forefront.
The complex-looking geometry of the following wooden lamp is quite simple to make with your own hands. LED lamps and bars corresponding to their length are the main parts of a non-standard wooden chandelier.
Another example of a laconic and at the same time original form of a wooden lighting fixture. Here you will need to prepare grooves in wooden planks in advance for laying the electrical cable. Lamps of a different shape give a completely different perception of the chandelier than in the previous sample. The undoubted advantage of both wooden models, which you can easily assemble with your own hands, is the ability to illuminate a large space around, so they are ideal for arranging a terrace or gazebo.
Another wooden specimen intended for outdoor use. The unusual shape of a wooden chandelier is fixed on a pole and provides full illumination of the surrounding area.
A real wooden masterpiece, appropriately complemented with glass inserts, will adequately decorate the most presentable interior. Scandinavian style or another eco-friendly trend will organically accept a sophisticated wooden chandelier.
An identical model of a smaller lamp is suitable for the interior of a small room. This could be a kitchen or a children's room.
Returning to the topic of geometry, I would like to present another simple and at the same time interesting example of a wooden chandelier, which will not be difficult to assemble with your own hands.
An unusual combination of an openwork base, complemented by matte shades. A similar chandelier made of wood and glass will not go unnoticed and will successfully act as an accent element of the interior.
The lamp made of metal and wood is highly functional due to the ability to adjust the direction of light flows. The idea is difficult to implement on your own, so it is better to buy a ready-made copy.
Wood processing
To treat wood, a natural mixture of linseed oil and mint leaves is used, which is infused for 2 weeks. To increase the protective characteristics, beeswax is introduced into the heated solution. Adding potassium permanganate to the composition allows you to change the color of the treated wood and improves protection against fungus or mold. The use of ready-made synthetic compounds is allowed; the surface is coated with yacht varnish.
DIY wooden masterpieces
To assemble a wooden chandelier with your own hands, experience with wood will not be enough. You will also need basic electrical knowledge. You can take a ready-made wooden model as a basis or develop your own original design. Depending on your skills in handling metal, choose an exclusively wooden lamp or a lighting device supplemented with metal elements. The photo gallery will once again demonstrate the possible options for making a wooden chandelier with your own hands.
Wooden chandeliers are a stylish interior element that is suitable not only for rustic design trends with a national flavor, but also for modern room design ideas. Country and chalet, Scandinavian and eco style, modern and loft - for each style you can choose a successful model of a wooden lamp.
Recommended Posts
Outdoor covering for the porch
DIY broom made from plastic bottles
How to choose a combination lock for entrance doors
Feeders made from plastic bottles
Types of road surfaces and their characteristics
How to remove wasps from the balcony on your own
What you need for work
Depending on the design option, you need to prepare materials and tools in advance.
Tools and accessories
Materials you will need:
- Wood. This can be timber, boards, branches or small planks.
- Fastening elements. The base is usually made of the same wood; chains and hooks can also be used.
- Cartridges and lamps.
- Additional materials. Some designs may require metal, glass, ropes, or other materials.
Rope can decorate a structure.
Tools:
- Sandpaper on a beam. Necessary to polish the surface of the material.
- Drill with pen attachment. Needed to make holes for cartridges.
- Brush. Used for applying paints and varnishes.
- Screwdriver.
- Tools for measuring and marking. Pencils, markers, rulers, tape measures are used.
What lamps to use
LED and fluorescent light bulbs work best. You can also use incandescent or halogen lamps, but during operation they get very hot, so they will be relevant in well-ventilated structures, for example, in a gazebo or on a terrace.
Choosing a wood type
Each type of wood has different properties, so before choosing, you need to know what design the wood lamp will be. Basic materials and their features:
- Pine. It lends itself well to processing, but has internal divisions, where individual circles are separated by resin. Therefore, this wood is not suitable for small parts.
Pine boards are suitable for large parts. - Cedar . Another coniferous species has a high density, so parts of any size are made from it. Cedar has an interesting pink tint and is often used without additional staining.
- Oak _ High strength, but low resistance to splitting. This wood is difficult for beginners to work with.
- Deciduous trees . They have high strength and can be used to process parts of any size and complexity.
Blueprints
One option is to use ready-made drawings. The advantage is that it saves time and that there are examples of finished products.
The second option is your own drawing. This is how you can make your own designed lamp. The diagram must necessarily show the dimensions of the structure, places for light bulbs, and the length of the step between them.
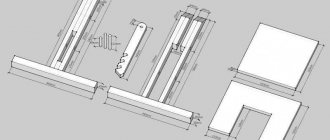
Preparation of a sketch, production of parts and assembly of the product
The process is described using the example of a table lamp, the drawing of which is above. To assemble it, you will need plywood with a thickness of 3 to 5 mm. The best material is first grade hardwood. The work is carried out like this:
- Patterns are made from paper exactly to size. Then their contours are transferred to plywood; it’s easier to do this using regular carbon paper. Before starting work, you should stick the sheet with tape so that it does not move.
- The parts are cut out with a jigsaw. This is the main working tool, so you need to purchase thin blades with fine teeth in advance to ensure better cutting quality. Additionally, narrow width options are best for cutting curves and small features.
- All cutouts for connections on the platforms and side elements are best made with a router. Then they will be the same size, which will simplify assembly.
- The ends and surface are sanded manually or by machine. The parts must be smooth.
- The surface is cleaned of dust and treated with varnish or impregnation. Work continues after drying.
- During assembly, glue is applied to the joints, after which the parts are connected and fixed. When about half of the lamp is assembled, the socket is placed inside and the wiring is pulled through. Then the product is glued to the end and the glue is left to dry.
It is better to apply impregnation in several layers so that the coating is durable.
Making an unusual lamp from plywood is not difficult if you have an accurate drawing and the necessary tools for the job. To ensure safety, wiring connections must be covered with heat shrink or pads used. It is advisable to install LED lamps, as they hardly heat up.
A few words about self-assembly
A big danger when using wooden lamps is fire. To minimize the risk, you need to correctly assemble the craft with your own hands:
- Leave a distance between the lampshade and the lamp of at least 15 cm, and between the base and the base 5–7 cm.
- As a radiation element, use energy-saving lamps up to 15 Watts or LED strip.
- In order not to drill through the workpiece, you can make a groove on the back side for the wires.
- When laying wires in a wooden trench with your own hands, they need to be insulated. Silicone sealant is used for insulation. After drying, it can be painted to match the wood and the wires will be invisible.
Options in the interior
Wooden lamps are not only beautiful, but also very versatile. They are able to enrich almost any design idea, regardless of stylistic orientation.
They are most often used when decorating interiors in oriental style. They also look great in a room decorated in a “country” style - most often country houses or cottages.
Here they use models with a natural shade of wood and a minimum number of additional design elements made from other materials. The combination of noble simplicity and refined sophistication is a valuable property of wooden lamps.
Wooden lighting fixtures are also in demand for creating retro interiors. With this detail you can immerse yourself in almost any era. Lately, antique-style lamps in the shape of a cart wheel, on which candle-shaped lamps are placed symmetrically around the circumference, have become increasingly popular.
This decor is used when decorating home interiors in the style of the Middle Ages, as well as for stylized public institutions (cafes, bars, restaurants, hotels, etc.).
Sources
- https://2proraba.com/other/lyustra-iz-dereva-svoimi-rukami.html
- https://dekoriko.ru/svetilniki/iz-dereva/
- https://tvojdizajn.ru/ljustra-svoimi-rukami
- https://LampaExpert.ru/lyustry/iz-dereva-svoimi-rukami-originalnye-idei-pod-starinu-dlya-dachi-i-doma-iz-vetok-instruktsiya-i-skhemia
- https://www.remontbp.com/derevjannye-svetilniki/
- https://dizajngid.ru/lyustra-svoimi-rukami/
[collapse]