Recently, various inscriptions and individual letters made of wood or plywood have become very popular. They are used in a wide variety of situations. You've probably seen similar products in some magazines dedicated to interior design, in gift and accessory stores, in wedding boutiques, in offices offering organization of events. Often such decorations appear in television projects about renovation and interior design. In addition, you may have seen similar signs in IKEA stores.
First lesson
We will make a sign for the bathhouse; you can do it yourself without spending a lot of money or overpaying someone else for the work.
So, for work you will need the following tools and materials:
- Wood;
- Ruler in the form of a triangle;
- Simple black pencil;
- Saw;
- Furniture varnish;
- Stain;
- Sandpaper;
- Application brush.
Step-by-step manufacturing process.
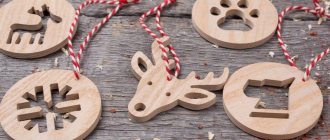
We cut out a sign from a rectangular board, as shown in the photo.
We find a sketch of the word on the Internet and redraw it on a sign.
If you are afraid to draw yourself, you can print the sketch on a printer and transfer it onto the material using carbon paper.
To make the words look more interesting, we suggest you draw leaves or, for example, brooms for them. Once the sign is made for a bathhouse.
Let's move on to wood carving. The carving technique is simple, so even a beginner can handle it. To work, you will need only three types of cutters - a joint, a cutter, and chisels. With the first type of cutter you need to make a cut along the entire contour of the word, with the second type we select the drawing, then the letters will be three-dimensional.
Read this: Wood Carving Patterns: From Simple to Complex Designs
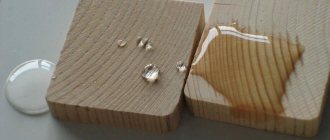
You can also make steam as a decoration, as shown in the picture. Sand the finished plate with sandpaper.
We cover the finished plate with stain. You can apply it in two layers, again going over the letters with sandpaper.
We varnish the finished product. Place in a dark place until completely dry. Afterwards, you can safely use it for its intended purpose.
Creating inscriptions
To work you will need the following:
- Sketch with inscription;
- Plywood;
- carbon copy;
- Sandpaper;
- Drill;
- Jigsaw;
- Clear varnish;
- A simple black pencil.
Step-by-step process for creating an inscription.
We lay the plywood on the work table and sand it to level the surface. We transfer the finished sketch to the prepared surface.
It won't hurt if the inscription is applied again. First of all, this is necessary for your own convenience.
Using a drill, we drill out places near the letters that have a closed contour.
When working with a drill, you do not need to put pressure on it, otherwise the plywood will begin to crack, and the inscription will not work.
Next, you need to cut out the inscription with a jigsaw from a single piece of plywood.
Now the work requires increased attention. After all, with the help of a jigsaw we produce the most complex cuts.
When working with an electric jigsaw, you must follow safety precautions; the most important thing is to take your time when cutting.
Read this: DIY Book Carving for Beginners: A Masterpiece for Book Lovers
The final action will be considered cutting out letters with a closed contour.
The finished inscription must be sanded. This process must begin with the front and back sides. Afterwards we sand the side parts of the inscription.
The inscription is completely ready, all that remains is to color it. But this is at your request. A prerequisite is to coat it with clear varnish upon completion. Leave until completely dry.
Here's what we get as a result of the work:
That's all, and the master class has come to an end. As you can see, you can make such an inscription yourself. The main thing is to have the necessary tools with you.
how to carve on wood
I need to find a company that does laser cutting on wood, who can recommend which one? one job needs to be done.
Girls, I’ll make a metric out of wood with various pendants on ribbons for your kids or as a gift)
We cut out a love tree for dad, sign it and glue it on double-sided tape.
How to translate the inscription into a tree/decor for baskets
We're preparing a surprise for dad for tomorrow. A tree made of hearts We've only just cut it out, but we'll see what happens tomorrow #schoolmom #early development #Rostovchildren #Rostovmama #what to do with a child #valentines
Making an inscription from wood
And it’s been a while since we trained our fingers))) I cut out a tree, a hedgehog, a sun from cleaning wipes and made a dinosaur out of the leftovers))) the task is to remove and put on clothespins. #fine motor skills #mom_everyday #games with children #ideas for activities with children #school_for_baby #development #developingplaying #forchildren #athomemom #leisurewithchildren
We study the seasons. My daughter and I made this tree from two sheets of cardboard. It’s very simple to do: draw a layout of our tree. cut out. We transfer to cardboard in two copies. Then you need to make slits on top of one copy. from another.
The kindergarten offered to make autumn crafts at home with the children and bring them to the group.
This time we decided to make something like three-dimensional paintings.
I assembled the frames, I also cut out the wooden houses, and then... children's creativity.
Master class No. 3
For work you will need the following tools and materials:
- Pine board, thickness 18 mm;
- Plywood sheet 6 mm and 8 mm thick;
- Stain;
- Varnish for painting;
- Jigsaw;
- Jigsaw machine;
- Drill;
- Fraser;
- Grinding machine;
- Strubnitsy.
Today we will make a sign for your home. So let's get started.
In the Photoshop program we make an inscription for our home. We print it on a printer, this is how it should turn out.
The resulting sketch must be attached to the pine material.
Numbers and letters must be pasted separately, as shown in the photo.
So, let's move on to cutting out the frame. It should come out of two parts. Here's what happens:
Read this: Wood carving with an engraver for beginners: some ideas
The sawn parts must be glued together. We wait until the glue is completely dry.
In the meantime, we begin to cut out letters and numbers. In closed letters it is necessary to drill the middle.
Then we begin to cut out from the inside, and only then move on to the outside cutting.
That's it, all the components are ready.
We sand the workpieces, thereby removing the paper.
Here's what happens:
By then the frame should be completely dry. Let's start sanding.
We cut out the background of the sign from plywood 8 mm thick and begin sanding.
Cover the front side with stain.
Use sandpaper to sand down the letters and numbers.
The background part and the frame must be glued together.
It is necessary to cut off excess material from the background.
This is what you should get:
The frame with the background is completely ready. Now we move on to gluing the inscription itself. Here's what happens:
We coat the finished sign with colorless varnish; it is advisable to do this in several layers. Remove until completely dry.
At this point our plate is completely ready. All that remains is to make places for attaching the sign itself. Feel free to take it and hang it up.
We also suggest that you watch video tutorials that will help novice craftsmen understand this craft.
Vytynanka numbers on windows
You won’t be able to make a beautiful inscription “Happy New Year 2021” without numbers. To decorate everything beautifully, make not only letters, but also beautiful numbers on the outside. Here you will find a complete set of numbers, from 1 to 10 in different variations. By the way, for one inscription you can use numbers and letters of different designs. It will be even more interesting this way. In general, download and print. what you like, but making an inscription, having fun discussing each letter and number with the children, is another event.
So, here is the first number 0, look at 17 stencils of the number 0 in the style of protrusions for your choice. For the coming 2021, this is a very big number. Of course, not so important when we celebrated the year 2000, but still :)
There are different options, and openwork embroidery, and with a hat and even with a sheep - beautiful.
READ How Much Oil to Pour into a Vibrating Plate
New Year's figures 8 and 9
There really isn’t a lot of choice here, but there are enough numbers for the rest of the set.