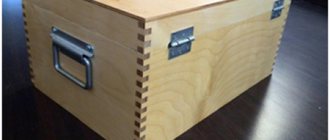
Plywood is a very accessible, relatively inexpensive material for various crafts. Things made from it can have not only decorative value, but also be useful in our everyday life.
Plywood is an easily processed building material, which is produced by gluing together several layers of veneer and specially treated wood chips.
Photo: Having drawings of animals made of plywood, you can use a jigsaw to create a special atmosphere in your home, including a cheerful one, for example, this cat made of thin plywood makes you smile. Is not it!
Introduction
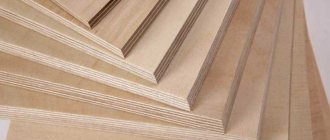
These sheets, which can be used for making crafts and structures, may differ:
- number of layers of veneer - three-layer, five-layer and multi-layer;
- the type of wood from which the multilayer sheet is made (deciduous or coniferous);
- according to the degree of processing of the surfaces of the plywood sheet (sanded on one or both sides, not sanded).
Building codes and standards
To learn more about the building material in question (about the classification of the entire plywood nomenclature, grades, standard sizes produced), which can be purchased for the manufacture of many products and crafts, it is recommended that you familiarize yourself with the following documents:
- GOST 3916.1-96 “General purpose plywood with outer layers of hardwood veneer.”
- GOST 3916.2-96 “General purpose plywood with outer layers of softwood veneer.”
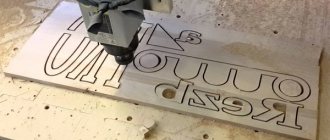
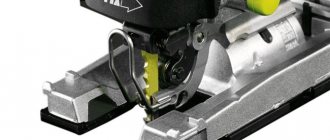
Sawing with a saw table
This design allows you to significantly simplify the process of cutting different materials. When using, you need to move not the tool, but the workpiece. This allows you to control the marking line without much difficulty. But at the same time, increased forces on the surface being processed should be avoided.
You can buy a saw table or assemble it yourself
Schemes, drawings and patterns for products made from plywood sheets
A pattern of a cat, according to which, using drawing programs, you can easily make a plywood blank of any size with your own hands for further processing (for example, cover it with polyurethane foam and paint it black).
Computer drawing programs
Today you can easily find a diagram, a pattern for a plywood structure, so that you can then prepare any drawing using computer-aided design systems (including the above cat pattern). Next, use a plotter to print it onto a paper sheet of the required format.
Popular drawing programs are the easiest to learn and can be used in 2D and 3D modeling, including for plywood structures:
- "KOMPAS" is a complex of automated systems with the ability to prepare drawings in accordance with the standards of the ESKDI and SPDS series;
- AutoCAD is a two- and three-dimensional computer-aided design and drawing system.
So, if you cannot find a detailed drawing of the plywood product you need, then the application capabilities of the given software will help you make a full-fledged drawing using any diagrams and patterns posted on the Internet.
Kayak
The price of the construction plywood from which the kayak is made is simply incommensurate with the pleasure that the person who made it with his own hands and who loves rowing boats will receive.
Appearance of a single-seater boat, drawings of which are given below in the article
The Eskimo kayak is the same kayak among the Aleuts - a traditional rowing boat of the Arctic peoples. This boat can be single, double or triple. Let's post drawings of a plywood kayak for one person.
For this kayak, plywood sheets were purchased - 1525 x 1525 (mm), thickness 4 (mm).
The algorithm for building a rowing boat from plywood sheets is, in principle, general, with the exception of some nuances. A step-by-step procedure for cutting, processing and assembling a kayak can be seen in the video in this article.
Plywood table - simple and functional
Plywood table: 1 – cover;
2 – inner wall; 3 – side (end) walls. Clear drawings of a plywood table with your own hands, which will be easy to implement even for a person without special carpentry skills and experience.
Table cover (1 sheet) - 1300 x 600 x 16 (mm)
Inner wall (1 sheet) - 1170 x 400 x 16 (mm)
End wall (2 sheets) – 450 x 740 x 16 (mm)
Cut plywood with your own hands
Sawing technology:
- All procedures are carried out according to drawings that are drawn up in advance. This will avoid mistakes.
- The marked slab is laid in the prepared place. It is important to ensure free passage of the disk or saw and rigid, stable placement of the resulting fragments.
- The exposed stop is fixed with clamps.
- Based on the most comfortable position, the largest possible cut is made. It is important to ensure that the parts - especially the part being processed - do not sag or jam the tool. Whenever possible, cutting is carried out without stopping.
- Figure cutting is performed in a single section or fragments, the excess is removed gradually.
Masking tape glued to the cutting line can prevent the appearance of small chips along the edge, but if the disc is selected correctly, then you can do without such manipulations
. For complete safety, it is recommended to work with safety glasses, a mask and a respirator. All processes are carried out carefully; upon completion, the device is disconnected from power.
Plywood constructor
Various plywood construction kit drawings are now gaining more and more popularity. Assembling such models from safe material is a very useful activity for children and teenagers. Such crafts will become good examples of collections and will decorate the modellers' corner.
Tank
The photo shows drawings of a plywood tank: top of the hull
Tank bottom
Tower details
Other elements of the tank
The stages of installation of the tank model are as follows:
- The plywood is sanded (first with medium-grain sandpaper and then with fine-grain sandpaper);
- The drawings are carefully transferred through carbon paper onto sheet plywood material sanded with fine-grained abrasive.
- In the corners of the contour transfer, through holes are drilled with a drill (drill 3 mm or more);
- Attach the file to the jigsaw and start cutting out the elements of the tank;
Sawing can be done even by a child
Note! Cutting out parts must begin inside the contours of the tank blanks, and only then around the office itself.
- After cutting out all the parts, sand them again with sandpaper, removing the burrs left from the file;
We polish every detail - Start assembling the parts.
Advice! When assembling the model's plywood assemblies, have different types of needle files on hand so that you can fit the elements together at any time.
- After adjusting all the parts, you can start gluing them (for example, with PVA glue, “Titan”);
Advice! In order for the components and elements of the tank to grip each other more firmly and reliably, you can tie them with thread or rope for a while after gluing them.
- The cannon can be made by cutting the wooden handle of a watercolor brush or from other auxiliary material;
- If desired, you can apply a side number or other inscriptions and patterns to a tank, or any other model, using an electric burner;
- For greater preservation and decoration of the model, they can be coated with varnishes and paints.
The model of the tank is made of plywood with a thickness of (3 – 5 mm), the plywood elements were sanded, joined with “Titan” glue, primed and coated with acrylic varnish and paint. The photo shows the result of the actions described above.
Car – retro (old Mercedes)
Model of a retro Mercedes car
Note! When you transfer these drawings of a plywood machine with your own hands onto the plywood sheets themselves, do not forget to transfer the numbers.
Mercedes parts (1)
Mercedes parts (2)
When assembling the model itself, look carefully at the numbers.
In this case, the process is carried out according to the following algorithm, in accordance with digital notations:
- the part or assembly numbered 1 must be connected to another number 1;
- and part number 2 is attached accordingly to the next number 2 and so on until the machine is assembled.
Gun
Model of a pistol of the Bulldog type M19
Drawings of a pistol made of plywood of the Bulldog model. When assembling, we follow the same rules as when assembling a machine: the same numbers must be mounted with each other.
Pistol parts(1)
Pistol parts(2)
Advice! This model of pistol is best coated from a bottle of spray paint; for a better resemblance to the original, layers of black paint can be applied.
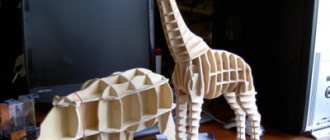
Dinosaur
It’s not difficult to make a model of such a dinosaur; it’s just a matter of patience when cutting out the parts with a jigsaw.
When designing, drawings of plywood dinosaurs, for example, those presented below, can be made in any scale you need according to the presented pattern in a drawing program for a computer.
Preparing the material, model elements and the assembly itself is not difficult, but you will have to have some patience when working with a jigsaw and adjusting the model components to each other.
Parts for assembling a dinosaur
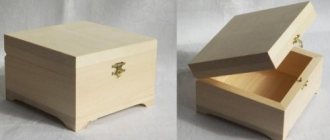
Napkin holder – “Grape leaves”
Very light + simple + necessary detail in everyday life
This item in the shape of grape leaves is always useful in the household for its intended purpose - for napkins, and for storing, for example, sheets of paper of the selected format:
Drawings of a plywood napkin holder: before varnishing, staining or painting a plywood blank, you need to burn out the pattern
Napkin holder base with technological slots for attaching vertical parts, in the shape of grape leaves
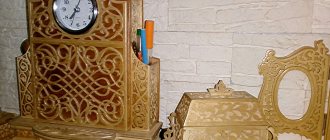
Vase, stand for pencils, pens, brushes
A vase that can be used for sweets, for writing objects, for storing other small household items.
Drawings of a plywood vase, from which you can easily cut out a craft of the size you need:
Stand, with holes for fastening the side walls of the vase
Side, prefabricated walls of the vase with holes for attaching to each other
Plywood panel
It is the ease and simplicity of cutting out plywood sheets of various configurations with different sizes with a jigsaw, and installing various structures from them, that allows us to create a variety of decorative panels for the walls of our homes. Any panel made carefully is an excellent gift for family and friends.
Panel – “butterfly shelf”
Drawings of a plywood panel, which also serves as a shelf in the household:
A panel in the shape of a butterfly with a hole for a shelf (the shelf can be made shaped, rectangular, or semicircular).
How to cut material without chipping
To avoid such defects, it is advisable to consider the following recommendations:
- Based on the cutting drawing and the dimensions of the selected tool, the thrust rail is set. It will avoid vibrations of the cutting device, which will reduce the amount of damage.
- If the work is carried out with a hand-held circular saw, the tooth output is minimized. As a result of the adjustment, the sawing part should not protrude more than 5 mm.
- To make the edge without chipping, a special tape is glued along the line. This reduces delamination, but does not guarantee complete absence of defects. An alternative option is to wet the upper area, but due to the moisture resistance of the material, it will not be possible to achieve the desired effect.
- The cutting part is brought to the starting point of the process in the switched on state, since when started, the teeth tear the wood fibers directly at the edge.
- The movement of the tool should be uniform; pressing too intensely creates creases and burnt areas. If you move very slowly, tracks will appear as a result of constantly entering the surface.
An important point is the type of plywood. The most difficult to process are laminated options: chipping can be completely eliminated only on a format-cutting machine, where trimming is carried out from above and below. You can minimize damage if you immediately select the front side and carry out a test saw on the section. This will allow you to determine the correct location of the sheet in relation to the cutting part.
Tips for preparing and assembling plywood crafts
To avoid such defects in the workpieces when sawing with a jigsaw, prepare the plywood sheet by coating its surface with a solution of glue and water.
Some useful tips and warnings:
- When transferring patterns and drawings onto plywood, use the thinnest and sharpest pencil lead. It's even better to use a used ballpoint pen, then the lines will always be the same and the copy paper won't be torn by the ballpoint. It is convenient to transfer drawings to plywood using a laser printer.
- For better fastening of parts, where possible, it is recommended that the width of the grooves correspond to the thickness of the plywood sheet.
- There are two types of files with large and small teeth. It is more convenient for beginners to learn how to use a thick file, and cut out small parts with a thin file, already having some experience and skills in using a jigsaw.
- The files must cut from top to bottom, so pay special attention to the correct fastening of the file in the jigsaw.
- Files can easily break, so cut carefully and do not allow parts to hang on the saw blade.
- When purchasing a file, make sure that the teeth are sharp, and that the file itself should not bend easily, but rather be firm. It’s not the flat ones that are easy to use, but the so-called “twisted” files – they can be used to make cuts in any direction.
- For those who enjoy cutting out structures from plywood sheets as a hobby, there is no need to purchase a band saw; it is enough to purchase a jigsaw. Although everyone is an amateur, some craftsmen still often resort to a hand jigsaw when they “need to get a feel for the material.”
Work process
They cut it out with a jigsaw on some kind of stand to make it smooth and easy.
Before using a jigsaw, a pattern should be applied to the workpiece. It can be transferred from a special album (you can look at flea markets for albums with cutting patterns from the times of the USSR), or you can draw it yourself. Another option is to print the pattern on a printer and then glue it onto the workpiece. Regardless of how the pattern is applied, you should paint over those areas that should not be cut. After this, the workpiece is placed on the work surface, using clamps and yews for fastening. At this point the preparatory stage of work is completed, then the cutting begins.
They start cutting out from the internal contours of the workpiece. This is due to the fact that plywood is a fragile material, and in the case when the outer contour is cut out first, there is a high probability of chipping the finished pattern. To start working in the internal contours of the workpiece, you should drill holes with a drill into which the file is inserted, after which it is fixed to the jigsaw. If the workpiece has more internal contours that need to be cut, you should drill the required number of holes before securing the workpiece. This will reduce operating time. When fixing the blade on a jigsaw, it should be secured so that there is no vibration of the blade during operation. The cutting process itself differs little from working with a regular saw - the same translational movements. An important point when working is the need to maintain a 90° angle between the workpiece and the jigsaw blade. If the cut is made at an angle, the blade may break. Such mistakes are often made by beginners, but there is nothing wrong with this - the canvas is quickly replaced.
http:
conclusions
- Before choosing, purchasing and directly working with the material from which you will cut models, panels, construction kits and structures, familiarize yourself with its types and classification according to construction documents (GOST).
- For sawing, purchase high-quality tools, equipment and accessories for it.
- Take a responsible approach to choosing high-quality plywood. Do not limit yourself to a visual inspection, tap it for internal voids and delaminations due to poor gluing of the veneer layers.
- Before working with a jigsaw, optimally equip your workplace. Pay special attention to good lighting so that the cut and markings are clearly visible and your eyes don’t get tired. It’s not a bad idea to use a strobe light to illuminate the area where you’re working with a jigsaw. Convenient and comfortable sawing!
A little about safety
The jigsaw for figured cutting is an arched frame. The tool is equipped with a handle and 2 attachments for a cutting blade, which allow you to cut patterns of varying complexity.
Depending on the type of work, different attachments are selected. Thick saws are used to cut out contours, and thin blades are used for openwork work. The workpiece processing process can be mechanized using electric tools. To speed up the process, some models are equipped with a pendulum mechanism.
A stationary electric tool, which is mounted on a static surface, is similar in principle to a sewing machine. The use of this type of equipment eliminates perpendicular cutting errors.
Sawing with a jigsaw requires compliance with safety rules. The workplace must be properly equipped. When working, it is recommended to use personal protective equipment.
What else do you need for creativity?
First, you need a sketch of the future product. When choosing profiles, designs and ornaments, you can use both traditional sources, books and magazines, and Internet tools. There are a huge number of photographs of finished products, as well as drawings and patterns on the Internet. You can use three types of prototypes and sketches:
- completely finished sketches, patterns or drawings;
- ready-made sources, modified at your discretion;
- completely unique own sketches.
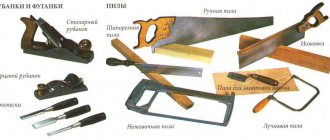
In addition to the jigsaw, you will need many auxiliary tools and tools. It is impossible to give an exact list; it all depends on the technology and size of the future product. But you can make a mandatory list of what you need, here it is:
- drill or screwdriver with drills or cutters. If the slot is closed and does not start from the edge of the workpiece, holes are drilled to insert the file;
- marking tool: compass, ruler, square, tape measure, pencil, awl for pricking the center of holes, etc.;
- a set of round and flat needle files and files or emery devices for finishing the internal planes of the workpiece.
For the combined technology, jigsaw plus surface carving or lathe processing, separate tools are required.
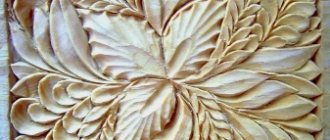
What is artistic carving?
This is one of the types of wood carving. Its main difference is not superficial, but through curved cuts that make up ornaments, figures, product details, etc. The photo shows a simple example of such work:
Obviously, this kind of work can only be done effectively with a jigsaw. Of course, you will need auxiliary tools.
If desired, the slots can be made without a jigsaw. For example, punch with chisels, straight and rounded, use cutters for semicircles and circles. But such work options are slower and of poorer quality than using a jigsaw. Therefore, this method of wood processing is called “sawing with a jigsaw”, because this tool is the main one.
What tool is needed
All tasks are performed by different tools. There are 3 main groups of tools that work on the principle of a jigsaw.
Manual
This is the simplest option, files of different sizes that are held within a frame. In principle, a jigsaw can be called both a metal file in a frame and a small bow saw for wood. But classically this is the name of a jewelry jigsaw, a short thin file in a high frame.
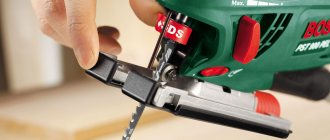
Manual electric
A jigsaw has a number of advantages and disadvantages compared to a simple hand tool. It cuts quickly and easily. The craftsman's only effort is to accurately guide his saw.
The downside is that this tool is quite clunky. The file is fixed at only one end in the rod. Therefore, it tends to move away from the markings. Visual control of the progress of the saw is somewhat difficult.
Therefore, the finest and most precise work is performed with hand tools, while coarser work is performed with electric tools.
If you need an electric jigsaw, then before purchasing we strongly recommend that you familiarize yourself with 9 tips that will help you choose a jigsaw.
Tabletop electric
This is a version of a mobile (manual) jigsaw. The only difference is that it is stationary. If a hand tool moves along the workpiece, then in a stationary tool the workpiece is dragged under a file. For this reason, it is more difficult to work with large parts.
At the same time, among the desktop options there are highly efficient and productive tools. Especially those that work on the principle of a band saw. Instead of a saw, they have a closed saw blade running in a circle on two guide wheels. In its pure form, such a tool is not called a jigsaw, but rather a tabletop band saw. But it is quite possible to perform jigsaw tasks on it.
There are also stationary jigsaws of varying power and classic design, where the file makes reciprocating movements. Moreover, on some models it is fixed not at one end in the driving rod, but also at the other end in the passive (driven) rod, which makes cuts more accurate.