Wood has traditionally been a material used for exterior and interior decoration of residential premises. And today, openwork wood carvings, photographs, drawings and sketches of which can be found in colorful art publications and on the Internet, amaze the imagination with their beauty and grace.
People who love to make decor with their own hands are able to master the art of artistic cutting. Wood allows you to create genre paintings and decorative compositions that you can decorate your own home with and give to friends. A favorite skill in the hands of a connoisseur of the beauty of natural materials can become the main profession. The demand for wooden carvings today is higher than ever.
Tools for work
In order to get started, you will need to select special tools and study the features of the technology. This matter has its own nuances that make it possible to more fully reveal the beauty of wood in the ornament.
You also need to stock up on suitable blanks and sketches that will be repeated on wood in the form of patterns, lace, compositions or genre scenes.
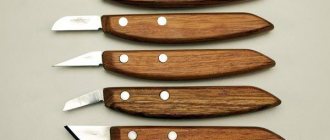
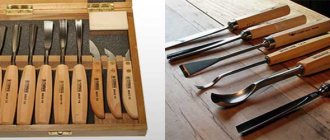
For his work, the carver uses a large set of tools:
- knives;
- jigsaws;
- needle files;
- chisels;
- electric drill;
- drill;
- bars;
- chisels;
- spoon cutters;
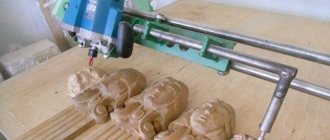
- milling machine;
- drill.
Advice for a beginner: when choosing tools for work, you need to focus on the quality and durability of such products. In the first stages, you can get by with a small number of devices.
A special set of tools is designed for a beginner. It will be enough to master the basics of artistic processing of wooden blanks.
You will also need raw materials from certain species. The quality of the product will depend on this. There are hard and soft varieties of trees. Each type has its pros and cons; in each specific case, a specific processing technology is selected.
Soft breeds include:
- Linden;
- birch,
- aspen
- spruce;
- pine;
- juniper.
Soft material is easier to process, but it is easier to ruin it with one wrong move of a knife or chisel. Another thing is hardwood. These include:
- oak;
- Red tree;
- beech;
- boxwood
Solid raw materials are expensive, but products made from them are beautiful, durable and in demand. Experienced craftsmen work with expensive rocks and know how to process a hard surface without breaking the tool or causing injury. Therefore, beginners should start with cheaper and more amenable material.
To select raw materials, it is necessary to take into account not only the hardness, but also the color of the wood. For beginning carvers, birch is an ideal choice for creativity. It can be cut in different directions and lends itself well to drilling and cutting. When choosing a design for a product, it is necessary to take into account that over time, light birch wood may darken.
Coniferous species are suitable for products with a large number of slots. The soft material of pine, spruce, and cedar allows you to apply large designs and create intricate patterns. Beginners can start with conifers, as well as linden, birch and aspen.
A beginning carver should learn the basics of craftsmanship from simple ornaments. For the first job you will need a small set of tools. First, you can get by with a jigsaw, an awl and a knife.
Before you start cutting, you should set up your workspace with good lighting. Having selected a suitable workpiece with a flat surface and without knots, you need to transfer the selected pattern onto the surface of the workpiece. You can use tracing paper for this. When the stencil is transferred, it is coated with varnish on top so that it does not disappear or deteriorate during work.
A beginner will need knives, chisels, and an awl. For through slots, it is better to use a jigsaw or a manual milling machine, this will save time and effort.
The carver must master all the techniques that he will then use in his work on the product. Using a variety of decorative wood processing methods, you can create artistic masterpieces.
Varieties of ornaments
Carved ornaments have been used to decorate wood products since ancient times. This is a pattern that is characterized by the rhythmic placement of parts made in the form of various visual components. There are many different kinds of ornaments - floral and geometric patterns, images of birds, animals and humans. Often, complex threaded elements are simplified and stylized into simpler ones for visual perception, as well as for the manufacture of elements.
Geometric
Geometric ornament patterns consist of the simplest elements, the combination of which sometimes creates fantasy pictures that cannot but surprise. Wooden carved decorations and compositions are usually presented as rosette, stripe, border or star designs. Individual elements can be used independently:
- The dot is almost never used as a separate element, but when repeated it gets a decorative effect.
- Lines are an element that is often used, most often used to distinguish between different motifs.
- The broken line - zigzag is a symbolic watermark.
- Rhombus and square - often serve to limit the space filled with motifs.
- Octagons and hexagons are a common element with an oriental motif.
- Crosses are symbols from antiquity with a varied structure.
- Twisted cords and spirals are unusual elements with a geometric curvilinear structure.
- A circle contains a pattern or represents an independent element of a composition.
The geometric type ornament is used for all kinds of wood, but in particular in contour and geometric techniques.
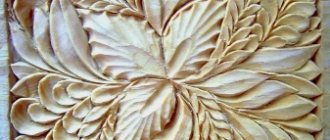
Vegetable
A leafy or floral pattern can be embodied in the form of a strip or border of an ornament with repeating elements, or it can be a separate composition with images of fruit-bearing plants, trees, flowers and other things. Representatives of the flora can either be depicted naturalistically, or stylized and then simplified. After such carvings, the plant type ornament is the most popular, and it can also be used for all types of carvings. At different times and among all kinds of nationalities, there were certain favorite plant patterns. The most popular plant forms (since ancient times): oak, lily, ivy, grapes, laurel, hops.
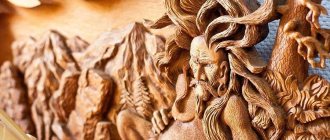
Zoomorphic
Such an ornament (animal) is based on the repetition of images of animals. They can be both real and mythical. Most often, zoomorphic images for carving are stylized. This ornament is one of the oldest, and in different countries there are certain preferences, as well as the symbolic meaning of certain animals. A carved composition may contain not just a specific animal, but also details - wings, paws or heads. The animalistic pattern is often combined with other patterns - geometric or floral. Patterns with animals are used in all types of carvings, both sculptural and flat-notched.
Human image
Sketches and designs for wood carvings depicting a person are often used in the art of wood carving, either realistically or schematically. For example, the human face is used to decorate similar decorative elements, for example, mascaron. Often a person is in an ornament with animal or plant motifs.
Complex
There are also carved elements that carry a decorative, or perhaps symbolic meaning:
- Hieroglyphs, inscriptions, ligature (Arabic type) and so on.
- Heraldry - family coats of arms, emblems from different countries.
- Symbolic motifs are very diverse, for example, the yin-yang sign, cross, solar signs, lotus, etc.
These are the main types of patterns.
Artistic themes and uses
The carver uses various sketches in his work, from which he takes an image and transfers it to the surface of the workpiece. Today, for this it is not necessary to use an image made by hand with a pencil. Modern technological advances make it possible to use photographs and scanned digital images that can be taken on the Internet.
Sketch of the ornament
Samples for artistic wood processing are distinguished by their decorative and thematic variety. On the Internet, websites dedicated to this craft offer a large selection of cutting themes. The facade of a wooden house is decorated with wooden patterns. This decor will look great on doors and walls. Artistic cutting is used for the production and finishing of furniture and tableware.
Kitchen utensils and interior wooden products decorated with intricate openwork are very popular among buyers. In each specific case, the master selects the material, creates a sketch of the future product and begins to work.
The drawings come in a variety of themes. Geometric plant motifs are used. Often the wooden surface is decorated with genre scenes depicting animals, people and trees. Wood is a very plastic material, and in the hands of an experienced carver it turns into a real artistic canvas.
For each type of artistic cutting, a special surface treatment technology is used. Using different techniques, the master creates a three-dimensional canvas on which you can see the smallest details of the image.
Tools
You first need to prepare a workplace with enough free space. Good lighting should be provided.
To get started you need to prepare special tools:
- Graphite pencil and ruler for drawing contour lines of the future pattern on a wooden base.
- A compass for dividing a complete sketch into separate fragments to simplify the work.
- A jamb knife used for direct cutting.
- The file is needed to form the wooden workpiece itself on which the carving will be made.
- A straight chisel can serve as an auxiliary tool for a jamb knife.
A set of necessary tools has been collected. It remains to determine the width of the working part of the knife. This parameter is selected in accordance with the size of the picture. Additionally, you may need an eraser and fine sandpaper.
Variety of techniques
Various technologies are used for artistic wood processing. In each specific case, the choice of method determines the product itself, its purpose and the type of wood from which it will be made. During the existence of this applied art form, several cuttings stood out:
- flat-relief;
- embossed;
- excavation, or geometric;
- slotted;
- contour;
- volumetric.
The pattern can be through, flat, relief, volumetric, small and large. The choice of finish directly depends on the size and functional purpose of the wooden product. For large items, such as decorative carvings for house facades, a large pattern is used. For interior items and furniture, craftsmen apply small patterns to the product, which are carefully worked out.
Details
The main forms of carved ornaments
Depending on the compositional nature, placement and shape, this type of ornament can be divided into categories:
- Border and ribbon ornament is a sharp type detail that borders the product or runs along its edge.
- Garland is a pattern with a wave-like shape that has plant motifs.
- A rosette is a separate type of symmetrical type ornament with a regular shape (polygon, circle or oval).
- Arabesque is an ornate, complex pattern of floral or geometric patterns.
- Palmette is a fan-shaped carved decoration.
- A wreath is a carved element with plant motifs.
- Braiding is a pattern in which elements (ribbons, stems, stripes, etc.) are intertwined.
- A panel is a pattern that is placed in a ribbon or carved frame.
- An openwork type ornament is produced using the saw-type carving technique, and its peculiarity is the creation of a through patterned background.
Below you will find beautiful sketches.
Flat creased pattern
This image has a slight relief. The image has the shape of a silhouette, and all the details are located in the same plane. For execution, an oval contour, a cushion pattern and a selected background of the pattern can be used.
How subtypes of this technology are distinguished:
- contour,
- stapled
- geometric (triangular).
To perform the contour technique, in-depth lines running along the main background are used.
Staple technology uses special notches in the form of staples to create the finish. When using geometric carving, the master applies the outline using triangular pyramids and pegs. The type of cutting repeated many times in different versions allows you to create a variety of relief decors that are slightly recessed into the general background. This technique is characterized by numerous compositions of geometric shapes in the form of rhombuses, triangles, honeycombs, wreaths, etc.
Types and features of geometric patterns
Carving ornaments (drawings) are formed from geometrically regular elements, most of them having straight sides - rhombuses, squares, rectangles and trapezoids. Due to the simplicity of cutting out a single element, the operations do not require the use of a special tool, and the carver does not have to master the basic theory of pattern composition. In addition, even with a small cutting depth, it is possible to create quite decorative patterns with a rich play of penumbra.
On a note!
When applying a marking pattern on a wooden surface, only the main lines are drawn, and the position of each individual element is determined “by eye.”
When making dihedral notches, initially parallel lines are cut along and across the fibers obliquely. After this, between them, using a chisel of suitable size, a sample of wood is taken to a depth of 2.0 millimeters. Thanks to this, a simple “cup” (“scaly”) pattern is obtained. If a chisel with a straight blade is used to sample wood between parallel cuts, a “ladder” pattern is formed.
Not a single geometric, carved ornament on wood is conceivable without the use of elements in the form of triangular recesses. Typically one of the following two techniques is used:
- carving with a recess at the top, which forms “chips”, “wraps” and “corners”;
- the central depression is located at the point of intersection of the medians, due to which triangles are formed.
The execution of the first type of ornament begins with cuts on the sides. After they are completed, the lower, separated ends of the triangle are connected with one cut of a chisel. The second type of thread starts from the center of the triangle. Triangular recesses are used to form such designs as honeycombs, beads, scales, fir cones and others.
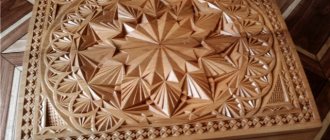
The technique of geometric carving “shine” can be a wonderful decoration not only for individual pieces of tableware, but also for making the interior more decorative as an element of furniture. When performing it, simpler execution techniques are used.
Typically, the “shine” is formed from several or triangular recesses - wedges or triangles, which are connected to each other by their vertices. “Shine” can be made in the form of fans, diamonds, but this style is especially popular for decorating ceiling rosettes, which add great decorativeness to any interior design.
On a note!
There are other techniques as well. In addition, any professional woodcarver considers it his duty to have his own, original style of geometric carving, which, albeit in small details, differs from standard techniques.
Geometric carved patterns look great on unpainted light wood (linden, maple, ash). To paint a wooden carved surface, various types of homemade or industrially produced stains are used.
To age the carving, give it greater contrast and to visualize the relief, use a solution of acetic acid, in which iron nails were “infused” for three to five days. This solution is applied with a piece of foam sponge or a cotton swab, then dried and sealed with furniture varnish.
Wood carving 53 photos:
Selecting material for work
When choosing wood, you should pay attention to three criteria:
- Weight. The heavier the block or board, the stronger the finished product. This rule applies to all types of wood.
- Humidity. Do not use damp wood for work. Sooner or later it will dry out, and this is fraught with deformation of the material, which can also affect the thread.
- General state. The more growths, knots and deformed fibers in the bar, the more difficult it is to work with such material. Such defects do not allow the master to move the tools in the desired direction, since they will constantly “stumble” over obstacles.
If the carver supplies wood himself from a neighboring forest, then the material must be dried. It is advisable to carry out this procedure in the summer, since the tree should lie in the open air for 1-2 weeks. If the workpiece has impressive dimensions, then this period is increased to 1-2 months. You cannot leave material outside during the rainy season. There will be no sense in such a procedure, since at a high level of environmental humidity, water will not disappear from the micropores. After drying outside, the wood is brought into the house, but not placed next to heating appliances. Remaining moisture will be removed within a week. For small-sized workpieces, the boiling technology is suitable. They are placed in a container of water, which is heated and boiled for 2-3 hours. This express method allows you to quickly “squeeze out” the remaining moisture from the micropores of wood. After the procedure, the workpieces are allowed to “rest” in the house for about a week.