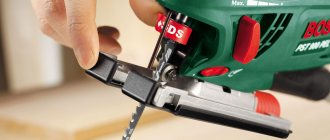
I've been wanting metal planes for a long time. Since I have a passion for restoring old tools, I found 2 old, rusty planes on the market. Now the task is to restore them. We'll see if it works or not. This is the instruction I found on the net.
The author of this article is David Charlesworth. He teaches carpentry in his workshop on the north coast of Devon, southwest England. I would also like to express my gratitude to the translator of this article. I hope it will help people in setting up their instrument.
Chipbreaker operation
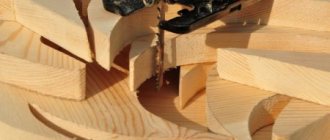
Photos 3 and 4 show a wide gap between the front jaw of the “mouth” and the cutting edge of the knife (chip slot).
The chipbreaker (photo 4) is located at a distance of about 1.5 mm from the cutting edge. In this case, the knife works like a cleaver and a chip is formed.
Here the fibers run approximately at an angle of 10° to the face of the workpiece. Having traveled less than a millimeter, the chips turn clockwise at an angle of 35° and, before moving further, they break, leaving behind a torn surface.
Both photos show that regardless of the presence of a chipbreaker, chips are broken only by the blade itself.
If you follow the recommendation and install the chipbreaker very close to the cutting edge, you get different chips (photo 7). Then the fibers cannot rise as they are pressed by the tip of the chipbreaker. This creates a serious inconvenience - when gouging, you will have to exert much greater effort, sending the tool forward, and there is also a possibility that chips will get clogged between the chipbreaker and the knife.
- How to set up a hair clipper: instructions, features, tips
Link on topic: How to work with a plane - setup
With a wide “mouth” (photos 3 and 4), chipping becomes the cause of breakouts. However, if the fibers do not rise, they may chip. In photos 5 and 6, the cutting edge of the knife is moved towards the front jaw of the “mouth”. At the same time, the sole of the plane itself presses the wood fibers until they come into contact with the cutting edge, which no longer works as a cleaver, but as a truly surgical instrument.
Of course, there are situations when machining performance is more important than an elegant surface. Then the narrow “mouth” of the plane can become a disadvantage.
What you need to know about a plane chipbreaker
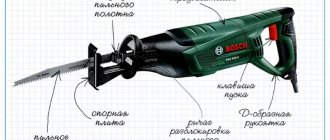
Chips can get stuck between a poorly secured chipbreaker and the plane blade. To check the processing of the contact zone of the chipbreaker, it is worth making a simple device from the clamp of the plane knife and a ground steel plate of 50x25 mm to simulate a real working situation (photo 1). You need to check the contact area at the tip of the clamp. If it does not lie at the top of the bend of the chipbreaker, when adjusting, the offset of the knife by the adjustment screw may be uneven.
One final note. For planes, for example, end planes, with a smaller cutting angle and a knife mounted with the chamfer up, the geometry of the knife is the same as for planes with the chamfer down. They leave behind a beautiful surface... But they don’t have chipbreakers!
Instructions for setting up a manual wood planer
Before planing, it is mandatory to set up a hand plane, as well as a sherhebel and a jointer. The plane is placed with the plantar side up and it is analyzed at what distance the knife cutter is set and whether it is skewed.
The edge of the cutter on a jointer and a hand plane should have an elevation of up to 0.3-0.5 mm, without clearly visible distortions (parallel to the plantar surface); for scherhebel this parameter is 0.3 cm.
The elevation of the protrusion of the edge part above the plantar area of the instrument is measured approximately using a ruler. Or they give an estimate by eye. But greater accuracy in measuring the placement of the cutting edge is provided by a specialized device with an indicator.
For error-free installation and fixation of the blade, disassemble the plow.
Disassembly of plows equipped with wooden blocks and a wedge-shaped knife mount is carried out in the following order. In one hand, a plane is held by the block on the left, while with the right hand, with a slight force, blows with the corresponding devices are performed on the block from the back side until the wedge falls out. After that, they hammer the wedge in and watch how the blade will be positioned.
Please note: a jammed knife will move slightly with the wedge. For this reason, the edge of the blade is set in advance to a slightly reduced height. It is removed from distortions by tapping the ends with a hammer. There are a sufficient number of plows with a metal block. And one of them is presented here.
Setting up a hand plane, in particular its assembly and disassembly, is carried out using screws. There is a groove on the knife that adjusts the height of the blade edge. The adjusted cutter is secured with a screw.
Using the working edge, the chip breaker is adjusted at a distance of 3-5 mm from the edge of the knife cutter and secured by screwing in the screw. The main function of a chipbreaker (also known as chipbreaker) is to break chips. This eliminates the need to independently tear off chips from the surface being cleaned.
Equipped with a chipbreaker reduces the likelihood of unevenness in the wood being processed. Knives with chip breakers must provide a gap from the edge of the knife cutter to the edge of the chip breaker of about 1-4 mm (depending on the properties of the wood and the thickness of the chips). Cleaning a clogged tap hole (bottom hole) is done by pushing a thin sliver or pulling the chips upward. If these cleaning methods do not give the desired result, then the plow is disassembled.
Tips for working with a plane
On the picture:
In this case, by cutting off part of the side wall of the jointer body, I was able to use a digital camera to get close-up shots of the double iron in action. The jointer is fixed on a support attached to the camera tripod. Along the jointer, the workpiece is fed with a clamp screw.
- A homemade device for checking the fit of the chip breaker under clamping load.
- Straight to the grain, the cutting edge gently separates the fibers, and the back of the knife presses them upward.
- Planing against the grain without a chipbreaker. Note the deformation at the base of the chip.
- Planing against the grain with a chipbreaker. And in this case, the surface is torn, the chips are deformed and bent.
- Planing against the grain with a chipbreaker and a narrow slot for chips (“mouth”).
- Planing against the grain without a chipbreaker and a very narrow chip gap.
- Planing oak against the grain with a very low chipbreaker setting.
Author: J. Gorman, (G. Britain)
TOOLS FOR CRAFTSMAN AND CRAFTSMAN, AND HOUSEHOLD GOODS VERY CHEAP. FREE SHIPPING. RECOMMENDED - 100% CHECKED WITH REVIEWS.
Below are other entries on the topic “How to do it yourself - for a homeowner!”
Scraping plane - use: for what and how to do it correctly Scraping planes - WHAT FOR...What kind of plane does every carpenter need? What kind of plane is needed in a carpentry shop...How to use a plane. Setting up a plane (jointer, sander). How to use a plane (double, jointer...Scraper and shavings - what's the difference? Scrapers and scrapers in carpentry...Do-it-yourself plane (photos and drawings) How to make a sanding plane with your own hands He...Preparing wood - planing the rough workpiece and obtaining a smooth finishing board PREPARING WOODEN BLANKS FOR WORK... Do-it-yourself planter from newspapers - photo and description of how to make it How to weave a flowerpot from newspapers:...
Subscribe to updates in our groups and share.
Let's be friends!
Despite the wide range of electric planers offered by stores, ordinary hand tools are still quite popular among carpenters. The fact is that with their help, wood processing can be done somewhat better. Most often, modern carpenters have both types of planes in stock. Electric is used for the initial processing of workpieces, and manual is used for finishing them.
Installation recommendations
The blades are located on the rotating drum of the tool. Their purpose is to remove the top coating of wood during processing. The planer design can be equipped with one or a pair of knives. The last cutting parts are rotatable.
If any side becomes dull, the position of the blade can be easily changed. These parts are typically made from tool steel alloy or tungsten carbide. Steel knives can be sharpened repeatedly on a manual or automatic sharpening wheel.
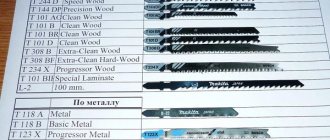
Knives for electric planes are classified according to their shape:
- Rounded - used for processing wide surfaces, because the transitions should be as smooth as possible.
- Direct ones are designed for processing small products and in the process of selecting quarters.
- Wavy (curly). Such blades are used to age the material.
Before working at home, you should make sure that the knives are installed and adjusted correctly. If there are any errors, then certain actions should be taken. The cutting edge of the part should be positioned strictly parallel to the bottom of the electric planer and protrude slightly upward. Correct adjustments can be determined by visual inspection of the instrument.
As a rule, the cutting edge of the blade should protrude about half a millimeter above the sole of the device. Sherhebel, which is used for roughing, should be produced no less than one millimeter. In this case, there will be no problems with adjusting the knives of the electric planer. To do this, you simply need to turn the large and small screw in different directions until the working part is in its intended place. The screws are located on the back of the platform.
Read also: Hydraulic motors axial piston characteristics
After all the necessary manipulations have been performed, the blade is placed in the plane and secured with fasteners. If the tool is completely new, then its blades are already adjusted, but after using it the settings become a little off. Therefore, even if you have not worked with the tool much, it is still advisable to adjust it in advance. It should also be remembered that after adjustment, the operation of the plane should be checked on some unnecessary part.
Design Features
To know how to choose a good hand plane, you should have an understanding of its design. Such instruments consist of the following main parts:
- Frame. This structural element is most often made of wood. It is in it that all the main components of the plane are attached.
- Knife. Sharpened at a certain angle.
- Clamp. Can be made from different materials. This can be a metal plate or bar.
- Chip breaker. Installed slightly higher than the knife. As you can already judge from the name of this element, it serves to break chips and guide them.
- Adjustment screw. This structural element is responsible for changing the position of the knife relative to the surface being processed.
All universal hand planes for wood have this design. The basic elements described above are also present in other, specialized varieties. On the body of any plane, among other things, there are two handles.
What to look for when choosing
The main element of the planer design is the knife. It is its quality that you should pay attention to first. This element must be made of high quality steel. In this case, the plane can be used for as long as possible without the need for sharpening. Of course, it is visually difficult to determine how well the material was chosen for the plane knife. Therefore, first of all, you should pay attention to the reputation of the manufacturer.
Of course, the cutting tool should never wobble. When purchasing, you should also check the front handle. It must also hold tight. In addition, when choosing a plane, you should pay attention to the size of the handle for the right hand. The length of this element varies. A tool with a small handle may simply not be suitable for a person with large hands.
What does the market offer?
Imported models, for example, from Skil, are equipped with standard blades measuring 82 millimeters. If you choose both reliable and cheap options, then you should pay attention to Zubr products. These blades are made from strong carbon steel. They are considered universal because they fit almost all models.
Standard parameters of knives are 82×5.5×1.2 mm . Currently, products from a variety of manufacturers are on sale. The cost of knives is directly dependent on the manufacturer. For example, Bosh products cost twice as much as blades from the brands “Stayer”, “Bison”, etc. However, their quality also differs.
There are also individual knives. For example, electric planers “Baikal” and “Interskol” have individual cutting elements. Their parameters determine unique properties.
This type of knives is often one centimeter wide, and their length varies from 82 to 102 millimeters. If the product suddenly becomes dull, you can sharpen it with your own hands using a sharpening wheel and a shaft.
Varieties
Of course, you should choose a hand plane based on the specific purposes for which it will be intended. There are several types of planes on sale today. The most popular are:
- Universal. This is a regular plane that can be used to do most carpentry work.
- Jointer. The body of this instrument is longer than that of a conventional one. A jointer is used to process large workpieces.
- End plane. The knife of such a tool is located at a flatter angle. This allows high-quality processing of end grain fibers.
- Zenzubel. A plane of this type is used mainly for making various kinds of carpentry joints and folds.
Types of planes
Flat planing
For flat planing, it is best to use hand planes such as Scherhebel, which is perfect for rough processing of wood. With it, the surface after cutting is prepared for final leveling, approximately adjusting all the irregularities to one format. Scherhebel is a plane suitable for a huge number of tasks.
Sherhebel plane
It has proven itself well as the main tool for planing wood that has already been processed. It has a fairly weighty and dimensional metal body, and is mainly intended for rough initial processing of the material by deep planing to obtain an approximate size and shape by cutting thick layers of wood. However, it is impossible to obtain a smooth surface when working with this plane, for which they usually use other types of tools to help, because as mentioned earlier, the types of planes and their purposes differ.
In addition to sherhebel and zenzubel:
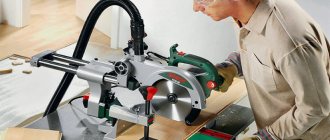
- For the manufacture of floor and external coverings, a bear is well suited - the appearance of which is distinguished by a wide base with paired handles mounted on the sides of the structure. This tool usually requires two people to operate. The blade in the structure is secured with a wedge at a distance sufficient to remove a 1 mm layer of wood.
- A semi-jointer is a shortened version of a standard jointer, used for planing large surfaces. Despite the length of the sole, 60 centimeters, it has an “adult” blade with a width of 8 centimeters. Used for primary processing of prepared parts.
- Sander - a hand plane for final cleaning of the surface and eliminating most defects caused by the influence of previous treatments. When using this tool, planing is carried out on the ends, areas with knots or with disturbances in the structure of the wood. The design provides for the installation of a double knife with a chip breaker blade installed at an angle of 60 degrees relative to the sole.
- Tsinubel is a hand plane for working with twisted types of wood, during use of which small grooves are applied to the surface of the material, which improve the fastening of elements when using an adhesive joint. The installed knives have ribs that form teeth when sharpened. Adequate work without scuffing with twisted wood is ensured by proper installation of the knife blade at an angle of 80 degrees. The length of the device varies around 20 centimeters.
- Structurally similar to a zenzubel, the selector plane differs from it in the presence of a single blade made of high-strength tool steel with the use of subsequent hardening to give additional strength. Designed for cutting grooves when performing carpentry and joinery work.
Half jointer
Medvedka plane
There are also three planes for additional manipulations with the source material:
- End plane - used for processing ends and surfaces with a tangled pattern of fibers.
- A single plane is a tool for repeated processing during work, which produces small chips on the surface without breaking. (Small chips or nicks are normal as a result of working with a hand plane.)
- Double plane - in addition to the main blade, it has an installed chip breaker, which improves the final quality of the work.
Reviews of plane brands
Carpentry tools of this type are sold on the modern market from different manufacturers. Many brands are of very good quality. For example, planes from companies such as Bailey and Handyman have earned good reviews from craftsmen. Bailey tools are valued primarily for the excellent quality of their knives and long service life. Sharpening the knife of a hand plane of this brand is done quite rarely. Sometimes there are comments that mention the build quality is not very good. But even if any shortcomings are found in the purchased tool, they can usually be easily and quickly eliminated, and on your own. Handyman planes, judging by the reviews, are also convenient and reliable. Their only drawback is their not very neat design.
Experienced craftsmen do not advise purchasing Groz brand products (India). Despite the fact that the products of this brand are classified as expensive, judging by the reviews, they are not of particularly good quality. Their build quality is simply disgusting, and at the same time it is inconvenient to work with them.
How to use
Hand planes for wood are simple in design and quite easy to use. The main thing is to do the work smoothly, without jerking. This is especially true for very long workpieces. If this condition is met, the surface of the finished product will be very neat and smooth. When planing, you should stand to the side of the workpiece, with one foot forward.
The top and bottom surfaces of the products are very easy to process. It is somewhat more difficult to do work on the edges. In this case, it is important to secure the knife very firmly. Under no circumstances should it vibrate in the block. Edges should be planed exclusively in the direction of the grain.
There is also a technique that allows high-quality processing of very wide workpieces. In this case, the product is first planed diagonally, adhering to the direction of the fibers. Next, the plane is checked for evenness using a special ruler. At the final stage, finishing is carried out. In this case, a thin layer of chips is removed from the workpiece parallel to the edge.
We process wood: what do you need to know?
Before processing lumber, you need to determine the direction in which you will plan. Usually planed in the direction of the wood grain. If the lumber is made from several boards, then you need to plan it diagonally.
To prevent the edge of the board from becoming uneven, you need to use a corner stop, which is attached to the base of the electric planer on the side and perpendicular to its axis.
When you have finished planing the wide board, you will need to align the boundaries between the passes. This stage is called scraping. For this, a special grinder is used, which will remove all roughness.
The world's first electric planer was released in Japan in 1958. Its appearance on sale is due to the desire to facilitate manual labor, which is a very tedious, monotonous and time-consuming task when processing wood.
This power tool can significantly save the family budget - untreated wood costs several times less than planed wood.
In order not to damage the tool or the material being processed, or to accidentally injure yourself, you need to know how to properly operate an electric planer.
How to sharpen a knife
Of course, a hand plane, like any other tool, requires some care. No matter how good the steel the knife of this tool is made of, sooner or later it will still become dull and will have to be sharpened. Most often, this procedure is performed on a special stone called a touchstone. The latter is pre-wetted with water. When sharpening, it is advisable to moisten the knife itself. You should press it against the stone as tightly as possible.
The sharpening angle of a hand plane may vary depending on the model. Most often this figure is 30 degrees. When working on a whetstone, you usually just pay attention to how the blade was originally sharpened.
Sometimes experienced carpenters sharpen a plane knife on a wheel. In this case, it should be pressed not against the edge, but against the side surface. When using a wheel, you can also get a pretty high-quality sharpening. It will be very convenient to use a hand plane with such a knife. But only if you use an abrasive fine-grained abrasive wheel. After sharpening on such a tool, finishing is usually done. This procedure is performed either on a piece of sandpaper mounted on a table or on a block. Checking the quality of sharpening is quite easy. To do this, you just need to carefully examine the blade. If it does not shine, then the knife is sharp enough to be used.
Planing process: nuances
For planing to take place absolutely safely, the main condition is rigid fastening of the workpiece. Planing can begin only after the workpiece has been clearly fixed. First, rough processing is carried out. Sherhebel is used for this purpose. The movements of the tool on which the sherhebel is installed must be directed across the grain. Otherwise, a large amount of wood will be spent on planing.
After processing small workpieces with Sherhebel, the surface must be cleaned with a double plane.
Plane sharpening angle diagram.
The movement must be performed along the fibers. The result is a smooth surface, without roughness.
A power planer is often used to chamfer a part. Depending on the width of the required chamfer, the edge of the workpiece is processed with a plane. Moving the tool at an angle allows you to obtain the desired chamfer angle.
If you attach a special side stop, usually supplied, to the electric planer, it becomes possible to perform folding. In this case, the stop must touch the workpiece being processed.
How to set up a hand plane correctly
To perform this procedure you will need a special screwdriver. Such tools are designed specifically for setting planes. Their distinctive feature is their large width and short length. The main purpose of setting up a plane is to set the amount of blade protrusion above the surface of the sole. If the knife protrudes too far, the plane will begin to remove very thick chips. A slightly exposed blade will simply slide across the surface of the wood.
For initial processing of workpieces, the knife yield should be about 0.5 mm. If the plane is to be used for finishing, the blade should protrude slightly less over the sole.
How to store it correctly
Experienced craftsmen believe that a knife for a hand plane becomes dull, for the most part, not even during operation, but because of improper storage. After finishing planing the workpieces, this tool should be cleaned of chips and placed in a box specially designed for it. In this case, the position of the tool should be such that the knife blade protruding from the body is not at the bottom, but at the side.
If the hand plane is going to be stored for a very long time, it must be disassembled and thoroughly cleaned before putting it in the box. Knives and other metal parts should be wiped with an oiled rag.
Sources used:
- https://stroy-podskazka.ru/rubanki/nastraivat-i-polzovatsya/
- https://kak-svoimi-rukami.com/2013/07/kak-nastroit-rubanok-svoimi-rukami-regulirovka-struzhkoloma/
- https://fb.ru/article/227019/kak-vyibrat-ruchnoy-rubanok-sovetyi-i-otzyivyi-kak-pravilno-polzovatsya-ruchnyim-rubankom-po-derevu
Safety regulations
To avoid injury when planing, you must follow a number of rules.
- Use a tool that is in working order and configured according to the requirements.
- The workpiece to be processed is securely fixed in the workbench.
- If there are knots, act carefully and release the knife blade as little as possible.
- Planing should be carried out longitudinally relative to the workbench.
- When planing, hold the handles firmly with both hands, do not be distracted.
- It is mandatory to disassemble and assemble the tool over a workbench. This also applies to settings.
- It is unacceptable to clear the slot from chips on the extreme side of the cutter, so as not to cut your hand.
- Use a tray to store the tool. Place the plane in it with the sole down so that the blade does not protrude outward.
- Dropping the plane knife is absolutely unacceptable.
- When passing the tool, keep the blade away from you.
- It is unacceptable to check the sharpness of a knife with your hand.
If you follow the rules for using a plane to level the board and safety precautions, the risk of injury during the work process is minimized.