Articles
All photos from the article
The simplest type of wood carving is geometric, which is where learning this craft technique begins. The ornament is formed from various shapes - squares, rectangles, polygons, ovals, stripes, circles, segments - parts of a circle, triangles. Today our task is to ensure that you learn as much as possible about what geometric wood carving is, where it is used, how to select and prepare material for it, about tools and techniques.
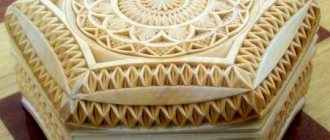
In the photo - a wooden box decorated with geometric carvings
History of development
Even in ancient Rus', the first objects decorated with geometric carvings appeared. And it is Rus' that is considered the birthplace of this woodworking technique, which subsequently spread throughout the world.
The thing is that the native expanses have always been rich in forests, so there were more than enough wood products that needed decoration.
In addition, door locks were even made from wood, which were also decorated with carvings. One such copy, created in the 18th century, has survived and is still in one of the museums in Moscow.
It is also worth noting that the geometry of carvings goes back to the times when people worshiped pagan gods, so absolutely all the ornaments applied to objects had a certain, rather deep meaning.
In the modern world, such objects are not endowed with any magical meaning , but in the times of ancient Russia they were used to protect the family, protect the home, and sometimes even from damage and the evil eye.
Wood carving for beginners
Geometric carving is the simplest type of woodworking art. It does not require special training, a lot of skill and experience. Even a beginner can handle sketch geometry. For this type of carving you will need the following tools:
- oblique knife;
- chisel;
- bar;
- sandpaper;
- varnish;
- stain.
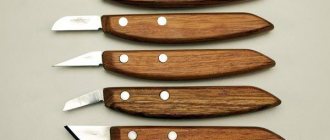
The main tool is a knife . You should always monitor the degree of sharpening of its blade. You can make knives for decorative woodworking yourself.
First, an inexperienced carver needs to learn how to hold a knife correctly. To do this, you should practice cutting grooves on a wooden board. For a beginning carver, it is better to use soft wood. It is important to determine the direction of the fiber before work. Start cutting by holding the knife firmly by the bottom of the handle and pointing the blunt angle of the knife towards you. Tilt the knife to the right, and the obtuse angle of the knife blade should not be completely immersed in the wood. The hand should move clearly along the line.
What it is?
Geometric wood carving is perhaps one of the most difficult types of decorating wooden objects.
The peculiarity of this technique is that the entire ornament consists exclusively of geometric parts and is executed with a cutter.
As a rule, if the master has enough experience and a steady hand, the geometry in the pattern is noticeable to the naked eye.
Of course, the age of modern technology makes it possible to produce such products using special machines, but it is impossible to guarantee the quality and accuracy that can be seen in the work of a professional, experienced craftsman. What can we say about the exclusivity of the product and the fact that such beauty can only be created from a pure heart, putting a piece of your soul into the work.
The purpose of such items can be varied, since chairs, cabinet doors, entrance doors, as well as dishes, bench legs, tables, window shutters and much more can be decorated with carvings.
It is worth noting that the carving itself does not carry any functionality and is used solely as decoration.
Where to use
Wood carving is widely used in interior and landscape design. Although such products are more consistent with the ethnic Russian style, the excellent work of the master can be organically combined with Scandinavian, eco-trend, eclecticism, Provence (in general, any kind of country style), modern, classic and even fusion.
The interior uses either carved utilitarian objects (chests, caskets, inkwells, saucers, furniture elements) or decorative details that serve only an aesthetic role (cornices, paintings on some parts of the walls, arch frames, doors).
For the exterior decoration of the house and the surrounding area, you can purchase gazebos, benches, platbands, pediments, gates and fences made using wood carving techniques.
Features and scope of application
The original and unusual ornamental pattern of a geometric notch is obtained by creating dihedral, trihedral and tetrahedral notches in wood, which are folded into geometric elements.
Despite the fact that this type of carving is considered the simplest, for many years the price of products decorated with its help has been quite high, and it has received a special place among other types of crafts.
Tip: when making furniture, make carved parts from the same type of wood as the main item.
The only limitation in the areas of application of geometric carving can be the author’s imagination, his sense of proportion and taste.
Today there is a large number of furniture decorated in this way, here are just a few:
- buffets;
- cabinets;
- cradle;
- shelves;
- coffee tables;
- the Bureau;
- chests of drawers
Geometric wood carving patterns created by professionals can be found not only in the private homes of collectors and craft connoisseurs, but also in various museums - for example, in the Catherine Palace in Pushkin or in the Hermitage in St. Petersburg.
Sketches of geometric wood carvings must be transferred to the surface of the workpiece
ITEMS THAT I DECORATED WITH GEOMETRIC CARVINGS
As you can see, this type of wood carving is not difficult to perform. All you need is your desire to get carried away with this activity! An activity that also has its practical side!
I hope that over time I will move on from kitchen boards and stands to larger-scale crafts, for example, boxes. Or maybe I’ll make my own, master backgammon. Out of curiosity, I once looked at their price in a store - a normal board is very expensive!
In the meantime, I’m just gaining experience and improving my skills! What else to do - you need to study always and everywhere! Moreover, this hobby is not dusty, calm, does not require much physical activity, but it distracts you from the outside world simply amazingly!
I am pleased to share with you photos of my works. With these patterns you can decorate the doors of bedside tables, bathroom cabinets, window trims and much more. Many people use this type of carving to decorate balusters of stairs, shutters and trim in private homes.
Geometric carving technology
Geometric wood carving is considered the simplest and is perfect for beginners. To create the intended design, you need to have a small set of wood carving tools and clearly follow the design. In geometric wood carving, symmetry and repetition are of utmost importance. This achieves a wonderful play of light and shadow.
Cutting boards using this technique and wooden panels look wonderful in the kitchen.
Geometric carving consists of sequential cutting out of simple geometric shapes: rectangles, triangles, squares, rhombuses. But the result is a wonderful ornament that looks different in different lighting.
The sequence of performing any wood carving is as follows:
- First, a wooden blank is made (board, deck, blank).
- Next is rough leveling of the surface of the workpiece, during which all defects and roughness are removed.
- Then a decorative relief is formed using special cutters.
- After the main carving is completed, the finishing process is grinding, impregnation, painting, varnishing.
You cannot work with a workpiece on your knees! The master must have a table to work on.
The use of carved decor in the interior
Various decorative elements with geometric carvings are widely used in decorating residential interiors in the Empire, Victorian, Baroque and other types of classical design styles.
Carved furniture adds solemnity, luxury and splendor to any living space. A bed with carved headboards will be the main formative element of the interior design of the bedroom and will give the entire furniture a touch of piquant sophistication.
On a note!
Various interior elements (balusters, railings, handrails, balustrades) decorated with carved decor are quite popular in private homes.
The use of geometric carvings on slopes or pilasters allows you to visualize the increase in ceiling height. Patterned railing support posts will look no less aesthetically pleasing. Particularly popular are these elements of staircases decorated with concentric or spiral carved additions.
On a note!
Ceiling rosettes, interior door frames, ceiling consoles and beams for hanging lamps will help increase the decorative effect of any living space.
No less popular are baguettes, frames and friezes. Today, products made of polyurethane, polyvinyl chloride or expanded polystyrene are usually used as these decorative and finishing elements. However, if you use wooden products with carvings, the comfort and elegance of your home will significantly increase. In addition, wooden decor, with appropriate protective finishing, is in no way inferior in durability to plastic products. A carved wooden ceiling frieze will also add originality to the interior of a living space.
Carved wood processing is widely used for various details used for facade decoration of residential premises and for the formation of exclusive landscape design. Today you won’t surprise anyone with small architectural forms (gazebos, tables, benches) placed on a personal plot and decorated with various decor. Entrance gates and street gates installed in the fences of personal plots, decorated with even the simplest carvings, look quite attractive.
Today it is enough to simply order products for decorating the interior of a living space and creating landscape design in specialized workshops or from individual carvers. Simple products - ceiling rosettes, ornaments on cutting boards and kitchen utensils can be done independently if you have certain skills and free time.
Basics of Geometric Wood Carving
Triangular-notched carving gets its name from the fact that almost all elements of the design are formed thanks to triangular notches. Ordinary geometric shapes, intertwining with each other, form a complete pattern.
To learn wood carving with elements of geometric carving, you need to master the technique of cutting simple elements from wood, gradually moving on to more complex patterns and combinations of straight and smooth lines.
Complex geometric wood carving begins from the moment when you need to master a complex of elements that are simple in terms of execution. Here you need precision in the distribution of each part of the part.
A novice master will definitely not be able to cope with such a design, but if you practice, then with experience you can achieve a high level of skill.
Basic patterns
Triangular-notched wood carving can be represented by combinations of any geometric shapes or lines. The main elements are the following notches:
- dihedral wedge-cutting (segment, sector, wedge);
- triangular wedge-cutting (triangles);
- tetrahedral (rhombus, square, rectangle);
- curvilinear (bracket, spiral, circle).
Each recess is characterized by its own parameters. In particular, it has its own configuration, depth and width, and angle of inclination relative to the base.
By mixing and matching notches at equal intervals (reports) of construction, more complex patterns are created in the form of geometric shapes.
Easy lesson
We bring to your attention an interesting master class for beginners, which will allow you to master the basic techniques of geometric carving.
To work you will need:
- softwood (the best option is birch board);
- blunt knife;
- pencil;
- ruler.
Read this: Artistic wood carving: a master class with a step-by-step description of the work
The first step is to apply a sketch of the future pattern to the base. To do this, draw two lines parallel to each other, the distance between which will be 1 cm. On each line we will make marks, 1 cm apart each, alternating in a checkerboard pattern.
Now, using the marks made earlier, let's draw a series of triangles. Let us mark the center inside each with a small dot.
Connect the centers of the triangles with their angles (in other words, draw the radii of the circumscribed circles).
Now you can begin the initial stage of carving. Before doing this, you need to familiarize yourself with the safety rules when working with cutting objects:
- the tool must be in the leading hand;
- the other hand should lie in front of the carver;
- While working, you cannot be distracted; you must be as attentive and focused as possible.
Let's start carving.
We insert the “toe” (protruding part) of the cutter to a depth of 4-5 mm, and tilt the “heel” to the corner of the triangle.
Read this: Wood carving panels: several ideas for creativity
With the knife tilted to the side, carefully cut out one side of the triangle.
Rotate the board 90 degrees and cut out the remaining sides of the triangle.
This type of thread is called “triangular-notched.”
We work on the remaining triangles. At the end of the row we get this ornament:
Again, mark the centers of the resulting triangles and connect them to the vertices.
We cut it out in the same way, resulting in a snake pattern, as in the photo.
Let's draw another line with an identical pattern.
First cut out the upper and then the lower triangles.
The result is a rosette pattern.
Let's get acquainted with another interesting element. Let's draw a circle of arbitrary diameter and divide it into an arbitrary number of parts.
Let's connect the points with which we divided the circle to its center.
Inside the first circle we will draw another one and draw rays.
We work with the cutter again. We proceed according to the described scheme (“deepen the toe, direct the “heel” to the base).
Read this: Wood Carving Lessons: Where to Get Started
We get a triangular shaped chip.
Cut out all the triangles.
We make a cut along the inner lines of the beam.
First cut out one side and then the other.
We get a shaped beam protruding above the surface.
We work out the remaining rays in the same way; the resulting pattern is called “shine.”
It is not necessary to make the rays straight. This pattern option is also possible.
We grind down all the roughness with fine-grained sandpaper.
These are the types of works that can be obtained based on the geometric carving skills acquired in this lesson (cutting boards, albums, boxes are shown in the photo):
Tools
Wood carving, the geometry of whose patterns often amazes with its beauty and attractiveness, requires the selection of appropriate tools, such as:
- Knife-jamb . It is characterized by a beveled blade that allows you to create geometric patterns - triangles, squares, lines, etc.
- Flat chisel. A small product that is no more than 2 centimeters wide is best suited.
- Hacksaw. It is necessary for cutting out small parts of a workpiece or cutting off unnecessary wood elements.
- Round, square and semicircular files . With their help, you can make recesses and holes of certain shapes.
- Rulers. These tools are usually not used for wood carving. At the same time, geometric patterns often need to be symmetrical. Therefore, in this case it is impossible to do without a ruler.
- Pencil. It is necessary for marking the previously selected workpiece. This way you can improve the quality of work and significantly reduce time.
- Compass. This simple tool allows you to correctly mark the workpiece if a round ornament is created on it.
- Eraser. It is used primarily for correcting pencil lines. In addition, such a tool is required after completion of the work if there are some marks left on the wood.
Thus, geometric wood carving does not require a large number of different devices. Often it can be done with a minimal set of tools.
READ Wood burning technique for dummies
Types of chisels
Now let's take a closer look at the types of chisels, which can rightfully be considered the main tool of a carver.
Depending on the characteristics of the blade and the area of application, chisels are divided into the following types:
- Straight.
Has flat blades. This tool is used for leveling individual sections of the workpiece or for cleaning it at the preparatory stage of work. - "Joints."
The cutting angle of their blades varies from 35 to 70 degrees. They are widely used in geometric carving. - Cranberry.
It is considered a type of semicircular chisel. They are used for background work and cutting out large convex shapes, and have a curved blade that resembles the "cup" of a rose petal. - Angles (nuts).
They have a beveled blade that leaves a characteristic “groove” on the workpiece. - Semicircular.
Cutters are usually used for three-dimensional carving, but can also be used in relief techniques. These tools vary in bend radius and blade length. They are used to create concave circles and lines on the workpiece, the depth of which is adjusted by changing the pressure on the cutter.
Each master has his own “favorite” tools in his set, those that he uses most often. Usually this passion develops over many years of work, when the carver has already developed his own individual style. Beginners have to find their favorite tools through trial and error until they find the perfect one.
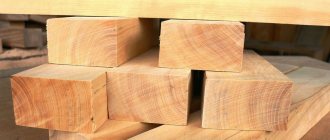
Wood (how to choose wood?)
There are several types of wood that can be used to make geometric carvings:
- Solid. Most often, this type of wood is chosen by professionals. This is due to the fact that they have the relevant knowledge and experience. That is why, despite the complexity of working with hard rocks, they cope well with the task.
- Very hard. Most often this option is chosen due to the aesthetic properties of such trees. Working with hard wood is difficult, even for professionals.
- Soft. It is easier to process. That is why, if the master has no experience in creating sculptural compositions, it is best for him to choose this option. Soft blanks are made from linden, pine or aspen.
As a rule, it is quite difficult to get blanks from linden trees. This is due to the fact that it is often used, including by professionals. The main disadvantage of pine is that it is very prickly when cutting. In turn, aspen is the best option, allowing you to end up with a truly beautiful piece of work.
Quality criteria
There are certain physical qualities of wood, according to which the craftsman must choose the material. The wood color, humidity, texture and smell are important to the carver. He will evaluate hygroscopicity, ability to swell and shrink. Let's consider individual criteria.
For example, the color of wood will depend on the age of the tree, on how it was exposed to external conditions, on subsequent exposure to finishing, and also on the angle of light reflection. The decorative effect of wood in crafts depends on the texture of the wood itself, on the natural pattern that is visible on the cuts.
What kind of wood should be used for wood carving:
- Since young wood is still soft and loose, and old wood is not resistant to rot and injury, wood from the middle or mature period is valuable for carvers. But different breeds have different indicators for this period. So, if you take oak, its optimal age for carving is from 80 to 150 years. For birch this age is in the range of 60-70 years, for ash it is the same. The age of a tree can be calculated by the number of so-called growth rings on a cross section.
- Wood moisture content is another significant criterion. If the products that will be made by a master are intended for use outdoors, their humidity should be 15%. And the material for such products is dried for at least 3 months outside, under a canopy. If the products will only be indoors, the wood will still have to be dried in the room.
- Freshly cut wood, of course, is not suitable for cutting. Yes, and overdried is unusable. In the first case, after drying, the material will shrink in volume and warp. In the second, even at normal humidity levels, it will absorb moisture from the air, causing it to begin to swell and crack.
Not drying and over-drying the wood will result in a problem for the craftsman. If the rock is hard and dense, then the quality of crafts made on such a basis will suffer. But soft wood for decoration does not have such problems with drying.
Be sure to look at the growth rings: the parallelism of the rings indicates the straightness of the internal structure of the tree. Wide wood layers are a sign of looseness and low strength of the wooden workpiece.
Single-growing trees are also not taken for carving; they are more susceptible to wind influence than others, because their fibers twist and their density is different.
Beginner carvers do not always know that carved products do not combine (or try not to do so) different species, as well as parts of wood. Sound hardwood shrinks less than sapwood, but the board has virtually no center of warping. When choosing wood, you should avoid defects (knots, grain bending, cracks, and also, of course, rot and wormholes).
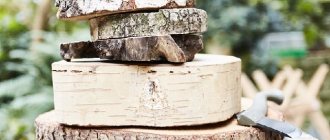
We learned which wood is best for wood carving, and now a few words about how to prepare for carving. The start of preparation, of course, can be called the cutting down of the tree itself. But this is still far from the actual work of the carver. The longest preparatory stage is drying. The final result depends on how it went. The manufacturing process also depends on whether it will be comfortable for the craftsman or whether he will have to suffer with the carving.
Recommendations for preparing working material:
- Wood is traditionally harvested in late autumn or winter; there is less moisture in the tree at this time, and therefore it dries faster. The attitude towards wood was special and reverent, so the material was prepared without haste. Natural drying is preferred and this process has remained unchanged.
- Natural drying involves stacking logs and covering them with a canopy. And this state lasts for a year. The material that is intended for carving operations is sawed into logs and stored in a dry place without any drafts. The wood is also stored in it for a long time, at least a year and a half. So it dries to a universal humidity of 8-10%.
Not every wood is suitable for carving art. Since materials have different properties: moisture, strength, softness, flexibility, etc. Therefore, the choice of a specific option depends on:
- simplicity and speed of processing of workpieces;
- visual appeal of the product;
- the ability to make small and complex ornaments;
- durability of the product (figurines, furniture, etc.).
Which tree to choose with all the variety of species? The selection of a specific material is largely determined by the technique in which the master works.
Preparing for work
For the first lesson, you need a board measuring 170 by 110 mm and 2 cm thick. Sketches for this work will be given below. The surface of the board must be sanded with sandpaper. Now, using a ruler and a simple pencil, draw out the entire surface of the tree in 5 cm cells.
Wood carving patterns
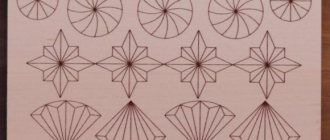
Then we draw all the figures, as shown in the figure below. There were 7 figures in total: pegs, diamonds, a twist, a pyramid, stars, squares and a rosette. From these figures you can then create new patterns. A photograph that shows what compositions can be made from just elements, and how the composition looks after processing and painting the wood.
Preparing a wood blank
You need to cut a board of the required size from a piece of wood. For the first time, it is enough to take a small canvas with a thickness of 2 cm.
The surface must be sanded with sandpaper. There is no need to rub it too hard - just remove small chips and splinters. Removing such defects will allow the tool to glide easily across the surface. Additionally, there will be no splinters left on your hands.
Field preparation
A flat, smooth surface needs to be outlined. Using a ruler and pencil, divide the entire area into cells with a side of 5 cm. The parameters of the cells depend on the size of the pattern and its “details”.
READ Cap and suvel what are they and how are they different?
Draw the workpiece around the entire perimeter. Each cell will become the basis for the formation of an element of the future ornament.
Sketching a pattern
Passing between the cells, a pattern is formed, which will later be cut out with a knife. You can use the one presented above, or a more complex one - it all depends on the skill level of the master.
More complex versions of the design use smooth, curved lines.
Types of patterns
There are several main types of geometric patterns that are used for wood carving. These include diamonds, pegs, twists, stars, pyramids, rosettes and squares. By studying all the nuances of creating each of the ornaments, the master will be able to connect them together, creating unique and original works.
Skolishki
To carve, you first need to learn how to do simple actions like trimming and pricking. To do this, take a knife in your working hand, with your thumb on the beveled part of the handle. First, you need to press the cutter so that it goes deeper into the tree a couple of millimeters. Next, lower the blade of the side knife along the markings made earlier. In the same way, carry out the injection on the other side. Trimming is done like this:
- The cutting knife part should be applied to the left side of the triangle - it should be fastened with a bevel to the figured top.
- Move the handles of the knife back, while maintaining a parallel between the right side of the pattern and the blade.
- Finally, press down on the knife and return the brush to its original position. At the end, the knife nose should be on top, and the cutting part will be on the right side of the triangle.
Since the trimmed triangle should break off on its own after such actions, the resulting pattern during such actions is called a chip.
Rhombus
The diamond is often used for geometric wood carving (based on sketches), and it represents a very simple figure. It is made of a pair of triangles that are held together by bases.
Please note that the technology for making diamonds on wood is similar to pegs, but first you need to cut out the top row, and then the surface of the board and proceed to the lower figured part.
Viteika
There is another type of chips called viteyka. It is obtained by displacing a pair of triangles on either side of each other. So, by making a lot of twists, you will end up with a winding path of the pattern. To do this, you first need to cut out the bottom triangles, split them off, turn the board over and start making the top row. After this, a kind of snake will remain in the middle.
Pyramid
And this is the first difficult drawing that can be made with a wood cutter. It is made of several triangles that must be placed in a certain order in relation to each other. In the center between the three triangles there is a point where the corners touch. It is for this reason that when cutting, make sure that the cutting blade always has one end in the middle. The cutting should be done in the direction of the wood layer.
Star
A distinctive feature of the star is that it is made of a huge number of triangles (more than in a pyramid). Despite this, the process of making such a pattern is generally similar. To cut out the stars, you need to make 4 triangles in succession on the workpiece as described above.
Squares
Unlike the other ornaments described above, squares are made using a different method called “straw”. The pattern can be used as a border of the entire work, or as part of a more pompous element of the design. Making a square is done as follows:
- Step back 0.1 cm from the markings, and then at an angle of 45 degrees, deepen the knife into the workpiece by 0.2-0.3 cm. This requires making cuts along the line.
- On the left side of the strip you need to perform the same actions, but in mirror image.
- At the end and beginning of the line, a puncture must be made, and the knife must be made vertically in relation to the board.
At the end, a piece in the form of a straw should fall off the tree, and if you process all the lines on the squares using the same method, you will get an unusual pattern.
Socket
This is the most difficult ornament in geometric carving. A compass is required to make it. Using it, draw a circle with a large diameter, and then make the second one 0.5 cm smaller than the first. Next, you need to divide the circles into perfectly even 16 parts. Once everything is done, you need to mark the points in the middle of each segment on a small circle. From such places it is necessary to draw a line to the points closest in each direction to the larger circle. At the end, when there is marking, all that remains is to cut and split off the triangles using the technique described above.
Basic patterns
Geometric patterns for wood carving can be any geometric shapes and lines.
Before starting work, the wooden surface is thoroughly cleaned with sandpaper. After this, you will need to draw out the working surface with cells and apply a geometric sketch along the cells, which will be the basis for the geometric carving.
Simple figures:
- The simplest figure is the peg. It is a cut out triangle and is done like this: first, the figure is drawn out, the first cut with a knife is made perpendicular to the surface, the second - at an angle to the first along a different line, and the cut out triangle will break off on its own.
- The second figure is a rhombus. To cut a diamond, you must first, following the example of making a peg, cut out the upper triangle. After this, from the base of the upper triangle, cut the second one in a mirror image.
- A viteyka is a chain of displaced pegs.
The previous three geometric wood carving patterns are the easiest to make. Any novice master can handle them. The following patterns are more complex and require more experience and skill:
- The pyramid consists of three triangles touching each other at an angle at one point. The difficulty of cutting a pyramid is that the knife comes into contact with one point several times. Therefore, when working on a pyramid, absolute accuracy is important.
- The star figurine represents several pyramids cut out in a circle.
- The square figure is cut out using the “straw” method. This is done like this: the knife enters the wood at an angle, removing chips; Afterwards, the chips are split off with a vertically directed knife. This type of cutting requires experience.
- The socket is the most complex element. This will require accumulated experience and skill. To draw a rosette on a tree you will need a compass. Several circles are drawn with a compass, one inside the other. Then several diametrical lines are drawn and small elements of the pattern are applied.
By combining various cut-out elements, you can get a variety of compositions.
Carving technique
To get beautiful combinations on a wooden product, individual elements of the design, for example, triangles or squares, must be completely similar in accuracy, size and depth of the planes.
Only in this case can an ornament be obtained - a pattern evenly distributed on the surface. You can see it in geometric script with alternating squares divided into triangles on old spinning wheels.
To make geometric carvings on the surface of homogeneous wood, you can take several small chisels and one cutter with a working part 2 mm wide.
The instructions are as follows:
- Before starting work, apply marking lines to the workpiece, marking the fields on each side with a marking compass. Divide the resulting rectangular plane into several segments and draw lines using a ruler.
- Secure the marked workpiece with its end to the support, hold it for stability with your left hand.
- Position the cutter vertically to the workpiece.
- Start cutting a line 1.5-2 mm deep, moving the cutter from the opposite edge towards you.
Advice: do all the work in a sitting position, while the posture should be free and relaxed, you can slightly touch the table with your chest, but do not tilt your head or torso.
- Guide the cutter towards you at an angle of 30-40˚ with a slight tilt to the right. To prevent chipping and the tool from wobbling during operation, move the heel of the cutter slightly closer to the workpiece. However, be careful that it does not “burrow” into the board.
- Notching is the first pass of the cutter along the line marked with a pencil. Hold the movement of the cutter towards the end of the line slightly, raising the heel to end the line exactly at the field mark.
- Turn the workpiece to the left and run the cutter along the same line, but on the other side. This technique is called pruning. The result of scoring and trimming will be a smooth groove with a triangular cross-section.
READ What is wood brushing?
Across the grain:
- Mark the workpiece in the same way as the previous one, only across the grain.
- Try to place the lines parallel to the end of the workpiece.
- Turn the board with the long side towards you, fix and hold it for stability with your left hand.
- Make the cut with a cutter at an angle of 45˚, then unfold the workpiece and make a trim.
Tip: since it is more difficult to guide the cutter across the grain, its heel should be raised slightly.
Checkers:
- Combine parallel and transverse lines to create a simple checkered pattern. When doing this, maintain the exact distance.
- First make a cut along the grain line, while moving the tool slightly to the right of the marking.
- Unfold the workpiece and trim.
- In the same order, trim and cut across the grain with a cutter.
Scheme for drawing up a checkerboard pattern
This technique allows you to decorate a wooden surface with an ornament of regular checkered squares. The pattern is often used to decorate the lids of various chests or chests.
The next method is to cut straight parallel lines at an angle and diagonally to the edges of the workpiece. You can make different angles to create flat or sharp-angled patterns.
Schemes of geometric wood carving in the form of a grid
Perpendicular lines of this type, when intersecting, form a pattern of repeating diamonds or squares, which is called a grid. The initial lines are cut on the wooden surface from right to left, then the workpiece is turned over and a second cut is made, but in the opposite direction - from left to right.
Trimming is carried out in a similar manner. The correct positioning of the cutter affects the correctness of the drawn thread lines, the accuracy and aesthetics of the finished pattern. (See also the article Wood jigsaw: features.)
Details
Preparatory stage
To carve wood with geometric patterns, you need to prepare a board with the following dimensions in advance:
Width – 11 cm.- Length – 17 cm.
- Thickness – 2 cm.
Please note that you will additionally need sketches of various geometric patterns that can be made on a wooden blank.
Beginners need to start work by sanding the previously selected board. To do this, use a ruler and pencil to draw vertical and horizontal lines across the entire surface of the board so that you end up with even squares. Next, you need to draw the figures on the boards according to the selected sketch. It is best to start with the image of rhombuses, pegs, pyramids, crowns, stars, rosettes and squares. When using such a pattern, you can later create your own unusual ornaments. There are a couple of basic cutting methods that allow you to make the main geometric shapes on the surface of wood:
- Cutting into strips.
- Triangle cutting.
Interesting fact! The first cutting method is used to make squares, and for other cases the triangle method is suitable. Geometric designs for wood carving can be created by combining these two methods.
Precautionary measures
Carving for beginners is a fascinating, but at the same time very dangerous activity. This is due to the fact that during the work process the master needs to use a lot of cutting and stabbing tools. It is for this reason that safety precautions must be followed:
- Perform each movement from the hand - this will greatly simplify the work and reduce the load on the shoulder girdle.
- The hand holding the cutter should be pressed tightly against the working part of the wooden workpiece - this helps free up the movement of the hand.
- When the cutting process is in progress, the fingers of your free hand should not be on the workpiece, as otherwise they can be injured.
So, wood carving can be a safe process if you follow all the above tips from experts.
Types of patterns
There are several main types of geometric patterns that are used for wood carving. These include diamonds, pegs, twists, stars, pyramids, rosettes and squares. By studying all the nuances of creating each of the ornaments, the master will be able to connect them together, creating unique and original works.
Skolishki
To carve, you first need to learn how to do simple actions like trimming and pricking. To do this, take a knife in your working hand, with your thumb on the beveled part of the handle. First, you need to press the cutter so that it goes deeper into the tree a couple of millimeters. Next, lower the blade of the side knife along the markings made earlier. In the same way, carry out the injection on the other side. Trimming is done like this:
The cutting knife part should be applied to the left side of the triangle - it should be fastened with a bevel to the figured top.- Move the handles of the knife back, while maintaining a parallel between the right side of the pattern and the blade.
- Finally, press down on the knife and return the brush to its original position. At the end, the knife nose should be on top, and the cutting part will be on the right side of the triangle.
Since the trimmed triangle should break off on its own after such actions, the resulting pattern during such actions is called a chip.
Rhombus
The diamond is often used for geometric wood carving (based on sketches), and it represents a very simple figure. It is made of a pair of triangles that are held together by bases.
Please note that the technology for making diamonds on wood is similar to pegs, but first you need to cut out the top row, and then the surface of the board and proceed to the lower figured part.
Viteika
There is another type of chips called viteyka. It is obtained by displacing a pair of triangles on either side of each other. So, by making a lot of twists, you will end up with a winding path of the pattern. To do this, you first need to cut out the bottom triangles, split them off, turn the board over and start making the top row. After this, a kind of snake will remain in the middle.
Pyramid
And this is the first difficult drawing that can be made with a wood cutter. It is made of several triangles that must be placed in a certain order in relation to each other. In the center between the three triangles there is a point where the corners touch. It is for this reason that when cutting, make sure that the cutting blade always has one end in the middle. The cutting should be done in the direction of the wood layer.
Star
A distinctive feature of the star is that it is made of a huge number of triangles (more than in a pyramid). Despite this, the process of making such a pattern is generally similar. To cut out the stars, you need to make 4 triangles in succession on the workpiece as described above.
Squares
Unlike the other ornaments described above, squares are made using a different method called “straw”. The pattern can be used as a border of the entire work, or as part of a more pompous element of the design. Making a square is done as follows:
- Step back 0.1 cm from the markings, and then at an angle of 45 degrees, deepen the knife into the workpiece by 0.2-0.3 cm. This requires making cuts along the line.
- On the left side of the strip you need to perform the same actions, but in mirror image.
- At the end and beginning of the line, a puncture must be made, and the knife must be made vertically in relation to the board.
At the end, a piece in the form of a straw should fall off the tree, and if you process all the lines on the squares using the same method, you will get an unusual pattern.
Socket
This is the most difficult ornament in geometric carving. A compass is required to make it. Using it, draw a circle with a large diameter, and then make the second one 0.5 cm smaller than the first. Next, you need to divide the circles into perfectly even 16 parts. Once everything is done, you need to mark the points in the middle of each segment on a small circle. From such places it is necessary to draw a line to the points closest in each direction to the larger circle. At the end, when there is marking, all that remains is to cut and split off the triangles using the technique described above.
Types of wood carving tools
- Straight - have a straight edge, which is convenient for making grooves, recesses, recesses, cutouts, and sockets. These tools make it convenient to adjust parts to the desired size.
- With a beveled edge - such tools are also called jamb knives because of the edge beveled at a certain angle. Serve for fine artistic cutting and making three-dimensional geometric shapes.
- With a semicircular edge - chisels are used to make channels, artistic patterns, and rounding corners.
- V-shaped - used for the same tasks as flat ones, as well as for making patterns of angular shapes.
- With a curved blade - such incisors are called cranberries. Used to perform complex three-dimensional drawings. For example, they are used to select a background or create a relief on a figured surface.
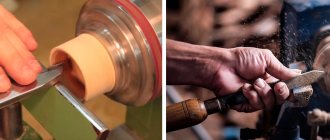
Tool sharpening
For wood carving to be enjoyable and the created masterpieces to be pleasing to the eye, the tool must be sharp. If during work you feel an increase in the resistance of the material, you need to take a break and sharpen the tool. This will allow you to avoid using unnecessary effort when carving and guarantee the excellent quality of every stroke, every groove.
Sharpening should begin by leveling the working surface of the tool. To do this, use a coarse abrasive. It quickly and efficiently removes burrs and creates an ideal cutting edge.
Note! When working, it is important not to spoil the sharpening angle of the wood chisel and the geometry of the knife blade.
When working with emery, you need to be careful, you must not allow the metal to overheat; sudden temperature changes can “release” the cutting edge.
After large irregularities have been removed, they move on to fine-grained abrasives. During grinding, roughness that arose during rough sharpening of the carving tool is removed. The last ones to use are sanding mixtures applied to a felt base. They create a perfectly flat surface, reducing friction between the tool and the material to a minimum.
Geometric carving technique
I would like to highlight several basic wood carving techniques within the framework of this work; I plan to give a more detailed description of the technique in future articles.
The main points are:
- Watch the angle of the torch.
- In order to avoid chipping, you need to cut out the side that is closest to the cut out element.
- First of all, you need to cut the side that goes along the layer of the workpiece.
- Rosettes should be cut from the edge to the middle.
- When a large triangle is cut out, a smaller triangle should be cut inside it.
- The ribs should be sharp - it's beautiful.
- You should cut with an overlap to remove the marking line.
- Follow the sequence when carving.
Wood carver safety rules
- The work table must be sufficiently strong and stable (do not wobble or move when carving).
- When working, you should use special devices for fastening the parts being processed. This will secure and speed up the work process.
- The lighting in the workroom must be sufficient and located so that the carver does not block it with his body while working.
- When sharpening a tool on an electric sharpener, you must wear safety glasses.
- You cannot check the sharpness of the tool with your finger (there is a wooden block for this).
- You cannot cut towards yourself, and you also need to make sure that your free hand is not in the direction of the tool’s movement.
- The workplace should be cluttered with foreign objects.
- You should maintain cleanliness in the workplace (it is better to remove shavings from the table several times during the work process, rather than, brushing them off at the end of work, and unexpectedly stumble upon a joint knife or chisel).
- To clean the workplace you need to use special brushes.
- Tools should always be put in their place (the advantage, and most importantly the safety, of this is undeniable, since in this case they will definitely not fall off the table and hurt anyone).
- When using a power tool, it is necessary to monitor the serviceability of not only the tool itself, but also the electrical cord (it should not become twisted during operation and remain twisted during storage).
- You should pay attention to the accuracy of connecting power tools, especially if several electrical appliances are plugged into the outlet at the same time. There is a danger of getting tangled in wires, which can lead to tools falling and being damaged, and worse, various injuries that can result from them falling.
- It must be remembered that power tools tend to either rotate or move back and forth, so you need to be extremely careful when working with them.
- If the workroom is connected to three phases, then it should be remembered that three-phase equipment cannot be operated without grounding.
And a little about fire hazards. Dry shavings are highly flammable, so it is better to ensure that they do not come into contact with heating devices during operation. Wood begins to char at 214-216 °C, and as the temperature rises, it ignites. When the chips come into contact with direct fire, they instantly burst into flames.
You also need to be careful when making wax mastic. It is better to heat it on an electric stove rather than over an open fire. As for nitro varnishes, they should only be used in a well-ventilated area (it is best to do this on the balcony).
There must be a first aid kit in the work area. Those who have been carving for a long time and have a workshop or workbench can confirm the correctness of what is written, and perhaps even complement the above.
How to protect yourself from injury when carving wood
Any tool of a master carver can be compared to a straight razor, therefore, when working with it, you must strictly follow safety precautions. The material must be positioned so that you can work freely with a knife or chisel, eliminating the possibility of the sharp edge hitting your hands.
The work place should be comfortable and clean. All unnecessary tools at the moment should be carefully folded, because they are very sharp and can cause injury.
Sources:
- https://vplate.ru/rezba-po-derevu/geometricheskaya/
- https://rubankom.com/predmety/promysly/309-geometricheskaya-rezba-po-derevu
- https://nacrestike.ru/master-klassy-po-rukodeliyu/raznye-vidy-rukodeliya/rezba-po-derevu-dlya-nachinayushhih
- https://lesoteka.com/obrabotka/geometricheskaya-rezba-po-derevu
- https://masteridelo.ru/remeslo/derevo/rezba/geometricheskaya-rezba-po-derevu.html
- https://masteridelo.ru/remeslo/derevo/rezba/derevo-dlya-rezby-po-derevu-osobennosti-materialov-i-kakie-porody-drevesiny-luchshe-vybrat.html
- https://Proekt-sam.ru/rezba/geometricheskaya-rezba-po-derevu.html
- https://WoodShpala.ru/oborudovanie/geometricheskaya-rezba-po-derevu-razdelochnye-doski.html
- https://domsdelat.ru/plotnikam/geometricheskaya-rezba-po-derevu-dlya-nachinayushhix-eskizy-uzory.html
- https://www.vseinstrumenti.ru/ruchnoy_instrument/stolyarno-slesarnyi/instrumenty_dlya_rezby_po_derevu/
- https://DrevoGid.com/instrumenty/dlya-rezby.html
- https://wood-petr.ru/dekorativnaya-rezba/tekhnika-bezopasnosti-pri-rezbe-po-derevu.php