Design features
When choosing the ideal circular saw that meets all your stated requirements, it is important to consider its design features. It is worth familiarizing yourself with them in more detail using the example of a convenient circular saw.
The main working unit of this popular tool is a special saw blade with teeth. It starts to move thanks to a small electric motor. In most modern devices, this disk is located in the front of the entire structure.
Today's manufacturers make sawing discs from a variety of steel grades. All of them have the teeth necessary for sawing. According to the rules and standards, their shape must correspond to the material that is planned to be processed.
For wood they should be different than for metal. In order to cut materials with a hard structure with a miniature circular saw, there are special carbide tipped on its teeth.
As a result, all work procedures are carried out many times faster. The cutting line turns out to be slightly uneven.
To ensure that the master is insured against serious injury during all work, the saw blade itself is protected by a special casing. In most cases, the top of the box is securely fixed to the maximum. During the process of embedding the workpieces, the lower part begins to rise. The motor of this device is located in a miniature housing that smoothly turns into a handle.
Small models are usually made in a plastic case. It also always contains a number of rubberized parts.
The device is equipped with a small start button. In most cases it is located on the handle. For large units the handle is at the top, for mini-circular units it is at the back. This position of the handle makes the small saw more maneuverable and easier to transport.
Circular saws are often supplemented with a special support platform. Thanks to this equipment, the master does not have to hold the tool suspended, and the positioning of the saw in this case is more accurate and verified.
Do not think that mini saws are represented by only one standard model. In fact, you can find many different types of this instrument on sale today. It will be possible to choose the ideal option for any work.
It is worth considering in detail what types of small circulars exist and how they differ from each other.
Design elements of a self-made wood sawing machine
Creating a stationary circular saw with your own hands has a number of features that need to be taken into account.
Making a carriage for a circular saw with your own hands
The function and operation of the device may vary depending on the availability of various accessories. One of them is the carriage. To construct it you need to do the following:
- cut the plywood slightly wider than the table;
- Attach guide bars from below - the interval between them should coincide with the width of the table;
- Fix the stop bars on top.
Note! To make the coating easy to clean from sawing waste, it is recommended to coat it with varnish. This material is applied in several layers.
The manufacture of the carriage has a number of features
How to make a shaft for a circular saw with your own hands
The shaft is considered an important element of the circular. It is made from round steel grade 45. In this case, the diameter of the workpiece must match the dimensions of the saw blades. The most commonly used is 32 mm. Saw blades must be installed between the flanges and clamped with a nut.
To use a saw to work with different materials, you need to provide several operating modes. Therefore, it is worth making several grooves on the shaft. This will make it possible to move the pulleys and change the speed.
What discs should you use for circular saws?
These elements have a major impact on productivity and quality of work. The discs can be designed for processing metal or wood. In the first case, the circles should have small teeth. There are also universal models.
Disks can be monolithic or carbide. The first type is made from a single piece of high-carbon steel. Such parts have an affordable price, but at the same time they have to be sharpened frequently. Carbide elements have a higher degree of wear resistance, but are much more expensive.
Do-it-yourself parallel fence for a circular saw
This is an important element that is needed for working with large workpieces. The emphasis can be made from different materials - plywood sheets or chipboard. On average, its dimensions are no more than 25 mm. The stop can be fixed with sides or self-tapping screws.
To focus, you need to do the following:
- take 3 strips of laminated chipboard and make a U-shaped profile;
- Make a guide channel from 2 slats and bolt it to the end of the table;
- make an inverted T-shaped structure from MDF - it needs to be screwed to the stop and placed in the channel.
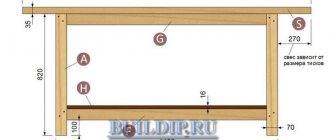
DIY circular table
To make a table, you need the following:
- plywood;
- bars;
- several fragments of chipboard;
- bolts.
To make a tabletop circular you need to do the following:
- Assemble the top of the table from laminated chipboard sheets. It resembles a box without a bottom. The fragments need to be secured with bars. Their length should be greater than the height of the sheets.
- Turn the structure over and fasten the bars with additional jumpers.
- Cut a tabletop from a plywood sheet. Use a jigsaw to make a hole in it lengthwise and place a saw blade there.
Note! To modernize the structure, you can use a metal corner instead of bars. It is worth making a shelf at the bottom of the structure.
To get a reliable stationary structure, you need to make a table.
There must be markings in the form of a grid on the working surface of the device. It will help make the work more accurate. Also, the use of a protective casing should not be neglected. This element helps protect the device from mechanical influences during operation.
Description
Currently, the range of tools for both professionals and amateurs is very rich and amazing in its diversity. Consumers have a wide choice of devices for carrying out almost any work.
Circular saws, made in mini format, were allocated to a separate niche relatively recently. In the Russian Federation, such interesting and functional devices first appeared under the Rotorazer brand. This name is still applied today to a similar class of electrical instruments.
The popularity of the compact circular saw was not long in coming.
The rapid growth in demand is due not only to the excellent functional and technical characteristics of these instruments, but also to their modest dimensions, which do not require much free space. It is permissible to store them at home.
The Rotorazer is a single-purpose tool. It is a representative of a new generation and can easily replace a classic circular saw or sander. Such devices are relevant for both home and professional work. Often, the use of a rotorizer is resorted to in various workshops where furniture is mass-produced. A small circular saw can easily replace bulky equipment, as it is no less functional.
This is what makes a mini saw different – it can replace many other important tools that are often used in various jobs. It is often chosen as a replacement for professional machines.
In addition, this multitasking device is very convenient to use. Most modern mini-saws are equipped with comfortable handles and other little things to ensure the convenience of the master.
Few people know that the pioneer in the new generation of household tools was a brand called Rockwell. More than 15 years ago, this brand introduced the first mini circular saw, Versa Cut. Her build was in many ways similar to the good old Bulgarian. This circular saw from Rockwell was presented in several functional models. Each of them was characterized by remarkable performance and safety. The kit came with a good solid type casing.
With the help of such a model, it became possible to cut a variety of materials, which had a serious impact on the popularity of such a tool. Soon, similar devices found their niche in the European market, but under the Worx brand.
Options for making a woodworking machine
Today, there are a large number of ways to make a stationary circular saw. Angle grinders, hand drills, screwdrivers, and many other tools are used as drives for them.
The most common drive options are:
- drive from a hand-held circular saw;
- machine with a motor from a washing machine.
How to make a stationary sawing machine - step by step guide
When manufacturing, you will need a small amount of material and hand tools, which, as a rule, are in everyday use of every owner. This includes:
- wooden blocks;
- OSB or plywood sheet;
- fastening hardware;
- drill with a set of drills;
- hand-held circular saw.
A sheet of plywood or OSB with a thickness of at least 20 mm and dimensions of 1100 x 880 mm will be used as a desktop. To make a stationary machine for cutting wood, you must perform the following steps:
- Place the hand-held circular saw in the intended installation location and trace the outline. After this, make a recess of about 12 mm.
- Drill holes along the contour of the recess for the M8 mounting bolts and use them to fix the hand-held circular saw on the back base of the table.
- Install a socket next to the saw and connect the saw to it, make a groove in which the saw blade will be located.
- Make a frame for the perimeter of the table and legs of the required length from a wooden block. Install a folding box at the place where the saw is attached, constructing it from thin plywood. Install a power button at the end of the table, having previously connected it to a socket.
- Make a hole in one of the corners of the box to connect a vacuum cleaner. To fix the hose, you can use a plastic fitting with a diameter of 50 mm.
- The box is fixed to the table using metal corners and screws.
- Then, across the table it is necessary to cut 2 longitudinal grooves to install a 150x100x10 mm channel. Since the work table will be covered with 4 mm thick PVC sheets, the depth of the grooves under the channel should be 6 mm.
- After this, you can begin making pushers. Hardwood slats are used as guides. The pusher frame can be made of laminated chipboard with a thickness of 16 mm.
For better sliding of the guides, they must be treated with aerosol silicone lubricant.
After watching the video, you can familiarize yourself with detailed step-by-step instructions for making a stationary circular saw from a hand-held circular saw.
Homemade cutting machine driven by a washing machine
Another common option is to use an asynchronous motor from a washing machine as a saw blade drive. For domestic use, a low-power electric motor is suitable, for example the engine from an old Malyutka washing machine or any modern automatic machine.
We also recommend reading a detailed guide on how to make a circular saw with your own hands using a motor from a washing machine.
Sawing machine from a drill at home
You can also make a good circular saw using a hand drill. The costs for materials are minimal, and almost everyone in the house has a drill. You will find more details about all the nuances and a step-by-step algorithm for making it yourself in our article on how to make a circular saw from a drill.
What is a mini circular saw?
An electric mini circular saw is a narrow-profile equipment that is quite capable of replacing a conventional circular saw or angle grinder.
The tool is indispensable for home construction. It can handle cutting any lumber using a saw blade.
The structure of the saw has a complex design, but despite this, it is not difficult to make it yourself. This does not require special skills of an electrician or mechanic.
Advantages of homemade equipment
A homemade circular saw is considered a fairly popular tool. It is easy to manufacture and has a high degree of reliability.
So, a DIY circular saw has the following advantages:
- versatility;
- ease of manufacture;
- cost savings;
- reliability.
Today you can find many drawings that allow you to design stationary or mobile saws of different sizes. For this you can use drills, grinders and other tools.
Some craftsmen combine a circular saw with a jointer, placing them on the same base. These devices can operate from a common engine. With the help of such a machine, it is possible to achieve perfect cleaning of a wooden surface. Therefore, the combination of a jointer with a circular saw is considered a very functional solution.
Circular machine design
Making a bed for a circular saw with your own hands is very simple. For manufacturing you will need the most ordinary lumber and very little time.
READ Do-It-Yourself Double-Row Hiller for Motoblock
Before you think about the design of the upcoming machine, you need to calculate the load to which it will be subjected. The main thing in the frame is reliability and stability. For powerful production saws, the base is a welded reinforced metal structure. But you don’t need such a unit to use it yourself.
If you have just decided to make your own woodworking machine, then you need to take into account the basic parameters of the equipment. Since saws can be different, naturally, the design of the bed can also be different.
First of all, you need to determine the power of the tool. As a rule, for home use, equipment is chosen whose power parameters do not exceed 850 Watts. But, for example, when building a summer house or country house, it is often necessary to cut a very large amount of wood.
That is, more circular power is required. But experienced craftsmen do not advise buying saws where this figure is more than 1250 watts. Installing this equipment in a home workshop is absolutely not justified. And working on it will only increase electricity costs.
The greater the productivity of the machine, the more stable the base is needed. For professional circular saws, as a rule, a base is installed, welded from a steel profile. Sometimes these frames are even concreted into the floor. Because vibration of the device can cause danger to life.
Depth of the proposed cut. The thickness of the material that will be processed on your machine depends on this parameter. This figure in semi-professional and professional machines ranges from 5 to 8 cm. For cutting boards and thick plywood, this is quite enough.
But working with logs on this machine will be inconvenient. In addition, you need to take into account that this characteristic is reduced in a homemade saw. The depth of the cut will be approximately 1 cm less. But this can be avoided if you provide in the table frame the ability to lower or raise the disk.
When making a tool with your own hands, you need to take into account the frequency of its rotation. If a circular saw to prepare building materials, then this figure may be less. If a clean and even cut is needed, then the rotation speed is needed quite high. This is needed, for example, for making furniture.
But even in this case, there are certain nuances. This saw is not suitable for cutting plastic materials. Due to the very high speed of the tool, the disk heats up and the plastic begins to melt.
Therefore, it is better to choose a device where the rotation speed is no more than 4500 rpm; in this case, the frame for the circular saw can be made of wood. The vibration of this machine is low and additional reinforcement of the table is not required.
Well, in the end, what needs to be considered is the location of the buttons and other controls on your machine. When assembling the saw with your own hands, do not forget that access to the control panel must be safe. This rule is even more important when the open part of the saw is located at the bottom of the tabletop.
In this design, it is best to place the panel with switches on the outside of the machine or make a rising tabletop. This design is also convenient for servicing the device. Then, when you have taken into account all the nuances and little things, you can begin directly assembling the table.
Circular from Dremel
Dremel is a power tool with a huge number of names. You may know it as an engraver, straight grinder, mini drill or drill. The essence is the high speed of rotation of the working tool on the shaft with the compact dimensions of the Dremel.
To assemble a Dremel-based mini circular saw you will need:
- Discs;
- Plexiglas;
- Pipe clamps;
- Bolts;
- Wing nuts;
- Pipe insulation;
- Screws;
- Drill;
- Screwdriver;
- Knife;
- Wood glue.
The process of assembling a mini machine with your own hands follows the following instructions.
- Wooden boards with approximate dimensions of 2.5 by 20 by 120 cm are sawn into 4 elements - 2 by 25 cm in length and 2 by 10 cm.
- Other boards with dimensions of 2.5 by 5 by 120 cm are cut into 4 elements, each 14 cm long.
- According to the pre-prepared cardboard template, make markings on the board. Its size should be about 2.5 by 20 by 25 cm. The template may be different, since it directly depends on the specific model of the Dremel used.
- According to the markings, the board is sawn and drilled. Finish the edges with a cut to allow the tool to fit into the cutouts.
- Using screws, all the structural elements of the mini circular are connected.
- The Dremel is installed in place and secured with clamps. If necessary, do not forget to modify the grooves and notches.
- Using plexiglass, you need to make a covering for the worktop of the mini machine.
At this point, the assembly of the Dremel circular saw can be considered complete. In this case, we are dealing with a truly mini circular machine. a circular saw that is more impressive in size . Therefore, the following two examples of mini circulars may be more suitable for you.
Circular from the engine
To manufacture such a unit, you can use any asynchronous motor with enough power for you. The choice of motor is based on how hard of a job it has to do.
- The frame is made from a profile pipe by welding the elements. You can make a tabletop or floor design.
- A metal sheet is mounted on top of the frame. Its thickness should be 3-4 millimeters. Fix using screws with countersunk heads. Instead of metal, textolite or plywood, covered with a thinner sheet of metal on top, is suitable.
- The motor and shaft are connected to a belt drive.
- Use the electrical connection diagram that matches the motor.
- A switch is installed along with a block of capacitors in a convenient area of the structure.
- The body of a mini circular saw can be assembled from wooden blocks.
- If you have the desire or opportunity, cover the frame with sheet materials. The advantage of a wooden structure is that no welding is required. Connections are made with self-tapping screws and bolts with nuts.
- The main working unit is installed under the desktop. It includes an electric motor, a spindle and a circular saw blade.
- To assemble the spindle, many people use the pedal assembly of a regular bicycle.
- It is recommended to use discs with a diameter of up to 130 millimeters. To satisfy everyday needs, such parameters will be sufficient.
- For the engine, provide an air cooling system by blowing.
We figured out how to make a mini circular saw based on almost any asynchronous motor with our own hands. The task is not the most difficult, but requires a careful approach to execution.
READ Miter Box For Circular Machines Or Do-It-Yourself Trimming
Purpose of a circular saw
Home craftsmen strive to fill their workshops with a variety of useful devices and equipment. Having a circular saw, it will be easy to carry out woodworking without spending a lot of time and without exerting much physical effort. For example:
- cut a board;
- process the workpiece, strictly maintaining the dimensions indicated in the drawing;
- cut wood.
The design of the tool is easy to manufacture, which attracts the attention of craftsmen who want to create useful devices with their own hands.
A circular saw consists of the following elements:
- beds;
- countertops;
- cutting tool;
- a motor that ensures rotation of the shaft, and subsequently the rotation of the cutting tool.
The operation of a circular saw is that after starting the electric motor, its shaft begins to perform rotational movements, driving the cutting tool. The cutting tool is a disk with sharp teeth.
The disk is secured so that its middle is below the level of the table top. As a result, only a separate segment of the disk is displayed above the surface.
The workpiece is brought directly to the rotating disk, the teeth of which cut into the wood, creating a perfectly clean cut strictly according to the drawing.
The circular can be supplemented with the following elements:
- a pusher that moves the wooden workpiece in the direction of the rotating disk;
- lifting mechanisms providing cutting depth.
Using ready-made drawings and diagrams, home craftsmen can assemble a tool based on:
- Bulgarians;
- washing machine motor;
- chainsaws;
- drills.
Circular manufacturing options
There are a huge number of video tutorials where craftsmen with their own hands talk about the nuances of assembling mini circulars using various tools and materials.
Among this variety, you need to decide what exactly you want to assemble a compact-sized circular from.
We suggest that you familiarize yourself with three rather interesting instructions that will help you assemble mini circulars with your own hands from:
- Dremel;
- Asynchronous motor;
- Bulgarians.
Each version of the circular has its own advantages and manufacturing nuances. After reviewing them, you will be able to decide which one is best for you.
Circular grinder
Another great example of a mini circular grinder is a design that is based on the use of a regular grinder. Many craftsmen have an angle grinder. Do-it-yourself assembly requires the use of a minimal set of tools and auxiliary materials.
Therefore, mini circular grinders based on grinders are one of the most common among homemade compact machines.
Experienced craftsmen offer 4 ways to transform an angle grinder into a mini circular saw with your own hands.
- The simplest method of assembling a circular saw involves screwing the handle of an angle grinder to the tabletop with your own hands using long bolt-nut connections. To do this, you will need to make appropriate holes in the handle with a drill. To securely fix the structure, use brackets on both sides. But remember that the main task in making a circular saw is to obtain a design that is resistant to vibrations. In the case of this assembly option, the equilibrium is not ideal. The more powerful the grinder, the less stable the structure will be.
- Use the services of a professional turner. A miller with extensive experience can, with his own hands, ideally turn a part that allows you to secure the table top and part of the tool’s protective casing. The casing should be removed. The advantage of this method is maximum balance and stability. Plus you get an emphasis on a mini circular. The design has a reliable fixation and is not characterized by the presence of free movement.
- When turning a grinder into a mini circular machine, it is recommended to artificially reduce the speed. The optimal value is at least 4500 rpm. To do this for the benefit of a mini circular machine based on an angle grinder, a reduction gear is mounted to the grinder. This circular design becomes more complex than the previous one, but at the same time works more efficiently. When installing the gearbox, be careful not to damage the components of the angle grinder.
- The self-tapping screws used to fasten the gearbox in the previous version of the circular can be replaced with bolted connections. This version of the mini circular is much more accurate. But its disadvantage is the complex implementation of the bolted connection. Therefore, you will have to spend more time assembling an improved mini machine. At the same time, you will receive an important advantage - minimizing damage to the angle grinder.
These are some of the many examples of how you can assemble a circular saw with your own hands using available tools. But think carefully about your decision. Perhaps the best choice would be to purchase a proven factory circular saw.
Adjustable side support
Any type of work will require a stop. The side support is made of a block of dense wood. In other cases, it is possible to make it from a metal corner. The arrangement should be slightly longer than the table structure. The stop is installed using bolts. The template is installed between the table and the cutter for precise installation and better settings.
The most important part of the design is the shaft mounted on the circular saw. A self-made shaft for a circular saw can damage the structure and cause injury. The reason for this is runout, which cannot be avoided when making a shaft using artisanal methods. The manufacture of the shaft should be entrusted to a specialist with good turning equipment. You should remember that there is a cutter that needs a seat. The holes must be symmetrically machined and machined.
Finished shafts are sold in specialized markets. Preference should be given to parts with a self-aligning bearing. Otherwise, the conventional mechanism may soon render the circular machine unusable.
Motor
In most cases, homemade machines are equipped with an engine from an old washing machine. The main features are increased service life and efficiency. The speed of such engines is not high, which makes working on a circular saw assembled with your own hands safer, longer, and has a positive effect on the result. The use of a special three-phase motor implies the presence of a 380 Volt network. If one is not available, you will have to use a starting and running capacitor, which leads to additional costs.
Circulation table
The main condition for making a table is the selected material. It is recommended to use a solid steel sheet, duralumin or silumin alloy. Materials such as moisture-resistant plywood, plexiglass and textolite require processing and installation on top of a galvanized sheet. The use of any material in manufacturing must meet the main conditions:
In cases where the conditions are not met, DIY circular saw The consequences can be different, from a damaged part to injury to a person.
There are several options for making a circular table. Stationary tables can be sawed or made from two parts. The circular saw blade should protrude no more than a third of its diameter.
Circular saw from washing machine motor
If you have an old washing machine on your household that has exhausted its working life, you can use its parts. The motor from a washing machine can give life to a new tool.
If there is a choice, then the engine must be taken with a high power level. If there is no choice, then the engine that is available is taken as a basis.
Initially, you need to prepare the motor for the future circular machine. Using an ohmmeter, the coil with the highest resistance is determined. The following are subject to verification:
- connections at the brush and commutator outputs;
- speed sensor wires.
Next, you need to connect each of the two outputs of the collector to two contacts of the coil. After connection, a test run is done and the device is connected to the power supply.
If you swap the contacts, the rotational movements will occur in the opposite direction.
You can increase the functionality of a homemade circular saw if you equip it with a device that reduces or increases the speed of rotation of the disk.
To do this, you can use a trigger from a hand-held electrical appliance or a dimmer as a basis. They are connected in the following sequence:
- one of the coil contacts is connected to the armature contact;
- the second contact is connected to mains power;
- the remaining armature output is output via a dimmer in the same way to the mains power supply.
After the motor is completely prepared, you can proceed to the further construction of the circular machine.
As a frame, it is better to take a welded metal frame, in the lower part of which the motor is fixed. The next stage involves manufacturing the motion module.
The cutting tool (disc with teeth) is rotated through a drive belt, which is fixed on a pressed-in smaller pulley. It is important to make notches on the pulley that will prevent the poly V-belt from sliding.
To prevent the drive loop from slipping, a small protrusion is specially welded on the edge of the larger pulley. Before starting the circular machine, it is important to check the reliability of the fastening of the disk and the motor itself. If a disc comes off during operation, it can cause serious injury, which in some cases can even be fatal.
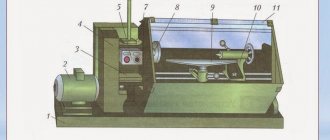
Design features of a circular machine
Circulars of any fixed type consist of main parts.
- Table for connecting mechanisms. An assembly combined with higher power engines is preferable to a table made entirely of metal. The surface of the table must be made level with your own hands, for a higher quality product at the end.
- The engine in most cases is used from what is in stock. Electric motors designed for long-term operation from the network will be preferable to commutator drives.
- The shaft is the most critical component of the circular. Finished products are used most often; in other cases, the assembly is made on a lathe. It is important to calculate the mounting holes and eliminate runout.
When making a machine with your own hands, you should pay special attention to safety. The main surface of the saw blade should be covered with a protective cover. The moving parts of the drive and motors must be covered. The emergency stop button is built into the electric drive circuit and has a convenient location.
Determining the parameters of a homemade circular saw at home
The primary task is to choose the power of the future stationary circular machine. Typically, devices with a power of up to 850 W are recommended for home use. If you are planning not to carry out repair work, but to build, for example, a bathhouse or a summer house, as a result of which you will need to cut a lot of material, then you can use a 1250 W motor. A device with a higher rating is not recommended, since such powerful circular machines require not only a solid stand-table, but also fixing the latter to the floor by fastening or concreting.
An important characteristic is the cutting depth. In home devices, it should not exceed 8 cm. In fact, this indicator is quite enough for sawing boards, plywood or wood boards.
When making a mini-circular saw or a full-scale sawing structure with your own hands, be sure to take into account the rotation speed. If you just plan to cut boards to make certain wooden elements, then you can limit yourself to a motor with a low or medium frequency. If you need perfectly smooth and clean cuts, it is better to use a high-speed motor. The optimal indicator for a home power tool is considered to be 4500 rpm.
For a circular machine, you can use a motor from a washing machine.
Be sure to take into account the height at which the start button will be located. Its location should be convenient for pressing.
Note! The control panel of a homemade circular saw must be accessible.
DIY circular
In the household, a circular saw always comes in handy. Major repairs are a costly and troublesome task. Not everyone can afford to buy expensive tools for processing wooden materials. A DIY circular saw allows you to carry out safe work and speed up the construction process. A saw made by yourself has a number of advantages, such as reliability, efficiency and sharpening for immediate needs.
READ The Better Way to Cut Drywall
Broadcast
There are several types of gears that can be used in the design of a DIY circular saw:
- V-belt transmission;
- mechanism consisting of gears.
The preferred option is to use a belt drive. Using a mechanism with gears can lead to jamming if a foreign body enters and injury to the worker. When choosing the pulley diameter, the maximum number of revolutions of the saw blade is taken into account.
How to make a circular saw with your own hands: preparatory stages of work
How to make a circular with your own hands? To do this, you need to prepare everything you need - buy or use existing parts. Before purchasing structural elements, you need to draw up a detailed drawing. Without a diagram, it will not be possible to take into account the dimensions of the mechanisms and create a complete set of parts.
To make such a tool, you can use a drill or grinder. Some craftsmen make a device from an automatic washing machine. To make the device more functional, it can be supplemented with a lifting mechanism.
Manual device from an angle grinder
A lot of work is done with the popular grinder tool. This tool will make a hand-made circular saw that is indispensable for households. It is enough to make a sliding stop from available material. The design assumes the presence of two small sections of corners that are located parallel to the disk. The connection is made using bolts, the gap is adjusted with supplied washers.
The band clamp is installed so that the screw location is at the bottom. Next, a strip of metal with a hole is attached; in another case, the structure may be uniform, but this way the thickness of the metal is lost. The next step is to cut holes in the body through which the handle is attached to perform basic work. A hand-made handle is a horn or bracket, based on a metal rod or pipe. It is also worth considering the riveting; if the ends are relaxed, the handle may bend during mechanical action on it.
preparing the table
First start immediately before preparing the circular saw, you must scrape the table. In essence, there is nothing complicated here; it is necessary to pay special attention to the accuracy and precision of the robot. The table must be stable and not get hit while the saw is being used. How to prepare the kitchen table, what is the metal frame. The top of it must be wide and level, so that the workpiece will be placed on it. In addition, it is necessary to make a cut for the saw. It can be prepared either from a metal sheet or from plexiglass. Before speaking, it’s important to make a top for the porch table, so that this will make life easier for you. This way you can at any time gain access to the internal parts of the bench, for example, to the engine.
How to make a permanent stationary circular?
Now let's move on to the simplest part. This possession does not develop in one day, but collecting it is not so easy, and it also requires a large number of elements and parts. With such a stationary workbench, you can cut everything easily: both thin and thick timber. In principle, if you are not a master of wood design, then the tabletop option will be enough for you. If robots are moving frequently and with high intensity, you may want to think about assembling a stationary saw.
Regardless of whether a tabletop or stationary circular saw is made, the table is covered with a thin ball of steel or galvanized steel, which is necessary to increase the value. In addition, without a special coating, after about an hour a small hole will appear in the center of the table, and you will no longer be able to make a deep, straight cut. Let's take a look at how to develop and select the main nodes and what is special about the installation.
Shaft and bearing selection
Shaft. One of these knots is that it is not good to work independently. In the worst case, you need to go to the “freeze” and buy a used shaft with a seat for the disk. The priority must be the new virus. The most advanced. Turn off the blade completely, since this negative factor will significantly increase during the operation of the disk under pressure, which can lead to the fact that the circular saw is stationary and will be destroyed. If the bearings are running out, then it is better to give advantage to self-aligning ball bearings. Any self-sufficient option will not work again, as such a device will not last long. The pin and bearing should be protected with a casing to prevent the saw and shavings from being lost. In principle, the circular saw is ready, I just have a couple more knots left.
Working body and butt stop
Do not forget about those with a circular table saw or a stationary one that does not have to stand above the table more than 1/3 of the diameter. Otherwise, the cutting power will get worse, and the work will become more unsafe. So, to trim 100 mm timber, a 350 mm disc is required. In any case, you will need to increase the engine pressure by approximately 1 kW. For a 170 mm disc, a motor power of 0.4 kW will be sufficient. For these simple reasons, evaluate your capabilities ahead of time and then proceed before collecting.
Once we have found the required disk for the circular saw, it is necessary to use the working stop. It is best to make one from a steel roll of 60-80 mm and a working table extended approximately 200-400 mm. The vertical shelf is cut with small pieces. As a result, the surplus may last until the end of the day. The tails bend downward to form the letter U. The stench is to blame but is equal to the thickness of the table plus 15 mm. After emphasis, press on the table and secure. The border is placed behind the template.
preparation of the guide
On the table, you will need to prepare a guide bar, which is necessary for precise movement of the workpiece. The best way is to make a guide from a metal heap and attach it with additional clamps to the plate. It is necessary to pay attention every time if you are going to introduce a new size. It’s important to try to adjust the slat bar as you move across the table. It’s really cool. However, in such a situation, the table top is due to the fact that the sides are strictly parallel, and this is the only way to ensure smoother and even movement of the guide bar. If you follow such a path, you will need to earn a foraging sergeant. The best choice for these purposes is a steel or aluminum cut. You must carefully skim along the edges of the table, thereby maintaining a straight cut. You can also try to make sanchata from wood, but it is not easy due to the bulkiness and inconsistency of wood.
Sources:
https://fishing-mityaevo.ru/info/minicirkuljarka-nastolnaja-dlja-modelistov-svoimi/ https://stankiexpert.ru/stanki/stanki-dlya-rezki/cirkulyarka-svoimi-rukami.html https://faqukrstory .ru/dom-i-byt/dom-i-semja/5212-cirkuljarnaja-pila-svoimi-rukami-ruchnaja-mini.html