Arsenal Master RU's assortment includes the largest selection of clamps, clamps and vices. For your choice, for every taste, for your tasks. We will deliver throughout Russia.
Arsenal Masters RU has more than 750 clamps, clamps and clamping devices for every taste and for performing any type of work.
You can find them in the catalog in the Workshop Equipment section in the subsection Clamps / clamps / vices / clamps
Using the filter you can select:
- type of clamp (clamp, clamp, clamp, etc.)
- manufacturer
- model name
- product status (HIT, Promotion, etc.)
Clamp: we make various types at home - options, drawings, implementation
Craftsmen are drinking.
Excuse me, they are having a intimate conversation. For one, instead of the sacramental “Vasya, do you respect me?” “Vasya, how many hands would you like for yourself?” comes out of your mouth? He thinks about it: “How much? But who knows... Well, how much work is needed there..." Hands, of course, to hold, press, grab, etc. Therefore, such an auxiliary tool as temporary removable clamps of various types - clamps - is always lacking for a craftsman. There wasn’t enough at a time when these same clamps cost a penny. Nowadays they can charge more than 1000 rubles for a good clamp. Despite the fact that now even in small piece production, power tools, electric and gas welding, pressure gluing and other technologies that require reliable holding of parts during the working process are widespread. The purpose of this article is to tell the reader how to make a clamp with your own hands at home. Preferably - from scrap materials with minimal need for welding and turning work.
Note : in English, a clamp is cramp (screw), bar clamp (spring-lever) or simply clamp, similar to how a screwdriver (screw driver) is often called simply screw. A person who knows spoken English well, but is unfamiliar with the technical features (these are very different languages), hearing something like “Give me screw driver,” most likely will not understand what they want from him. Moreover, poorly educated English-language articles are most often “swallowed.” If you happen to find yourself in a similar situation, listen: “the screw” means a tool, and “a screw” means some kind of threaded hardware (screw, screw) that is twisted with it.
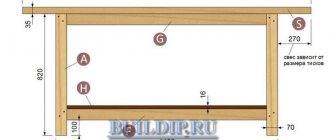
Corner option
Regardless of the type of clamp, it must firmly clamp the parts for joining or processing. A corner joiner helps to fasten wood pieces at a certain angle (most often 90°, but there are others). You cannot do without this when assembling furniture and frames.
In order to make such a clamp from wood with your own hands, you will need the following materials:
- two wooden blocks 25 mm thick made of hardwood;
- plywood 12 mm thick or more;
- screws, studs;
- jigsaw or hacksaw;
- drill.
A square board with a side of 25 or 30 cm is cut out of plywood. Two bars are fixed on it at an angle of 90 °.
Important! The angle must be measured with high precision, since the correct fixation of parts depends on it.
First, the bars are glued, then countersunk, holes are drilled and screws or other fasteners are tightened. Perpendiculars are drawn from the center of the bars - screw studs will pass here.
At a distance of 20 mm from the corners, thrust bars are attached, maintaining a gap between them. It should be slightly larger than the width of the parts that are to be clamped with a homemade clamp. It is better to screw in the studs immediately, before fixing the stops. You will also need to cut out the movable blocks that will be connected to the pin (when it is unscrewed, the workpiece will be pressed against the corner bar).
In the same way, a clamp is made from plywood or chipboard sheets. In it, instead of wooden blocks, a thick plywood sheet is taken. There are other options for making clamps yourself, but the principle of their assembly is generally similar.
Clamp in the form of a caliper
Devices that are shaped like calipers are used to firmly hold small parts. For a homemade clamp, you will need, as before, plywood and small thickness bars.
For screws, it is best to take studs with rectangular or trapezoidal threads. The thread pitch is 2 turns per cm. It is very good if the stud has a rear sight on one side of a slightly smaller diameter than the thread. It can be used to seat the handle. On the other hand, a rear sight with a slightly larger diameter to accommodate the bearing is desirable.
So, in the simplest clamp, one end will be stationary, and the second will move through a worm gear.
To release the workpiece, you need to move the bracket to the required distance and turn the knob a few turns. This will fix the element. After this, you can release the mechanism and the workpiece will be released.
The simplest version of this model is equipped with a rail structure. The guides, which are arranged in parallel, have cut grooves at equal distances. Fixed stops are secured using rods made of metal. They can move exactly along the width of the workpieces. At the end of the beams, fixed stops should be installed, which have a worm mechanism. The usual method is to clamp it with a hairpin and a furniture nut.
End clamps
Design features . The end clamp consists of a cast or forged base-bracket with three clamping screws.
Advantages . A simple and affordable design for solving specific carpentry tasks: a clamp with a T-shaped profile is used to clamp edges and ends.
Flaws. Despite all its functionality, managing an end clamp is not so easy: fixing an edge, simultaneously holding a clamp and tightening three clamps is not always convenient alone.
Application area. Clamping of edges and end elements of wooden products.
How to properly glue furniture boards
Gluing of furniture panels is carried out not only on an industrial scale. Small carpentry shops also resort to this technology in order to produce furniture that is not inferior in strength to structures made from purchased panels.
Tabletops made from spliced lamellas last a very long time, do not warp, deform or swell from moisture. Another reason for splicing is the remains of small-sized bars in your production, which are unreasonable to throw away and have nowhere to be used. The best option is gluing the lamellas into furniture panels.
- Video about how Serega Dorzhiev glued a furniture panel for the first time
- How I glued a shield myself in 25 minutes
- What tool do you need to have to glue furniture panels on a production scale?
- What glue to use to glue furniture boards
- How to properly glue furniture panels. Slat arrangement options
- How to glue two furniture panels together
Video about how Serega Dorzhiev glued a furniture panel for the first time
Furniture made from natural and environmentally friendly materials with your own hands is valued and in high demand. This construction material is more attractive and practical than MDF and chipboard.
How I glued a shield myself in 25 minutes
To get aesthetic and high-quality material, sort the bars according to the following criteria:
- absence of knots and cracks on the surface;
- correct geometry (slight curvature can be leveled with a plane);
- correspondence of texture pattern and shade;
- identity of the species - pine is glued to pine, larch to larch.
It is important how tightly you tighten the bars when gluing. Most often, PVA glue is used as an adhesive, so it is important to create a lot of pressure by tightening the material tightly with clamps.
» >
Photo 1. Please pay attention to the fact that the geometry of the corner of the bar is 90 degrees, and that there are no chips, cracks on their surface, no knots at all, or a minimum number of knots. In the end, to obtain an even geometry, the block can be planed
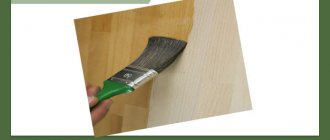
» > Photo 2. Take all the necessary materials - wooden blocks, PVA glue, brush and clamps
» > Photo 3. I use this glue, in the summer, when the woodwork is good, it glues the shield together in 10 minutes, and in the winter, when it’s cooler, in 20 minutes
» > Photo 4. Fold the blocks in one row, as closely as possible to each other to eliminate gaps. To do this, select the smooth sides, aligning them with each other. If some of the raw material has uneven cuts, place it along the edges. Thickly coat the entire surface with PVA glue using a brush.
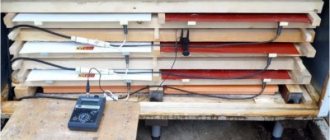
» > Photo 5. Tighten the resulting structure with clamps. To avoid damaging your workpiece, place a block or any piece of wood under the clamp
» > Photo 6. Gradually and alternately tighten the clamps. The tighter you can do this, the more likely it is that the structure will stick together evenly and efficiently.
» > Photo 7. Gradually and alternately tighten the clamps. The tighter you can do this, the more likely it is that the structure will stick together evenly and efficiently.
» > Photo 8. To level my shield, I used a grinding machine like this, after first removing the remaining glue from the front and back of the shield with a stationery knife
» > Photo 9. The grinding process took about 10 minutes and tired me out, or it was a thickness planer, it would have gone through in a minute.
Features of the manufacture of clamping tools of different types
There are different types of clamps; they differ in design, material, and size. Let's look at the types of clamping tools and the nuances of their manufacture.
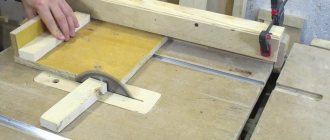
Quick-clamping
Pistol type clamp. When the trigger is pressed, the jaws move apart. By releasing the locking screw, you can change the gap between the jaws. The clamping force is small. You can make it yourself, but it is not economically profitable. It's a lot of work, but it's inexpensive.
But such a clamp with a cam clamp is very easy to make. And she holds it tightly.
PHOTO: pimg.mycdn.me Cam-type quick-release clamp
G-shaped
G-shaped clamps differ from C-shaped ones only in the presence of a molded fixed jaw. This allows you to clamp parts more clearly and firmly.
End
The end clamp can be made using C-shaped technology. The only difference is that it has three clamping screws. Its dimensions are selected based on the dimensions of the future object of work.
T-shaped
When making such a clamp, it is necessary to accurately maintain the size of the holes of the sliding parts.
F-shaped
To make such a clamp, milling work is required to make a toothed notch on the rod.
Corner
The carpentry corner clamp is described above.
Tape
Tape clamps are used for gluing frames, boxes, and caskets. The tape tightly covers the product and prevents it from falling apart prematurely. Manufacturing requires a good drawing and precise adherence to all dimensions.
Pipe
“Pipe” clamps are basically a thick pipe. They are used when gluing panels. The thickness and length of the pipe are determined by the size of the shield: its width, plus 10 cm for the length and diameter of the pipe (from half an inch to three-quarter).
PHOTO: youtube.com Pipe clamp for gluing panels
Spring
This clamp creates a clamping force due to a spring. The amount of clearance between the “heel” of the bracket and the “heel” of the clamping screw is created precisely by the rotation of this very screw. First you need to set the solution, then pull back the movable part of the clamp, compress the spring, insert the part into place and release the spring.
PHOTO: usamodelkina.ru Homemade spring clamp
Self-clamping option
For gluing parts, it is better to choose the simplest clamp model, which has an F-shape. The stores sell various models that consist not only of wood, but also of metal. The cost of such instruments is high. Therefore, many craftsmen prefer to make them with their own hands.
For small jobs, a cam-type clamp is ideal. For example, if you need to glue small parts or fix workpieces. This model works in the same way as the f-shaped element. The tool includes 2 jaws and guide bars. Sponges: movable and fixed. For reliable clamping, it is necessary to fix the workpiece well and rotate the cam 90 degrees.
You can make such a tool yourself with a minimum set of tools and materials. Before you begin, you should draw a drawing of the product. You can use any material for manufacturing, and also change the standard sizes as you wish.
The tire is made of wood or metal. Small bolts and rivets can be used instead of metal pins. It is recommended to make movable and fixed jaws at the same time, since they mirror each other. Their width and length can be changed to increase the grip of the product.
Design Features
In the process of making wooden products with your own hands, joining parts is often required. This process will allow you to obtain parts of a sufficiently large width. Such products are much less susceptible to warping than those made from solid wood. But it is very important to ensure even and reliable gluing. In this case, it is necessary to take into account a number of factors: the thickness of the workpieces, glue, orientation and number of layers. There are many different designs of wedges for assembling wooden products, gluing bars, etc. This carpentry equipment is used for various work in the DIY workshop. The choice depends on the characteristics of the materials, the work and the final goal.
Pneumatic clamps are machines that are used to press and clamp wooden products for gluing. The pressing force is compressed air. They are often used in the woodworking industry in the manufacture of wooden objects: furniture, etc. They can be used to glue structural parts under high pressure. This is how beams and panels, multilayer beams of the required sizes are produced. Such clamps consist of clamps and special sections for vertical bilateral fixation. They can be used for wood and hard and soft species.
This equipment is quite lightweight, so you can work with it in different places.
Mechanical clamps can be lever, screw, cam, etc. They consist of a frame with stops, of which there can be two or four. The stops are driven by screws, for rotation of which there are handles or handwheels.
Material for making clamps (hand clamps) and what it affects
In most cases, metal is used to make a clamp. However, there are also products made of wood or plastic. What are the features of each type of material for the production of clamps, we will find out further.
- Forged cast iron - their main advantages include such properties as durability, strength and reliability.
- Made of plastic - used to work with any types of materials except metal. Most often they are used when installing suspended ceilings or gluing rubber, plastic and other parts. They do not damage or stain wooden surfaces. They are made from polymers that are resistant to mechanical stress.
- Metal stamped ones are the most common type of clamps that most craftsmen choose. They are used for various purposes, but their main purpose is the installation of metal frame and load-bearing structures. To resist corrosion, metal surfaces are coated with zinc or galvanic substances.
- Wooden - they are designed to work with fragile and soft materials, including wood products. The main condition for their manufacture is the use of hard wood, which eliminates the possibility of failure during operation.
- They are made from aluminum - they are produced by casting, and the main advantages of such devices include: lightness, corrosion resistance and low price. It is very important to take into account that such models are not intended for use under intense loads.
WHAT YOU NEED TO GLUE WOODEN BOARDS INTO A SHIELD
- Plane;
- A circular saw;
- Clamps;
- Hammer;
- Gauge for marking;
- Measuring and drawing instruments;
- Equipment for wood processing (surface grinding and belt units). If they are not available, then you can use sandpaper, but then leveling will take longer;
- Wood material;
- Wood glue;
- Electric planer.
IMPORTANT: You need to use good glue to ensure that the boards are joined together well.
- Impeccable high-quality wood glue Kleiberit 303.2. It has excellent moisture resistance and is characterized by powerful fixation. Suitable for both indoor and outdoor use, for gluing various types of wood. Product price starts from 6,600 rubles per unit of 28 kg.
- Kleiberit pur-glue 501. Excellent quality glue suitable for all types of wood, slabs, and ceramics.
How to make disposable wedges from timber
This is a simple design option. It is not the most reliable, but sometimes it happens that for constant use it is not needed. This instruction will allow you to create a simple disposable clamp.
- beam;
- high strength self-tapping screws;
- saw;
- carpenter's hatchet;
- screwdriver
The creation technology is as follows:
- Wooden parts must be laid flat and horizontal.
- Position the workpiece. The gap between the parts is approximately 40 centimeters.
- On both sides of the workpiece, strictly parallel, it is necessary to lay a long beam, which is attached to the crossbars with self-tapping screws.
- To compress the workpiece, the clamp must be wedged with special wedges.
- As soon as the wooden shield is glued, the wedge can be disassembled and the parts can be used for other purposes.
Materials and assembly steps
In order to make tree clamps, you will need the following elements:
- beech or birch block;
- feather drill;
- pipe 2.5 cm;
- mortise nuts of suitable diameter;
- a nut that has a rounded knob (used for decoration);
- a cutter with a diameter of 2.5 cm and a long pin.
The basis of the material is a pipe, from which a piece of the required length is cut. Depending on the size of the jaws, it is necessary to cut the block. The pieces should be from 15 to 20 cm. For free movement of the timber along the pipe, a hole with a diameter of 2.5 cm should be made at a distance of 2.5 cm from the edge. Parallel to the hole, a cut should be made from the same end. To fix the sponge on the pipe, connect the hole to the end.
For the driving nut, you need to drill an additional hole on the side of the cut. You need to drive a nut into it and tighten it with a bolt on the back side. To fix the sponge, clamp the pipe in the hole. To move the pipe, you need to unscrew the bolt, then move the element and repeat all the steps again.
The lower clamping part has 2 jaws; it is slightly larger than the upper one and has an additional nut. The structure of both parts is identical. An additional driving nut is located at the opposite end of the pipe into which a stud with a wing nut is installed.
In the second collapsible moving part there are no clamping parts such as cuts and nuts. The dimensions of such an element are also rather large. In this part it is necessary to make a recess for the stud device.