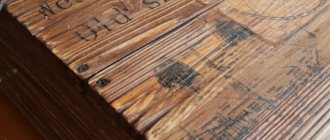
In the production of furniture or during decoration, chipboard material is often used. It is easy to process even at home. However, in case of incorrect, sloppy cutting, cracks, breaks, and chips may appear on the surface of the laminate. Therefore, in order to avoid these troubles, when sawing chipboard at home, you must adhere to certain rules and observe some nuances during work.
Sawing using a scratched marking line
You can carefully cut laminated chipboard without cracks or chips appearing on its surface by applying a scratch. To do this, you need to take a ruler and, using a nail or an awl, scratch the markings necessary for marking on the laminated coating.
Then the chipboard must be sawed strictly along the scratched line. In this case, the edges of the teeth of the saw used must fall exactly in the place of the scratch. Using this method, you can quite successfully, without any incidents, cut laminated chipboard using a jigsaw or an ordinary hand saw.
Recommendations from experts
Jigsaw with vacuum cleaner connection
If the tool has a connection for connecting a vacuum cleaner , you should definitely take advantage of the opportunity to remove waste from the cutting area, this improves the visibility of the markings and makes it easier to maintain the correct cut.
When the quality of the edge is unimportant or it will not be glued, the easiest way is to use a regular hacksaw with fine teeth for cutting; this will save money on purchasing power tools and consumables.
Application of a jigsaw
You can use a jigsaw to accurately cut laminated chipboard. At the same time, it should be noted that this tool is preferable to use for cutting small sections of wood. Also, when using a jigsaw, you should select a file with small teeth.
When sawing laminated flooring, the power tool should be moved smoothly, without strong pressure. When cutting laminated chipboard using a jigsaw, it is recommended to set the power tool to low speeds.
Ways to minimize chipping
An additional reason for the formation of chips may be misalignment of the saw teeth. Therefore, the first thing you need to do is purchase a tool with a straight cut (often Bosh files). However, it should be taken into account that during prolonged use, such files overheat and may even bend during the cutting process. Therefore, it is necessary to take breaks from work to cool the cutting tool.
However, just replacing the saw blade is not enough and in order to cut laminated chipboard (laminate) with a jigsaw without chipping, you need to make minor modifications to the power tool. Namely, make sure that when the saw moves against the inclination of the tooth, the material does not pull out. For this purpose it is enough to make a persistent platform. You can come to this conclusion by trying to cut two sheets of chipboard at the same time. So there will be practically no chips on the lower element.
In order to make a stop pad for a jigsaw, it is enough to cut out a rectangle from any dense material (for example, laminate) with dimensions identical to the dimensions of the sole of the power tool.
Then, along the larger center line, you should make a notch and secure the resulting equipment to the sole of the jigsaw using insulating tape or double-sided tape. All modifications are ready and finishing work can be carried out in compliance with certain recommendations.
Firstly, as mentioned above, you should use a jigsaw file with a straight cut.
Secondly, in order to better control the cutting process, it is justified to apply a marking line on both sides of the chipboard and check the accuracy of the processing from above and below.
And thirdly, take constant breaks from work to cool the cutting equipment.
Sometimes the solution to this issue can be simply cutting through the laminated layer of material using a mounting knife, and subsequent work with a jigsaw will no longer cause large defects in the form of chips. However, this work requires the performer to have some experience and accuracy.
It is extremely rare that when carrying out repairs using chipboards, it is possible to do without cutting the material. Unfortunately, owners often cannot cut chipboard so smoothly that there are no chips or other damage. But with a competent approach to carrying out such an event, it is still possible to get quite a good result. To do this, you need to perform the following steps.
Sawing with a circular saw
Often, for sawing laminated chipboards at home, circulation saws or, as they are also called, circular saws are used. In this case, for processing chipboard using such a power tool, it is preferable to use a saw blade with fine, small teeth.
As a rule, this method of processing laminated chipboard is used in cases where it becomes necessary to make a long straight cut on the slab. In this regard, a circular saw will show better results than, for example, a jigsaw. To increase the level of cutting accuracy, it is recommended to use guides and mount the power tool itself on a stationary surface, such as a workbench or table.
What absolutely should not be done when sawing laminated chipboard
Before moving on to the tools that you can use, you need to note the one that is better not to use, especially since there is only one. And this is an angle grinder, or, as it is also called, an angle grinder.
It is not used for cutting, firstly, because during use, chips will definitely appear on the finished parts, no matter how hard you try. And secondly, because it’s easy to get hurt when working with an angle grinder. Moreover, furniture blanks from laminated chipboard can be obtained using much safer tools.
Sawing with undercut
To use this method, which allows you to carefully cut laminated chipboard, you need to take a large ruler (tire), and then securely fix it on the slab using clamps. Trimming the slab must be carried out strictly according to the applied markings. After the tire is installed on the marking line, you can make the first cut, the depth of which should be about 6-10 mm. After this, you need to make a second, through cut and saw the laminated board.
How to cut chipboard without chipping?
Before we start cutting chipboard, especially laminated chipboard, we cut a line along which we will cut with a sharp tool and glue paper tape with an adhesive layer along it. This will help minimize damage to the decorative chipboard layer.
To ensure that there are as few chips as possible, it is necessary to direct the movement of the hacksaw at an acute angle to the surface (no more than 30°). Movements should be smooth, without excessive pressure on the plate or sudden jerks.
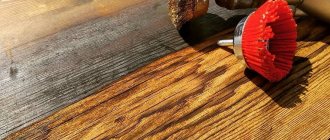
If chips still cannot be avoided, we process the cut first with a file, working in the direction from the edges to the center, and then with fine-grained sandpaper. You can also mask all defects by using, where possible, a flexible profile.
Application of a router
A router is a special power tool that is actively used in manual wood processing. It is used for shaped processing of products, cutting grooves and edges. It is worth noting that before using a router, the chipboard must first be processed with a jigsaw, making an indent of approximately 3 mm from the markings applied to the slab.
After this, the cut line is aligned with a router according to the applied template. To cut laminated chipboard, you must use a cutter with a bearing, which allows you to shape the depth of the cut to the desired level.
It is worth noting that using a router allows you to make even curved, complex cuts. However, the use of this power tool when processing laminated chipboards is a labor-intensive, complex process.
Cutting tools and equipment
Depending on the volume of work to be done and the configuration of the cut, use:
- electric jigsaw;
- circular saw (parquet);
- manual frezer;
- hacksaw;
- professional equipment.
Not every tool can produce parts of the required shape.
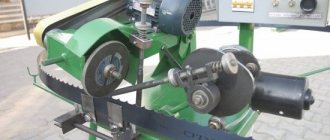
Slitting machine
Cutting chipboard on a sawmill
If you know the exact dimensions to which the sheet should be cut, it is better to entrust the work to professionals. Almost all sellers - bases and construction markets - provide this option. Often the cutting service is free, the customer only pays the cost of the chipboard.
For cutting, format-cutting machines of various designs are used.
additional devices allow you to saw off chipboard without chipping For example, on some models two sawing discs are installed: the first, of small diameter, cuts through the surface laminated layer, and the main one makes a full cut.
CNC cutting machines operate in a semi-automatic mode, eliminating operator errors, which allows you to obtain finished parts with dimensions accurate to 1 mm. This is important in the manufacture of cabinet furniture.
Jigsaw
You can use a jigsaw to cut shapes
An electric jigsaw is used to cut the sheet along straight and curly lines .
Advantages of the method:
- accessibility - most craftsmen have a jigsaw, and a new one is inexpensive;
- There are special files for sale for chipboard, chipboard and laminate;
- You can cut circles with a small radius;
- Suitable for making through holes for hatches or electrical installations.
To obtain a straight cut, you need to have experience working with the tool or just use a guide bar.
Parquet
A hand-held circular saw , sometimes called a “parquet saw,” is used if there is a large amount of work on cutting chipboard along straight lines .
Purchase discs with carbide tooth tips.
To simplify and speed up the work, choose parquet flooring complete with a guide rail or purchase an additional accessory separately.
Hand-held circular saw with guide bar
You can do without additional parts if you cut along a guide from a corner or plaster rule.
The main disadvantage of this method is the inability to make a curved cut.
Fraser
To cut chipboard efficiently using a router, the craftsman needs a lot of experience.
A smooth, flawless edge is obtained only when using diamond cutters , the price of which is high.
Hacksaw
To cut chipboard you need a fine-toothed hacksaw
Cutting with hand hacksaws takes a lot of time and requires a lot of physical effort .
Hand saws with large and medium teeth are only suitable for sawing regular chipboard (without laminated layer). The result will always be accompanied by chips and scuffs. The appearance of the edge can only be corrected with decorative overlays.
A small amount of cutting is performed with a hacksaw with fine teeth. To reduce the number of chips , stick masking tape over the sheet, mark the cutting line and only then start working.
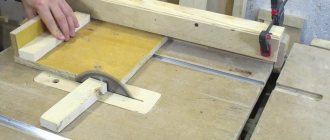
Technique 2. “Reverse cut.”
The first pass is performed in an unusual manner - in reverse. That is, the circular saw rotates as the workpiece is fed. We set the minimum cutting depth, turn on the saw and move backwards rather than forwards.
If you have a regular saw, then simply fix the saw with minimal overhang beyond the base. The point of the first pass is that the blade, moving along the guide, only catches our workpiece. We need a small groove on the chipboard.
Having made the first - trimming cut - you will make sure that there are no chips with such a feed (backwards). The surface is perfect!
Now we will set the saw to full depth and cut the workpiece along this groove with a regular cut - forward feed. We will get two cuts per workpiece. No wave cuts, arson, nothing - perfect quality!
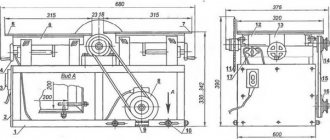
How to make a machine with your own hands
When using a format-cutting machine, you can obtain high-quality furniture parts. This is due to the high precision of the production process, including cutting. Therefore, if it is difficult to purchase ready-made equipment, but you really want to start a chipboard processing business, you can assemble the machine yourself.
Required tools and materials
The saw unit of the machine is most often a welded structure, since it most effectively resists vibration.
- welding machine;
- “grinder” with a metal disc;
- electric drill;
- measuring tool.
In order for the equipment to operate for several years, it is better to choose those materials for its manufacture that have been subjected to heat treatment.
- square or round pipes;
- a beam or two round pipes connected to each other;
- rollers;
- steel sheet with a thickness of at least three millimeters;
- chipboard sheet;
- lever mechanism of any configuration.
Manufacturing
Manufacturing begins with the main components and ends with smaller ones.
Stages of making a machine for cutting chipboard with your own hands:
- Manufacturing of the bed. Square or round pipes will be required. They are cut and fastened to each other using clamps. After checking the dimensions and correct location of the components, welding begins.
- Manufacturing of a movable carriage. Install guides, preferably a beam or two round pipes connected to each other. The carriage must be equipped with rollers for smooth sliding.
- Making a desktop. The base is made of a steel sheet with a thickness of at least three millimeters, the working surface is made of a sheet of chipboard, and measuring rulers are attached to it.
- Production of clamps for sheets, for example, from a lever mechanism of any configuration.
- Upon completion, the cutting unit is connected to the chip suction unit.
The quality of finished products produced on home-made machines is higher than that of products created entirely with hand tools, but still lower than on industrially manufactured machines.
Sawing rules
Before sawing, choose a method, as well as accessories and tools.
- scotch;
- masking tape;
- pencil, ruler;
- sandpaper.
- hacksaw;
- milling cutter;
- a circular saw;
- tire;
- jigsaw;
- sawing machine.
How to saw chipboard without chips step by step:
- Apply dots to the end part of the chipboard. You need to determine in advance what type of cutting will be done - straight or figured. Their cutting technique is different.
- Connect the dots into a line and stick adhesive tape on top. It is advisable to saw laminated chipboard using adhesive tape. It will reduce cracks when cutting, since the wooden slab is subjected to strong pressure with increasing temperature.
- Cut the board. The accessory is installed at the desired angle to achieve extremely smooth edges. The process should occur smoothly, rhythmically and without strong pressure.
- If necessary, process irregularities and edges with a file and rasp. The edges can be covered with veneer of the appropriate color. This will provide them with protection and will look more beautiful.
To disguise low-quality ends, a decorative finishing method is used - veneering (gluing the sides). Thus, not only the appearance will improve, but also the service life of the product will increase.
Only after placing all the necessary tools on the table can you start cutting.