Articles
All photos from the article
As soon as wooden houses began to come into fashion again, the tendency to decorate their facades with all kinds of patterns and ornaments was revived. Wood carving has been used by people for many centuries and today, thanks to many technological innovations, it is becoming available to an increasing number of homeowners. Next, we will look at the main types of this direction and the nuances of do-it-yourself wood processing.
Aesthetic wood patterns on houses
Varieties
It is worth noting that carved ornaments can decorate any wooden product, be it a box, a cornice, a gazebo or the facade of a residential building. So, if you want to experiment, then you don’t have to build a wooden building; for the first time, for example, a stair railing or the door of an old bedside table will be enough.
Through thread
Through wood patterns for gazebos
This is a very common method of creating patterns, which is used most often in the process of decorating houses. It involves the complete end-to-end removal of some elements of the wooden surface. If previously all the necessary work was carried out mostly with chisels and cutters, now the task is performed mainly with a jigsaw.
Tip: It is recommended to use an electric jigsaw for wood. With its help, the work will go faster, the main thing is to be careful.
DIY wood patterns using an electric jigsaw
Blind thread
Blind patterns on wood using a hand router
When implementing this method of applying patterns, the cutters do not pass through the wooden canvas, which is most conveniently done with a milling cutter.
In turn, blind threads are also divided into several types:
- Flat-skinned. In this case, there is a background plane, and the ornament goes deeper into it. Subspecies:
| Thread name | Description |
| Contour | The simplest execution instruction, which consists only of cutting out an even groove along the contour of the pattern that does not change its size. |
| Bracketed | Here the main element is no longer a groove, but a semicircular notch created by a chisel in two steps. It is from such peculiar brackets that the ornament is created. |
| Geometric | In this case, there are two fragments: a triangular pyramid buried inside the canvas and a peg. First, the area to be treated is outlined, and then all excess is cut off according to the planned figure. |
| Black-lacquered | Unlike the first option, here the primary plane is first coated with black varnish, and only then the grooves are cut out, which results in an amazing play of light and shadow. |
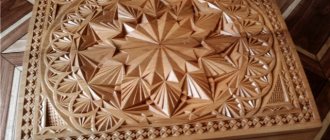
Photo of a wooden plate decorated with geometric carvings
- Embossed. Here the fragments of the ornament are either on the same level with the background, or even higher than it. The method itself is similar to contour carving, but when it is implemented, the edges of the grooves change their shape, fitting into the overall design.
Applying relief patterns to the future shutter of a wooden house
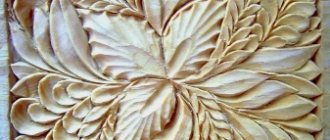
- Flat-relief. A very common way to decorate wood surfaces in architecture and applied arts. It consists in removing part of the material with a recess of several millimeters and at different angles. The result is a volumetric composition.
Flat relief wood carving
Sculptural carving
Wooden sculptures
Of course, creating wooden sculptures from wood is the most complex type of processing. But with such works of art you can safely decorate not only your home, but also any place in your summer cottage.
Advice: after applying patterns to wood, be sure to treat it with antiseptics, especially when it comes to external work. This will significantly extend the service life of your masterpiece.
Rotation speed selection
The quality of wood surface treatment depends on the speed of rotation of the router. An even and perfectly smooth surface is obtained at a higher speed of the milling cutter. A beginner should start with low speeds, because when milling wood, you need to apply a certain force, direct the router in the desired direction and hold it securely in your hands. Once you have mastered the tool, you can move on to higher speeds. The router speed setting depends on the wood being processed, the depth of processing and the diameter of the cutter. It can range from 7000 to 24000 rpm. There is a special knob in the milling cutter body for adjusting the speed. The minimum speed is used when milling large depths or engraving with a large diameter cutter.
If the carving is carried out along the grain of a wooden workpiece, the average speed of revolutions stops. Cross carving requires maximum speed to avoid chipping the edge of the wood piece. At the same time, it is necessary to reduce the speed of movement of the tool, since the speed of rotation is interdependent on the speed of movement. Different types of wood require different processing approaches. Hardwoods such as oak, walnut or beech should be milled at a minimum speed of movement of the router. Soft woods such as pine or birch are milled at a faster feed rate.
Recommendations for applying patterns on wood
If you decide to decorate your own house or gazebo, then all of the above methods of applying patterns can be used in combination. But if this is the first time you’ve touched on such a task, then it’s better to stick to the simplest options.
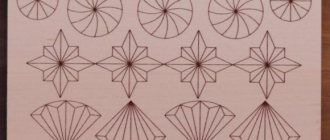
First of all, it is worth considering wood carving patterns for beginners:
Elementary sketches of patterns for wood carving
| Designation in the figure | Pattern name |
| A | Ladder |
| B | Kulichi |
| IN | Triangles |
| G | Viteika |
| D | Snake |
| E | Christmas tree |
| AND | Diamonds |
| Z | Chain |
| AND | Honeycomb |
| TO | Squares |
| L | Stars |
| M | Shine |
| N | Shards |
| ABOUT | Scales |
Wood selection
Examples of suitable samples for processing
When choosing a suitable material, you should pay attention to the following factors:
- Texture features. So, if you want to create a complex ornament with a semantic load, then it is better to take a block with a weakly expressed wood pattern. And if you prefer to only emphasize the natural beauty of wood with your pattern, then opt for a clearly defined texture.
- Try to place the pattern itself along the fibers. This will make it easier to apply.
- Pay attention to wood damage caused by rotting or other diseases. Discard such samples immediately.
- It is also worth weeding out products with such defects as knots and pockets with tree sap.
Purpose
When decorating your home, remember the main functions performed by wooden patterns:
- Decoration of appearance. This is the main purpose. It is noteworthy that in ancient times many ornaments had a specific mystical meaning and served as amulets.
- Protection from direct sunlight. A visor with a through thread does an excellent job of dispersing light.
- Fencing of dangerous places. A balcony or staircase railing can become much more attractive thanks to this finishing.
Wood patterns act as balcony railings, sun shades and decorations
Preparation
Once you have chosen the appropriate block or board and decided on the carving method, prepare the work area. You may need a vice or clamps, a pencil, a jigsaw, a chisel and a router.
Created patterns for wood carving using a router
Next, use a pencil to draw a sketch of your design onto the wooden canvas. Securely secure it and start working. Be extremely careful when applying the pattern, as the slightest miscalculation can ruin the entire workpiece.
At the end of the work, coat the resulting ornament with varnish and install it in the place where it will be located. As a result, you will receive an original product that is made with your own hands. Even if you don’t get a masterpiece the first time, don’t despair, a little practice and your craft will become a real decoration of your home.
Compass for router
When carrying out work in a home workshop, there are often options for needing accessories for a hand router, which can simplify the milling of a round surface. An example is a special compass, which is natural for a milling cutter to make in a handicraft way. The main tips for doing the job are as follows:
- To create the simplest design you will need: a bolt with a nut, a small piece of plywood, several self-tapping screws and a wood wing. At the production stage, the router , and naturally a saw with a screwdriver.
- A platform about 50 mm wide and 150 mm long is marked along the piece of plywood used. Note that the width should be more than just the router pad, and the length should be more than just the processing radius.
- After marking the working part of the site, holes should be made for the mounting bolts. There is an option to drill with a percussion, the diameter of the resulting holes should be 20-30 mm.
- A through groove is created along the central mowing line. Its width is desirable to be less than the width of the axial bolt.
- On the reverse side of the created platform, a recess is created for a nut with a washer, the second nut is attached to the wood wing.
- The central axis is being assembled. A bolt of the required length is used as studs, the head of which is sawed off.
After creating a homemade compass, attach it to the router, you can check the device in operation.
Cheap and cheerful
Wood carving is always excellent, rich and expensive. This is done by professional people, painters or architects. As annoying as it may sound, there are carving methods that anyone can do. For example, cutting patterns on wood with a hand router is very easy. The work is done with a small diameter end mill along the contour of the pattern. For this purpose, you need to select a hardwood board, nail a stencil cut out of cardboard, and mill it according to the template.
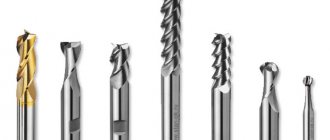
A milling machine of any power is suitable to perform the work. It is better that it is light and comfortable, then it will be easier to copy the drawing. There is no need to worry about which router to choose for beginners; the main thing is to choose cutters with a diameter of 2 mm or more. During work, you need to be diligent in order to evenly pass the narrow cutter along the contour of the design without breaking it. The next step is to deepen the background; for this purpose, you will use a flag cutter with a huge diameter.
Hazardous factors
Milling machines require compliance with a functional}} version of safety and high qualifications of the worker. When using electric machines, there are opportunities for injuries to occur due to the ejection of material during milling. Therefore, the performer of the work must have special work clothes.
If powerful dust is generated during milling, you need to wear safety glasses. The highest safety in this case is provided by special clamps and vices that perfectly hold the workpiece, preventing it from being thrown out. You cannot hold the workpiece with your hands in the rotation zone of the cutter, as it is also called, and directly touch the rotating tool. It is necessary to use special clamping devices to advance the part during milling.
As wooden houses began to come into fashion again, the tendency to decorate their facades with different patterns and ornaments was revived. Wood carving has been used by people for many centuries and now, thanks to many technological innovations, it is becoming available to an increasing number of homeowners. Next, the main types of this direction and the nuances of wood processing without the help of others will be examined.
Aesthetic wood patterns on houses
Copy ring
A variety of accessories for a hand router can significantly simplify the process of processing various workpieces. A copy ring for a router is a common product that acts as a side. During the work, the ring slides along the template being used, setting the position of the wood router. Machine options can be manufactured using various materials. Here various fastening mechanisms are created:
panther with a hand milling cutter. intarsia implantation of wood into wood
- Screw.
- In the form of a threaded hole.
- When using special antennae.
It is worth considering that the rings used usually have a diameter whose value is close to that of the router. But, during processing, it should not touch the ring, as this will lead to damage to the cutting tool.
Copy ring for router
The copying ring can also be secured using common clamps. The ring production process uses steel designed to withstand force. Soft alloys are not used due to the fact that they naturally deform, and this will lead to severe errors.
