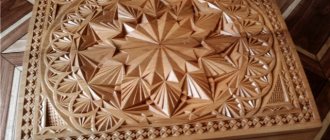
Openwork saw-cut ornamental carving is perhaps the most beautiful type of artistic wood processing. The cutting carving technique involves preliminary marking of a flat surface, on which patterns are subsequently cut out using a jigsaw. The result, as a rule, is beautiful openwork lace, although here everything depends only on the imagination of the master.
Unfortunately, these days many people consider it more advisable to buy a ready-made craft than to make it with their own hands. However, mass replicated production does not know such a thing as “exclusive”.
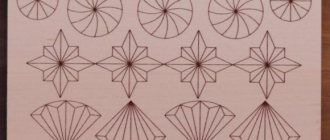
Simple templates for cutting with a jigsaw.
And many of us would like to put something original on our shelf that no one else has. And the most obvious way out is to make such a product yourself, which we will talk about in this article.
Workshop - Shaped sawing of house carving elements with a jigsaw. Master Class
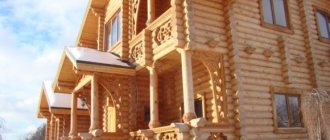
From time immemorial, people have decorated their homes with house carvings.
The talent of the Russian people and their inherent sense of beauty made it possible to create deeply original works that contributed to the rise and flourishing of the high art of folk architecture and house carving.
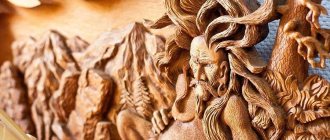
But most importantly, protective symbolism has always been included in house carvings. In our lesson we will cut a carved wooden element that signified Bereginya, the keeper of the hearth!
.
In today's lesson we will cut out elements of house carvings with a jigsaw. These elements can be used to decorate the pediment of the house, cornice, or porch.
- Guided by the traditions of Russian wooden architecture, we are developing a pleasant image for the soul - a template.
- Draw the template onto the prepared board.
Photos of crafts made from plywood with a jigsaw
Read here - Craft airplane: master class on making various airplanes, their design and assembly diagrams (video + 105 photos)
Did you like the article?
0
Open lesson Technology of wood carving
Class: 6A Date: 01/24/2019
Lesson topic: Technology for performing slotted (through, saw-cut) wood carving
GOALS:
Educational:
introduce students to the main types of carving. Learn to perform simple elements of slotted carving.
Developmental:
develop constructive thinking and creative abilities of children;
Educational:
to cultivate hard work, patience, perseverance and the ability to perform teamwork. To cultivate a sense of beauty, to instill a love of folk art.
- Type of lesson:
learning new knowledge (use of ICT, conversation, practicing practical skills). - Visual aids and accessories:
- for the teacher
- laptop, handouts, carving samples; - for students:
notebook, pencil, wood blank, jigsaw, cutting table, sandpaper, file, PVA glue, brush, hand drill, set of drills. - Design of the chalkboard:
number, lesson topic, key words - wood, carving, jigsaw, solar signs - Lesson time:
45 minutes. - PROGRESS OF THE CLASS
1. Organizational part.
2. Preparation for the perception of educational material.
- Updating basic knowledge.
- Motivation for learning activities
3. Presentation of new material.
3.1.Instruction.
- Generalization, systematization of material.
- Homework
- Performance evaluation
I. Organizational part (3 min)
Hello guys! I'm glad to see you in class today.
- We have guests at our lesson, but this will not prevent us from working fruitfully with you.
- Please guess the riddle:
- DRESSES IN SPRING, AND UNDRESSES IN AUTUMN (Forest)
That's right - forest, and forest is wood, perhaps the very first material that man began to use in his life. Wood as a natural material has valuable qualities: good thermal insulation, low density, beautiful natural color, ease of processing. It is no coincidence that since ancient times, people have used wood to build and decorate their homes.
2. Preparation for the perception of educational material.
2.1
Updating basic knowledge .
One of the most ancient and widespread types of folk art in Rus' is wood carving. For many centuries, decorative elements of houses were decorated with skillfully executed carvings.
Topic of today's lesson: Technology for performing slotted (through, saw-cut) wood carving
- Motivation for learning activities
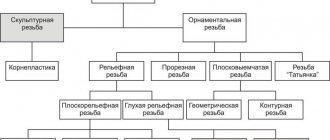
There are several types of wood carving: geometric; contour; Tatyanka; volumetric (Embossed). (Slideshow 1).
Geometric Contour Tatyanka Volumetric Saw (house)
- Presentation of new material
In the second half of the 19th century, saw carving, made using a thin jigsaw file, became widespread in wooden buildings in the countryside and in the city. In today's lesson we will try to make a simple element of this particular carving.
It has several names: openwork, through, invoice. And its most common name is “Brownie
" It received this name due to the fact that it was used more often than others to decorate houses.
When performing sawing, the background is removed, or rather cut out.
In many cities and villages throughout Russia there are houses richly decorated with carvings of this type. Sawn carving decorates the pediments and walls of houses, window frames, cornices and other elements of the house. It resembles wood lace. (Slide show 2).
The technique of sawing carving is quite simple; thanks to the large number of options, it is indispensable in the manufacture of carved home decor.
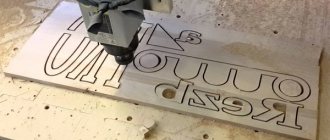
To make a thread, it is necessary to make a template, which is transferred to the prepared material. The places to be drilled or sawed out are marked on the material.
You can use plywood for interior decoration of an apartment or house, and wood for exterior decoration.
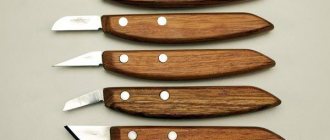
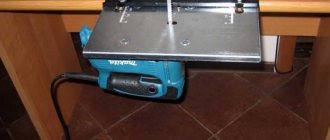
The main tool for sawing wood is a manual or electric jigsaw . (Demonstration of a jigsaw and its device).
The teeth of the jigsaw should be directed towards the handle, that is, down.
When cutting with a jigsaw, a special stand is used - a table. The table is secured to the table with a clamp or clamped in a vice.
3.1 Briefing.
While performing the task, safety precautions must be observed. Let's review the basic rules of safe work.
RULES FOR SAFE WORK WITH A MANUAL JIGSAW
- Perform the work with a well-prepared jigsaw.
- Do not tilt the jigsaw while sawing.
- Make sure that the hand holding the workpiece does not fall under the file.
- Take your time and don't press too hard on the canvas.
- Do not blow away the sawdust, use a broom brush when finished.
- If you are injured, notify your teacher immediately.
3.2. Practical work.
solar signs when decorating the façade of a home, making wooden utensils and other utensils when performing house carvings.
– stylized symbolic images of the deity. For example, the sun in the form of a rosette of a stylized flower inscribed in a circle.
Images of the sun, according to the ancient Slavs, protect the home from various troubles. This sign occupies a central place in many home decorations - on the pediment of a house, light fixture, porch, dishes in a window frame or a hot stand
Now we will try to make such a hot stand. Everyone will make a talisman for themselves or their loved ones.
- Please get the material and tools.
- Let's look at the technological map and get to work.
- PRODUCT
- Routing
- Manufacturing of kerf thread element.
- №
- operation
- picture
- tools
1.Saw off the workpiece to the size of the product, taking into account the processing allowance.
Pencil, square, hacksaw.
2. Place the picture on the workpiece.
Picture, carbon copy, buttons for fastening
3. Trace the drawing in the picture.
- Mark the centers of the holes.
- Pencil.
- 4.Drill holes for sawing holes
- Hand drill, drill bits
- 5.Cut out the internal pattern
- Hand jigsaw, cutting table.
6. Cut out the drawing along the contour.
- 6Process the edges, ends and planes of the product.
- File, sandpaper.
- Note:
All operations must be performed strictly following safety precautions. - Now you can optionally treat it with water-based dyes and varnish.
- Well, now you have your own solar sign with which you can decorate your workshop or office, kitchen and which, according to ancient legends, will protect you from failures.
4.Secure the material.
Our lesson is coming to an end. Let's consolidate in our memory what we learned in today's lesson. And I propose to do this in a playful way. Try the following crossword puzzle. Answer the crossword questions and name the keyword.
- The platform on which the workpiece is placed when cutting. TABLE
- Another name for kerf thread? HOME
- Geometric, contour, Tatyanka - What is this? THREAD
- Should the teeth of a jigsaw be tilted down or up? .DOWN
- A device into which the sawing table is clamped? VICE
- What is clamped into the base of a hand jigsaw. ? . FISH
Some nuances
The design of a hand jigsaw consists of a metal profile curved in the shape of a sickle. The files installed in this tool are made of brittle steel, and they are very thin both in thickness and width.
Taking this into account, it is necessary to stock up on saw blades in advance to ensure uninterrupted work on the product.
An electric jigsaw is equipped with a more durable file, and with such a tool the work progresses faster. However, problems may arise here too, mainly related to the power supply.
Wood carving with a jigsaw - basic techniques
Wood carving with a jigsaw is a type of artistic design. For training, it is easiest to use plywood - it is cheap and pliable. There are several techniques for working with a jigsaw on wood.
Flat relief carving
It is characterized by a deepening of the pattern into the thickness of the board. The carved image and the background of the board are located in a single plane. One of the subtypes of carving is Abramtsevo-Kudrinskaya, in which the patterns, lines and cuts are uneven, everything is oval, with tubercles in the background. The emblem of this technique is the image of a bird.
Saw thread
It is a continuation of the flat-relief variety. The openwork pattern is sawn through. A jigsaw and a rotary saw are the most suitable tools for this technique. The location of future cuts is marked on the tree with an awl, after which straight or slightly curved lines are sawn.
Slotted thread
For this technique, large cuts of wood are used. Using a jigsaw, openwork patterns with relief are created. The peculiarity of slotted carving is that during its manufacture all parts of the background are removed. Coniferous wood is chosen as the base.
Overlay thread
A carving is considered overhead if its background is smooth. The finished image is placed on interior items for decoration.
Preparation
Handmade crafts have never been a priority in decorating a home or plot of land. You can create this without resorting to outside help.
The key to the success of every creative endeavor depends on serious preparation for the task. Having provided a plan for the planned work and drawn up drawings of crafts made from plywood for a jigsaw, it will greatly facilitate the manufacturing process.
Also, the masters from the portal https://dachnichek.ru have prepared a huge selection of unusual ideas; you can study everything in more detail on the official website.
Cleverly designed diagrams of light crafts made from plywood, using a jigsaw, have the ability to turn complex actions in creating household items into a simple process that can be implemented in a short time.
Procedure
In order to obtain high-quality products and minimize the number of defects during work, you need to do everything slowly and thoughtfully, and you should also focus on the process itself.
Before you start cutting, you should make sure that the thickness of the plywood or wood workpiece is equal to the height of the groove, which is located on the printed sketch.
Source 2proraba.com
How to transfer images to the surface of a workpiece
In order to apply a contour to the surface of your plywood or wood workpiece, print the template itself on fairly thick paper.
If you draw the pattern ornament with a pencil, then various hassles may arise when transferring the drawing from your A4 diagram.
Therefore, to apply complex patterns and the contours themselves, auxiliary methods should be used.
One of these methods uses carbon paper.
The first step when using this method is to place a carbon copy on the workpiece.
Afterwards the template itself is placed on top, and then the lines are simply drawn. The template can be glued to the workpiece using 2-sided tape.
But you can also use regular glue. However, you should thoroughly clean the entire surface with sandpaper.
The next method of applying a contour to a workpiece is more accessible. After all, it uses a stencil that is made using ordinary nail scissors.
First, preparation takes place, and then the template is applied to the surface of a plywood or wooden blank and simply outlined with a pencil.
For greater convenience and high-quality application, the sheet is secured with adhesive tape or tape. Also, if desired, the design can be applied using a thermal method instead of a pencil. An inkjet printer is used for this. It is used to print out the diagram.
After that, the printed drawing is applied with its front side to the surface of the material from which the craft is cut out, and processed with a preheated iron.
Source ytimg.com
Material characteristics
Plywood is a wood-laminated board assembled from veneer or tree bark. Birch or coniferous trees are used. The sheets are distinguished by the thickness of the canvas, the types of coating of the outer layer and the type of glue that is used to glue the layers together.
If you want to place crafts cut from plywood in the fresh air, then it is best to take sheets assembled using phenol-formaldehyde glue. It's called FSF plywood. It has the highest level of protection from moisture and resistance to environmental influences. But such products cannot be used indoors, as they are harmful to health.
For children's crafts and decorative elements for the interior of rooms, use FK type plywood based on urea glue. Such sheets are used for furniture even in kindergartens. It is not harmful, but is not able to withstand moisture. Therefore, such crafts cannot be soaked in water.
Manufacturing step by step
The master class looks something like this.
- We draw a template for a “seasonal” product on a sheet of paper or thin cardboard (the latter option will be the best for children), and then cut it out. The drawing itself can be copied from the Internet, or you can develop it yourself, if, of course, you understand this.
- We put the drawing on the plywood (you need to immediately take a suitable piece with a margin of dimensions).
- Using a jigsaw, we cut out 2 spare parts from a sheet of plywood (they will be arranged crosswise) with dimensions: height approximately 0.6 meters, width approximately half a meter.
- We cut out a circle with a diameter of half a meter. It will be used as a stand.
- We sand with a hand machine or various types of sandpaper - first coarse, then fine sandpaper.
- We find the center of the circle and drill a hole and make slots for attaching the barrel. The first and second barrel templates should fit into each other’s slots to increase the stability of the structure (we make the cuts with a jigsaw). We connect the stem templates “tooth to tooth”, and also fasten them to the base with self-tapping screws.
Then you can decorate the craft according to the time of year, selecting additional accessories (for example, gluing them with double-sided tape). In winter - snowflakes, in spring - leaves and flowers, in summer - butterflies and insects. And in autumn there are yellow and red foliage. In general, there is room for your creative imagination to run wild! You can also make a wish tree out of plywood, placing notes and candy wrappers on it.
Or - a tree made of plywood on the wall; it will have not only an aesthetic, but also a practical purpose. And not only to look very beautiful, but to implement some useful function. For example, a craft equipped with wire branches will become an additional hanger for various small things, for example, ladies' jewelry, watches, keys, and the like - all this will no longer be lying on the floor and shelves. And a tree on the wall can even have these same shelves and become part of the decor of a residential building, an independent interior design.
A little about the material itself
Plywood is made from wooden plates using the gluing method. This material is ideally suited for a variety of crafts done with one’s own hands, using a minimum of tools. Other materials at hand can also act as additional accessories - as inlays and decorations of the main one. As a fertile base, plywood, without a doubt, has many advantages. Let's list just a few.
- You can use new or used plywood: you can find it in your dacha, virtually anywhere. For example, parts of old furniture or irregular pieces left over from renovations.
- This automatically leads to the following advantage: low cost of crafts. You will spend practically zero additional money on purchasing components, since both the material and the tools are already available. The exception would be, perhaps, complex, filigree items, which will require processing, for example, sanding and painting. But even then, the price will be significantly less than if you buy similar things from a craftsman or in a souvenir shop. But we ourselves have a mustache, right?
- From the building material plywood it is possible to construct a large number of accessories, just for the country, for decoration, and also for practical use. There is a great variety of drawings, projects for cottages and interiors.
- The plywood material can be easily sawed and sanded, and all the tools you need can be found at an avid summer resident. All you need is a jigsaw, a file, a plane - creativity begins!
- Plywood is a natural product made from wood. Which means undeniable environmental friendliness, not just a beautiful appearance.
- About the shortcomings - where would we be without them? Fundamental for use in crafts is considered to be low moisture resistance and a negative reaction to bad weather. For example, after the rains, a thing may begin to rot, losing its attractiveness. Experts recommend treatment with water-repellent agents, which can solve this problem, albeit for a short time.