When connecting two wooden parts crosswise or at right angles, the most reliable connection is half-wood. In this case, both parts have a half-thick groove made so that when the grooves are crossed, one part fits exactly into the other.
A half-timber connection is less labor-intensive than a tongue-and-groove connection, but is quite strong. This, in particular, is facilitated by the relatively large area of the joining areas covered with glue. And yet, the strength and stability of the structure is achieved mainly due to the fact that both parts are connected to each other according to the “groove-to-groove” pattern and, with perfect joining, remain completely motionless. The half-wood joint is placed on glue and is often additionally secured with screws or dowels, also seated on glue.
A half-timber connection is one of the options for the structural connection of wooden parts - transverse and longitudinal. This method is used quite often and is suitable for T-shaped, corner and cross-shaped connections of parts.
How it's done
- In accordance with the drawing, measure the strips of the required length.
- Mark the grooves.
- Using light shading, mark on the strip the areas that need to be removed.
- Saw through the sides of the grooves.
- Use a chisel to hollow out a groove.
- Check the tightness of the connection of both parts and correct if necessary.
- Apply glue and press the parts together with a clamp, wait until the glue dries.
- If necessary, further strengthen the connection with screws or wooden dowels.
WHAT YOU'LL NEED
Material:
- Wood blanks.
- Glue.
- Screws.
Tools:
- Carpenter's square.
- Reismus.
- Knife.
- Pencil.
- Saw.
- Chisel.
- Clamp.
- Optionally, a hammer.
- Screwdriver.
- Drill.
Types of half-tree connections
The half-timber joint is a stable design for T-shaped, corner or cross-shaped joints. According to existing rules, a half-tree connection is made across the entire width of both parts. However, a blind half-tree connection is also possible. In this case, the area of the joint areas covered with glue will be even larger.
Half-tree corner connection.
Half-tree T-joint.
Half-tree cross joint.
Blind T-shaped connection in half a tree: invisible from the outside.
Technologies for corner connection of timber “without residue”
With the first technique, the fasteners are distinguished by straight butt edges; with the second, the timber ends at a certain distance extend beyond the wall plane at an angle of 90°. Of course, this is reflected in the overall material consumption of the structure, since the consumption of beams increases by 50 cm in comparison with end-to-end cutting. But the corners of a house made of timber “with a remainder” of protruding fragments of logs are better protected from negative climatic influences. In addition, this technology makes the walls stable.
Excess fastening is carried out in 3 configurations:
• in the oblo (cup); • in the okhlop (Siberian bowl); • in the okhryap (in the girth).
The first method of connecting timber is the simplest type of corner arrangement. Its essence lies in the fact that a spherical (shaped) bowl is formed on top of the timber. Then a log with a prepared bowl is placed crosswise into the treated area. Corner fastening of logs using this method is performed in the following variations:
• half a tree; • into an oval ridge; • in the fat tail.
A half-tree oblo is the simplest type of connection. In order to increase the required packing density, an additional longitudinal groove is formed at the top of the beam, in addition to the bowl. After laying and securing the cross beam, the logs of the next crown are installed. Before laying each tier, the longitudinal groove is sealed with insulation. For structural strength, each new log is attached to the previous one using dowels, which enhances the vertical stability of the surface.
The second method of fastening log walls is to leave a small rounded ridge at the bottom of the bowl, which follows the contour of the longitudinal groove made at the bottom of the log. This fastening increases the stability of the log house and increases its protection from the wind.
The most labor-intensive is the third type of angular joint - “in the tail”. Here, in addition to the oval ridge, another protrusion is cut out at the bottom of the bowl along the block and across the cup bottom. And at the bottom, across the groove, a special recess is formed, onto which the fat tail is placed during installation.
Another type of cutting corners is “in the clap”. This technique copies the above options “in the log”, but the main difference is that the notch is formed not from above, but from below the log.
Okhryap is an intermediate type of connecting timber in the corners between the classical methods with and without a remainder. The difference between cutting “in okhryap” is that bowls of 1/4 diameter are cut from the bottom and top of the beam.
The timber joint of the corners without any residue (“in the paw”) is devoid of end fragments protruding behind the wall surface. To increase its instability, the ends of the logs are made with spikes and recesses (cuts). A standard undercut paw is characterized by a predisposition to air leakage. To avoid this, the horizontal surfaces of the notch are tilted in different directions. This type of fastening is called “dovetail” (inclined planes jam the corner structure).
When fastening beams with excess “in the burl”, they are articulated with locking grooves (1-, 2- and 4-sided). Fasteners with a 1-sided groove have a shallow cut in the bar in the form of a transverse groove. As a rule, profiled timber is connected in this way. When fastening with a 2-sided groove, cuts are made on both sides, top and bottom, with a depth of 1/4 of the thickness of the beam. When making a 4-sided groove, cuts are made on 4 sides. The presence of transverse grooves significantly simplifies the process of installing crowns - the logs fit tightly against each other, the stability of this method of connecting beams in the corners increases significantly.
Marking
For marking you need a square, thicknesser, knife or marking dowel. Use a pencil to mark only on material with a rough, untreated surface. On a fine-fibered or smooth surface, the marking line is drawn with a knife or dowel: a shallow groove will also serve to guide the saw evenly.
The prepared bars or planks are laid side by side parallel to each other and marked at the same time. This ensures complete coincidence of the marking lines, which guarantees a flawless, distortion-free connection of all parts. It is important to get everything right the first time, as it will be quite difficult to make corrections in the future.
This is how the groove is marked.
Use a thicknesser to mark half the thickness of the plank on the narrow sides.
No ballpoint pens
To mark, never use ballpoint pens, felt-tip pens, ink or ink, as they leave virtually indelible marks on the wood.
Intermediate cuts
When treated with a chisel, soft wood can easily split in the place where the growth rings pass. To avoid this, you need to make several additional cuts. In this case, if the tree splits, it will be between two adjacent cuts, and not across the entire width of the groove.
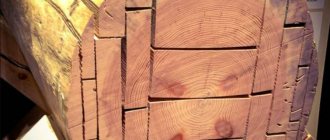
Connecting logs in corners with remainder
First, let's talk about log houses. Recently, they have become popular again, especially in suburban construction: they look attractive and are also natural. Moreover, even despite a significant overconsumption of material, the corners are made with a remainder. These methods of joining logs are traditional. They came to us from our great-grandfathers, this is how they built their houses.
Log house in a bowl
As has already been said, a longitudinal recess is made in each log - a groove. In the corners they are trimmed more, according to the shape of the log lying across. This notch is round in shape, which is why it is called a bowl, and the method of cutting a corner is called a bowl. The second name is “in the oblo”.
Marking the upper and lower bowl
Depending on the location of the bowl, there are upper and lower bowls. The upper bowl is so called because the log rests on top of the crown, clasping the lower one. This connection is also called “clap”. Remember: the bowl is upper, despite the fact that it is formed at the bottom of the log.
The work is carried out in several stages. The log is first placed in the log house and leveled. Then they outline the contours of the groove and the bowl, place it on a flat surface and process it there - cutting the bowls. When the excavation is ready, the log is raised again and placed in place, trying it on. If necessary, they are adjusted (removed again, trimmed where necessary) and only then laid on a compactor (tow, jute, moss). All these movements are compensated by the fact that with this method of cutting, sediment simply flows down the side surfaces of the wall, and they, as a rule, are well protected by several layers of impregnations and paints.
Types of bowls for joining logs in corners
The lower bowl can be molded directly in the log house: all manipulations can be done on the laid crown. When the walls are already raised high, it is very inconvenient to do this if you lack dexterity, so you still have to drag the logs up/down. Perhaps this is why this method is less popular.
It is easier to make a frame into a bowl: it allows you to correct almost all mistakes. In addition, despite all the apparent complexity, it is this type of joining of logs that is easier for beginners to do. All others require more carpentry skill.
How to make a joint from a log frame into the lower bowl is shown in the video below. The explanation is detailed, showing techniques for working with an ax and the full procedure. First you just need to talk about the tool that is used to draw the log. This is a carpenter's trait or scriber.
The device is very similar to a school compass. There is also a sharp stop on one side and a pencil on the other. Just like in a compass, the required distance is fixed with a screw. Having placed the ends at the required distance, the sharp part is guided along the log for which the bowl needs to be cut. Using a pencil, respectively, according to the one in which the groove and bowl will be cut. This produces markings, which are then drawn with a marker. It will become clearer when you see the process of marking the bowl in the video.
Actually, now a video about how to connect logs into the lower bowl. The first part deals with molding the longitudinal groove, the second directly deals with cutting the bowl.
Connection in okhryap
This type of connection consists of two semicircular bowls. In order for a corner folded using this method to be warm, considerable experience is required: even minor errors in the width of the groove or the thickness of the lintel will cause drafts.
Log in okhryap
Marking
First, a clear marking line on the parts indicates the contours of the grooves. In order not to confuse anything when processing parts and to prevent mistakes, the areas to be removed should be marked with shading. There is a particularly great danger of making mistakes when processing parts that are to become lintels and crossbars. To avoid this and in the future not to confuse the finished parts during assembly, arrange the blanks according to their place in the frame or support box and number all ends.
The areas to be removed should be marked with hatching so that the contours of the grooves are not blocked: the main markings should be clearly visible during subsequent operations.
Light shading on the parts marks those areas that should be removed. In this case, you must not block the marking line.
Clamping and sawing
To cut parts along the markings, use hacksaws or bow saws with thin, frequent teeth to make the cut as smooth as possible.
The cut line should pass through the area of the part that will go to waste. First, make a small notch with a saw. Then they saw along the front edge along the marking line to the lower limit. Thus, the marking line will always be in front of your eyes, which means you can accurately guide the saw and immediately make adjustments if the cut begins to move away from the marking line.
When the cut of one corner is ready, turn the part over and do the same on the other side. Only after this the saw is positioned horizontally and the cut is completed in this way.
When processing even wide parts in this way, the cut is very precise. Excess wood can later be removed with a chisel and file or sandpaper.
During the first movements, guide the saw blade with your thumb until you make a notch.
Saw along the front edge of the piece first, moving the saw at an angle exactly along the marking line.
Then do the same on the other side until the entire horizontal marking line is captured.
At the final stage, guide the saw horizontally.
Connecting corners with remainder
Pairing the timber with the rest has two main advantages:
- High degree of tightness;
- High strength and reliability of the connection without additional fixation elements. The strength of the joint is achieved due to the pressure of the weight of the upper rims, so displacement or change in the size of the surface of the walls is impossible even under seismic influence of moderate force.
Corner joints without remainder and with remainder
A locking (key) one-sided groove does not use a tenon in mating - a groove is selected along one side of the beam, perpendicular to the longitudinal axis, with a depth of ½ the thickness of the beam. The groove is made square so that another beam fits into it equally evenly. When implementing this interface, each of the timber elements is firmly fixed in relation to the lower beam, laid in one direction. Typically, such a connection made of timber is reinforced with dowels, so it is possible to connect both a square beam and a profiled rectangular one.
A double-sided locking groove is a little more difficult to implement due to the fact that the lumber is taken from both the bottom and the top. With this pairing, the sample is made at ¼ of the thickness of the timber. Double-sided sampling makes the pair of connecting elements rigidly fixed in two directions, and their displacement is almost impossible even with strong fluctuations in temperature and humidity. Before making a groove in the timber, it is necessary to check the sampling location for the absence of knots, chips and cracks.
Lock connection
A four-sided keyway is not a solution for every case. Such a connection is indeed the most airtight, but it has no other advantages - the strength of the connection remains the same, but the complexity of the work increases. More complex joints “tenon-groove”, “tenon-ridge”, “toe-foot”, “to-head”, “dovetail” and others are made using milling equipment.
Connecting corners without leaving any residue is the most economical solution, since the ends of the beams do not extend beyond the wall. Such savings lead to a decrease in the reliability and tightness of the interface.
Four-sided keyway
Existing methods of connecting timber in corners without leaving a trace are end-to-end, on dowels, half-timber, in a paw. Let's look at each in more detail:
Butt jointing is the simplest and does not require additional processing of the timber. With this connection, the lumber is laid in a checkerboard pattern, and displacements and shifts are avoided by additional fastenings of the timber with dowels or other hardware, including metal ones - staples, clamps. This connection is made along the length, and its simplicity allows the work to be completed without any practical skills. The only condition for such a pairing is dry timber. The disadvantage is the need to insulate (seal) the gaps, which will not prevent the beam from deforming when air humidity changes. Therefore, it is recommended to impregnate the timber with moisture-resistant compounds.
Types of butt joints
» alt=»»>
A keyed connection from a timber is a selection of wood at the end of one timber and at the side of another timber product. These openings are fastened with a key, which helps to avoid large drafts in the gaps and displacement of the timber in one direction. The use of a dovetail key can minimize movement in the other direction. This groove widens towards the edges of the opening, and it is more difficult to make such a shape yourself - usually, when ordering a project from a factory, such connections are made using the machine method.
Interfacing from half-timber timber is a technology in which the ends of the timber are cut to ½ of their thickness, and the length of the tenon is equal to its width. Such a connection must be strengthened with dowels, since in itself it is weak. The tightness is also low, so caulking will be required.
Half-tree pairing
A variation of this simplest technology is “paw-to-paw” pairing. This method involves making more complex shapes of the ends of the timber, which provides higher strength to the connection.
The connection in a warm corner (in the root tenon) makes it impossible to move the timber walls on both sides, and also provides complete wind protection.
Connection to root tenon
How to prepare lumber for joining into a warm corner:
- The end of one beam is cut so that a tenon remains, the length and width being equal to 1/3 of the cross-section of the product. The shape of the tenon can be widened towards the tip or rectangular;
- The second beam has a groove, which does not have to be made exactly the same size as the tenon, since this connection will be compacted;
- The tenon is inserted into the groove from above, the beam is additionally reinforced with dowels.
» alt=»»>
Tenon and groove
It is recommended to cut the tree gradually, a few millimeters from bottom to top. When working with a well-sharpened chisel, it is better to abandon the hammer. Your movements will be more accurate if the tool is guided only by palm strokes.
In a half-wood through corner joint, a tenon is placed on a tenon in a T-shape - tenon on a groove, and in a cross-shaped joint - groove on a groove.
Therefore, along with the saw, you will also need a chisel. First you need to saw through the sides of the groove to the limit line - marking the depth of the groove.
The area between the two cuts is removed with a chisel. If you have little experience with a chisel, you should be careful not to remove more than necessary. Otherwise, the connection will end up with voids, which means it will be shaky.
Be careful when approaching the bottom marking line—the “bottom” of the groove—to ensure a completely flat surface. This is the only way to ensure a good adhesive connection between the two parts.
To make a groove using a chisel, the part must be firmly clamped, since both hands will be busy during work.
Half-tree cut "dovetail"
A half-timber dovetail notch is similar to a half-timber T-joint, but is more durable, as it has greater tensile strength along the axis of the vertical element. It can also be called cutting half a tree into a half-frying pan, a transverse lock into a simple frying pan, and other names derived from these names.
Marking and cutting connection elements
First, a vertical element is cut out to form the “tail”. Mark and cut the overlapped section as directed for a simple half-timber T-joint. Mark the dovetail corner using a template or stencil (1) or use a ruler. Cut out the waste with a saw or chisel, depending on the size of the joint (2). Place the dovetail on the cross piece and mark its shape on the front side (3). Continue the lines along the edges and between them draw a depth line with a thicknesser. You can then select the waste using a saw and chisel.
Gluing
Before applying glue to the joints of both parts, you should once again check their connection in a “dry state”. If a gap is found in the connection, then some of the parts will have to be replaced: such an error cannot be corrected later. It’s a different matter when you have to apply too much force to connect the parts in a T-shape or cross-shape, or when, with a corner connection, the parts do not fit very tightly to each other. Then you need to remove the excess with a chisel or clean the surface with sandpaper. At the same time, you should not wield the chisel with excessive zeal. Also make sure that the surfaces do not turn out round. Remember: with any half-tree connection option, the parts must fit tightly to each other.
Connecting a log frame from timber “to the paw”
When connecting timber “into a paw” there are also several options. The simplest of them is end-to-end, in which the timber is secured with metal plates or brackets. This option is quite cold, does not have increased strength, and is not suitable for a bath. The “doweled” connection involves assembling the frame using wooden pins. They are made from hard wood, which ensures strong adhesion of the crowns of the log house. The greatest strength is obtained when the liners are made oblique, but their implementation is more complex. The warmest and most durable option is to connect the bars into a main tenon: when a longitudinal protrusion is made in the lower bar - a tenon, and in the upper - a groove of the corresponding section. During installation, it is necessary to lay flax-jute fabric between the tenon and groove. At the corners, each crown is reinforced with a wooden dowel.
Advantages and disadvantages
The half-tree connection does not have any serious disadvantages. Of course, it may be inferior in thermal insulation properties to the “warm corner” technology. But you can’t call him “cold” either. Otherwise, this connection in practice shows only advantages, among which are the following:
- ease of implementation;
- low cost;
- minimal lumber costs;
- high strength;
- windproof;
- absence of cold bridges.
The combination of these advantages is what makes the half-tree corner connection as popular as it is today.
Other articles
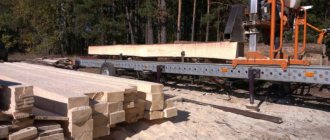
Sequence of construction and fastening of the harness
First of all, the timber, impregnated with an antiseptic and cut in accordance with pre-designed markings, is laid out on the pile heads. The cuts and grooves in the wood are also made in advance.
After this, you can proceed to the most important stage - aligning the strapping along the diagonals and along the length of the beam.
Remember: errors made while screwing piles are normal. The pile heads can be shifted 1-2 cm away from the straight line, but the piping that is installed on them must have a perfectly even geometry.
If you end up with a diamond shape at the base of the house (instead of a clear rectangle or square), then you will never be able to align the walls and roof of the house. It is for this reason that you should concentrate your attention on the geometry of the harness, and not on the alignment of the heads.
The diagonals of the strapping, laid but not yet secured on the piles, must be checked and aligned several times. Only after this can the timber be secured at the corner points of the pile foundation.
Having secured the corners, you should check the geometry of the side and internal beams. To do this, use a rope stretched between the corners along each side of the harness.
The side and internal beams should be fully secured to the pile heads one at a time, checking them for displacements away from the straight line.
To prevent the strapping from coming apart during operation, the side and corner connections of the timber must be additionally secured with staples and special corners.
How to make a cross connection
One of the simplest is the cross connection. It is easy to manufacture; even a novice carpenter can master its intricacies. The work is performed in the following order:
- markings are made. The parts to be connected are placed on top of each other. Using a ruler, draw a cutting line. Thickness markings are applied using a thickness gauge;
- the first part is clamped in a vice. Using a hand saw, carefully cut along the lines to the mark left by the surface planer. The workpiece rotates. A second cut is made;
- the workpiece is removed from the vice. Using a sharp chisel and a wooden mallet, remove part of the wood between the cuts;
- the second part is processed;
- The planes are leveled using sandpaper or an abrasive stone.
Now you can join wooden blanks. The connection must be tight, without backlash or gaps. If the product is one-piece, the joints are coated with wood glue, and the structure is additionally reinforced with screws.
Types of corner fastening
You can connect the material at the corners thanks to two options:
- with remainder - implies the use of longer raw materials than required for the construction of the facility;
- without residue - assumes the presence of perfectly even corners in the structure.
Practical point of view
The remains of the material are entrusted with a responsible mission - protecting the timber from the destructive effects of climatic factors - precipitation and wind. However, this design is expensive due to the higher consumption of raw materials and is troublesome.
An object with perfectly even corners is susceptible to the destructive effects of climatic manifestations. But its construction is quite simple and cheap compared to the previous version.
Aesthetic point of view
A structure with remains looks much more attractive than without them, since it is associated with a welcoming hut or a luxurious tower. And what style do you think has the golden trident of power on fashion Olympus? Right! Russian direction.
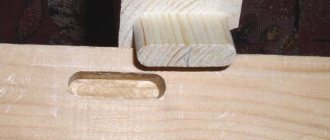
T-shaped (T) connection
The lap joint is another variation of the half-timber joint, which is widely used in the creation of frame structures. In this case, the end of one part is adjacent to the middle of the second. A fold is cut out on the first (according to a similar pattern as in a corner joint), and a landing groove is cut on the second. Below is one of the schemes for creating such a groove manually.
Make markings on the front side, focusing on the width of the counter part.
Using a thicknesser and a square, mark the edges.
Make cuts in the waste part. They will facilitate subsequent sampling with a chisel.
Use a wide carpenter's chisel to remove the waste. Remove layers, moving from the center to the edges.
Clean the groove. The edge and shoulders must be perfectly smooth and meet strictly at right angles. This will ensure that the parts fit as tightly as possible.
We are building up
There are different ways to connect timber. Since this material has been used for a long time, there are a great many similar types. At the same time, some ancient methods are considered more effective and reliable than their more modern counterparts.
Types of timber connections differ in the principles of execution, place of use, strength and a number of other parameters. For example, it is very often necessary to increase the length of the material used. If the length of the wall or other structure is much greater than the size of the original beam, then it must be increased.
To perform such an operation, the following steps are carried out:
- a place for landing is made at the end of one beam;
- a protrusion is cut out from the end of the second beam, which should be shaped to fit the seat of the first one;
- After this, both beams are joined. For reliability, the connection point is additionally secured with a metal bracket or nails of sufficient length.
There are many designs of such locks. Each master chooses his own option. The most popular are straight and oblique overhead locks. Such methods have been tested for centuries and are deservedly considered the most reliable. A straight or oblique joint can easily withstand even heavy loads.
Some experts use a half-tree connection. At the connecting ends of the beams, a cut is made up to half their thickness. They are then connected and secured with staples, plates or nails.
But this method of docking is considered not very reliable and durable. The half-tree method is more suitable when joining corners.
Methods for fixing materials together
The construction of structures from wood material has been successful for thousands of years.
During this time, several optimal and ingenious options for fastening raw materials in the corners and longitudinally (that is, lengthwise) were developed and implemented, which are relevant for both profiled timber and regular timber. As was said, when constructing an object, the beams can be fixed to each other along the length and at the corners. What's the difference? The fact is that corner fastening is used in the construction of solid walls and attractive internal partitions in the room. A lengthwise fixer is used when the material needs to be built up. Like this? Well, look: there is a log 4 m long, and the size of the wall indicated in the project is 6 m, in this case, you need to lengthen the raw materials.