Articles
All photos from the article
Do-it-yourself wood cutting can present some difficulties for beginning craftsmen. However, after a little theoretical preparation, selection of suitable tools and at least minimal practice, problems usually disappear forever. Still, wood is a fairly simple material to process, and therefore almost anyone can handle it.
In our article we will talk about how woodworking is performed for different purposes and what devices are used.
Wood can be processed using different techniques and tools
Operation of the wood burner circuit and its settings:
Even a novice radio amateur or a home handyman can make such a circuit; you need primitive skills in the ability to solder and configure circuits (if all the elements are selected adequately and the circuit is assembled correctly, it will immediately work as it should). However, several subtleties should be highlighted separately:
1) Please note that the adjustment of the output voltage of transformer TP1 (and therefore the filament temperature of the nichrome wire) is carried out via the primary winding, do not be confused by this innovation! Since the circuit is taken as a basis, you should understand that for any heating element (in this case, a piece of nichrome wire) the shape and quality of the sine wave are not important.
2) However, I draw your attention to the fact that the secondary winding of the transformer must withstand the current consumed by the nichrome wire (you can easily calculate it by).
3) You should also use thick wires leading to the handle of the wood burner, and well insulated ones; failure to follow electrical safety rules when assembling or using the device can lead to injuries!!!
Tool making
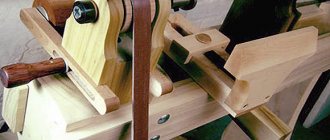
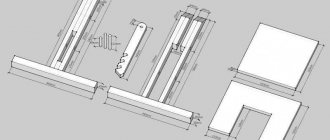
The design of the tool can be of two types: “fishing rod” and “jigsaw”. In the first case, the tool consists of a wire of a certain length, to the ends of which terminals from the secondary winding of the transformer are attached, in addition to one end a handle made of a material that does not conduct current and temperature is attached (preferably wood), to the second - a load, the size and weight of which allows you to hold the working part in tension. Instead of a load, you can attach a handle to the second end of the working part.
The second option is a little more convenient for work and resembles a regular jigsaw - nichrome is stretched on the jigsaw frame, but the clamps are made of non-conductive material. In this case, the terminals are attached to the wire BEFORE the clamps. The figure below shows how you can tighten nichrome on a jigsaw frame using a special clamping bar. The terminals are attached after tensioning. There is no need to bring the working part to the state of a “ringing string”, as is usually done with a file. It is better to use a flexible frame, since the length of the nichrome working section may have to be adjusted.
The length of the wire in both cases depends on the power of the transformer used. If a length of 100 mm is sufficient for 6V power, then for a higher voltage you will need a longer piece. Nichrome is used because other material with a small wire diameter will not withstand the required heat.
Nichrome is usually taken with a diameter of 0.3 mm to 1 mm (the diameter depends on the thickness of the material layer being cut).
The transformer can be used with a power from 6 to 24V, the source of the transformer can be an old TV, filmoscope or other equipment.
The length of the working part is selected based on the following considerations: nichrome should heat up to a dark red color when the current is connected. With a lower degree of heating, wood and plywood will be difficult to saw, especially if the board is thick. If the temperature is higher, wood vapors can ignite. Thus, the length is selected experimentally on a specific transformer. For the convenience of adjusting the length of the working part or restoring it after a break, it is advisable not to immediately cut off a piece of the required length, but simply screw several turns onto one of the contacts, for which you can use bolts and nuts.
Additionally, a switch is needed on the wire coming from the transformer to interrupt the current in the circuit when the wire is transferred from one fragment of the pattern to another and when the wire breaks (burns out).
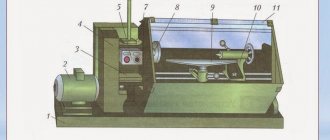
Below is shown the type of tool, its circuit diagram and the burning process itself.
Nichrome wire holder for wood burner:
Surely, assembling the power supply for the burner will not be difficult for you, but what to do if you do not have a convenient holder handle (electrode)? I offer you a very simple but very convenient version of the handle. You will need a thick wire, a dielectric (or wooden) handle from an old burnt soldering iron, a piece of PCB or carbolite or other dielectric heat-resistant material, electrical tape, nichrome wire (you can bite off a piece from an incandescent coil for an electric stove) Figure No. 2, and electrical terminals Figure No. 3 .
Figure No. 2 – Required materials for the burner handle Figure No. 3 – Electrical terminals
You need to remove the terminals from the insulation and screw them to the PCB as shown in Figure No. 4,5.
Figure No. 4 – Handle assembly Figure No. 5 – Explanation of how to properly screw the terminals
Then all you have to do is tape the wire with electrical tape (or attach it with a plastic clamp or thread) to the textolite pad and to the terminals (the ends of the wire must be soldered) and press it into the wooden handle (Figure No. 6).
Figure No. 6 – Wood burner handle
Working with such a wood burner is a pleasure because, firstly, you have a comfortable handle in which you can quickly and easily replace burnt out nichrome wire since it is screwed to the terminals, unlike simple burners. Secondly, it is possible to adjust the temperature of the filament wire (Figure No. 7), which is quite important when working with various types of wood.
Figure No. 7 – Red-hot nichrome wire
(Explanation for Figure No. 7: my version of the handle has a special tip that will be quite difficult for you to reproduce, which is why I offer you a simpler version with terminals)
Well, thirdly, the assembly of such a burner is relatively simple and not expensive. The only thing that will be difficult for you to choose is a step-down transformer because, despite the low voltage (3-8 Volts, depending on your needs), the secondary winding must be designed for a high current (from 3 Amperes).
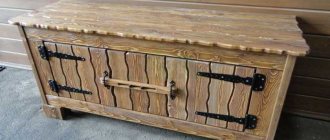
When you have assembled all the details of the wood burner, all you have to do is stuff it all into a neat case and start burning out various kinds of pictures and works of art, Figure No. 8.
Figure No. 8 – Wood burner (appearance) and an image burned into wood.
PS: I tried to clearly show and describe non-tricky tips. I hope that at least something is useful to you. But this is not everything that can be imagined, so go ahead and study the site
Wood burning is a form of pyrography art that allows you to create a variety of images on material. Artistic wood processing has been known since prehistoric times. The first analogues, representing a wood burner, were inconvenient and ran on fuel. Burning quickly gained popularity. Later, a modern homemade burner appeared.
Tips for Beginners
To create a complex picture for wood burning, you must have mastery and develop certain skills, as well as know the intricacies and technology of creating pictures. First of all, you need to choose a high-quality “canvas”, and in our case, soft hardwood (aspen, linden, poplar, etc.). Here it is important to know the combustion temperature of different wood species - from 150 to 250 ˚С. Therefore, you need to take soft wood.
To make the picture and drawings for burning easy, it is better to use carbon paper, apply the image through a stencil or transfer through tissue paper - this will allow you not to stain the main background.
Initially, you need to train on simple images - they are easy to reproduce and easy to hone your skills on. For complex pictures you will need special pins (brackets made of nichrome wire of different cross-sectional diameters). The wire is cut with pliers and round nose pliers are used to give it the desired shape.
Main types of burning process
Pyrography is expressed using classical methods and techniques for wood processing. Craftsmen practice an open stream of flame, evenly treating the entire surface of the front side of the product. This creates the desired, deeper background for the painting.
It is effective to use a layer of clay, which allows you to burn a bare pattern previously cut out on the applied material. This method allows you to paint a light picture on a dark background and vice versa.
The method of treating wood with hot sand is practiced. The master immerses the workpiece in the mass, if it is necessary to give a shade to the light material, experimentally determining the required exposure time.
The device of a butane cutter, like a wood burner, is considered independently. The main characteristics of this technique are suitable for creating heterogeneous elements with irregular shapes (waves, clouds). There are ways to burn with a solar ray by focusing the energy with a lens.
Burning out by friction on a lathe and hot objects is known. Relief burning is used, making boundary cuts. Miniature pyrography with the smallest specimens of feathers is also in use.
Methods of working with a wood burner
A classic device for wood burning can perform various types of application of objects based on the general idea of the future painting.
A popular option is contour burning, where only the boundary lines of objects are processed. In the case of silhouette burning, some figures or background are completely burned out. Experienced craftsmen can resort to decorative burning, which allows them to convey shadows.
Mastering the chiaroscuro method will allow a sophisticated creator to draw pictures that convey volume and dynamics using a homemade burner.
Wood burning for children
The experience of burning on wood for a child is an interesting, creative and technically oriented work. But it requires strict adherence to safety precautions and adult supervision. The adult himself first shows the young student how a beautiful picture is obtained on a flat and smooth board using a stencil or sketch transferred through carbon paper.
There are strict rules in wood burning for children:
- You can only work with dry wood;
- after the image is transferred to the base, you should first make points, and only then connect them along the lines;
- if the line is supposed to be thin, the device must be moved very quickly;
- the work always starts from the outer edge, and then the author slowly moves to the center;
- before applying a new stroke, the adjacent one must cool down;
- when the craft is ready, it makes sense to go over it with sandpaper;
- To make a pyrographic painting look more elegant, you can cover it with wax.
Burning devices are sold in art stores and children's supermarkets. Before purchasing, check whether the pyrograph is equipped with special elements that will protect the child from burns. The kit must include a handle-stand and protection for the work area.
It is very convenient that manufacturers of modern children's pyrographs come with sketches and diagrams that are just right for novice creators.
Burning device
A modern electric burner will allow even beginners to practice. The burner consists of a step-down transformer, the main characteristics of which must be at least 5 V and 2A. You need a handle with attachments and an electrical cord, which are connected into a single circuit. Various feathers and filaments can be used as nozzles, which can be given the desired shape. Factory instruments are often converted by replacing the original rheostat with a laboratory transformer. This addition will allow you to control the intensity of the incandescence, which allows you to diversify the color scheme in your work.
There are two types of burners:
- Burning apparatus with a wire tip, including those made by yourself.
- Electric burner with a hard pen for wood.
The main characteristics of an electric burner with a hard pen are distinguished by the rapid heating and cooling of the tool. A few seconds after switching on, the electric burner is ready for use. Thermal mode allows you to control the power value. A tip made of nichrome wire allows you to achieve precise movements and better results. It is attached to a special fork holder. The sting heats up red in a few moments. The tip of the device can be adjusted to the desired shape. Wire feathers can be attached in various ways: either with two bolts, or using replaceable attachments.
The device with a wire pen has the following main characteristics:
- long service life of the heating element;
- simple replacement of the wire element;
- A wood burning device allows you to draw lines of various parameters.
The poor qualities of the device include the high cost and difficulty of repair, and the difficulty of finding components.
Electric burners using a hard tip have the general appearance of a soldering iron. The difference is the sets with replaceable attachments for more convenient work with wood. The advantages of such a unit include a low price (3 times less) and a large number of attachments.
The models are easy to use and durable. However, such a tool will heat up and cool down for about 5 minutes, and the shape often does not allow for painstaking, small work. The handle of the equipment also heats up during operation and requires regular stopping of work.
This device is suitable for creating thick lines and shadows over a large area of the drawing.
Any wood burner circuit consists of the same elements:
- metal screen;
- nichrome wire holder or other element for effective wood burning;
- burning element;
- device body;
- wire for electrical power.
Devices, as a rule, are powered from a standard 220V network using a transformer. Modern devices with a built-in laser for burning wood have appeared on the market.
Do-it-yourself manual wood burning circuit diagram and subsequent setup are always relevant for burning enthusiasts. To create all the elements of a homemade device, knowledge of radio electronics is required. There are already invented schemes that are perfect for a homemade mechanism.
History of pyrography
The first artifacts indicating that people were engaged in burning many hundreds of years ago date back to 700 BC, and they were found in Peru. It is logical to assume that pyrography should have developed intensively in a country rich in wood. Therefore, Russian masters could not help but leave their mark on the history of pyrography. Back in the 9th century, folk craftsmen decorated wooden decorations by burning. They began to burn it with fire, then with hot nails and specially sharpened metal rods.
Wood burning reached its real heyday in the Middle Ages; in Europe, for example, it became a real art, and not just folk art. But in Russia it could still be called a trade.
Matryoshka Bogatyrs. Sergiev Posad.
It is impossible to imagine the Russian history of wood burning without the production in Sergiev Posad of “red” spoons and spoons, salt shakers, various glasses and ladles. At the end of the century before last, the first matryoshka doll appeared in the Moscow workshop “Children's Education”, and all 8 figures of which were framed by burning.
Alas, pyrography was a labor-intensive technique, and since the demand for nesting dolls was impressive, the craftsmen had to abandon burning in favor of painting. But wooden boxes and caskets continued to be decorated with pyrographic patterns.
A burning machine with a large set of tips, gas and electric furnaces, burners and pokers were the main tools of pyrographers until a pyrographic device with a soldering iron design appeared in the 20th century. And it was a real breakthrough, although the technology was cumbersome and not the safest. In 1962, the son of a British turner, Roy Child, decided to modernize the pyrograph. He improved the burning part of the device, and virtually reduced all the shortcomings of the massive technology to zero. Hot wire pyrographs and solid tip pyrographs are still in use today. The creative industry continues to develop and becomes more and more accessible, including for children's education.
Making a simple burner
If you wish, you can assemble a wood burner with your own hands. To do this, you will need a small set of tools and some improvised means, commonly used household items. To assemble a homemade burner you need the following materials:
- Wood bead.
- Insulating adhesive tape.
- Power unit.
- Nichrome alloy filament.
- Soldering device.
- Flux for soldering.
- Tin for solder.
- Electric drill with attachments.
Other materials may be added to the list, such as sewing threads and rubber thermal tubes.
Mini-burner assembly process
After preparing all the components, the creation of a holder for the device begins. As a blank to assemble a homemade simple wood burner, you can use a wooden glazing bead, with a regular length of no more than 10 cm. Handles from paint brushes can also be used as a holder.
Progress of required actions:
- Remove the plastic base from the needle from the syringe using pliers.
- Two needles (one sewing, the other from an injection syringe) must be attached to the working end of the pen in a parallel relationship. The point of both needles should point forward, resembling a simple ink pen. For fastening, you can use a thread, wrapping all the elements, thereby forming a layer of insulation. You can use insulating tape.
- After securely fastening the elements, the free end of the sewing needle must be bent so that the tip lightly touches the tip of the thin wall of the medical needle. Deformation can be achieved by repeatedly using duckbill pliers. The syringe game begins to warm up due to its high resistance.
- The attached needles must be connected to power from the mains charger. Polarity does not matter in this case. Flux is applied to the solder area and soldering is performed with tin.
- The entire area of connection with the wires is also wrapped with thread or other insulating material, securely fastening all the elements, and the excess is removed.
- A layer of thread can be impregnated with superglue, and a heat-shrink tube can be pulled on top. This will make the device more convenient to use.
There are also more complex examples of creating a burning machine with your own hands.
- You need to hammer two small nails into the wooden blank from the working end. After which you need to bite off the caps of the elements.
- Along the entire handle, grooves are marked and made for the future wire. Even a stationery knife can handle this. Sometimes the handle of a paint brush is used for the handle. The recesses can be processed with a file to remove all chips and defects.
- The wires are installed and secured with glue.
- Each wire is wrapped around the corresponding nail shank and the joint is then soldered.
- Connecting terminals for wires with screws are placed on the free parts of the driven rods
- The injection needle is bent into a triangle shape without a base. The bending area is processed with a file to make it thinner. This way the homemade burner will heat up in the required zone.
- The created tip is inserted into the terminals and the device can be tested.
If all elements are well connected and the materials for the tip are of good quality, you can use such a device without lengthy replacement of components.
Creative people who love to make crafts with their own hands will undoubtedly be interested in such a direction as wood burning. Its second name, pyrography, refers to the process of transferring a design onto a wooden surface using a soldering iron. The result is extraordinary masterpieces, and the process itself helps relieve stress. The finished works are suitable as gifts for loved ones, friends or to decorate a wall in your own home.
Nuances when working
- You need to know the fundamental nuances that will help make wood pyrography a simple task.
- Work should begin when a small flame without smoke appears from the pin. This means that the device is working well and the temperature is selected correctly.
- If the tip is heated unevenly, it should be understood that the gasoline used is of poor quality or does not have the required temperature.
- When working, you need to keep the tip clean. It should not be cleaned with iron objects as this will ruin it.
- Remember that you cannot make mistakes while working, since the lines can no longer be greyed out.
- Try to ensure a comfortable hand position, firm support and slope of the canvas.
- Start with the outline, and then work on the background.
- For a beautiful image, you need to use lines of different thicknesses.
- You can cool the pin by touching the stone surface.
If you are new to this business, we recommend that you read the wood burning guide in our magazine. In it you will find all the nuances of implementation for both beginners and people with experience.
Pyrograph and its varieties
On sale you can find dozens of models of electric burners from different manufacturers. Each type has its own characteristics, but they are all divided into two large groups:
- with hard feathers. Burning devices with hard nibs can maintain a certain incandescent temperature of the pen. When choosing a burner, you need to take into account
that the more power, the faster you can work. They are durable and easy to use. Most suitable for making large drawings. The set includes different attachments with which you can perform different types of work; - with wire feathers. Burning devices with wire pens can be used for delicate and painstaking woodwork.
Which burner to choose
When choosing a burning machine, you need to consider the type of work for which it will be used. We recommend buying only those burners that have an incandescent adjustment. It makes it much easier to control the pressure, thickness and brightness of the lines. The second parameter is the length of the rod. The shorter it is, the easier it will be to “switch on” to work, since the shape of the device resembles a familiar pen or pencil. Also pay attention to the presence of protective plates. These plates are located on the rod. They neutralize heat, so you can work with the burner for an unlimited time. The last parameter is the set in which the equipment is sold. In a good way, it should include a nozzle for drawing, for shading, for applying thin stripes and several stamps (optional). This is the minimum set required for work. All other attachments can be purchased separately if necessary.
READ What is wood marquetry?
How to make a wood burner with your own hands
Not everyone has the opportunity to purchase a burning device. To save money, you can make it yourself.
To make a burner, you need to prepare a soldering iron, nichrome thread, pliers, 1 sewing needle, 1 syringe needle, barbecue sword, glue moment, heat-shrinkable tube and power supply.
- You need to take a syringe needle and bite off her nose with pliers.
- Attach two needles parallel to the barbecue sword and wind the thread on top.
- Next, bend
until it touches the tip of the syringe needle. - Solder the wires from the power supply to the needles.
- We tightly wrap the wires around the sword with a thread.
- The protruding wooden bottom of the sword can be cut off.
- We impregnate the wound thread with Moment glue.
- Place a heat shrink tube over the thread.
The burner is ready, now it needs to be tested. To do this, you need to connect the power supply to a 220 V outlet; if everything is done correctly, the needle threads should turn red within a couple of seconds. The device should only be tested on wooden surfaces.
Pyrography progress
- All necessary materials and tools are prepared in advance.
- A piece of wood of the required size is selected. It is better to do the drawing on the smoother side. Wood varies in hardness from 1 to 10. Accordingly, hardness 1 refers to the softest wooden surfaces, and hardness 10 refers to the hardest. For the first attempts, it is better to use soft wooden pieces.
- It is recommended to place the burner on a special stand, as it heats up instantly.
- Then you need to sand the piece of wood on which the design will be applied. You can use sandpaper for this.
- Instead of continuous lines, it is necessary to apply strokes. You can't press too hard on the wood, otherwise it will be difficult to control the pencil and then erase the extra lines.
- There is no need to rush to get the job done faster. Wood burning itself is a long, painstaking process. For beginners, it is recommended to try to use
the same amount of force when applying the design. The design can be made darker by holding the burner handle on a specific area. - The piece of wood must be positioned so that the grain is directed downward. This will help make drawing easier, since the device will move downwards all the time. Burning against the grain will significantly increase the resistance.
- It is important to choose a comfortable place for the wooden plank. You need to place it so that you can easily reach any part with a burning device.
- It is recommended to start burning the design from the bottom or along the outer edge.
- It is necessary to go through places several times. If you touch the wooden surface softer, it will be easier to move the device. You should try to keep your wrist on the board.
- First of all, you need to finish drawing the main lines, and then move on to the rest of the details.
- To make a regular 2D drawing, and for a 3D one, you need to purchase different attachments.
- Once the sketch of the drawing is ready, you can move on to adding colors. But you need to remember that an additional color will not always look beautiful. To do this, you can use watercolor paints.
- Each attachment requires regular cleaning. This can be done using a sanding block for quick cleaning. Remove the nozzle with pliers and, to be safe,
immerse it in cold water for a few minutes. - When the drawing is completed, you need to apply a special varnish coating to it and wait until the surface dries completely. It must be applied in a well-ventilated room or outdoors.
Hi all! Are you ready to craft? Today we will make a wood burner with our own hands from scrap materials. Despite the simplicity of the design and materials from which we will make a wood burner, it has enough power to burn a hole in a piece of wood 1 cm thick.
This will be a pocket burner that runs on a 2A phone charger. If you need to quickly put an inscription or logo on a tree, or also try your hand at pyrography, don’t rush to the store. Use these instructions, spend a little time, and assemble a pocket wood burner from scrap materials.
How to burn wood correctly
Step-by-step rules for drawing with a pyrograph: 1. Before starting burning, carefully sand the wooden piece. 2. Using carbon or transparent papyrus paper, draw an image selected in advance on the blank. 3. Using the drawing tip, first draw an outline. To draw darker elements of the design, increase the heater temperature of the burner. If this is not possible, you can simply press harder on the pen. 4. Draw small details. Barely noticeable light details can be drawn with minimal heat from the device. When applying the image, smoothly move your hand with the burner. Don't stop at one point, otherwise it will burn more and stand out. 5. Fill in the blanks. To “fill in” the elements, use a shading attachment. It can quickly fill in white spaces. 6. Sand the “dirty” parts of the workpiece. After the painting is finished, you may need to wipe off transfer paper ink or other stains. This can be done using sandpaper. 7. Varnish the finished painting if desired. This way it will retain its original appearance for a long time.
Making a wood burner with your own hands
So, you are convinced that every home has a list of necessary parts. And if you are missing something, ask your neighbor, he definitely has it.
Bite the needle tip off the syringe. And bite off the eye of the sewing needle.
Attach two needles parallel to each other to a wooden stick using a thread. Leave the lower ends of the needles open; we will solder the wire from the charger to them.
Bend the sewing needle so that it barely touches the syringe needle.
Apply flux and tin the needles as shown in the photo.
Bite off or disassemble the charger connector. We will need a red and black wire (plus and minus). Solder the red and black wire to the needles, the polarity does not matter.
The wood burner is almost ready. Use heat shrink or electrical tape to insulate the contacts.
Methods for creating images
The principle of creating a pattern by burning is that part of the wood is charred and darkened, thereby standing out in contrast against the general light background. Working with a very thin tool, you can paint pictures on wood.
There are various pyrography technologies, many of them are complex and require special equipment. Among others:
- open flame treatment;
- firing using a clay stencil;
- burning with hot sand;
- friction burning on a lathe.
These are quite complex techniques, but an electric device is best suited for creating pyrography masterpieces at home. In the design of such a wood burner, the high temperature of the tip is created due to the flow of electric current through it.
The industry produces various models of burners, so it is not difficult for a novice master to choose the right tool. In addition, if you have the skills to work with a soldering iron, you can assemble such a device yourself.
Types of burners
Choosing a burner is a responsible matter. The quality of the resulting products largely depends on its characteristics. Both professional wood artists and beginning craftsmen use two main types of burning devices. These are devices with a wire tip and models with a solid tip.
With hard pen
This device is in many ways reminiscent of a regular soldering iron. Its working part is a sting, which is heated by a nichrome wire hidden under a metal casing. Unlike a soldering iron, a burner is equipped with removable attachments of various geometries. Depending on the price of the device, their number can reach 20 or more pieces.
The abundance of attachments allows you to make strokes of different widths and shapes, and by combining them, create unique images. Wood burners with a hard pen are characterized by low price, high durability, and ease of use. As disadvantages, it is worth mentioning the heating time (5 minutes or more), as well as the bulky design with a long handle, which complicates the performance of delicate work.
With wire pen
In burner devices with a wire pen, the heating wire itself is the working tool. The current is supplied directly to the pen, so the instrument is ready for use almost the moment it is turned on. Devices of the middle and highest price categories have a power regulator, which allows you to select the optimal thermal mode for any type of work. The small thickness of the wire used and its bend create a small contact patch with the material, which allows you to easily perform the most delicate work.
The disadvantages of this type of burner include the relatively high price and difficult repairs.
Separately, it is worth noting the string cutter-burner. This is a device that allows you to use heated nichrome thread to cut parts from a thin board or wood-based sheet material.
How to work correctly
It is easy to notice that the working tool of a wood burner resembles an ordinary pencil, and therefore the technique of working with it is not much different from ordinary drawing. It’s just important not to forget that the “pencil” is very hot.
The entire work process can be represented in a few simple steps.
Preparation
You need to choose a board on which the drawing will be applied. Its surface should be flat and smooth. To level the wood, the wood is scraped and treated with sandpaper.
A good material for burning, especially for a beginner, is plywood. It is cheaper, its surface is almost ready for work, you just need to smooth it with sandpaper.
Drawing
For those who have drawing skills, it is not difficult to cope with such work; moreover, craftsmen can do without a sketch, working straight away with a burner. For beginners, we can advise you to select a suitable picture on the Internet, print it and transfer it to your work surface. Here, old time-tested copy paper will come in handy; you can scale the image using the square transfer method.
For a novice master, it is worth choosing simple drawings that are not replete with small details. In addition, it is better to immediately make something concrete, not some abstract board, but, for example, a plywood stand for a microwave oven, which can be decorated with floral patterns.
Burnout
Using the heated tip of the burner, they begin to apply a pattern along pre-designated lines. The handle of the instrument is held like a regular pencil.
Drawing begins with the outer contours. Straight lines are performed with quick movements without pressure. It’s not difficult to make an accent or draw a thick line; you just need to slightly reduce the speed of the burner’s movement. In curved areas, you must hold the tool perpendicular to the surface of the board, avoiding excessive pressure.
Note!
If there are several closely spaced lines, you should not try to draw them as quickly as possible; the wood must cool, otherwise the spaces between them may burn out.
The shade of the line can be changed within a fairly wide range. This is easy to achieve by changing the temperature of the tip, the shape of the working tool (in the case of replaceable attachments) and the angle of inclination.
Final processing
The completely finished image is processed with fine-grained sandpaper. Then they are coated with a layer of furniture varnish and, if desired, partially or completely painted.
The simplest homemade burner
To decorate a small board with pyrography or simply try your hand at something new, you don’t have to buy a professional machine.
From a soldering iron or radio components
You can make your own wood burner using a soldering iron. To do this, it is better to choose a model with a replaceable tip. Nozzles with the required profile can be easily made from a copper or brass rod.
A practically professional burning device can be made according to a circuit with current regulation in the primary winding. To work, you will need very few parts: a transformer, several resistors, capacitors and dinistors. The circuit is not particularly complicated, however, manufacturing the device will require knowledge and skills in working with a soldering iron.
Mini burner
If soldering radio components doesn’t appeal to you or you simply don’t have the time, you can make a device of the simplest configuration. To make a mini-burner you will need:
- unnecessary power supply (charger) from a mobile phone;
- syringe needle;
- sewing needle;
- material for the handle (wooden skewer or brush handle);
- soldering iron and solder;
- shoe thread;
- electrical tape or heat shrink tubing.
The process of making a burner is not particularly complicated. You should start by preparing a syringe needle. The plastic part is bitten off from it; it is not needed in this device.
Both needles are attached to a wooden handle diametrically opposite. The easiest way is to secure them with threads. The sewing needle is carefully bent to such an extent that its point barely touches the point of the hollow syringe needle.
The plug is cut off from the old power supply; it is also not needed. The ends of the wires are stripped. The wires are soldered to the needles. Polarity doesn't matter. At this point, the production of a homemade wood burner is almost complete.
As a final touch, it is necessary to give the product an attractive appearance and create conditions for convenient use. The wire is wound to the handle. This can be done using the same thick thread. This design will be convenient and reliable, however, it is worth strengthening the thread with glue, and after it hardens, put heat shrink on the handle or wrap electrical tape.
Note!
Heating of the tip occurs almost instantly. The principle of operation of the device is extremely simple: resistance arises between the needles and the needle from the syringe (due to the fact that it is thin-walled) becomes hot.
Perhaps, such a burner will not be able to make a picture (insufficient power, not the most convenient tip), but you can practice and decorate, for example, a cutting board.
Types of equipment
There are many types of wood burning, and each has its admirers. Usually a master tries one technology, and in the course of work an interest in a new experience arises - this is how pyrography becomes a great hobby, and perhaps even a job.
Open flame burning
Using an open fire, the pyrographer evenly burns the surface of the work - this is how he gets the desired background. This procedure is usually carried out with a blowtorch. After this action, yellow and brown stripes appear on the surface. On smoked wood, the contours of the design appear more clearly. Burning is a careful process; the burner flame should barely touch the wood.
You can see how burning with a flame occurs in the video clip.
This type of pyrography has ancient roots: once upon a time craftsmen treated wood with smoke. First, a pattern was cut out with a chisel, then a smoldering flame passed along the inclined surface of the wood, painting it evenly. This way the background darkens and a light pattern is formed on it.
Hot sand treatment
Burnt wood
And this method is used for light coloring of light wood. So its shade became warmer. The master pours clean sand into a container and then heats it. Next, the wooden product is transferred to the heated sand, and it changes tone. The master just has to “dig” the product out of the sand and see if the tone has reached the desired shade.
Sunbeam
Work is possible in sunny weather. Take plywood or wooden board. The burning lens must be positioned so that the rays of the sun are focused on the surface of the board. The lens needs to be moved so that the bright spot “walks” across the surface, leaving a mark in the form of scorched lines. You shouldn't expect the same results from this technology as traditional pyrography, but the creative experience will definitely be interesting.
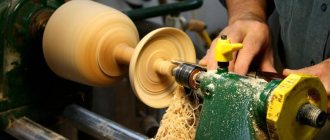
Friction
There are craftsmen who love to decorate a product without literally leaving the lathe. In this case, friction force is used. The finished product (but still on the spindle) will be the base to which the piece of hardwood is applied. The top layer becomes charred from friction itself, and a brown stripe appears on it.
Gas cutter
A butane torch can give good results in burning, but this pyrographic method is difficult to control. This is an effective job if you are going to be burning abstract shapes. You can also use a gas cutter as a device for filling the background or, for example, burning the edges. Used in decorating boxes, signs, frames and souvenir plates. Burning with a string or a nichrome cutter can compete with it.
Calligraphy
Pyrographic calligraphy is an elegant and delicate work. It is actively used to design signs, posters, and various titles. The master writes the inscriptions with a writing pen, as well as with special calligraphy pens. This is modern burning, because the given text is typed in a text editor, a suitable font and size are selected, the text is printed and transferred to the project.
Relief carving
Pyrography is a great way to decorate objects that are cut out in relief or in a circle. The relief gives the work more realism. And since professional kits often have an oblique pen, this is a good way to try your hand at burning small reliefs. If you heat up the sharp, durable skew stylus, it becomes a comfortable tool for cutting wood.
CNC burner
The burner will help add originality to the interior, diversify it with handmade products, but not only. You can make good money by making paintings created by fire. Landscapes, decorative panels, portraits, household items and kitchen utensils with elements of burning are in consistently high demand.
The use of modern technologies will significantly simplify the creation of masterpieces using the burning method. Computer-controlled machines have long become commonplace in wood and metalworking shops. There are similar solutions for pyrography. Such a burner can be connected to a personal computer, transfer the required image to it, and it will do the rest itself.
To make your own CNC wood burner, you will need significantly more knowledge and materials. Typically, such machines are purchased for production purposes. But for those who want to assemble the device themselves, you can use a laser for burning.
In general, there are two directions in the development of CNC burners. They differ in the main working tool.
Laser burner
As the name itself suggests, the main part of the machine is the laser. It is from this that its main advantages emerge:
- high accuracy of drawing due to a small contact patch;
- versatility, the machine can be used when working with wood, leather, films, paper;
- The burner is immune to changes in temperature and humidity.
Disadvantages include the low speed of the laser burner and difficulties in drawing halftones. In addition, the cost of such devices is high.