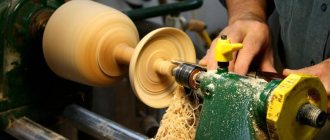
Wooden products always look interesting, especially when turned, when a beautiful and unique structure of the wood emerges. Even if the elements, when turned, turn out to be identical in shape and size, you will not find two identical ones.
It is known that one of Peter I’s hobbies was working on a lathe, perhaps something like this.
Therefore, no one would call this a “royal” task, but many can make a wood lathe with their own hands, and there are a lot of options for simple solutions here. We will offer you several successful, in our opinion, implemented projects.
What can a wood lathe be made from?
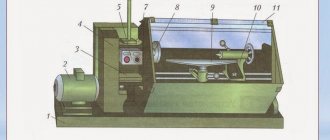
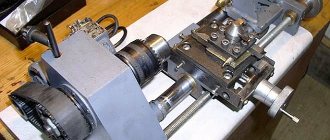
Making such a machine is not that difficult. First, let's look at its circuit diagram.
The headstock is rigidly attached to the frame. It can contain either an electric motor or a device with pulleys to which torque is transmitted from an external motor. This may be a self-centering chuck, a crown washer, or a faceplate with a tapered threaded rod. The tailstock can move along the bed and has a device for centering and pressing the workpiece. The stop is also movable relative to the frame in 3 planes.
The bed of a homemade wood lathe can be made either from metal or from wood itself or thick-layer plywood. Either the entire headstock or at least the main elements of the headstock and tailstock must be made exclusively from metal.
Most often, corners are used to make a metal frame - they are the easiest to tighten and fasten the moving elements of the machine and they have a high degree of dimensional stability. But you can use a channel or profile pipe.
Sometimes a groove is milled in the channel for moving elements.
The design solutions of the headstock and tailstock may be different, but the main condition - the ideal alignment of their centers - must be strictly observed. If the role of the headstock is performed by the electric motor itself, then the height of the tailstock is adjusted to it.
This is the simplest way to drive a lathe, but the motor parameters should be close to universal:
- rotation speed 1500 rpm;
- power – from 120 watts.
The output shaft of such an engine can be machined under a Morse taper to mount a three-jaw chuck from an electric drill, in which either a threaded rod or a crown is clamped. Less often, a large self-clamping chuck is installed on the engine shaft through a faceplate, which must be turned separately.
Craftsmen make full-size wooden lathes not for practical reasons, but out of love for the material itself and to demonstrate its design capabilities, although these can be fully functional devices that are in no way inferior in practical terms to their steel counterparts.
True, it will take 2 times more time to produce such a beauty than to produce a metal one, but this is compensated by the difference in the cost of materials.
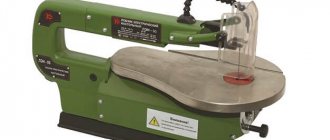
Making a circular saw with a frame
If you want to have a separate circular saw, then you can easily build it from a manual circular saw bought in a store. This homemade mechanism is not designed for too heavy loads, but is suitable for occasional use on the farm.
We take a bed of suitable size and attach a manual circular saw to it, make the maximum cut and leave it in that position. We turn the base over with the circular side down and place it firmly on the frame with legs.
We make a guide and everything is ready to go
Pay special attention to the height of the machine; it should be comfortable for you to work with it, and its height should be commensurate with your height
You may also need a pipe bender in the workshop. This is a device that allows you to bend pipes from almost any metal, as well as strips. Bent pipes are required when a person decides to make, for example, a greenhouse or a greenhouse or something like that.
There are different types of pipe benders, let’s say, made independently. There are very simple ones, and there are others that are similar in design to factory ones; they are more difficult to manufacture.
We get the simplest version of a homemade pipe bender by cutting a board on one side in a semicircle. Then this workpiece is attached to a stable surface and a limiter is mounted next to it - a wooden part that has space up to the semicircular workpiece, into which one end of the pipe is inserted.
It is recommended to bend pipes on such a device from the end, and not from the middle, otherwise you can simply break the workpiece. Such a simple pipe bender can be made either large or small, depending on the radius of the pipe you require.
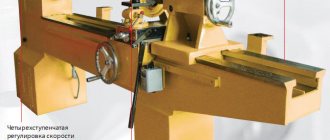
DIY metal lathe for wood: drawing
For those who do not want to reinvent the wheel, we offer a drawing of a wood lathe that is universal, in terms of the dimensions of the processed parts, created on the basis of 50x50 steel angles.
The drawing does not indicate the diameter of the hole for the central shaft of the headstock, because it will depend on the selected type of drive, and only the distance to its center is indicated. Also, if a shaft with pulleys is installed in the headstock, then this particular part will need to be made in two copies and the second one will need to be installed at the rear of the headstock. Of course, you can also install a tube with bearings on which the central shaft with pulleys located outside the headstock rotates.
On such a machine it will be possible to make table legs and even balusters. If you need longer turned products, the bed will need to be lengthened. Make all other parts of the specified sizes, except perhaps also slightly increase the length of the stop.
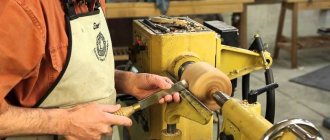
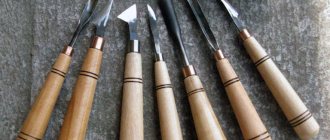
You can buy a cutting tool for a wood lathe or make it yourself.
The main cutters are: reyer - a passing or roughing cutter (in the photo 2 and 3 on the right) and meisel - a finishing cutter (in the photo - 2 middle cutters). The rest are used to produce sharp recesses of various shapes (left) and rounded recesses (right).
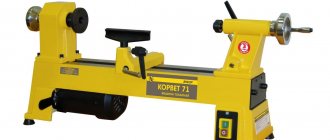
A small metal lathe can be made as shown in the video, which also shows the dimensions of all parts:
But for turning a large number, especially long, parts of the same type, it is worth thinking about making a machine with a copier.
What can be done for the garage
Often, a garage becomes not only a place to store a car, but also a place for many necessary tools, and sometimes a workshop at the same time. Therefore, here you need to have:
- Tools for car repair.
- Spacious racks for their placement.
- Garage workbench.
- Hooks.
- Shelves or brackets for tires.
- Lamps and heaters.
These devices are easy to assemble with your own hands. The organization of the garage space should be well thought out. Everything should be placed conveniently and not take up much space. Think about whether you need a workbench and where to put it, what size it will be and in what places to place racks and shelves.
A workbench will be needed if you are repairing your car yourself. Typically, all tools are located on shelves and racks next to the workbench. Spare tires are stored either on a special rack or hung on brackets on the walls.
Place all fuels and lubricants on a separate rack. Most often, some difficulties arise with storing small parts: screws, nuts and the like. You can use small glass jars with screw caps for this.
Screw the lid to the shelf below, sort all the small items into separate jars. This way you can save space and put things in order, and the search for the right screw, drill or nut will now be reduced to a minimum.
For these purposes, you can choose another option. You will need magnetic tape, small clear plastic containers with durable lids, and metal flat washers. Fix the magnetic tape vertically in the place you need.
Attach metal washers to the bottom of the containers. Sort all the small fasteners into ready-made containers and hang them on a magnetic strip.
For repairs, you will also need an inspection hole. And if it is not possible to equip it, then you can build two overpasses to lift the front or rear or side of the car. This will allow you to fully carry out all repair operations. Overpasses are made of timber and durable boards or metal, if possible.
Well, in the end, good lighting is very important for the garage. It can be general and as an addition to portable and local lamps
And make sure that there is more than one outlet in the garage. If you are repairing the car yourself, then you need to think about ventilation of the room.
Do-it-yourself wood lathe with a copier: video
Actually, the machine itself can be the same as proposed above, only its design will need to be modified, and one of the universal woodworking power tools will need to be used as a cutting tool - most often it will be a grinder.
The template for a product of regular cylindrical shape, machined using a copier, is an even strip. If you need to get a complex multi-stage shape, then its profile is cut out on a flat template. It can be metal, plywood, wood, plastic, etc. and installed in different places, depending on the design features of the machines.
Let's look at the structure of one of these machines.
The workpiece in this machine is clamped between the crown of the headstock and the stationary cone of the rear. The tailstock cone is secured with a lock nut.
The copier is mounted on a rotary shaft on 2 bearings and a tension roller from an automobile timing drive, allowing it to move freely along the shaft.
The shaft, in turn, is mounted on the base also on bearings, allowing it to easily rotate around its axis.
A grinder is rigidly mounted on the copier, with paired discs installed on it with a slight offset, allowing for higher quality and cleaner turning.
Saws should be taken with pobeditovy tips and large teeth, which promote better removal of chips.
The template can be attached in a convenient place that does not interfere with turning. The profile pattern is transferred from the template to the copier using a leash, but its shape and length must be consistent with this location. The thinner the tip of the leash, the more accurately it will transfer the shape from the template to the workpiece, but at the same time it must be quite hard and rigid.
An interesting option is when the role of a template is played by a reference part. The system proposed by the author of the following video provides just such an opportunity, and adjustments to its fastening allow you to make some adjustments to the thickness of the replicated turned parts.
Using a hand-held circular saw instead of a grinder, with the template placed in front, is also a rather progressive type of wood lathe with a copier. It allows you to make it more compact, but combining the control handle with the leash does not allow you to make it thin enough, so a very accurate transfer of shape will not happen with this arrangement.
And there should also be two disks on the saw.
Carpentry equipment
“Advanced” craftsmen have good workbenches with vices, rare machines and tools that are very necessary for making furniture:
- A surface planer is an electric planer that is permanently mounted. It allows you to plan boards to a given thickness. Using a surface planer, a purchased raw board is transformed into a high-quality material with a beautiful structure.
Quite a rare unit - a band saw machine similar to a jigsaw, an extremely convenient and necessary thing. The machine allows you to make curved cuts, cut out unusual shapes, and opens up great opportunities for creativity.- A miter saw is a very important tool; it is needed when you need to cut a large number of identical workpieces. With its help, this is done simply and accurately.
- A sanding machine is a very convenient thing. If you attach it to a workbench with a clamp, you get a good grinding machine.
- The milling cutter is one of the main mechanisms of the workshop. If there are a lot of repetitive operations, then it is not very convenient for them to do it and it takes a long time. To expand the possibilities, you can attach it to a workbench, and you will get an improvised milling machine.
The ubiquitous grinder
Every man has a power tool called an angle grinder. In fact, this is a grinding machine that is used to perform abrasive cutting of metal, stone, ceramic tiles and other materials. To do this, install a special abrasive disk with a thickness of 0.7 to 2.5 millimeters. The diameter of the cutting disc is from 115 to 180 millimeters, it all depends on the hardness of the material being processed.
The peculiarity of this machine is the high speed of the electric motor, for example, the Whirlwind UShM-125 has 11 thousand revolutions per minute. It is this indicator and low weight, only 2.5 kilograms, that excites the minds of home craftsmen to adapt it to perform types of metal-cutting work unusual for it.
Homemade grinders are available in every garage and home workshop, and each master makes a device for his own needs.
Cutting machine
A homemade option for the workshop is offered - a cutting machine suitable for cutting angles, pipes, square profiles, and fittings. The design of the device is simple:
- Desktop;
- spring return brackets;
- platform for attaching an angle grinder;
- emphasis
The table is made of metal.
To do this, using electric welding, a frame is made from a 40x40 millimeter corner, onto which a steel sheet 3 millimeters thick is welded. Table size 500 x 400 millimeters. Stands in the form of ears with an axle are attached to the table for movable mounting of the grinder platform. The platform itself has the same ears and base for attaching an angle grinder. A 400 mm long handle and a return spring are welded to the platform. A clamp is installed on the table in the form of a corner welded parallel to the cutting line.
The mechanism works as follows. The material in the form of a pipe is placed on the table, pressed against the stop, the grinder is lowered using the handle and cuts the material, the return spring returns it to its original position.
Pipe cutting device
If cutting angles, round timber and pipes is rarely done, there is no point in making complex homemade machines and devices; you can make a simple device that can simplify the work when cutting material.
To do this, you need to make a tabletop measuring 400 x 300 millimeters from waste, and attach a steel strip to it on a hinge, on which the grinder is attached. For the return movement, use an elastic band attached to the tabletop and handle of the grinder. Cut a slot in the tabletop for the abrasive wheel to exit and install a stop.
DIY wood lathe from a drill
Of course, the easiest way would be to make a wood lathe using a standard power tool, primarily a drill, although there are also factory-made devices.
It is desirable that the drill has sufficient power, a locking button in the on position and speed control.
Let's look at several schemes and start with the simplest one, when the use of a tailstock is not required. This is possible when producing small-diameter and not very long products.
In this case, a rather convenient way to secure the drill itself is to install a piece of threaded rod or the threaded part of a powerful self-tapping screw in the drill chuck, and drill a hole of the appropriate diameter in the workpiece for them. Any block of appropriate height will do as a stop.
And here is the relevant video:
If you can’t do without a tailstock, then a mechanic’s vice can partially perform its function; you just need to position the drill relative to it when fastening it.
And yet, the most common are homemade lathes based on drills, which have a wooden frame and, at a minimum, primitive tailstocks.
By the way, the role of a crown fixed in a self-clamping drill chuck can be successfully performed by a wood drill bit. To prevent it from starting to remove chips from the end of the workpiece when bringing the tool in, at this end you need to make a slot for the wings of the drill and drill the center.
The lathe shown in the video, made from a powerful drill, is not much inferior to stationary machines designed for processing parts of the same dimensions, and its ability to obtain higher speeds than theirs allows for higher-quality finishing of products.
To create a home lathe, you can use not only a drill, but also an angle grinder.
True, it is desirable that it have speed control, because 10 thousand or more rpm is too much for such machines.
For home craftsmen who know how and prefer to work with metal, we offer this design of a lathe made from an electric drill.
But a self-clamping chuck as a tailstock can be used in any other design.
And finally, a short video. It may seem that this is a toy machine, but with its help you can actually make a fairly large list of useful things: from door handles and handles for hand tools to chess pieces.
We recommend other articles on the topic
Making a simple key holder from scrap materials
DIY cutting board - examples, step-by-step instructions
Fish dryer, assembled from scrap materials
Broom made from plastic bottles - assemble it yourself
Pneumatic and electric tools
In Canada there is a settlement of Old Believers who live by their own laws: they do not use electricity, do not ride bicycles or cars. But this does not prevent them from having a carpentry workshop and using compressed air instead of electricity. To achieve this, all rooms are equipped with air ducts from a huge compressor; each workbench has a connection point for pneumatic tools. Using various carpentry tools, Canadian craftsmen are quite capable of making furniture without electricity.
The workshop has huge windows, as electric lighting is not used. All machines operate from compressed air. The external design of the machines does not change, only a pneumatic motor is installed instead of an electric motor. The workstation provides operation of pneumatic screwdrivers, drills, and milling cutters.
Sawing machine
The high speed of the grinder allows it to be used with a saw blade for wood processing. Without some protection this is very dangerous. The craftsmen have come up with a very useful and original homemade device for do-it-yourself carpentry, which allows you to safely use an angle grinder as a sawing machine.
For this purpose, special protection is made, similar to the standard casing that comes with the tool. It has a slide, two handles and a rotating device. The slide looks like a plate measuring 200 x 120 millimeters, with a slot for the saw blade to exit.
The plate is attached on one side to the casing on a hinge, the other to a steel strip with a 9 mm wide slot for sliding along an M8x1.5 pin, which is on the casing for fixing with a wing nut.
Two handles are welded to the casing to hold the sawing machine during operation. It is very convenient to cut and saw thin lumber, and the high speed of the machine on the joiner makes it easy to cut material up to 30 millimeters thick.
Vertical drilling model
The frame can be made from pieces of angle 50x50 millimeters and a steel sheet 5 millimeters thick. To do this, weld two corners along the edges of the sheet along the entire length; they will serve as legs. Table size 350 x 200 millimeters. Weld a bracket from a square pipe 80 millimeters high on top to attach the rack.
The stand or guide for the drill is made of a square pipe three millimeters thick. A section of water pipe eight millimeters long is welded into the upper hole. A cable tensioning mechanism is inserted into it. The height of the stand is 700 millimeters. The stand is inserted into the bracket and crimped with four bolts - two on two sides of the square pipe.
The carriage is a movable unit on which the drill is attached. It is made of 50x50 corners welded together, the height is 170 millimeters, the eyes are made of strip three millimeters thick. An axle is inserted into the eyes, around which the cable is wound.
A continuation of the axis is the handle that drives the carriage.
The carriage drive consists of an axis on which a cable and a handle are wound. One end of the cable is fixed to the bottom bracket. The upper end of the cable is fixed in the pipe at the upper end of the rack. A special bracket with a seat for an electric drill is attached to the carriage. The drill itself is tightened with a special clamp made from a strip 2 mm thick and 40 mm wide.
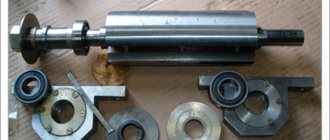
Headstock and tailstock
The front workpiece clamp is a complex composite design that allows the engine not to experience overload when processing wood. Before manufacturing this part, it is recommended to draw drawings of the rotating mechanism.
The drilling part of an old unnecessary drill can act as a headstock. Its base (pin) is fixed by welding in the center of the rotating shaft. A drive belt is laid from the motor to the shaft. A casing is made from a sheet of metal 15-20 cm wide, which will protect against accidental jumping of the belt.
Headstock
The main difficulty is to accurately calculate the center of the rotating shaft. The easiest way is to transfer the workpiece to a checkered sheet of paper, circle it, and then find the point of intersection of the diameters of the circle.
A simpler design for the headstock is to make a faceplate that will fit directly onto the motor screw and fix it. To do this, you need to cut out a circle with a diameter of 15-20 cm from a dense material (wood, plywood or iron sheet), and drill 5 holes in it - the central one and 4 at the intersection of two diagonals. Angles are attached to the four holes, and retaining screws are attached to the opposite side of them. By adjusting the screws, you can clamp a workpiece of any diameter.
Making a tailstock for a wood turning mechanism is much easier. This will require a wide screw with a tapered end. You can make such an element yourself by sharpening an ordinary wide screw at one end using a grinding machine. The spike is attached to the post using lock nuts - from the front and back of the support.
A more reliable design would be a screw support welded from two plates and a pipe. Nuts suitable for the size of the tenon are welded into the pipe on both sides. For quick fixation, a small handle is welded to the opposite end of the screw.
Tailstock
If the headstock is a fixed structural element, then the rear clamp must be able to move along the base, adjusting to the size of the wooden workpiece. Therefore, the tailstock post must have a hole for a fixing screw.